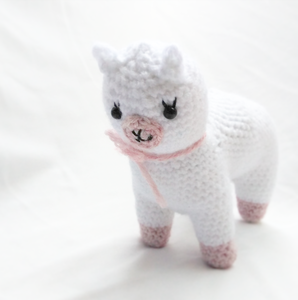

Alpaca
Purchase the PDF version to this pattern here
You are 100% allowed to sell anything you make from my patterns anywhere, no credit needed, please just don’t sell the actual pattern itself (the written pattern), nor repost the actual pattern itself anywhere (the written pattern). Of course you can link my patterns on your site!
Information Before Starting:
Best for Intermediate Crocheters
Supplies
Yarn Colors Needed: Pink, White and Black Embroidery Thread
Crochet Hook in 3mm
Safety Eyes Size Small
Stitches used: Sc, Inc, Dec, Ch, Magic Ring, and Finish Off
We start with making 4 legs, then setting them aside we will create the bottom half of the body. From there we will sc the legs onto the body. Then, working up we will create a neck and body barrier by chaining across the body.
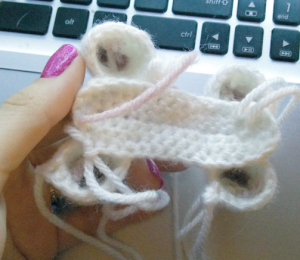
Legs
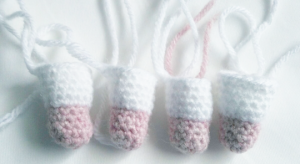
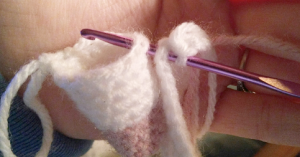
Round 1: In pink, 6 sc in magic ring (6)
Round 2: *Inc* all around (12)
Round 3-6: *Sc* around (12)
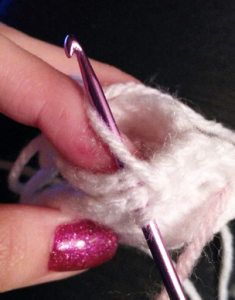
Round 7: Switch to white, *Sc in next 3 st, inc in next st* 3 times (15)
Round 8-11: *Sc* around (15)
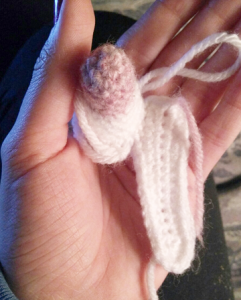
Finish off and set aside each leg. Make sure to knot the thread inside of the leg from the magic ring and changing colors. This will help to make sure the leg wont unravel.
Body
Row 1: In white, Ch 15. 2 Sc in 2nd ch from hook. Add st marker in 1st sc just made, Sc in next 12 st, Inc in next st, turn to other side of ch, Sc in next 12 st, Inc in last st (30)
Round 2: Inc in next 2 st, Sc in next 12 st, Inc in next 3 st, Sc in next 13 st (35)
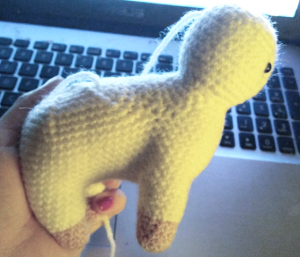
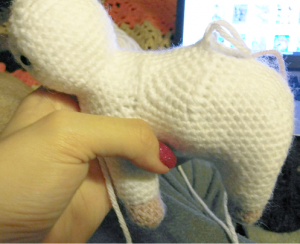
Round 3: Sc in next 3 st. Take any leg and line up with next body st. *Make sure Right side of the body is facing down. If you don’t do this then the alpaca’s pattern will look odd because the wrong side will be facing out.* Sc in next 4 st through BOTH body and leg, making sure leg line up looks like the picture.
Continuing on body, sc in next 6 st. Line up 2nd leg with body and Sc in next 5 st through BOTH body and leg. Now working on body, Sc in next 2 st. Now take 3rd leg and line up to body, Sc in next 5 st through BOTH body and leg. On body, Sc 6. Now line up last leg to body and Sc 4 through BOTH body and leg. Now we meet st marker.
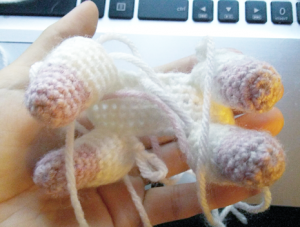
Round 4: Sc 4 on body. Now we meet the first leg. Sc in next 13 across leg, now we meet body. Sc in next 7 st. Now we meet the 2nd leg. Sc in next 12 st on leg. Now we meet the body. Sc in next 3 st. Now we meet the third leg. Sc in next 12 st. Now we meet the body. Sc in next 7 st. Now we meet the 4th leg. Sc in next 13 st (71)
Round 5-11: *Sc* around entire body (71)
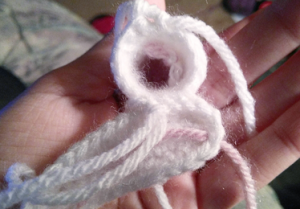
Round 6: Sc in next st, add st marker and leave st marker in sc just made. We will use this st marker later. Sc in next 27 st, ch 12, count next 22 st and sc in 22nd st. Now this forms the hole for the head which we will be creating now. We will close the body after finishing the head.
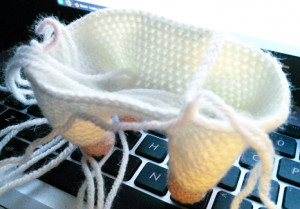

Now turn work to start sc across the ch just formed. Skip sc just made, Sc in next 12 st across ch. Now we meet the body. Sc in next 3 st. Add new st marker to 3rd sc made. Sc in next 18 st, now we meet the Ch, Sc 12 across ch, now we meet the body. Skip next st and sc in last st. (32)
Round 7: *Sc* around (32)
Round 8: *4 sc, dec* around, Sc in last 2 st. (27)
Round 9: *3 sc, dec* around, sc in last 2 st (21)
Round 10: *2 sc, dec* around, Sc in last 2 st (17)
Round 11: *inc* all around (34)
Round 12-19: *sc* around (34)
Round 20: *4 sc, dec* sc in last 4 st (29)
Stuff at this point
Round 21: *3 sc, dec* around, sc in last 2 st (23)
Round 22: *2 sc, dec* around, 1 sc in last st (18)
Round 23: *1 sc, dec* around (12)
Round 24: *1 sc, dec* around (6)
Finish off and add any additional stuffing. Sew hole closed.
Back:
Round 1: Go to st marker left in on round 6. Remove st marker and reinsert hook into same st. Pull through white yarn and sc in next st. Add st marker to sc just made.

Sc in next 26 st. Now we meet the neck, sc 12 across neck. Now we meet body, sc in next 21 st (60)
Round 2: *Dec, sc 8* around (54)
Round 3: *Dec, sc 7* around (48)
Round 4: *Dec, sc 6* around (42)
Round 5: *Dec, sc 5* around (36)
Round 6: *Dec, sc 4* around (30)
Round 7: *Dec, sc 3* around (24)
Stuff at this point
Round 8: *Dec, sc 2* around (18)
Round 9: *Dec, sc 1* around (12)
Round 10: *Dec* all around (6)
Finish off and add any additional stuffing. Now sew closed
Face Pieces
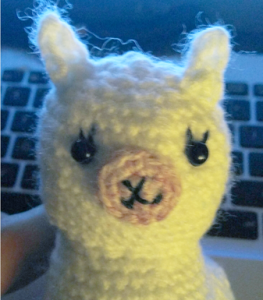
Mouth piece:
Round 1: In pink, 6 sc in Magic Ring (6)
Round 2: *Inc* all around (12)
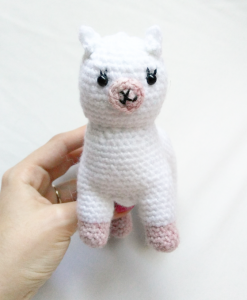
Finish off and with back embroidery yarn, create a small v in the middle of the piece. Now create two siilar small v’s on each side of the original v. Finish off and pin to the alpaca’s face.
Ears (Make 2):
Row 1: In white, Ch 4. Turn and sc 3 down ch.
Finish off and pin to head.
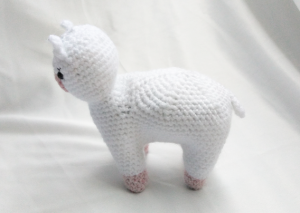
Tail:
Row 1: In white, Ch 5. Turn and sc 4 down ch.
Finish off and pin to head.
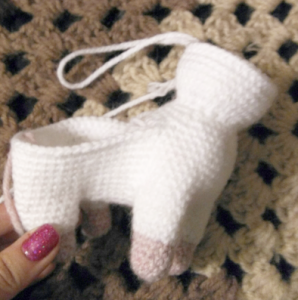
Assembly:
Take out eyes. With black embroidery thread, sew 2 eyelashes starting from the hole of the eye up about 1 whole stitch. Now add strong fabric glue into eye hole and reinsert eye into holes. Now sew on mouth. Now sew on ears. Now sew on tail.
Now you’re all done!


2 Comments
Hello, an image has been missing from the pattern for a while now and I’m wondering if it would help clarify my confusion could you add it?
Also, is the side with the stitch marker the head or butt side I think its the booty but I’m starting to second guess, thanks for the help.