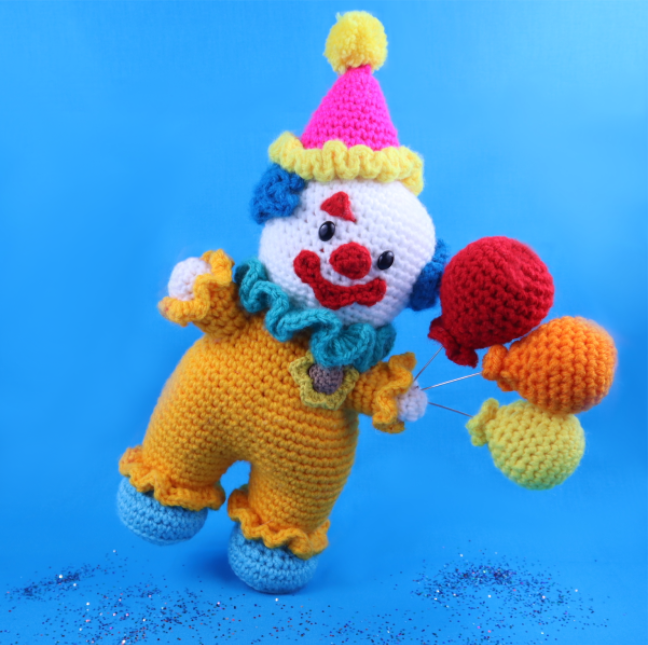
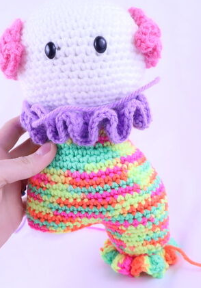
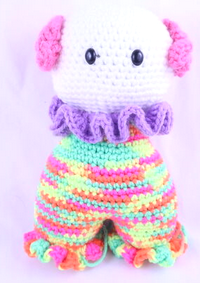
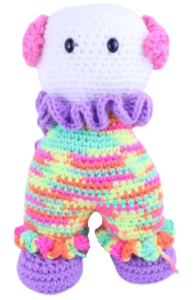
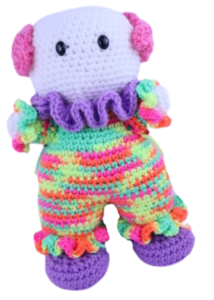
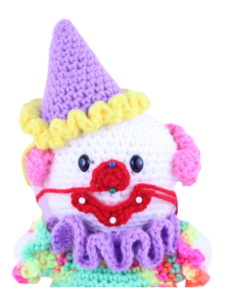
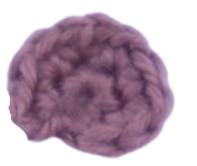
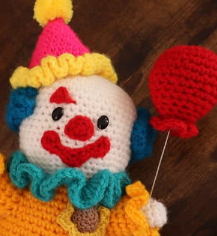
Clown Amigurumi Doll – Free Crochet Pattern
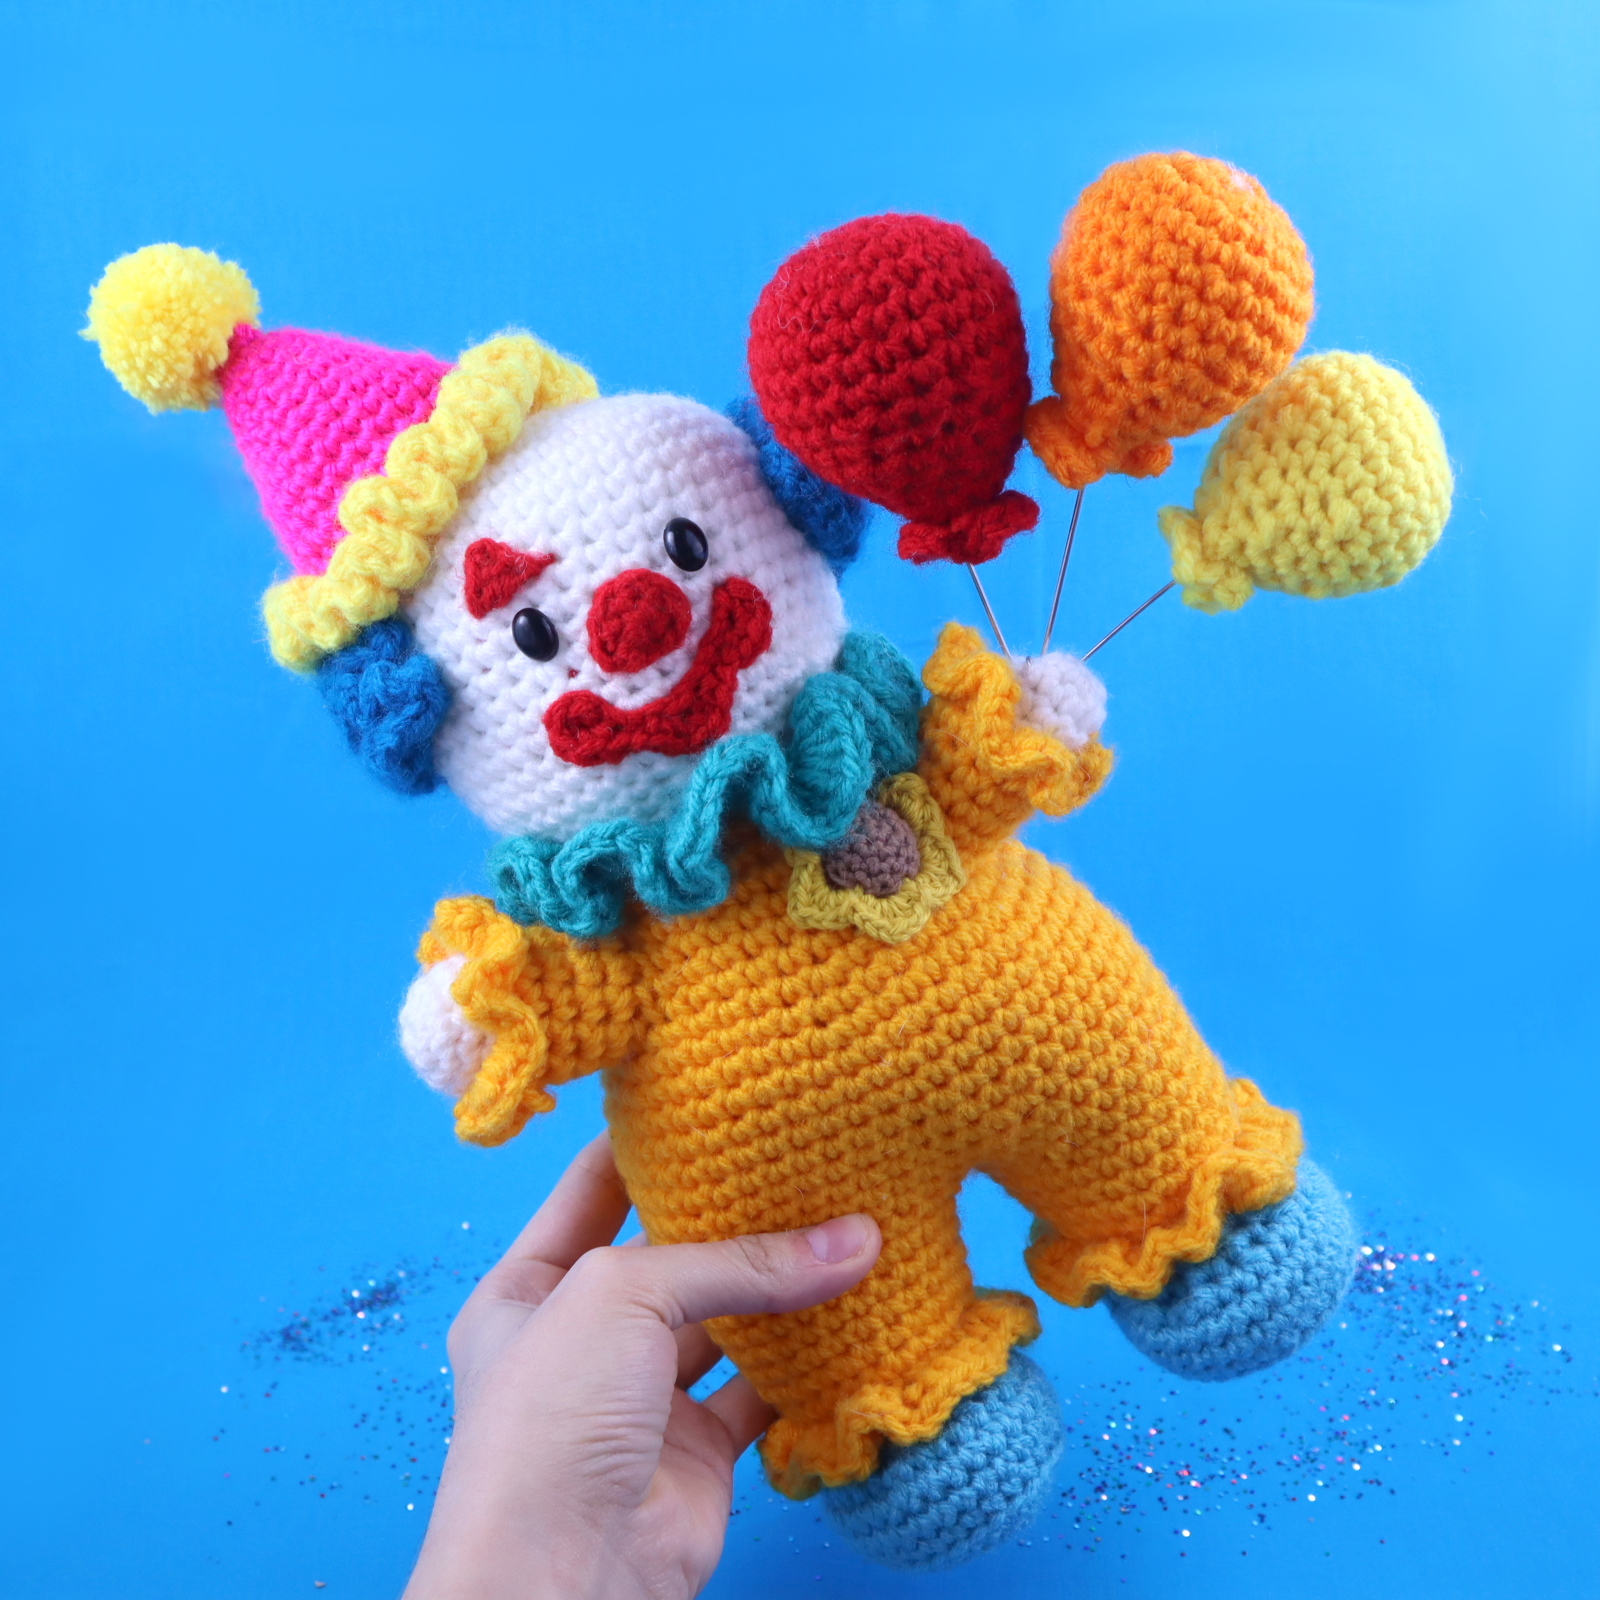

Here are first words about this week’s free amigurumi crochet pattern… I’m sorry if this pattern scares you! LOL, on a real note, this pattern was so much fun to make. I have really wanted to make a clown for such a long time and I’m so excited to have finally made one. I think adding little accessories to an amigurumi really makes it “pop”, so that’s why I decided to add some balloons and a mini sunflower!
This pattern actually took a really long time to make, just because there’s so many little details to take pictures of and write helpful descriptions about. That being said, if I somehow missed adding a little section in this pattern, PLEASE let me know. I usually copy section-by-section from the PDF to my website, so when there’s a ton of little sections to copy, the likelihood of missing something is always there. However, I tried to make sure it’s all here 🙂
I hope you have a lot of fun with this week’s free clown crochet pattern!
Purchase the PDF pattern here

Supplies:
• Yarn 4/Medium Weight Yarn in…
White for Clown’s face and hands, Use bright colors for the rest of the clown. I used yellow for the suit, Dark blue for the hair, Regular blue for the shoes & collar, Yellow for the hat pom pom & trim, Hot pink for the Hat, and Red for the clown’s facial features.
•Yarn 1/Fingering Weight Yarn in…
Brown for Sunflower, Yellow for Sunflower
•4mm Crochet Hook & 2mm Crochet Hook
•12mm safety eyes
•Tapestry needle
•Scissors
•Stuffing
•Hot glue gun or E600 glue for balloon
•18 gauge wire for balloon
Additional Information:
Difficulty: Experienced
• Getting started
This clown’s body is worked from the head, body, and legs, in one piece. While making the head we will also form his hair. After this, we will make this arms, legs, shoes, hat, facial features, and his balloons!
• Tip
Be sure to read the pattern through before crocheting it, that way you understand how things are done before trying it!
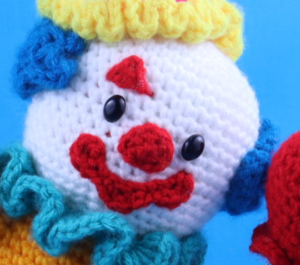
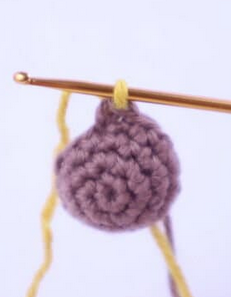
Clown
To make the clown, we’re first going to start at the head. While making the head, we’re going to work in the back loops only during some parts. This will then leave a front loop left. Later, we will attach our hook and new yarn to those front loops to make the hair. After we finish making the head, we’ll do this similar technique to make the collar.
Head:
In White
Round 1: 6 Sc into a Magic Ring (6)
Round 2: *Inc* all around (12)
Round 3: *Inc, Sc* all around (18)
Round 4: *Inc, Sc 2* all around (24)
Round 5: *Inc, Sc 3* all around (30)
Round 6: *Inc, Sc 4* all around (36)
Round 7: *Inc, Sc 5* all around (42)
Round 8-10: *Sc* all around (42)
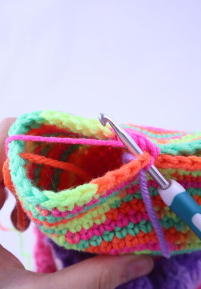
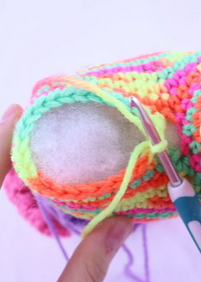
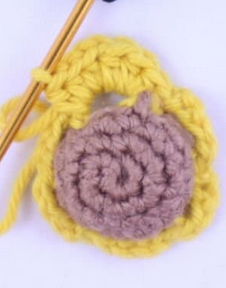
Round 11-12: Sc in the next 6 st. In the BLO Sc in the next 6 st. In BOTH loops Sc in the next 18 st. In the BLO Sc in the next 6 st. In BOTH loops Sc in the next 6 st (42)
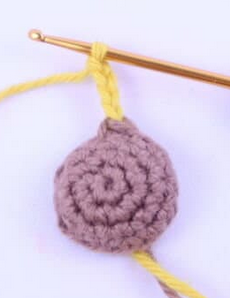
In the next round we will add two eye stitch markers. This will mark where to place the eyes later.
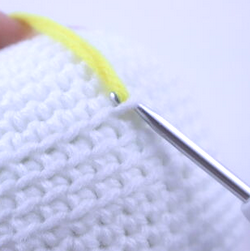
Round 13: Sc in the next 4 st. In the BLO Sc in the next 10 st. In BOTH loops Sc in the next 4 st. Sc in the next st and add a differently colored stitch marker into the Sc just made. Sc 4. Sc next st and add a differently colored stitch marker into the Sc just made. Sc in the next 4 st. In the BLO Sc in the next 10 st. In BOTH Loops Sc in the next 4 st (42)
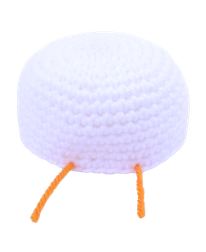
Round 13 will look like the photo above
Round 14: Sc in the next 4 st. In the BLO Sc in the next 10 st. In BOTH loops Sc in the next 14 st. In the BLO Sc in the next 10 st. In BOTH Loops Sc in the next 4 st (42)
Round 15-17: *Sc* all around (42)
Round 18: *Inc, Sc 6* all around (48)
Round 19: *Sc* all around (48)
Round 20: *Dec, Sc 6* all around (42)
Round 21: *Dec, Sc 5* all around (36)
Round 22: *Dec, Sc 4* all around (30)
Round 23: *Dec, Sc 3* all around (24)
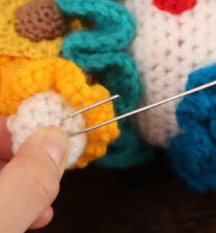
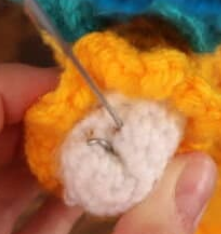
Add eyes into the marked areas now.
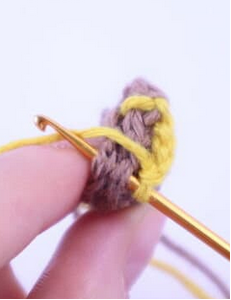
Hair:
In Any Bright Color
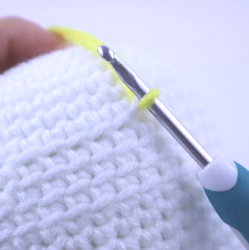
Now we’re going to add hair to the head! Remember the front loops we left when making the head? We’re going to crochet into those loops to form the hair. Let’s get started!
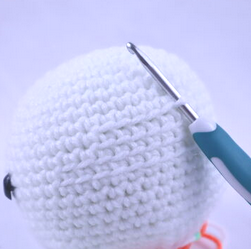
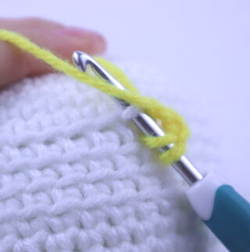
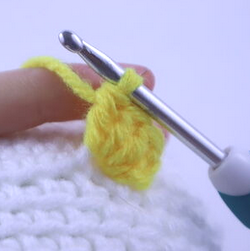
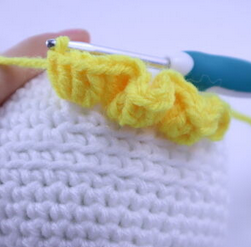
Place your crochet hook into the first loop on the top row of the loops as shown (Pic 1). Yarn over with the hair color (Pic 2). Now, pull the yarn through that first loops (Pic 3-4). Ch 3 (Pic 5). Make 3 Dc into that first loops (Pic 6-7). Continue making 4 Dc into each of the next 5 loops (Pic 8). Continue on the next page.
1. 2.
2.
3. 4.
4.
5. 6.
6.
7. 8.
8.
Turn the head upside down to start working on the next row of loops as shown (Pic 10). Insert hook into the first loop on the next row (Pic 11). Make 4 Dc into each of the 6 loops (Pic 12). Once you meet the end of the row, turn the head again to work on the next row of loops (Pic 13). Make 4 Dc into the next 10 loops (Pic 14-15).
10.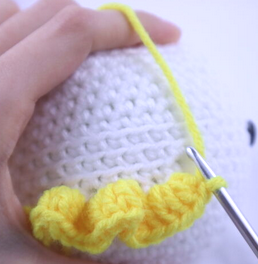 11.
11.
12. 13.
13.
14. 15.
15.
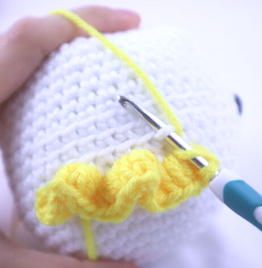
Turn the head upside down again, and work in the last row of loops (Pic 16). Make 4 Dc in the next 10 loops (Pic 17). Repeat this hair process for the other section of front loops (Pic 18).
16. 17.
17.
18.
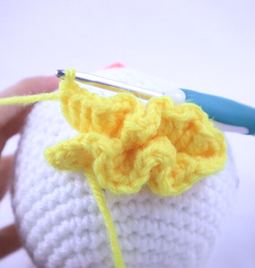
Now we’re going to continue working back on the suit for a round, then make the collar. After this, we’ll go back to working on the suit!
Suit:
In Suit Color
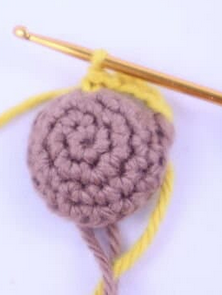
Round 24: Continue working from the head by placing your hook back onto the loop of the head. Change to Suit Color. In the BLO *Sc* all around (24)
Stop here for now, DON’T finish off.
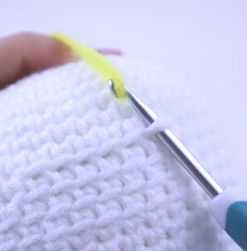
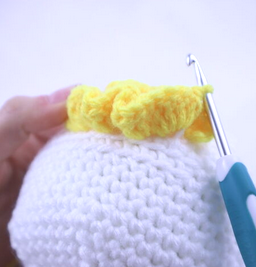
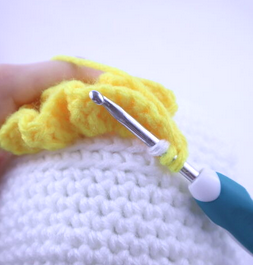
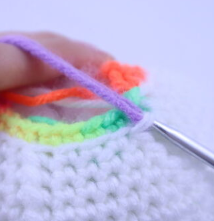
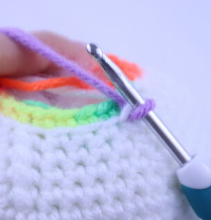
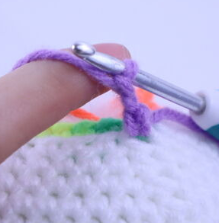
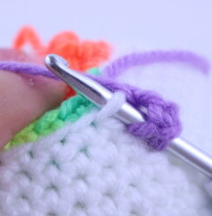
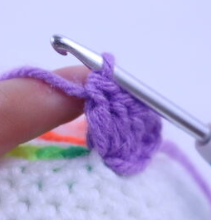
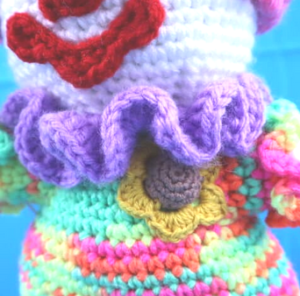
Collar Round 1: Place hook into one of the front loop only stitches as shown (Pic 1). Yarn over with collar color (Pic 2-4). Ch 3 (Pic 5). Working in the front loops only, repeat *2 Dc in next st, 1 Dc in next st* all around (72, Pic 6-8)
1. 2.
2.
3. 4.
4.
5. 6.
6.
7. 8.
8.
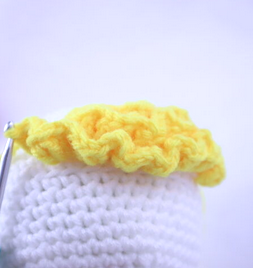
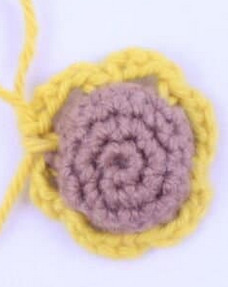
Collar Round 2: 4 Dc in each stitch all around (288)
Finish off collar here.
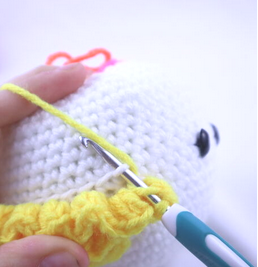
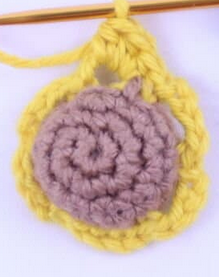
Continue Suit Round 25-26: Continue working from the suit by placing your hook back onto the loop of the suit *Sc* all around (24)
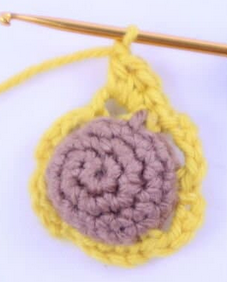
Round 27: *Inc, Sc 3* all around (30)
Round 28-29: *Sc* all around (30)
Round 30: *Inc, Sc 4* all around (36)
Round 31: *Sc* all around (36)
Round 32: *Inc, Sc 5* all around (42)
Round 33: *Sc* all around (42)
Round 34: *Inc, Sc 6* all around (48)
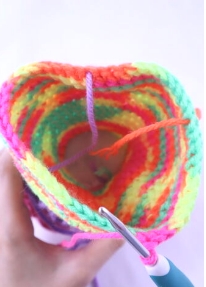
Round 35-42: *Sc* all around (48)
Important Note:
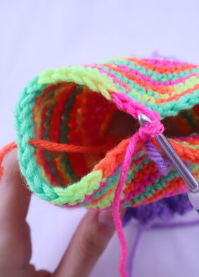
In the next round we will make the legs. To do this, we have to split the stitch count for each leg in half. Since we have 48 stitches, each leg will have only 24 stitches. If you follow how I did my legs and your legs come out looking uneven, just fold the suit part in half (Pic 2) and use a stitch marker to mark where the legs look even for you (Pic 1). Just make sure each leg has 24 stitches so they’re even!
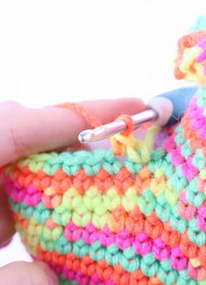
Round 43: Add a differently colored stitch marker in the 38th stitch (Pic 1). This marks where we will crochet into later to form the leg. Sc in the next 13 st (Pic 3). Now make 1 Sc into the stitch where we placed the stitch marker (Pic 4-5). This forms one leg. Sc in the remaining 10 st (Pic 6-8) (24)
1. 2.
2. 3.
3.
4. 5.
5. 6.
6.
7. 8.
8.
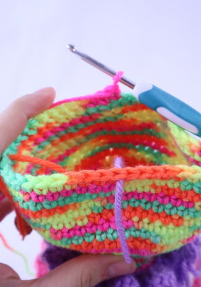
Round 44-48: *Sc* all around (24)
Round 49: *Dec, Sc 2* all around (18)
Round 50: In the FLO, make 4 Dc in each stitch all around (72)
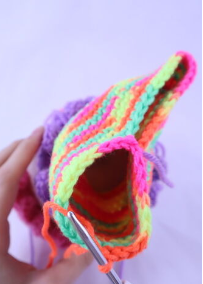
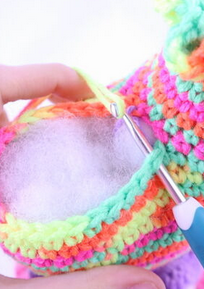
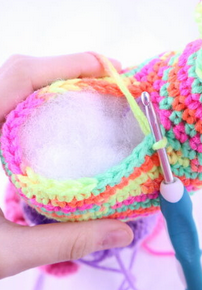
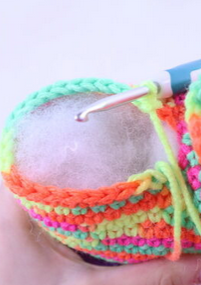
Finish off now, and weave in ends. Stuff the suit using the hole for the next leg. Once firmly stuffed, add stuffing to the leg we’ve already made (Pic 9).
9. 10.
10.
Second Leg:
In Suit Color
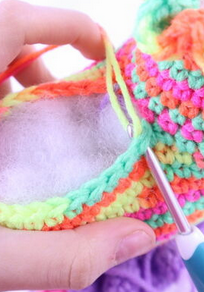
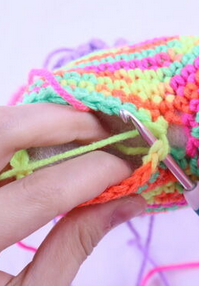
Attach your hook to any stitch of the unmade leg (Pic 2). Pull your yarn through the stitch (Pic 3-5), then chain 1. This chain 1 will act as your first Sc. Make sure to add your stitch marker into that first Sc.
1. 2.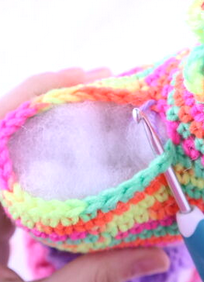 3.
3.
4. 5.
5.
Round 1-6: *Sc* all around (Pic 6-9) (24)
6. 7.
7. 8.
8.
9. 10.
10.
Round 7: *Dec, Sc 2* all around (18)
Round 8: In the FLO, make 4 Dc in each stitch all around (72)
Finish off now, and weave in ends. Stuff the leg firmly now.
Shoes: (Make 2)
In Shoe Color
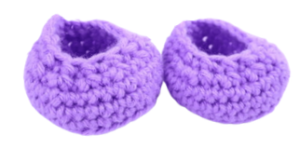
Round 1: 6 Sc into a Magic Ring (6)
Round 2: *Inc* all around (12)
Round 3: *Inc, Sc* all around (18)
Round 4: *Inc, Sc 2* all around (24)
Round 5: *Inc, Sc 3* all around (30)
Round 6: In the BLO, *Sc* all around (30)
Round 7-8: In BOTH loops, *Sc* all around (30)
Round 9: Sc in the next 6 st, Repeat *Dec, Sc 1* 6 times, Sc in the next 6 st (24)
Round 10: Sc in the next 6 st, *Dec* 6 times, Sc in the next 6 st (18)
Finish off, leaving a long tail for sewing. Stuff the shoe firmly now. Pin the shoe on to the bottom of the leg opening. Sew on, inserting your needle into the next stitch of the shoe, to the next stitch of the leg. Insert needle into the next stitch of the suit, to the next stitch of the leg. Repeat this until the shoe is fully sewn on!
Arms: (Make 2)
In White

Round 1: 6 Sc into a Magic Ring (6)
Round 2: *Inc* all around (12)
Round 3-5: *Sc* all around (12)
Round 6: Change to Suit color. In the BLO, *Sc* all around (12)
Round 7-10: In BOTH Loops, *Sc* all around (12)
Finish off now, leaving a long tail for sewing. Stuff the arm firmly. Attach your crochet hook into any front loop of the arm left in Round 6. Ch 1, then continue to make 4 Sc into each front loop for the next 12 stitches. Once completed, finish off and weave in ends.
Pin the arm on as shown, specifically the top of the arm on Round 26, and the bottom of the arm on Round 31. Weave in ends.
Nose:
In Red
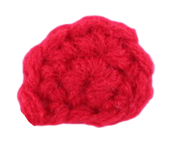
Round 1: 6 Sc into a Magic Ring (6)
Round 2: Sc in the next 2 st, 3 Sc into the next st, Sc in the next 3 st.
Finish off, leaving a long tail for sewing. Pin the nose between the eyes as shown, specifically having the top of the nose between Round 13 & 14, and the bottom of the nose between Round 16 & 17. Sew on, and weave in ends.

Mouth:
In Red
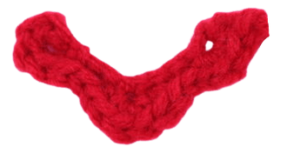
Row 1: Ch 10. Sc 4 times in the 2nd Ch from the hook. SlSt in the next 2 st. Sc in the next st. Sc 3 times in the next st. Sc in the next st. SlSt in the next 2 st. Sc 4 times in the last st (17)
Pin on as shown, the corners of the mouths should be between Rounds 16 & 17. The bottom of the mouth should be on Round 21. Sew on, and weave in ends.
Face Triangle: (Optional)
In Red
Round 1: Ch 3. Sc in the 2nd Ch from the hook, Dc in the next Ch. (2)
Finish off, leaving a long tail for sewing. Pin the triangle above the eye as shown and sew on. Weave in ends.
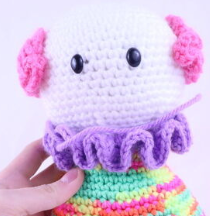
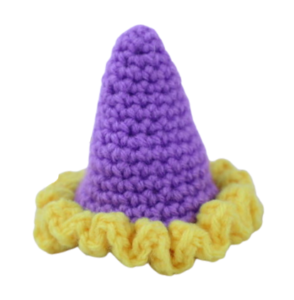
Hat:
In Any Hat Color
Round 1: 6 Sc into a Magic Ring (6)
Round 2: *Sc* all around (6)
Round 3: *Inc* all around (12)
Round 4-5: *Sc* all around (12)
Round 6: *Inc, Sc* all around (18)
Round 7-8: *Sc* all around (18)
Round 9: *Inc, Sc 2* all around (24)
Round 10-12: *Sc* all around (24)
Round 13: *Inc, Sc 3* all around (30)
Round 14: *Sc* all around (30)
Round 15: *Inc, Sc 4* all around (36)
Round 16: Change to a contrast color. In the FLO, make 4 Dc into each stitch all around (144)
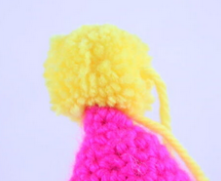
Finish off, leaving a long tail for sewing. Pin the hat on as shown, make sure it’s tilted to the side. Sew on, making sure to stuff firmly before fully sewing on. Weave in ends.
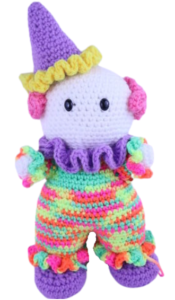
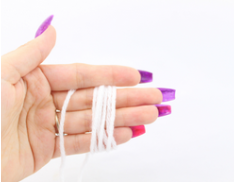
Pom Pom:
In Any Color
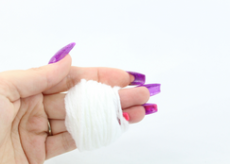
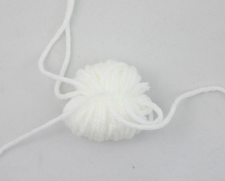
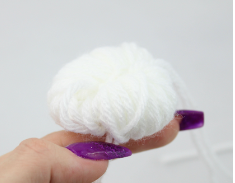
First, cut a 12″ piece of white yarn and set aside for later. Now, take white yarn and wrap it around for 3 fingers 80 times (Pic 1, 2, & 3). Now take the yarn off your fingers (Pic 4). Wrap the 12″ piece of yarn around the yarn a few times (Pic 5-6)
1. 2.
2.
3. 4.
4.
5. 6.
6.
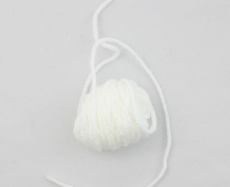
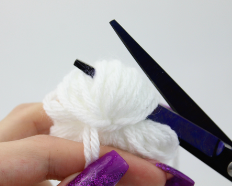
Do this tightly to secure. Now, cut the loops of yarn as shown (Pic 7-10)
7. 8.
8.
9. 10.
10.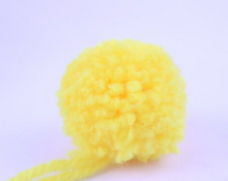
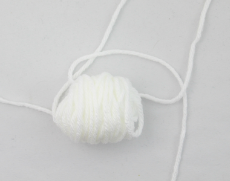
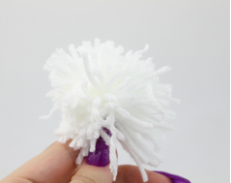
Be sure to cut all the longer pieces of yarn off to get a puffy ball. Finally, sew the pom pom to the top of the hat (Pic 11-12).
11.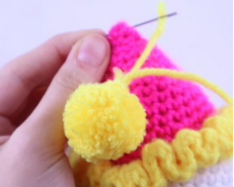 12.
12.
Flower:
Use 2mm Crochet hook and Fingering weight yarn
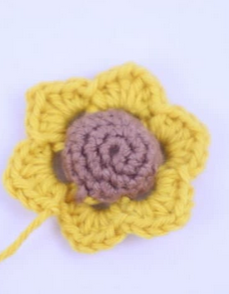
To make the flower, we will make the front and back of the brown part. Then, we will switch to yellow. While crocheting both pieces together, we will also form the petals.
Back of flower: (Make first)
In Brown
Round 1: 6 Sc into a Magic Ring (6)
Round 2: *Inc* all around (12)
Finish off now.
Front of Flower:
In Brown
Round 1: 6 Sc into a Magic Ring (6)
Round 2: *Inc* all around (12)
Round 3: *Sc* all around (12)
Round 4: Sc in the next 11 st. Sc in the last st, changing to yellow when making the last stitch (12)
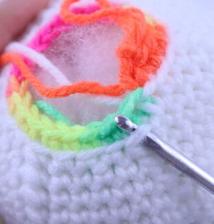
In the next round we will line the back of the sunflower up to the front of the sunflower. We will crochet both pieces together this round, so make sure to work in BOTH the back piece of the sunflower and the front piece of the sunflower (see pic 4).
Round 5: In yellow repeat *Ch 4 (pic 2), skip the next st, SlSt next st (pic 4-5)* 6 times (30, pic 6)
1. 2.
2.
3. 4.
4.
5. 6.
6.
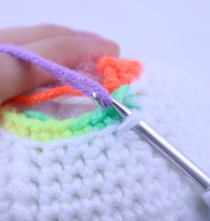
Round 6: Repeat *3 Hdc in the next Ch 4 space (pic 7), Ch 1 (pic 8), 3 Hdc into that same Ch 4 space (pic 9), SlSt into that same Ch 4 space.* 6 times (48, pic 10)
Finish off, leaving a long tail for sewing. Pin the flower to the suit as shown (pic 11), and sew on. Weave in any ends.
7. 8.
8.
9. 10.
10.
11.
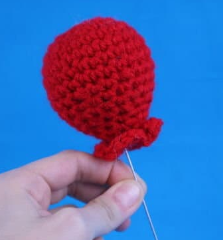
Balloon:
In Any Color
Round 1: 6 Sc into a Magic Ring (6)
Round 2: *Inc* all around (12)
Round 3: *Inc, Sc* all around (18)
Round 4: *Inc, Sc 2* all around (24)
Round 5-7: *Sc* all around (24)
Round 8: *Dec, Sc 2* all around (18)
Round 9-10: *Sc* all around (18)
Round 11: *Dec, Sc* all around (12)
Round 12-13: *Sc* all around (12)
Stuff the balloon firmly now
Round 14: *Dec* all around (6)
Round 15: In the FLO, *4 Sc into each st* all around (24)
Finish off, leaving a tail for sewing. Sew the 6 stitches from Round 14 closed.
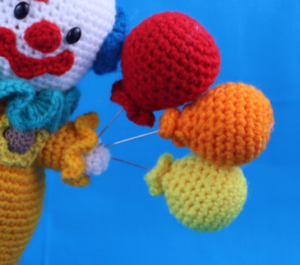
Balloon Assembly:
Now we need to attach the balloon! There are 2 ways we can do this. The first way is a lot more secure, but can only be done with 1 balloon because this method takes up a lot of room on the clown’s hand. If you’re giving this as a toy to a kid, I would only recommend attaching the balloon this first way.
The second way allows us to use multiple balloons, but it’s a lot less secure. This is a good option if you’re going to use the clown as more of a decoration.
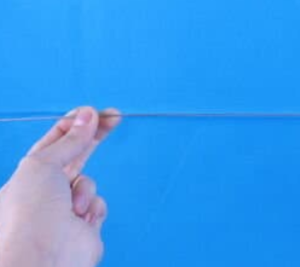
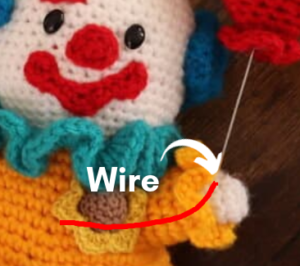
Note: Pipe cleaners won’t work to keep the balloons up. Please use firm wire stems. I bought 18 gauge stems from JoAnn Fabrics. Look in the floral section, the brand I used is called “The Bloom Room”. They come in long sticks, similar to pipe cleaners.
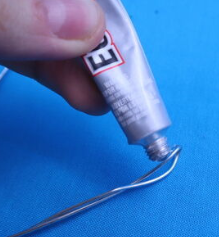
Note: Please make sure to bend the ends of your wire so they won’t poke anyone. For  extra safety, you can put hot glue or E600 on the end, then wrap yarn around it as show.
Method 1 of Balloon Assembly:
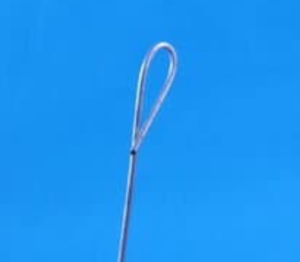
Take a wire, about 5″ long (pic 1). Bend the end of it up as shown, use pliers (pic 2). Insert the long end of the wire from the bottom of the toy’s hand, up to the top of the hand (pic 3). Do the same with the short end of the wire as shown (pic 4). The wire will now look like pic 5.
1. 2.
2.
3.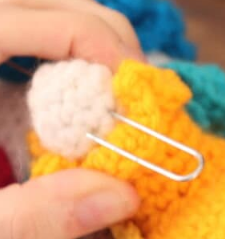 4,
4,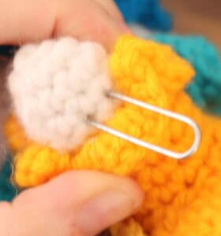
5.
Bend the very tip of short end of the wire once again, and bend it back into the toy’s hand (pic 6). Bend the very top of the long wire (pic 7). Place glue on the end of that wire (pic 8) and slide a balloon into the wire (pic 9).
6. 7.
7.
8. 9.
9.
10.
Make extra sure that the balloon is secure and won’t poke you! I found this was to be a lot more secure, but it only allows room for 1 balloon. You may notice the wire on the top of the clown’s hand – just sew some yarn over that small section! (Or paint it).
Method 2 of Balloon Assembly:
Take a wire, about 8″ (pic 1). Bend both tips of the wire as shown, so they won’t poke you (pic 2). Add glue onto one end of the wire (pic 3), and slide the balloon onto that end (pic 4). Insert the other end of the wire into the clown’s hand, leading the wire through the toy’s arm/body. Doing this will make it more stable. Repeat this process for any additional balloons. Please note that this method isn’t as stable as the previous method, so only use this method if your clown will be for decoration.
1. 2.
2.
3. 4.
5. 6.
6.
Done! I hope you liked this pattern, if you made it I would LOVE to see! You can post a picture of it in the comments, right underneath this post.


12 Comments
I love love love this can’t wait to try making it
That’s awesome to hear, thank you for your kind support! If you have any questions when making the clown please just let me know 😍
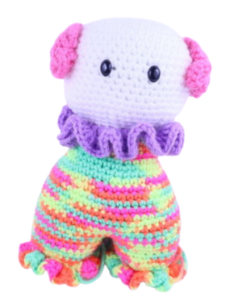
Hi Olive! I LOVE your patterns 🙂 What is the yarn you used for the multi color clown? (the rainbow one) I love the look!!!!!!!!!!
Hi there Sima! Thank you so much, you are so nice, I appreciate such kind words! 😍 The multicolored yarn is Day Glow from Red Heart. I love the yarn a bunch, and might stock up on it incise they discontinue it ❤️ Glad you liked the yarn too!
hello there, i absolutely love this pattern i have made three different clowns with it my only issue is that you do nit orovide a way to make the ruffles in the arms. But again i love this pattern i just think it would be better if it orovided that missing detail
Hi Sussan! I’m really glad you like this pattern so much that you’ve made THREE clowns! Wow, that’s super awesome! 🙂 I’m sorry about the missing ruffle in the arms, I thought I had put that in the pattern but it looks like it’s indeed missing 🙁 However, I just added that to the patterns! It’s easy to do, here’s how:
Finish off now, leaving a long tail for sewing. Stuff the arm firmly. Attach your crochet hook into any front loop of the arm left in Round 6. Ch 1, then continue to make 4 Sc into each front loop for the next 12 stitches. Once completed, finish off and weave in ends of cuff ruffles.
I hope this was able to help and sorry again about that, I thought I had it in there lol! 😛
This was so fun to make!! It came out so cute!! And because I am the best sister in the world I am going to send to my brother (who’s afraid of clowns lol).
Awww this is adorable, Vivian! I love how vibrant and happy your clown looks… okay honestly this might even cure your brother of his clown phobia lol 😁 I hope he loves it because you did such a great job on it! Thank you for making me smile by sharing a photo of your clown 🥰
So loved making these clowns Olive. Thank you for this pattern – so detailed. I just added a couple of more rows to the body and the arms. Came out so wonderfully.
Hi Pooja! I always love seeing what you’ve made, your skills truly never fail to amaze me 😍 Anytime you show me something I’m seriously so impressed! I love your clowns so much, they are so happy looking and I can’t stop smiling when I look at them! 😍😍😍 Great call on adding some extra rounds, too. It looks great with some extra length, a bit more proportional!
Thank you so much for sharing, you are awesome! I also love that color you used on the clown’s rainbow suit so much. I don’t know if it’d be available where I live but maybe I can find something similar 🙂
Thank you so much!! Awesome pattern, made one for a clown lover 🙂
This might just be me but I’m having issues with the collar portion. I’m not quite understanding how to get to 72 sts. I’m always cut off by a few thanks 🙂