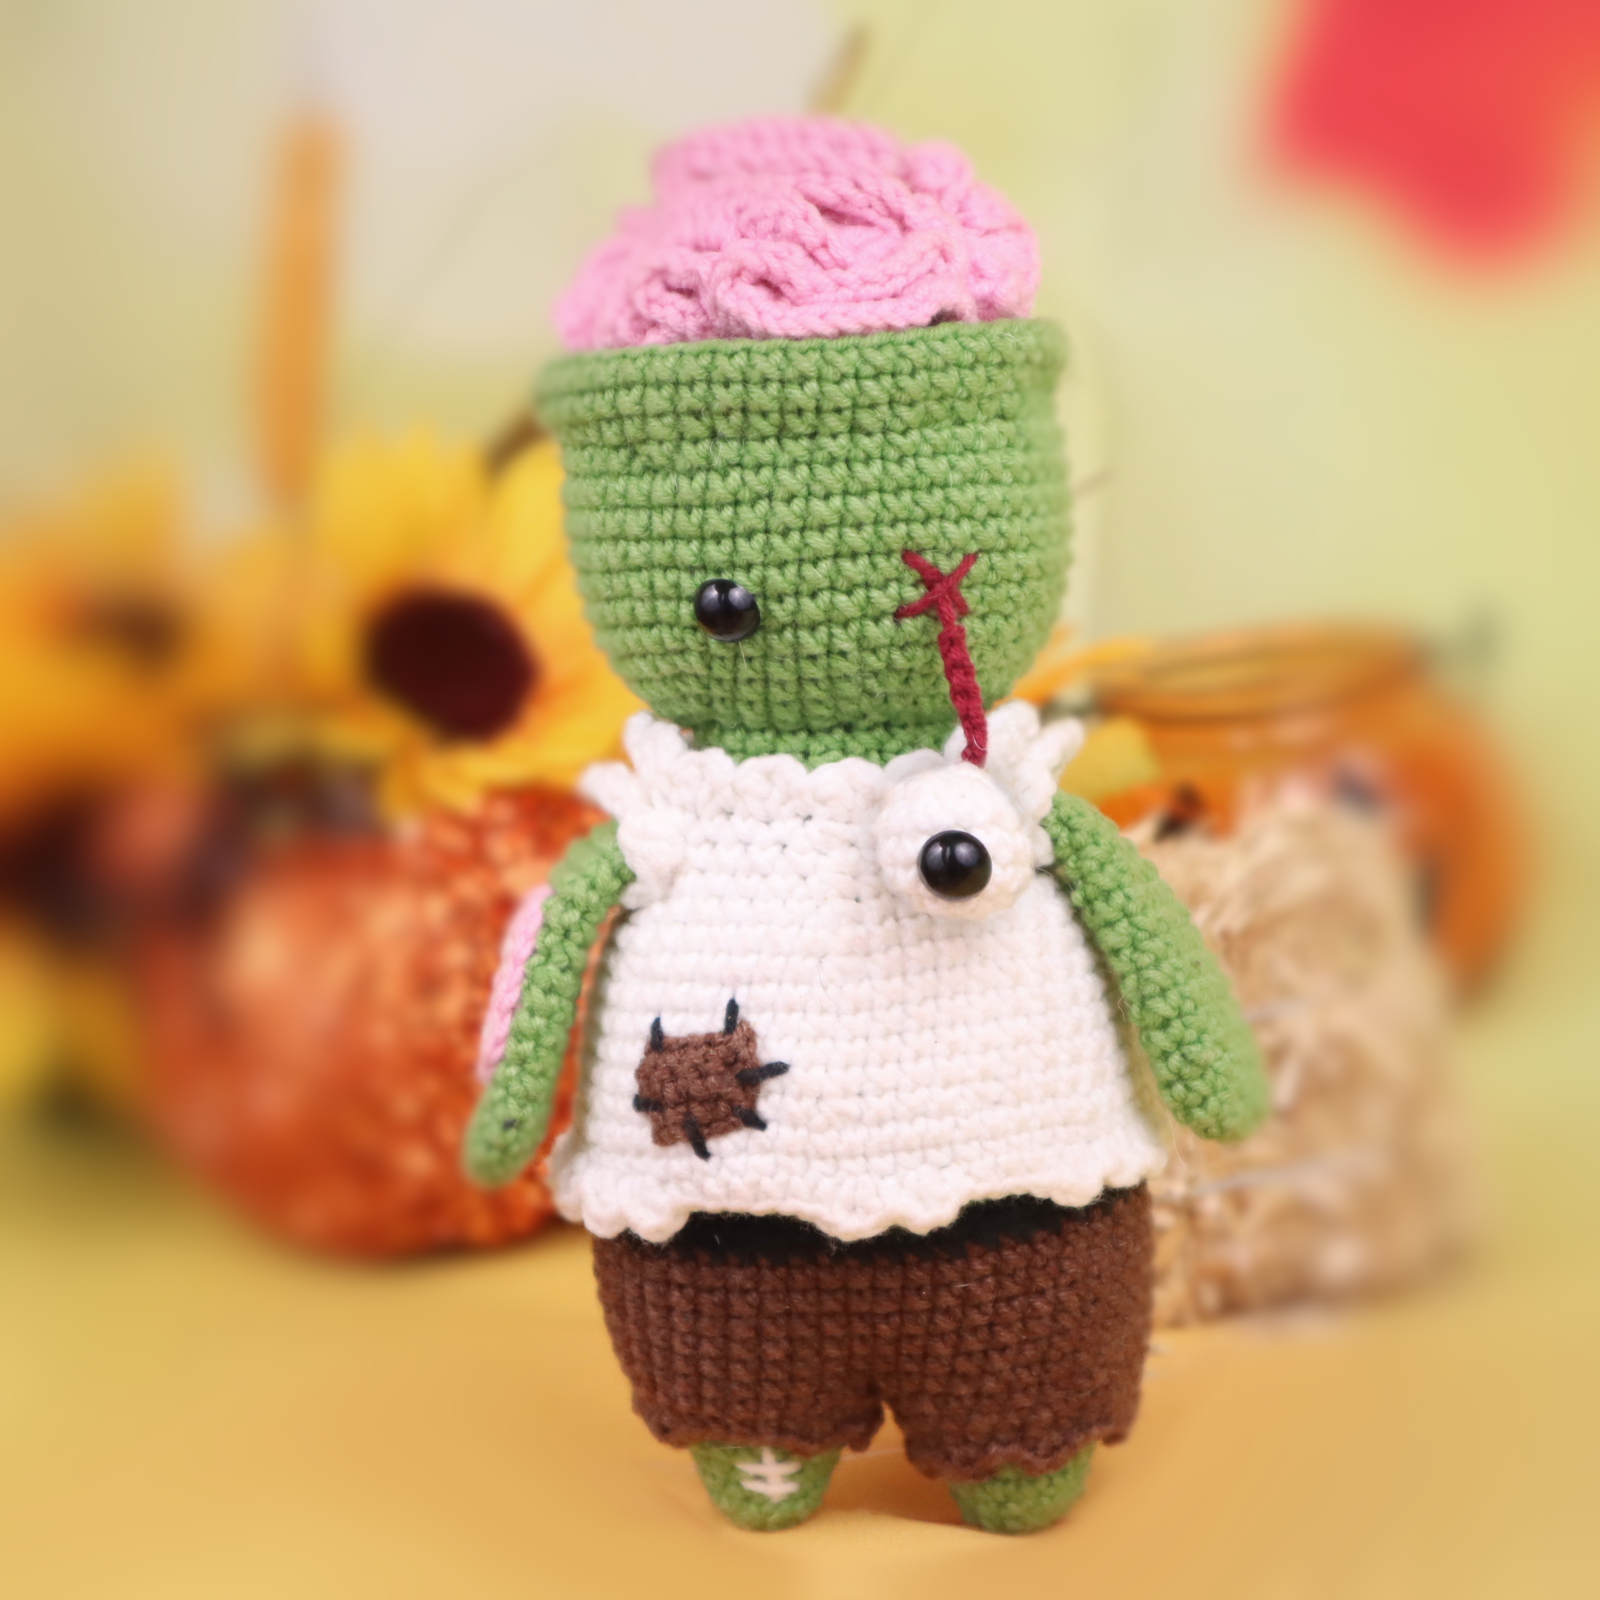
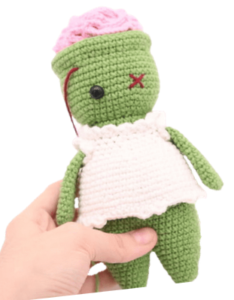
Freaky Zombie Amigurumi – Free Halloween Crochet Pattern
Hi everyone!
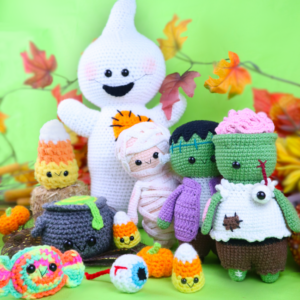
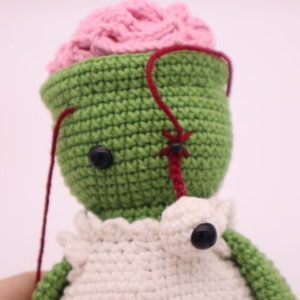
I’m kicking off September by releasing a free Halloween bundle! This year I will be publishing 10 Halloween themed patterns all for free on my website. As with all my bundles, this means that you will get 1 free pattern a week (and one week you’ll actually get FOUR patterns.) This isn’t something you’ll want to miss! And speaking of missing… I haven’t had a zombie pattern on my website yet. I had to change that has soon as I realized this. When I pictured a zombie crochet pattern in my head, all I could think of was a protruding brain and a hanging eye LOL! This is definitely the most gruesome pattern I have.
If you’d like to see the other upcoming patterns, here’s a picture. (You can click on the picture of the set below and you’ll be taken to a post which shows each upcoming pattern’s release date.)
Print this pattern out – purchase the PDF here!

This is just 1 out of 10 patterns included in the Spooky Halloween Amigurumi Bundle! Every week 1 or more Halloween themed amigurumis will be released.
Want to see the other Halloween patterns and their release date? See them here!
Become a member to unlock each PDF pattern as they’re released!
Supplies:
• Yarn 2 Weight Yarn in…
Green, pink, red, white, brown, and black
•2mm Crochet Hook
•Tapestry needle
•Scissors
•Stuffing
•Sewing Pins
•One 12mm safety eye
Additional Information:
Difficulty: Advanced
• Before we get started…
This zombie is made with Yarnart Jeans, which isn’t available in the US but can be purchased from Etsy sellers for an affordable cost. The yarn I used is small (2 weight) and paired with a small hook (2mm) to give the amigurumi a clean look. I also used the “yarn under” method to get “x” stitches – I include a tutorial of this on the last page.
You can make this pattern in regular 4/Medium weight yarn with a 4mm hook, however, your amigurumi will come out much larger.
• Let’s Get Started!
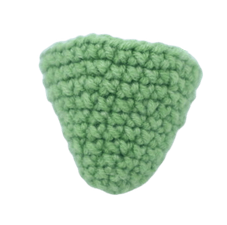
We will start by making the zombie’s legs. After they are both made, we will connect them together. The legs will then lead into the body and head. So the legs, body, and head are all made in one continuous piece.
After this, we will make his clothes, and spice them up by edging to the clothes for a dishevel look! We continue by making his arms, brain, eye, and little details. Let’s get started!
Let’s get started!
We will start by making the legs, then we will connect them together. The legs will then form up into the body, then the head. Let’s get started!
Legs: (Make 2)
Start in Green
Round 1: 6 Sc into a Magic Ring (6)
Round 2: *Inc* all around (12)
Round 3-4: *Sc* all around (12)
Round 5: *Inc, Sc in the next st* all around (18)
Round 6-7: *Sc* all around (18)
Round 8: *Inc, Sc in the next 2 st* all around (24)
Round 9: *Sc* all around (24)
What we will do from here will be different depending on which leg you’re making. If you’re making the first leg, continue on the next 2 rounds below:
First leg, Round 10: *Inc, Sc in the next 3 st* all around (30)
First leg, Round 11: *Sc* all around (30)
Finish off the first leg now.
If you’re making the second leg, continue on the next round:
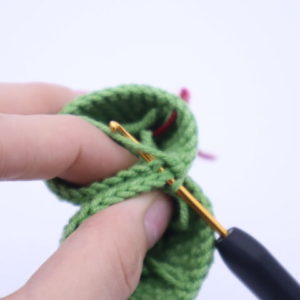
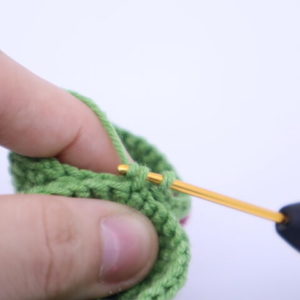
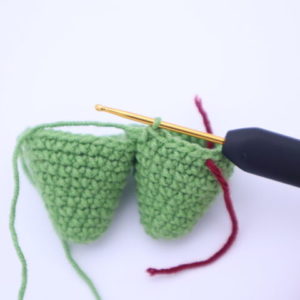
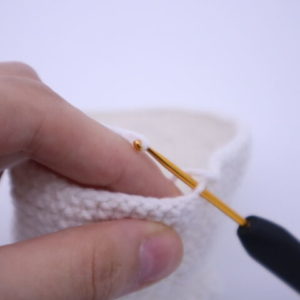
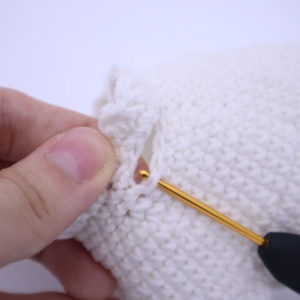
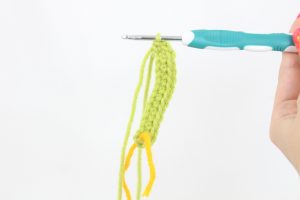
Second leg, Round 10: *Inc, Sc in the next 3 st* all around (30)
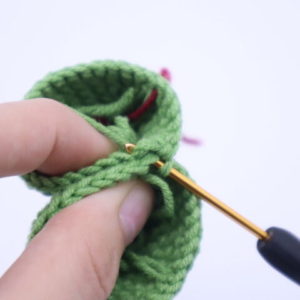
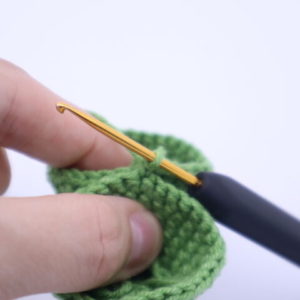
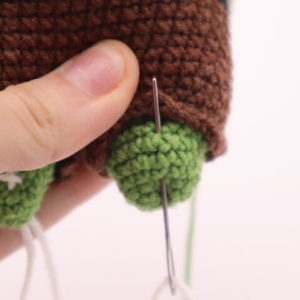
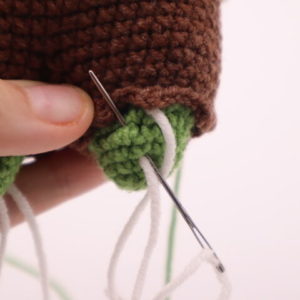
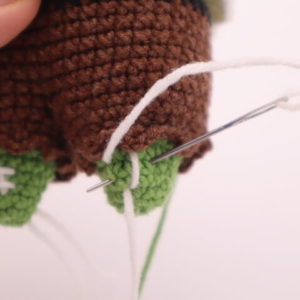
Second leg, Round 11: Sc in the next 6 st (Pic 1). Line the second and first leg’s stitches together (Pic 2) and going through BOTH legs, Sc in the next 6 st (Pic 3-10).
1.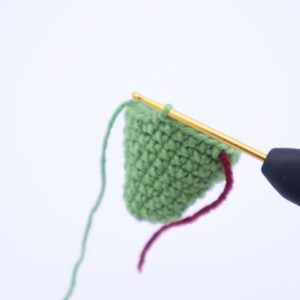 2.
2.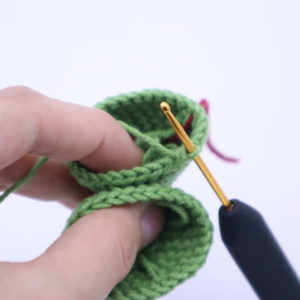
3.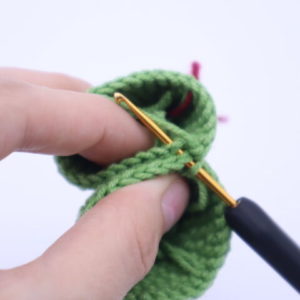 4.
4.
5. 6.
6.
7. 8.
8.
9. 10.
10.
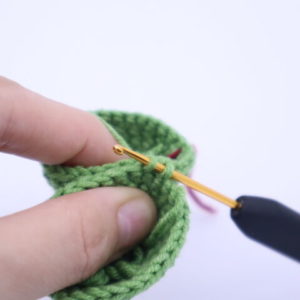
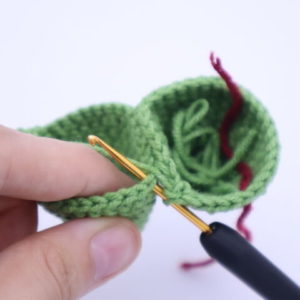
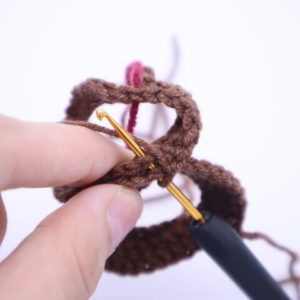
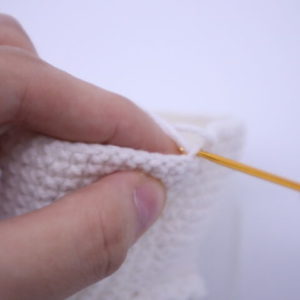
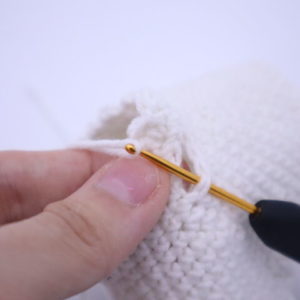
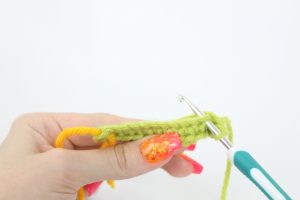
Working back on the second leg (Pic 11) Sc in the remaining 18 st (Pic 12, Stitch count: 6 stitches connecting the legs, 24 stitches on each leg)
11. 12.
12.
Tip: Now that we have the legs connected, they will start leading up to the body, then the head,
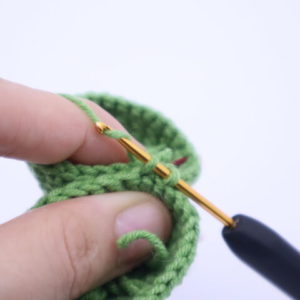
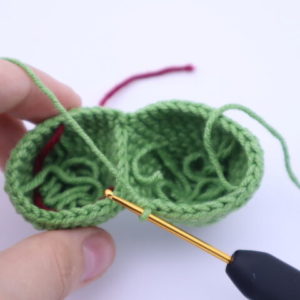
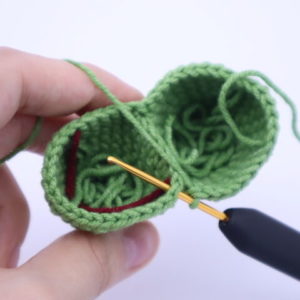
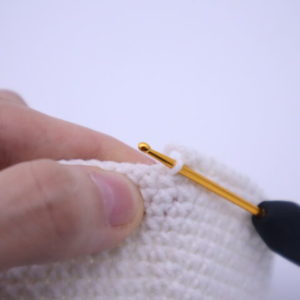
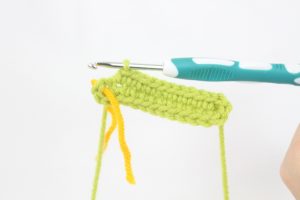
Round 12: Sc in the next 6 st (Pic 1). Now we meet the other leg, Sc in the next 24 st (Pic 2-3). Now we meet the other leg, Sc in the next 18 st (Pic 4-5) (48)
1. 2.
2.
3. 4.
4.
5.
Round 13-25: *Sc* all around (48)
Round 26: *Dec, Sc in the next 6 st* all around (42)
Round 27: *Sc* all around (42)
Round 28: *Dec, Sc in the next 5 st* all around (36)
Round 29: *Sc* all around (36)
Round 30: *Dec, Sc in the next 4 st* all around (30)
Round 31: *Sc* all around (30)
Round 32: *Dec, Sc in the next 3 st* all around (24)
Round 33: *Sc* all around (24)
Stuff the legs and body firmly now.
Round 34: In the FLO, *Inc, Sc in the next 3 st* all around (30)
Round 35: *Inc, Sc in the next 4 st* all around (36)
Round 36: *Inc, Sc in the next 5 st* all around (42)
Round 37: *Inc, Sc in the next 6 st* all around (48)
Round 38-47: *Sc* all around (48)
Insert one safety eye in between Round 39 and 40. Keep this safety eye on the left side of his face, because later we will make his gore-y eye on the right side.
Round 48: In the BLO *Sc* all around (48)
Round 49: In BOTH loops *Sc* all around (48)
Round 50: Change to red. In the FLO *Dec, Sc 6* all around (42)
Round 51: In BOTH loops *Dec, Sc 5* all around (36)
Round 52: *Dec, Sc 4* all around (30)
Round 53: *Dec, Sc 3* all around (24)
Stuff the head firmly now. Continue stuffing after each round
Round 54: *Dec, Sc 2* all around (18)
Round 55: *Dec, Sc 1* all around (12)
Round 56: *Dec* all around (6)
Finish off and sew the remaining stitches closed. Weave in ends.
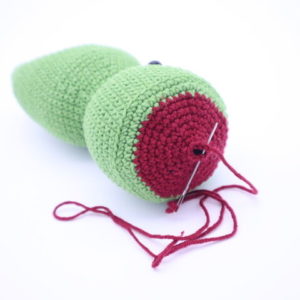
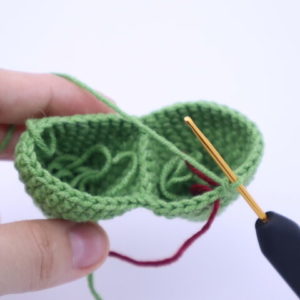
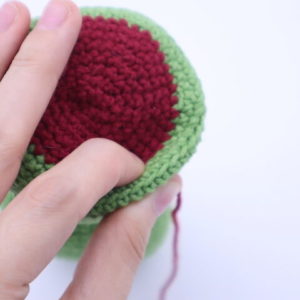
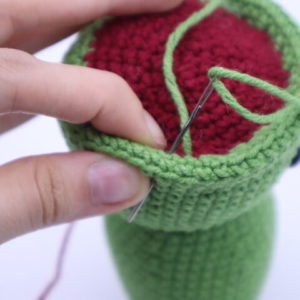
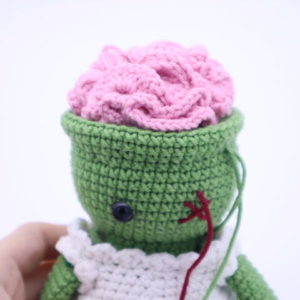
Head Assembly:
In Red
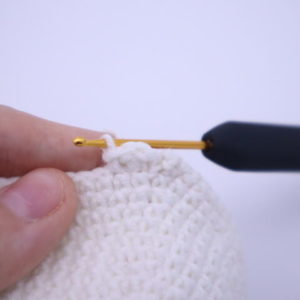
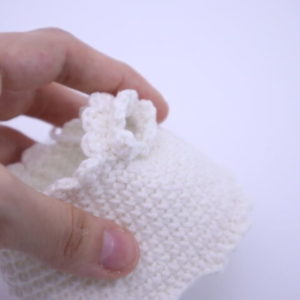
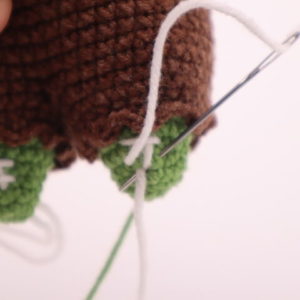
To make the zombie’s head more realistic, we will create an “indent” around the red part of the head. This will result in a hallow head, perfect to put his brain into! First, squish the last 2 green rounds down and together as I’m doing, making sure little to no stuffing is where you’re pinching (Pic 1). Take a long piece of green thread, and insert it into where you just pinched as shown (Pic 2).
1. 2.
2.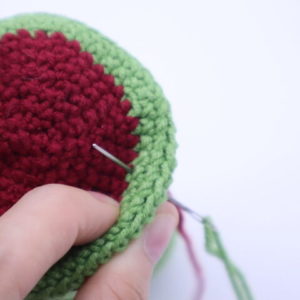
Insert needle out about 1-2 stitches to the left as shown (Pic 3). Repeat this process of pinching the next spot, then inserting your needle through that area until you’ve sewn it fully around. Once done, tie the end of yarn into a firm knot, then bring into the zombie’s head to hide the yarn/knot. Cut any excess yarn.
3.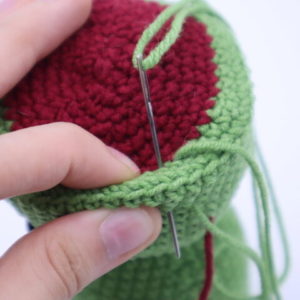 4.
4.
Shorts:
In Brown
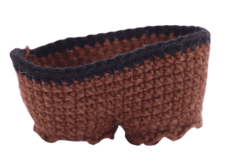
The shorts are made by creating two leg holes, then crocheting them together. These leg holes will be different lengths for a disheveled look. After completing the shorts, we will crochet an edging around the bottom of the shorts as well.
Start with right leg: (will be longer pant leg)
Round 1: Ch 26. Sc in the first Ch to connect and form a ring, making sure NOT to twist the chain. Add a stitch marker into the first Sc just made. Sc in the next 25 ch
Round 2: *Sc* all around (26)
Round 3: *Inc, Sc in the next 4 st* 5 times. Sc in the next st (31)
Round 4: *Sc* all around (31)
Finish off and weave in ends.
Left leg: (will be shorter pant leg)
Round 1: Ch 30. Sc in the first Ch to connect and form a ring, making sure NOT to twist the chain. Add a stitch marker into the first Sc just made. Sc in the next 29 ch (30)
Round 2: Sc in the next 8 st (Pic 1). Line up the first and second pant leg together, making sure the stitches line up (Pic 2). Going through BOTH stitches of the first and second leg, Sc in the next 6 st (Pic 3-4).
1. 2
2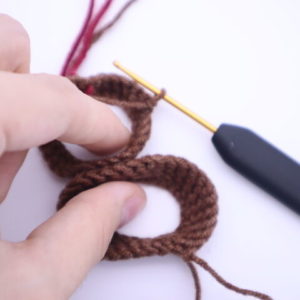
3. 4.
4.
Continuing on the second pant leg we made (Pic 5), Sc in the next 16 st (Pic 6. Stitch Count: 6 stitches connecting the pant legs, 24 stitches on one leg, 25 stitches on the other pant leg)
5. 6.
6.
Round 3: Sc in the next 8 st. Now we meet the other pant leg, Sc in the next 25 st on that pant leg. Now we meet the other pant leg, Sc in the next 16 st (49)
Round 4-8: *Sc* all around (49)
Round 9: Change to black, *Sc* all around (49)
Finish off now, leaving a long tail for sewing later.
Pant Edging:
In Brown
Now we will add an edging around the pant legs. This will give it a disheveled look. When we do this, be sure to attach your hook in the first stitch of the pants (so this will be the stitch to the left of the tail of yarn as shown!)
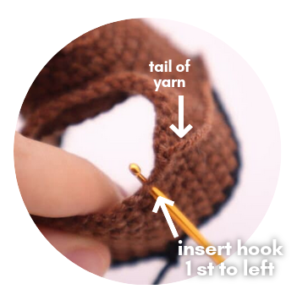
Short leg edge (left)
Attach hook next to the tail end of yarn on the shorter leg. Repeat *Sc in the next st, Ch 1, Sc in that same st. SlSt in the next 2 st* 3 times. SlSt in the next 3 st. Repeat *Sc in the next st, Ch 1, Sc in that same st. SlSt in the next 2 st* 5 times. SlSt in the remaining st.
Long leg edge (right):
Attach hook next to the tail end of yarn on the longer leg. SlSt in the next st. Repeat *Sc in the next st, Ch 1, Sc in that same st. SlSt in the next 2 st* 3 times. SlSt in the next 2 st. Repeat *Sc in the next st, Ch 1, Sc in that same st. SlSt in the next 2 st* 4 times. SlSt in the next remaining 6 st.
Shirt:
In White
Round 1: Ch 61. Sc to the first Ch to connect, making sure NOT to twist the chain. Add a stitch marker to the stitch you just made. Sc in the next 60 st (61)
Round 2: *Sc* all around (61)
Round 3: *Dec, Sc in the next 3 st* 12 times. Sc in the last st (49)
Round 4-7: *Sc* all around (49)
Round 8: *Dec, Sc in the next 6 st* 6 times. Sc in the last st (43)
Round 9: *Sc* all around (43)
Round 10: *Dec, Sc 5* 6 times, Sc in the last st (37)
Round 11: *Dec, Sc 4* 6 times, Sc in the last st (31)
In the next round we will form the sleeves. To do this, we will skip a few stitches to form the hole form the hole of the arm.
Round 12: Sc in the next 7 st. Ch 7, Skip the next 4 st, Sc in the next st. Sc in the next 9 st. Ch 7, Skip the next 4 st. Sc in the next st. Sc in the next 5 st (36)
Round 13: Repeat *Dec, Sc in the next 4 st* all around (30)
Finish off now and weave in ends.
Shirt Edging:
Much like we did to the pants, we will add an edging around the top, bottom, and arm holes of the shirt. When we do this, be sure to attach your hook in the first stitch of the shirt (so this will be the stitch to the left of the tail of yarn as shown!)
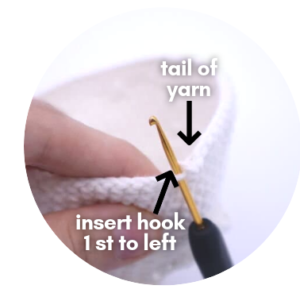
Bottom shirt edging:
In white
Attach hook to first st on the BOTTOM of the shirt (Pic 1-4). SlSt in the next 2 st. Repeat *Dc in the next st, Ch 1, Dc in same st, SlSt next st* 4 times. Sc in the next 4 st. Repeat *Dc in the next st, Ch 1, Dc in same st, SlSt in the next st* 6 times. Sc in the next 6 st. Repeat *Dc in the next st, Ch 1, Dc in the same st, SlSt in the next st* 2 times. Sc in the next 4 st. Repeat *Dc in the next st, Ch 1, Dc in the same st, SlSt next st* 2 times. Sc in the next 3 st. Repeat *Dc in the next st, Ch 1, Dc in the same st, SlSt in the next st* 3 times. Sc in the next 7 st (94)
1. 2.
2.
3. 4.
4.
5.
Top Shirt Edging:
In White
Attach hook to first st on the TOP of the shirt. Repeat *SlSt in the next st, Dc in the next st, Ch 1, Dc in the same st* all around. SlSt in next st to even out the edging. Once done, finish off and weave in ends. (60)
Sleeve Edging:
In White
Attach hook to first st on the sleeve of the shirt (Pic 1-3) Repeat *SlSt in the next st, Dc in the next st, Ch 1, Dc in the same st* all around. SlSt in next st to even out the edging. Once done, finish off and weave in ends.
1. 2.
2.
3.
Place the shirt on the zombie. Next we will make the arms, having the shirt done first makes it easier to see where to pin the arms 🙂
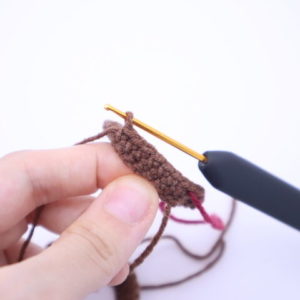
Shirt Patch:
In Brown
Row 1: Ch 5. Sc in the 2nd Ch from the hook. Sc in the next 3 Ch (4)
Row 2-3: Ch 1 and turn. Sc in the next 4 st (4)
Finish off and weave in ends. Take black yarn and sew the patch onto the bottom left side of the shirt – sew it on “poorly” as I did!
Arms: (Make 2)
In Green
Round 1: 6 Sc into a Magic Ring (6)
Round 2: *Inc* all around (12)
Round 3-19: *Sc* all around (12)
Finish off, leaving a long tail for sewing. I lightly stuffed the arms, but kept no stuffing at the top part of the arm.
Place the shirt onto the zombie. Now pin the arms onto the zombie’s body through the arm holes. Take the shirt off and sew his arms on. Once done, tie the ends of the yarn into firm knots and bring into the body to hide. Cut excess yarn. Now place the pants on and sew them in place with the black tail end of yarn we left. Weave in ends.
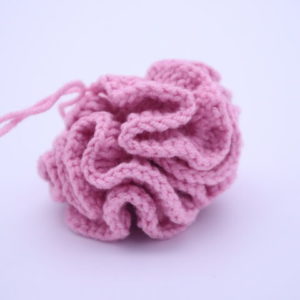
Brain:
In Pink
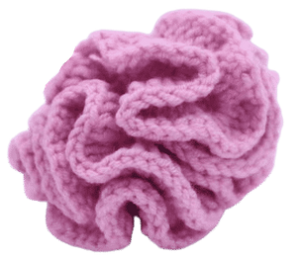
The brain is made up of many double crochets. This will form more of a circular shape, so later we will squish the brain and sew it in that position to make it more “brain” like. Let’s get started!
Round 1: Make 15 Dc into a Magic Ring (15)
Round 2: *3 Dc into each st* all around (45)
Round 3: *3 Dc into each st* all around (135)
Round 4: *3 Dc into each st* all around (405)
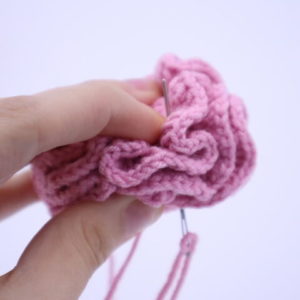
Finish off, leaving a very long tail for sewing. Squish the brain as shown (Pic 2). Now place the thread onto a needle and insert needle through all layers of the crochet brain (Pic 3-4)
1. 2.
2.
3. 4.
4.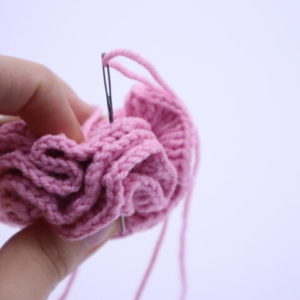
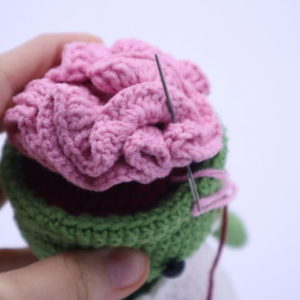
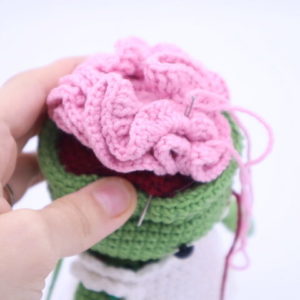
Continue sewing through the layers of the crochet brain – this will help it look squishes down and have a more “brain” look. Once done, place the brain onto the zombie as shown (Pic 5). Sew the crochet brain on by inserting needle into the crochet brain, then into the red area of the crochet head (Pic 7). Once securely sewn on, tie the tail end of yarn into a firm knot. Bring the knot into the zombie’s head to hide, and cut excess yarn. 5.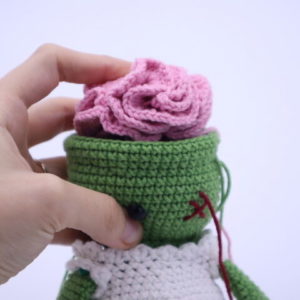 6.
6.
7. 8.
8.
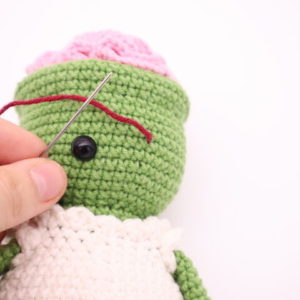
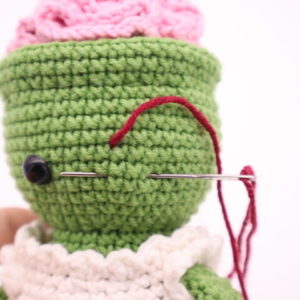
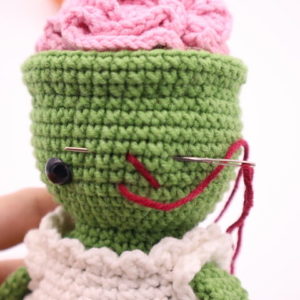
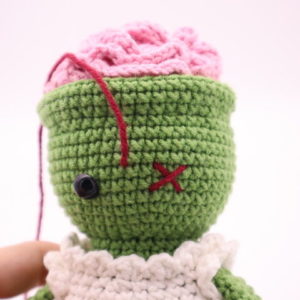
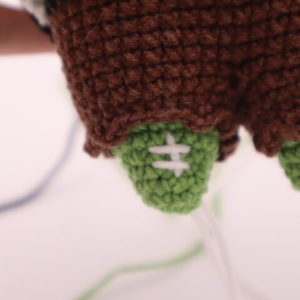
Missing Eye:
In Red
start is 34 Insert needle into zombie’s head, then pull needle out where shown (Pic 1, between Round 40 & 41, 5 st away from left eye). Reinsert needle where shown (Pic 2, between Round 38 and 39) and pull out about 2-3 stitches to the left (Pic 2). Reinsert needle where shown (Pic 3, between rounds 40 & 41, 7 st away from left eye). Pull needle out anywhere. Tie the tail end of yarn into a firm knot, then bring into the zombie’s head to hide the knot. Cut excess yarn.
1. 2.
2.
3. 4.
4.
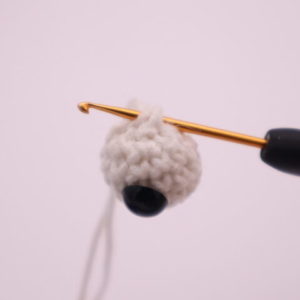
Falling out eye:
In White
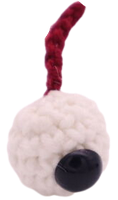
Round 1: 6 Sc into a Magic Ring (6)
Round 2: *Inc* all around (12)
Round 3-5: *Sc* all around (12)
Insert a 12mm safety eye into any stitch in between round 3 and 4.
Round 6: *Dec* all around (6)
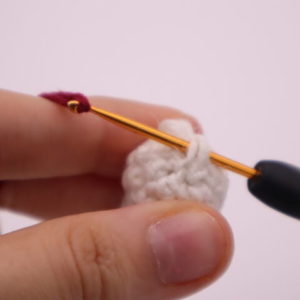
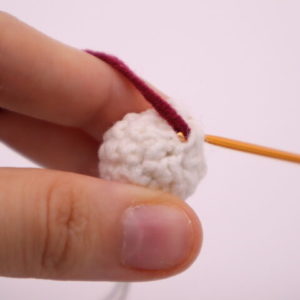
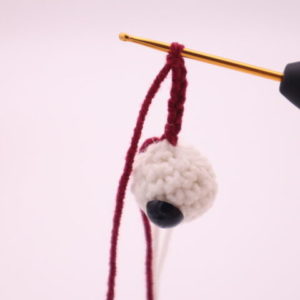
Stuff firmly now. Finish off and sew the remaining stitches closed. Insert your hook into the center top of the crochet eye (Pic 1) and yarn over with red yarn (Pic 2). Pull the yarn through (Pic 3) – you will have 1 loop on your hook (Pic 4). Ch 5 (Pic 5). Finish off, leaving a tail for sewing. Pin the last chain to the center of the “x” we made. Sew on by inserting needle with tail end of yarn directly through the “x” and pull out a few stitches away. Tie tail end of yarn into firm knot, then bring into the zombie’s head to hide the knot. Cut excess yarn.
1. 2.
2.
3. 4.
4.
5.
Leg bone:
In White
Insert needle with yarn into the bottom front of the zombie’s leg (Pic 1). Pull the needle out about 3 rounds up (Pic 2). Reinsert needle into the original insertion area (Pic 2), and pull the needle out at the left, about one round down from the top of the bone (Pic 3). Insert needle about 3 stitches to the right (Pic 3), and pull needle out where shown (Pic 3). Insert needle about 3 stitches to the right, and pull needle out anywhere (Pic 4). Tie the ends of yarn firmly into a knot, and bring into the zombie to hide. Cut excess yarn.
1. 2.
2.
3. 4.
4.
5.
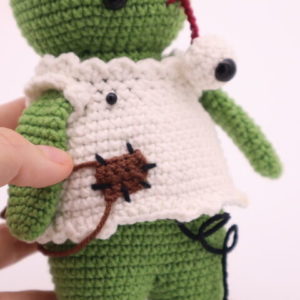
Arm Gore:
In Pink

To make this piece, we will be making a chain and working COMPLETELY around it to form an oval. Do not work this piece in rows by turning back and forth to work over the stitches you just made!
Round 1: Ch 6 (Pic 1). Sc 3 times in the 2nd Ch from the hook (Pic 2). Sc in the next 3 st. Sc 3 times in the last Ch. Now we meet the end of the chains (Pic 3). Turn your piece to the OTHER side, where we haven’t made any stitches yet Inserting your hook through that other side (Pic 4), Sc in the next 3 st (Pic 5, Stitch Count: 12).
Round 2: *Inc* in the next 3 st, Sc in the next 3 st, *Inc* in the next 3 st, Sc in the next 3 st (24)
1. 2.
2.
3. 4.
4.
5.
Finish off, leaving a long tail for sewing. With white yarn, embroider a bone onto the piece much like we did in the previous step! Once done, place the piece onto the zombie’s left arm and sew on, only going through one layer of it’s arm. Weave in ends.
Done! If you made this freaky zombie, I would LOVE to see! You can show me by posting a picture in the comments below this post 🙂


17 Comments
These patterns are so adorable
Awww thank you so much, Stephanie! That’s so kind of you to say 🥰 I truly appreciate it! Happy (almost… kind of) Halloween! Lol!
I am absolutely in love with this cute little Zombie!🧟♂️
OMG! He came out too adorable – I can’t get enough of this! Haha I absolutely love your zombie, everything about him is spot on!!! 😍 Thank you so much for sharing this, you are truly awesome 🙂
My zombie. Made with a 3.75 hook and 4 weight yarn. I found a mistake in the pattern as row 8 of the shirt is missing (I omitted it but my shirt was a little short so I stretched it and attached it to the body). I also added blood shot marks to the eyeball.
Hi Cheryl! Ahhhh he looks so scarily cute! LOL I looove the blood vessels you added to the eye, it looks awesome with that little detail 😍 I almost added them too but wasn’t sure if I could make them look like blood vessels – you did a great job! He looks sooooo cute and I love the shade of green you used on his skin. I see what you mean about round 8 not being on the shirt, I accidentally made a typo that went from Round 7 to 9, missing 8! But in fact, the pattern itself was correct but I mislabeled the rounds, so how you did the shirt is correct!
Thank you so much for sharing a picture, I love how your zombie came out 🙂
Love this pattern hes absolutely adorable, thanks for this amazing pattern 😉
Thanks for this pattern!!! It was super fun! Is it possible that you can make a pattern for spider man and Homer Simpson?
I have really enjoyed making this chap. He is so cute. The instructions were easy to follow and he turned out perfectly. Thanks for the project and I hope to use more xx
This is my favorite thing I’ve made. I made the arms posable. Thank you for the pattern. Spooky cute! I can’t stop saying brainzzzzz!
Loved making this zombie! Thank you so much for the pattern going to have a go at some others from the collection too
Haha finally i made it, it took me 2 days to finish 😅
Thank you for sharing the pattern 😊
Here is my Freaky Zombie! I started it shortly after it first published but had to put it aside. Now Halloween is once again around the corner so I pulled it out to finish. I so love it! Thank you for the design!
I’m giving this away to a couple getting married a week before Halloween this year. Thanks for the pattern
Had an absolute fun time making this! My granddaughter will love it
Il est super bien fait, j’adore 😍😍😍. Le mien est exactement celui de la photo. C’est super bien expliqué. Merci beaucoup
Voilà à quoi il ressemble le mien