


Purchase the PDF version here

Supplies:
8mm crochet hook, 7/Jumbo weight yarn in Green. 4mm crochet hook with 4/Medium weight yarn in White. 10mm safety eyes, scissors, glue gun or strong fabric glue.
Additional Information:
Difficulty: Easy
1.Use size 7 jumbo yarn for this pattern. This is know as “t-shirt yarn”. I used 2 skeins of Bernat Maker Big in color Green Pea. I bought this at JoAnns, but it is available on Amazon as well.
2. Instead of sewing limbs and eyes on, weave
them on using a slightly smaller crochet hook with your bulky yarn. Pull your bulky
yarn through the limb, into the body, then pull the yarn through the body, out to
the limb. Repeat this until the limb is secure and finish off.
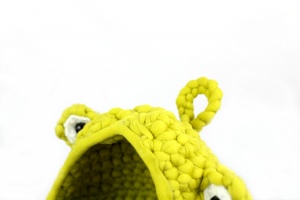
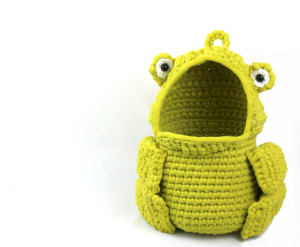
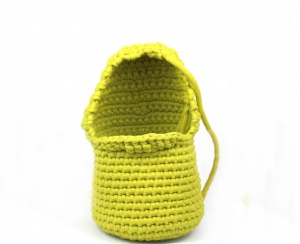
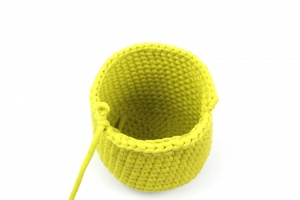
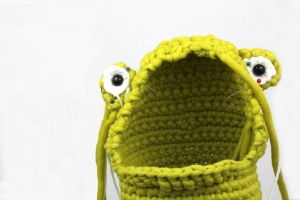
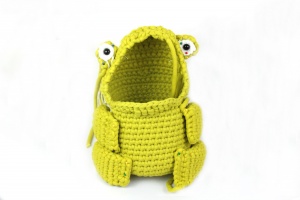
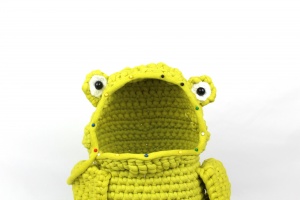
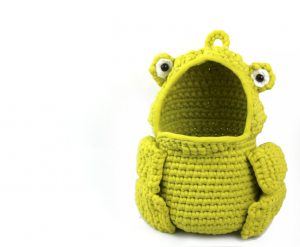
3. We start by making the body. We then make the lip, then start creating the head. The head and body are all worked together, not separate, so you do not need to sew them together. We then create the eyelids & eyes, sew them together, and pin them to the head. Then, we create all four limbs and finally create the handle. After all of this, we weave each part onto the body.
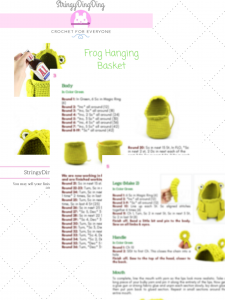
Body
In Color Green
Round 1: In Green, 6 Sc in Magic Ring (6)
Round 2: *Inc* all around (12)
Round 3: *Inc, Sc* all around (18)
Round 4: *Inc, 2 Sc* all around (24)
Round 5: *Inc, 3 Sc* all around (30)
Round 6: *Inc, 4 Sc* all around (36)
Round 7: *Inc, 5 Sc* all around (42)
Round 8-19: *Sc* all around (42)
Round 20: Sc in next 15 St, In FLO, *Sc in next 2 st, 2 Dc in next each of the next 2 St, Trc in next 4 St, 2 Dc in each of the next 2 St, Sc in next 2 st* in BOTH loops, Sc in next 15 St (46)
Round 20 pictured below


We are now working in Rows, not Rounds. We are building the head now and are finished working on the mouth. You can remove the St marker.
Round 21: Sc in next 15 st. Turn, Sc in next 30 st. (30)
Round 21 pictured below
Round 22-23: Turn, Sc in next 30 st (30)
Round 24: Turn, Sc in next 5 St, Dec 1 time, *Sc in next 7 St, Dec 1 time* 2 times, Sc in last 5 St (27)
Round 25: Turn, Sc in next 4 St, Dec 1 time, Sc in next 13 St, Dec 1 time, Sc in last 4 St (25)
Round 26: Turn, Sc in next 25 St (25)
Round 27: Turn, *Sc 5, Dec* 3 times, Sc in last 4 St (22)
Round 28: Turn, Sc in next 22 St (22)
Round 29: Turn, *Sc 4, Dec* 3 times, Sc in last 4 St (19)
Round 30: Turn, Sc in next 19 St (19)
Round 31: Turn, *Sc 3, Dec* 3 times, Sc in last 4 St (16)
Round 32: Turn, Sc in next 16 St (16)
Round 33: Turn, *Sc 4, Dec* 2 times, Sc in last 4 St (14)
Round 34: Turn, *Sc 2, Dec* 3 times, Sc in last 2 St (11)
Round 35: Turn, *Dec* 5 times, Sc in last St (6)
Round 36: Turn, *Dec* 3 times. (3)
Finish off and weave in ends.
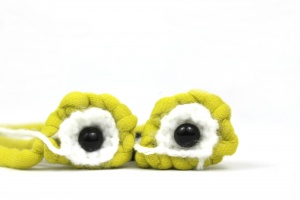
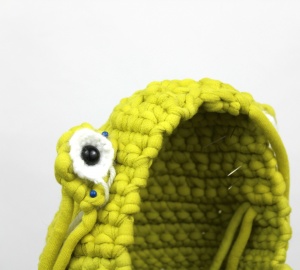
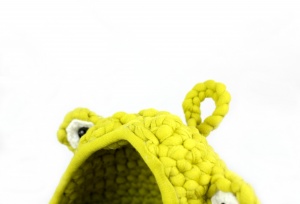
Eyelids: (Make 2)
In Color Green
Round 1: In Green, Ch 5.
Round 2: Turn, Sc in 2nd Ch from hook. Sc in next 3 St (4)
Round 3: Turn, Sc in next 4 St (4)
Round 4: Turn, Dec 2 times (2)
Finish off. Pin to the head.
Eyes: (Make 2)
In Color White
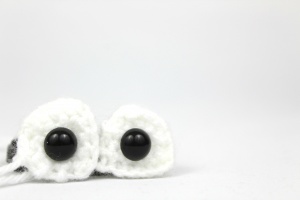
Round 1: In White, Ch 7.
Round 2: Turn, Sc in 2nd Ch from hook, Sc in next 5 St (6)
Round 3-5: Turn, Sc in next 6 St (6)
Round 6: Turn, Dec 1 time, Sc in next 2 st, Dec 1 time (4)
Round 7: Turn, Dec 2 times (2)
Finish off and weave in ends. Insert 12mm Safety Eye to the middle of the eye. Pin Eye to Eyelid. Sew on. Now pin each eye on the sides of the head.
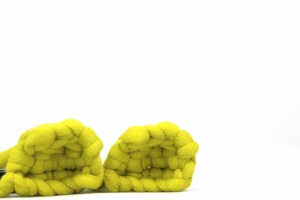
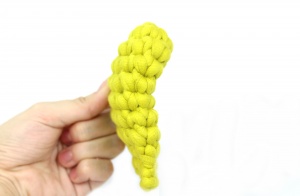
Arms: (Make 2)
In Color Green
Round 1: In Green, 6 Sc in Magic Ring (6)
Round 2: *Inc* all around (12)
Round 3-8: *Sc* all around (12)
Round 9: Line up each St. Sc aligned stitches together 6 times (6)

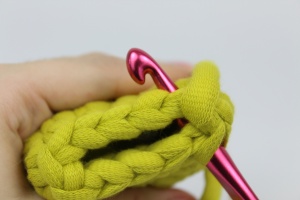

Round 10: Ch 1, Turn, Sc 2 in next St, Sc in next 5 St, Sc 2 in last St (8)
Finish off.
Legs: (Make 2)
In Color Green
Round 1: In Green, 6 Sc in Magic Ring (6)
Round 2: *Inc* all around (12)
Round 3-9: *Sc* all around (12)
Round 10: Line up each St. Sc aligned stitches together 6 times (6)
Round 11: Ch 1, Turn, Sc 2 in next St, Sc in next 5 St, Sc 2 in last St (8)
Finish off. Bend into a slight curved shape and pin to the body.
Handle:
In Color Green
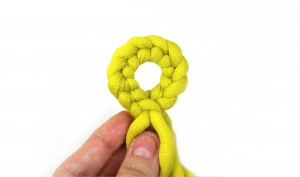
Round 1: Ch 10
Round 2: SlSt to first Ch. This closes the chain into a hole
Finish off. Sew to the top of the head, closer to the back.
Mouth:
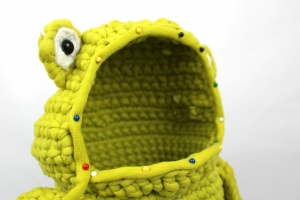
To complete, line the mouth with yarn so the lips look more realistic. Take a long piece of your bulky yarn and pin it along the entirety of the lips. Now get a glue gun or strong fabric glue and unpin each section slowly, lay down glue, then put yarn back to glued section. Repeat in small sections around the entire mouth.
 Yay! You’re all done! If you finished this pattern, I would be SO HAPPY if you upload a picture to the Ravelry project page, “try” it on Pinterest, or tag me on Instagram @StringyDingDing.


4 Comments
Quick point: in row 25, the actual stitch number does not match up with the sum total stitch in brackets at the end. Is there meant to be another decrease here or more sc in the middle?
Thanks Olive 🙂
I added 15 single crochets instead of 13 and it worked fine so I could finish the row. Then it added up to 25 stitches in that row.
How big is the finished product
My bottom of my frog is curving, this is bullshit.