 Pin this now!


Download the PDF for FREE! Click here to get the free PDF pattern
Hier is het PDF patroon in het Nederlands.
Supplies:
4mm crochet hook, 4/Medium weight yarn in any desired colors for your bear. White is required. 10mm safety eyes, tapestry needle, scissors, stuffing, black embroidery thread.
Additional Information:
Use “Main Color” as the main color you want your bear to be. “Contrasting Color” will be the color of your bears eyebrows, nose, and foot patch.
We start by making the head, which works into the body. Then we make the facial features. After assembling the face, we make the arms/legs and belly patch.
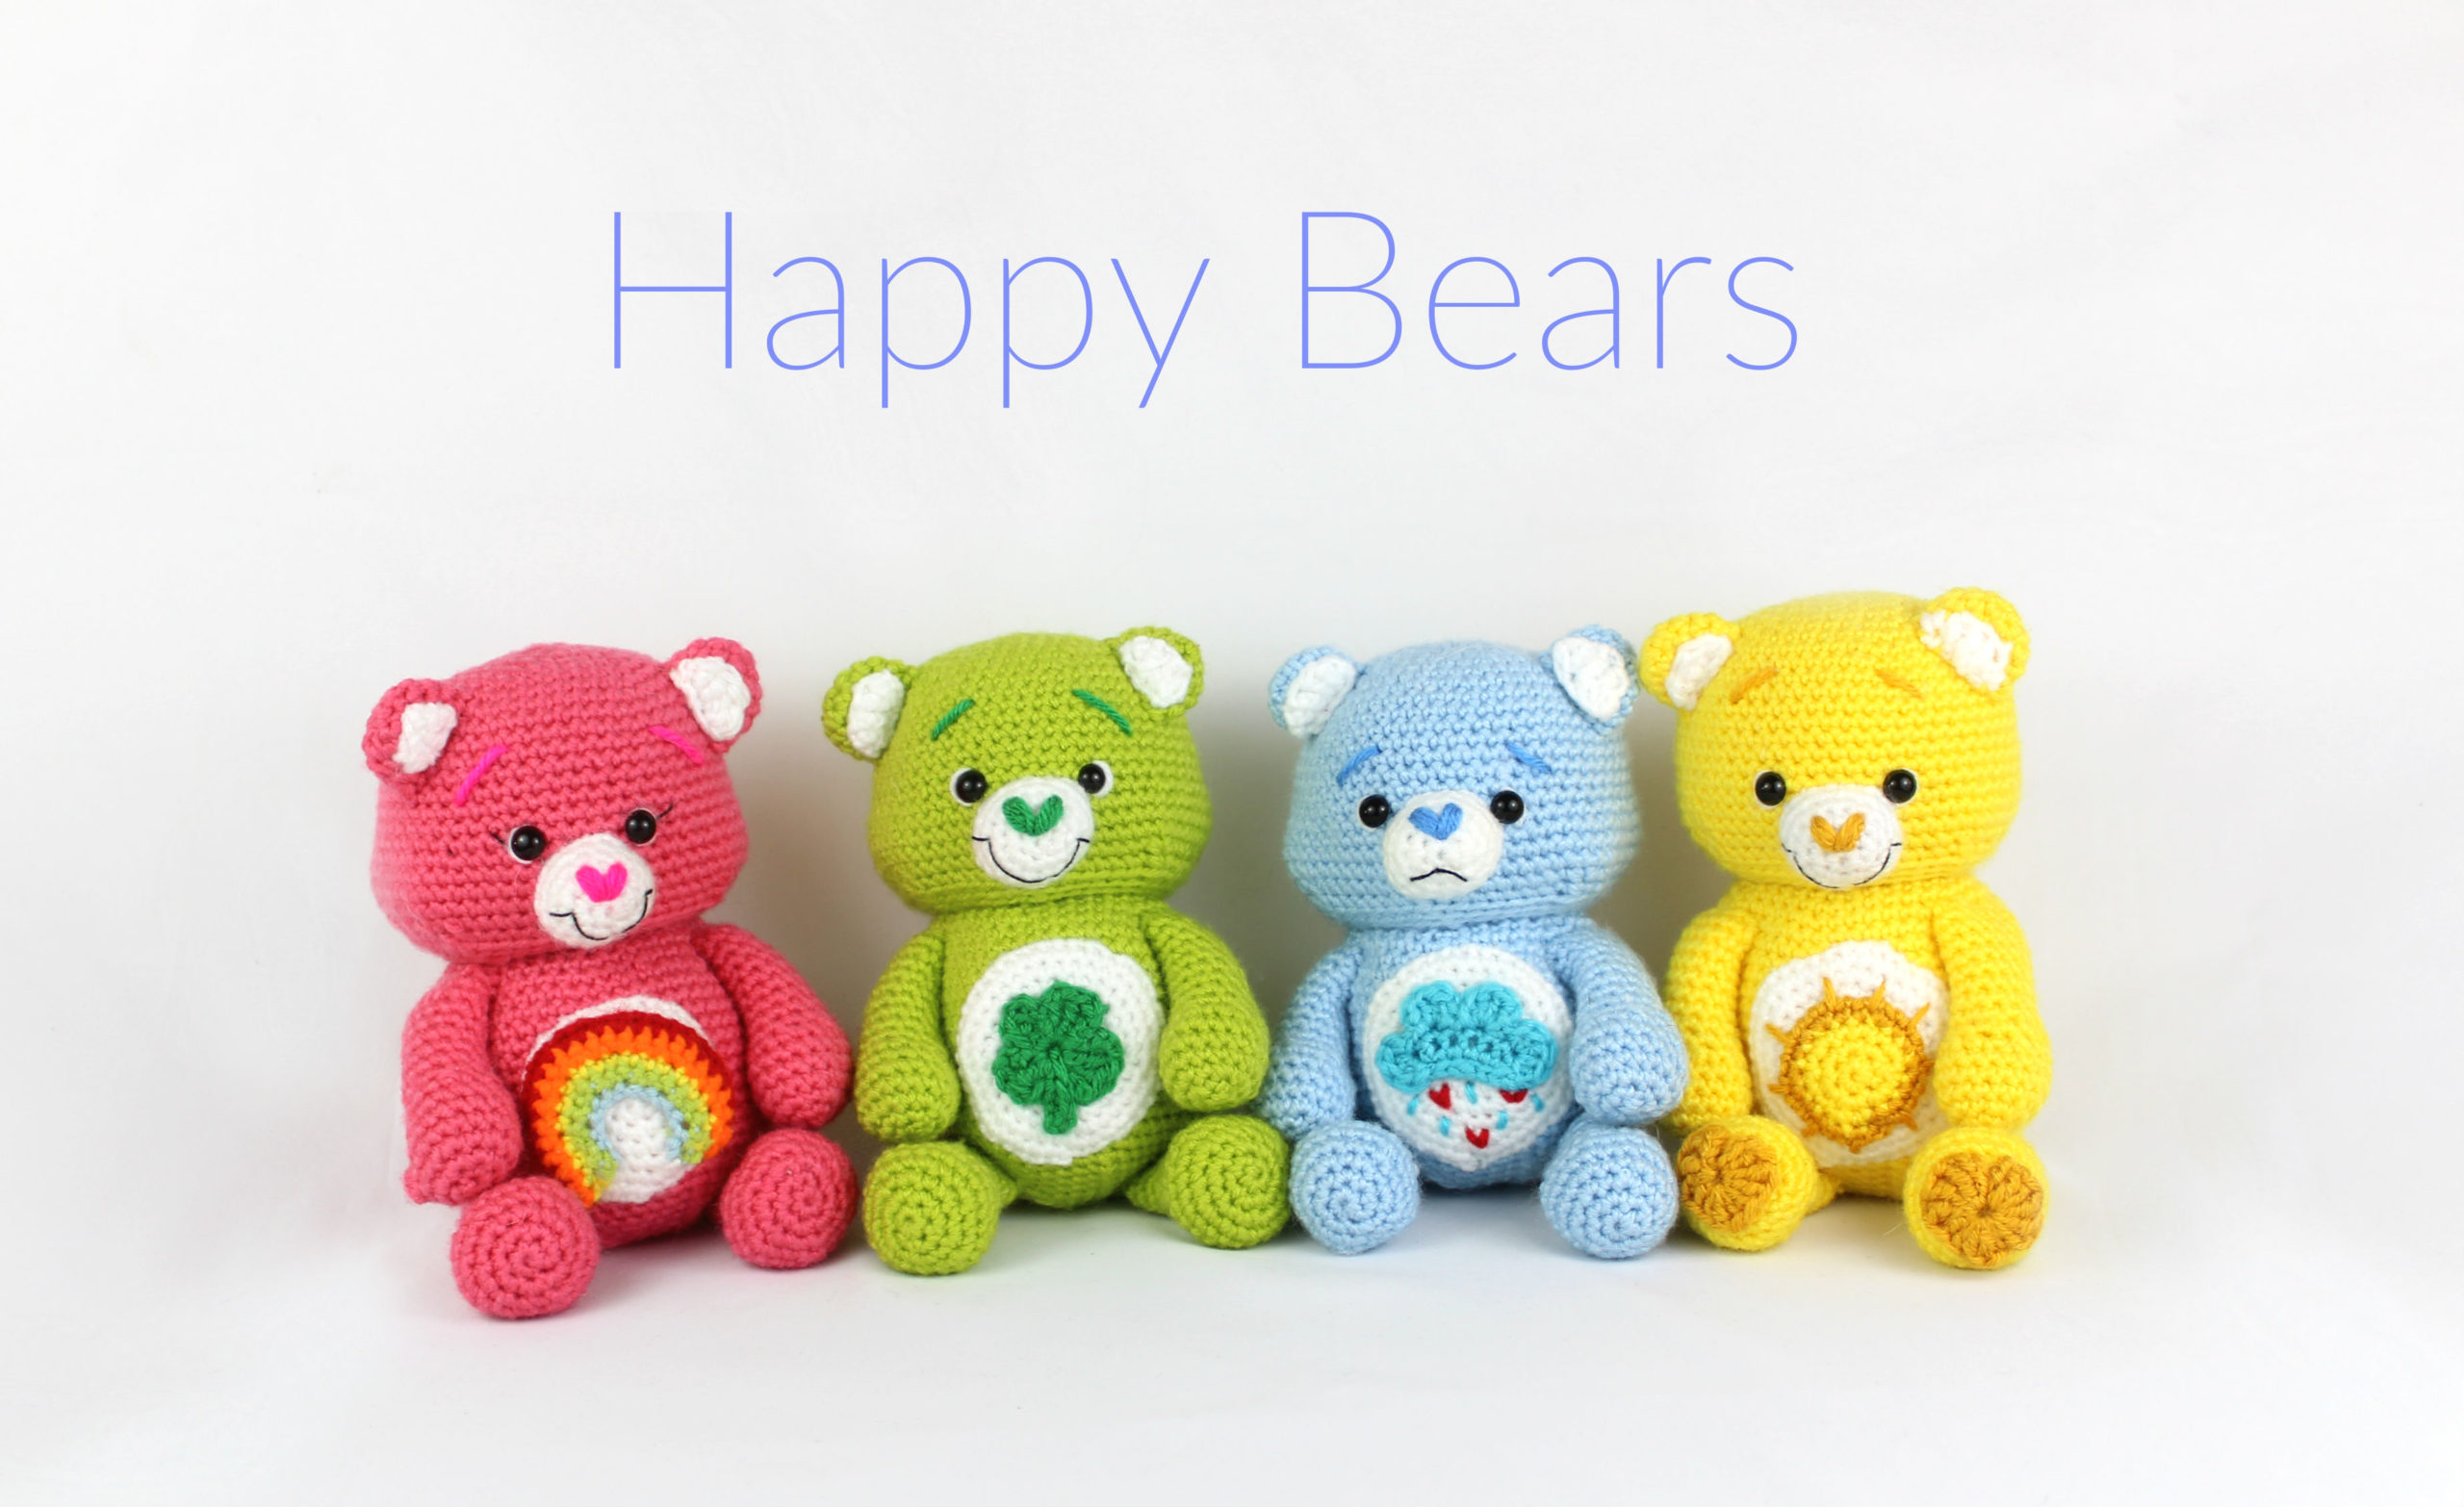
Bear Colors:
Sunshine Bear – Main color yellow, Contrasting color dark yellow
Rainbow Bear – Main color pink, Contrasting color hot pink
Lucky Bear – Main color light green, Contrasting color dark green
Raincloud Bear – Main color light blue, Contrasting color dark blue
![]()
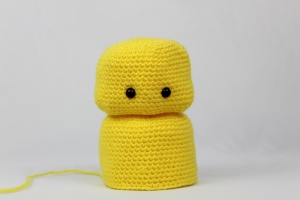
Head:
In Main Color
Head and body are one piece
Round 1: 6 Sc in Magic Ring (6)
Round 2: *Inc* all around (12)
Round 3: *Inc, Sc* all around (18)
Round 4: *Inc, 2 Sc* all around (24)
Round 5: *Inc, 3 Sc* all around (30)
Round 6: *Inc, 4 Sc* all around (36)
Round 7: *Inc, 5 Sc* all around (42)
Round 8: *Inc, 6 Sc* all around (48)
Round 9: *Inc, 7 Sc* all around (54)
Round 10-16: *Sc* all around (54)
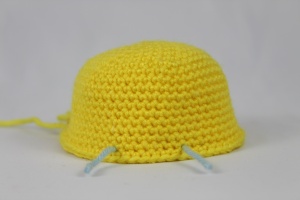
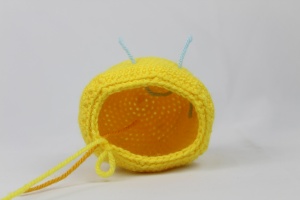
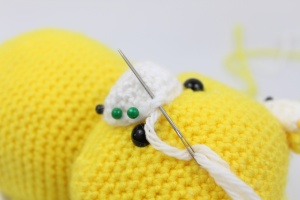
Round 17: Sc in next 15 st, Sc in next st and add different colored St marker to Sc just made. This marks the eye placement. Sc in next 6 st. Sc in next st. Add different colored St marker to Sc just made. Sc in next 31 st. (54)
Round 17 pictured below
Round 18: *Inc, Sc* 6 times, Sc in next 15 st, *Inc, Sc* 6 times, Sc in last 15 st. (66)
Round 19-21: *Sc* all around (66)
Round 22: *Dec, Sc* 6 times, Sc in next 15 st, *Dec, Sc* 6 times, Sc in last 15 st (54)
Add safety eyes in eye stitch markers.
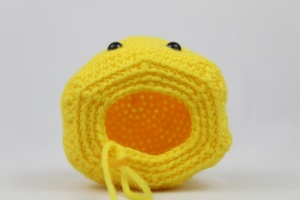
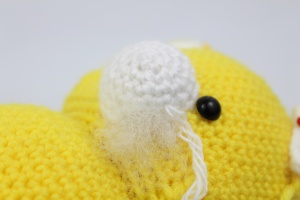
Round 23: *Dec, Sc 7* all around (48)
Round 23 pictured below
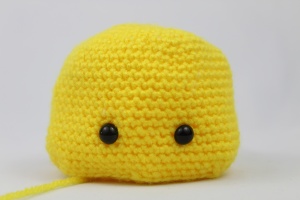
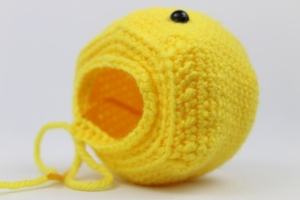
Round 24: In BLO (Back Loop Only) *Dec, Sc 6* all around (42).
Round 25: In BLO, *Dec, Sc 5* all around (36)
Round 26: In BLO, *Dec, Sc 4* all around (30)
Round 24-26 pictured below
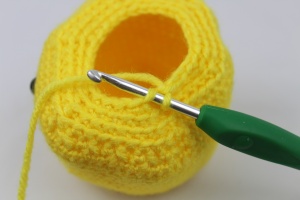
Round 27: In FLO (Front Loop Only), *Inc, Sc 4* all around (36)
Round 27 pictured below
Round 28: In BOTH Loops *Inc, Sc 5* all around (42)
Round 29: *Inc, Sc 6* all around (48)
Round 30: *Inc, Sc 7* all around (54)
Round 31-43: *Sc* all around (54)
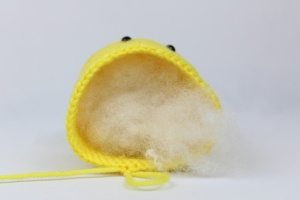
Stuff here. Stuff additional stuffing throughout decreasing.
Round 43 pictured below
Round 44: *Dec, Sc 7* all around (48)
Round 45: *Dec, Sc 6* all around (42)
Round 46: *Dec, Sc 5* all around (36)
Round 47: *Dec, Sc 4* all around (30)
Round 48: *Dec, Sc 3* all around (24)
Round 49: *Dec, Sc 2* all around (18)
Round 50: *Dec, Sc* all around (12)
Round 51: *Dec* all around (6)
Finish off and stuff any additional stuffing. Sew closed.
Face Pieces
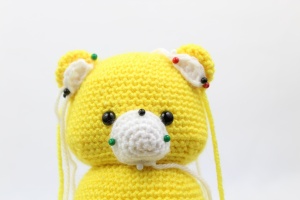
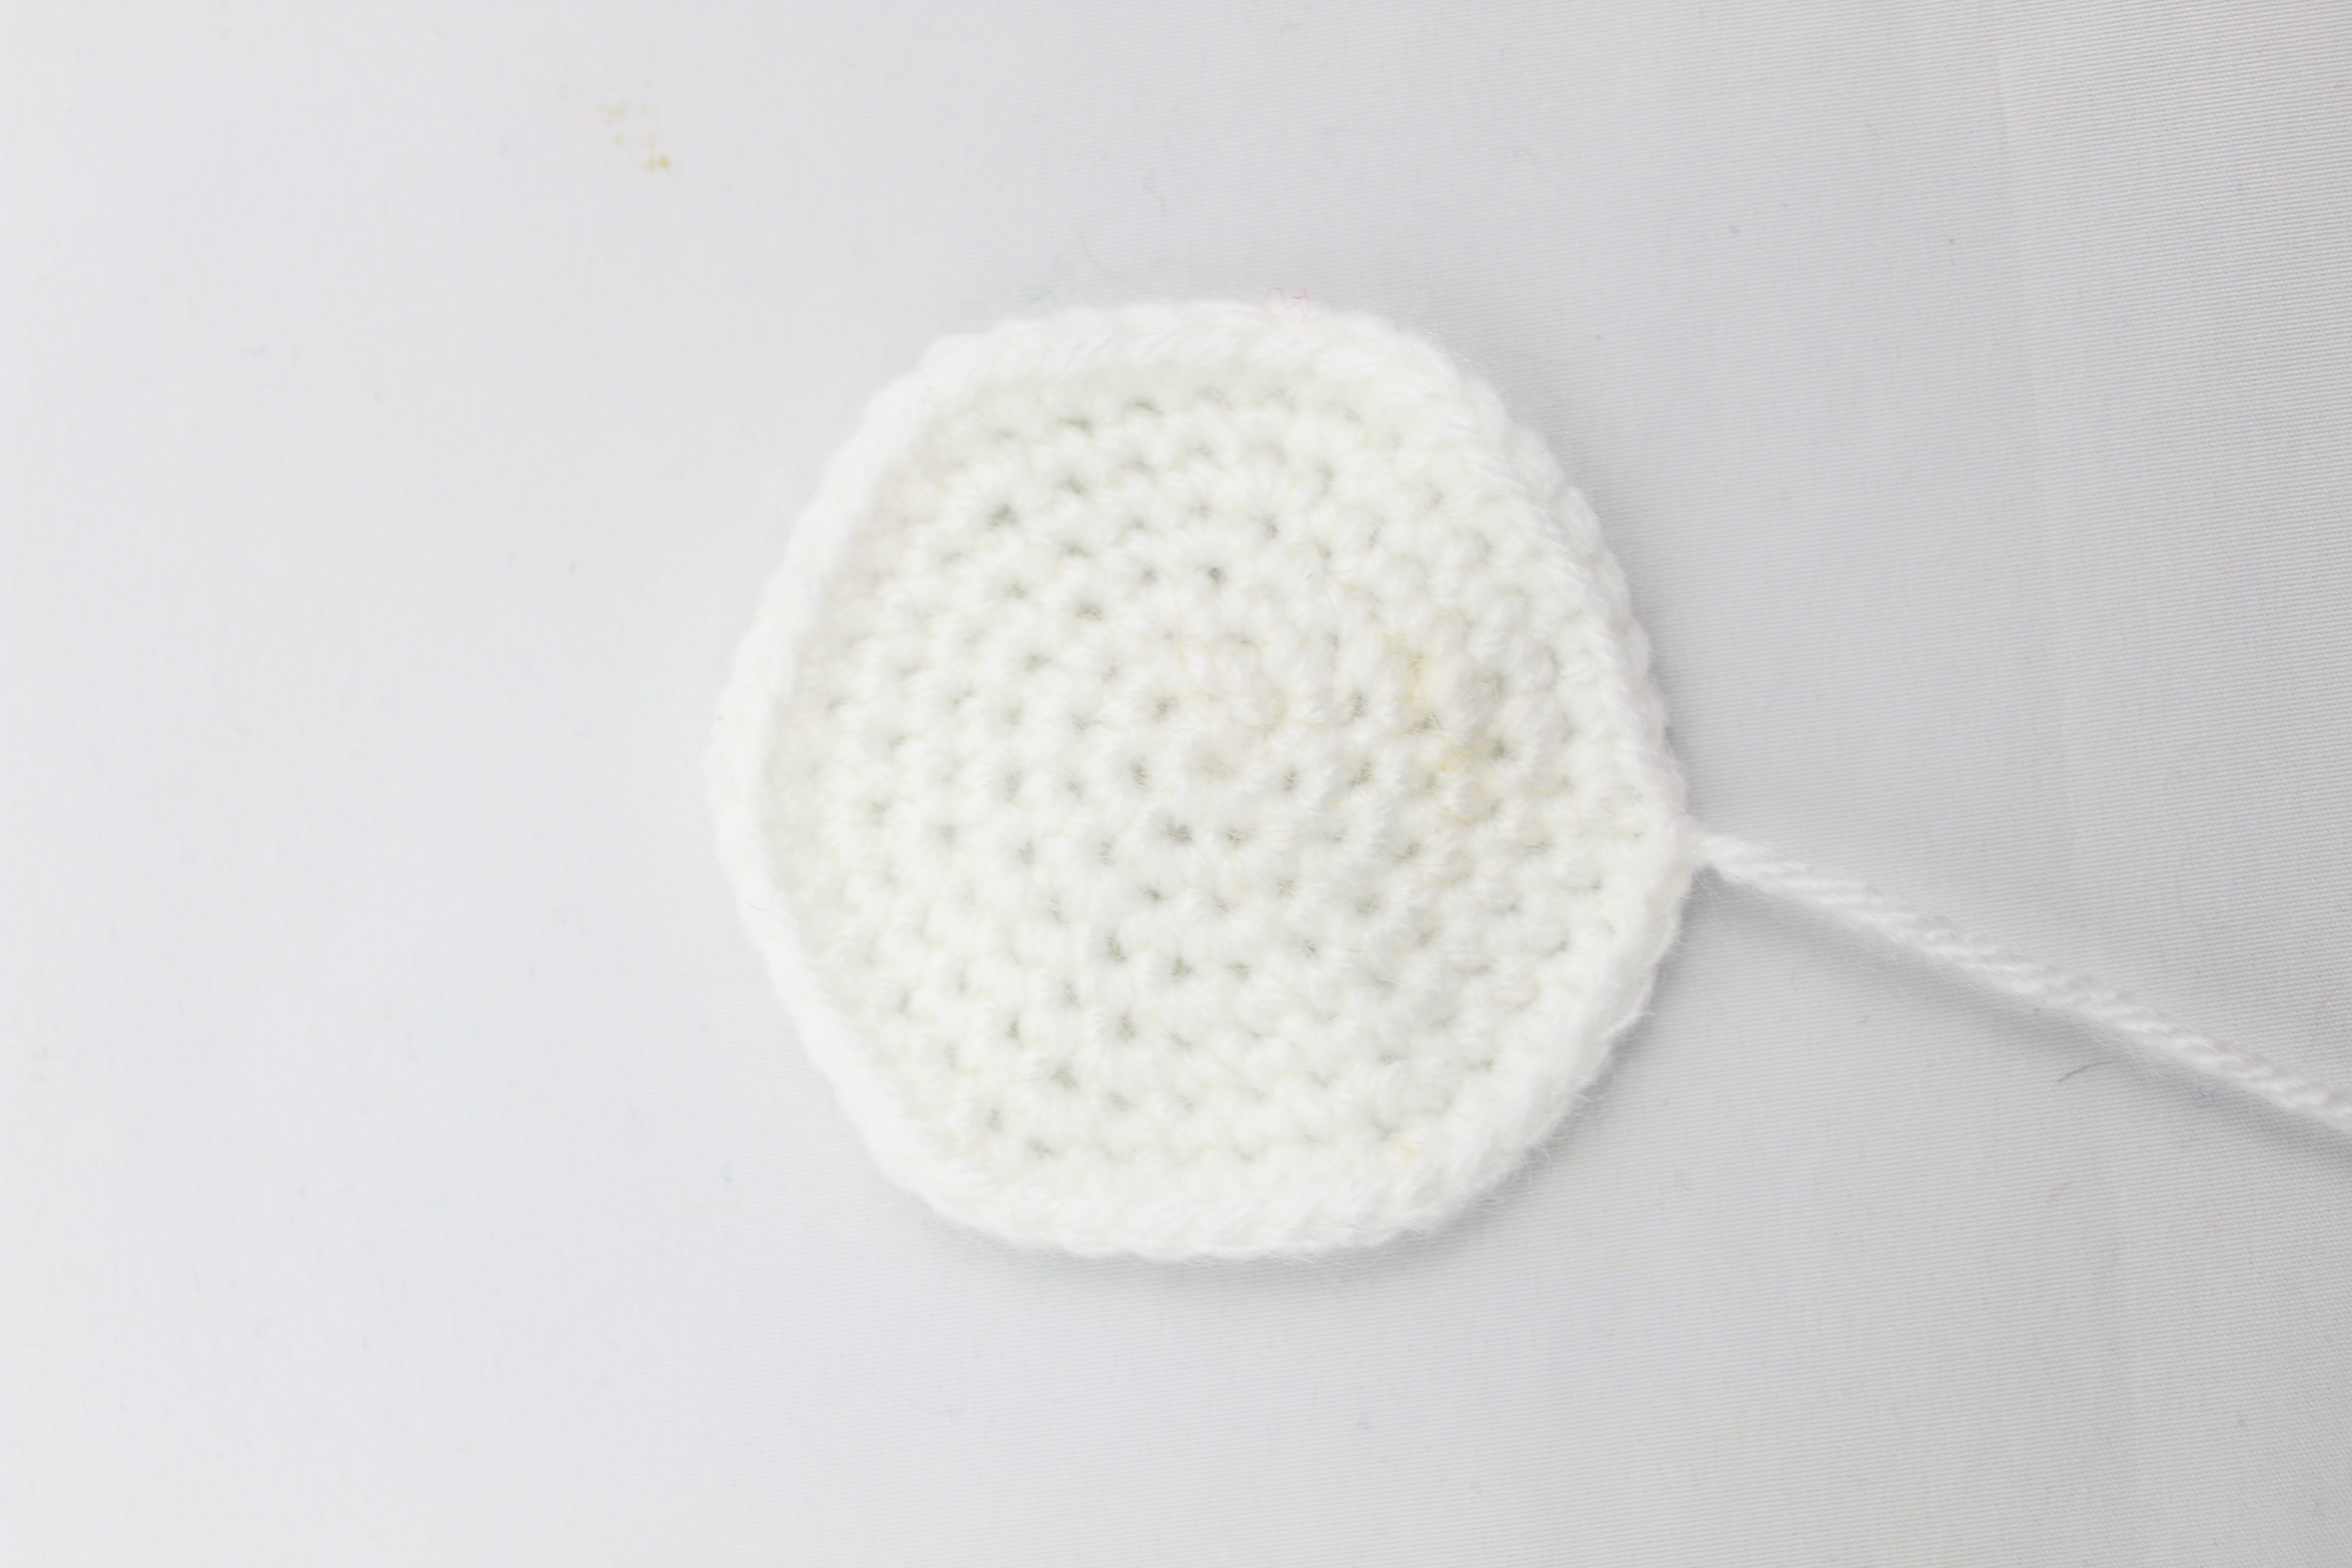
Muzzle:
In White
Round 1: In white, 6 Sc in Magic Ring (6)
Round 2: *Inc* all around (12)
Round 3: *Inc, Sc* all around (18)
Round 4-5: *Sc* all around (18)
Finish off and pin between the two eyes.
Ears: (Make 2)
In Main Color
Round 1: 6 Sc in Magic Ring (6)
Round 2: *Inc* all around (12)
Round 3-5: *Sc* all around (12)
Finish off.
Ear Patch: (Make 2)
In White
Round 1: In White, Ch 5. Turn, Dc in 2nd Ch from the hook. Trc in next 2 st, Dc in last st, Slst in same st. (4)
Finish off and sew to the ear. Now pin ears to the head.
Assembly:
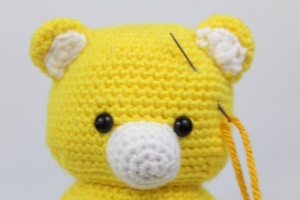
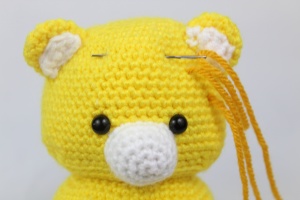
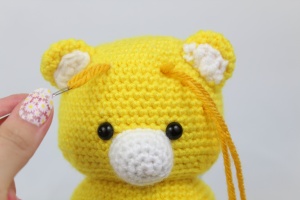
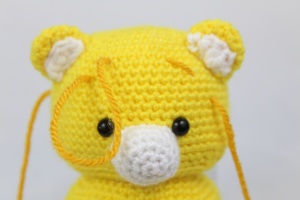
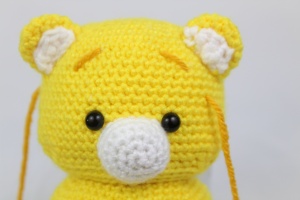
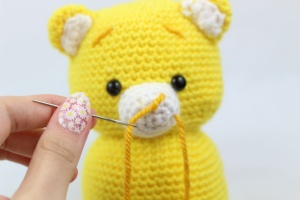
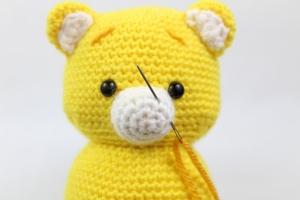
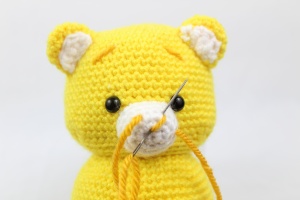
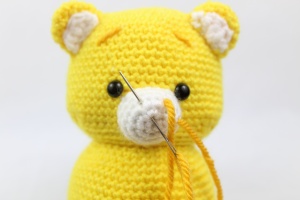
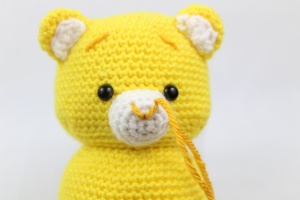
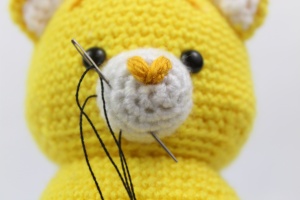
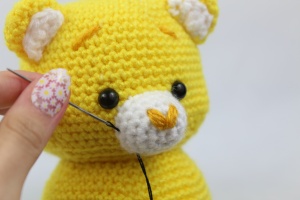
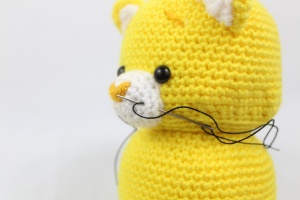
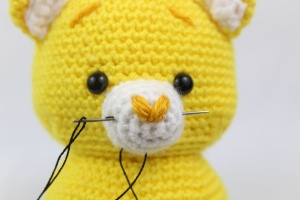
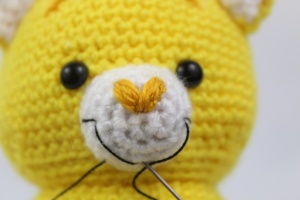
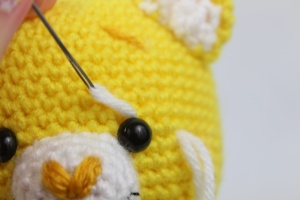
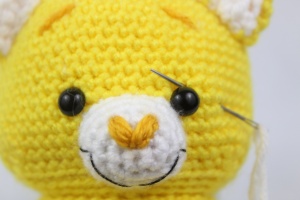
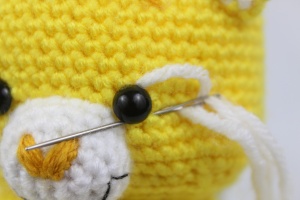
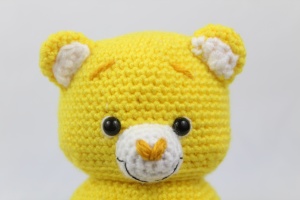
Sew on muzzle. Stuff nose before fully sewing shut. Sew ears onto head. Now sew on eyebrows. Sew on a heart shaped nose by going through the same two spots as shown. Sew on smile with black embroidery thread. Now line half the eye with white yarn. You can line the top half and the bottom half separately.
![]()
Muzzle:
![]()
Eyebrows:
![]()
Nose:
![]()
Smile:
![]()
Eyes:

![]()
Arms: (Make 2)
In Main Color
Round 1: In Main Color, 6 Sc in Magic Ring (6)
Round 2: *Inc* all around (12)
Round 3: *Inc, Sc* all around (18)
Round 4-6: *Sc* all around (18)
Round 7: *Dec, Sc* all around (12)
Round 8-16: *Sc* all around (12)
Finish off and stuff. Pin to the sides of the body.
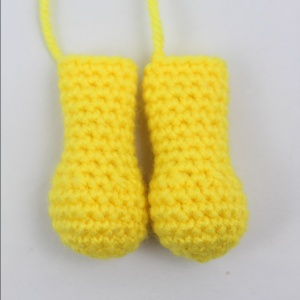
Legs: (Make 2)

In Main Color
Round 1: In Main Color, 6 Sc in Magic Ring (6)
Round 2: *Inc* all around (12)
Round 3: *Inc, Sc* all around (18)
Round 4: *Inc, 2 Sc* all around (24)
Round 5-6: *Sc* all around (24)
Round 7: *Dec, 2 Sc* all around (18)
Round 8: *Dec, Sc* all around (12)
Round 9-15: *Sc* all around (12)
Finish off and stuff. Pin to the bottom of the body.
Heart for Feet: (Optional – Make 2)
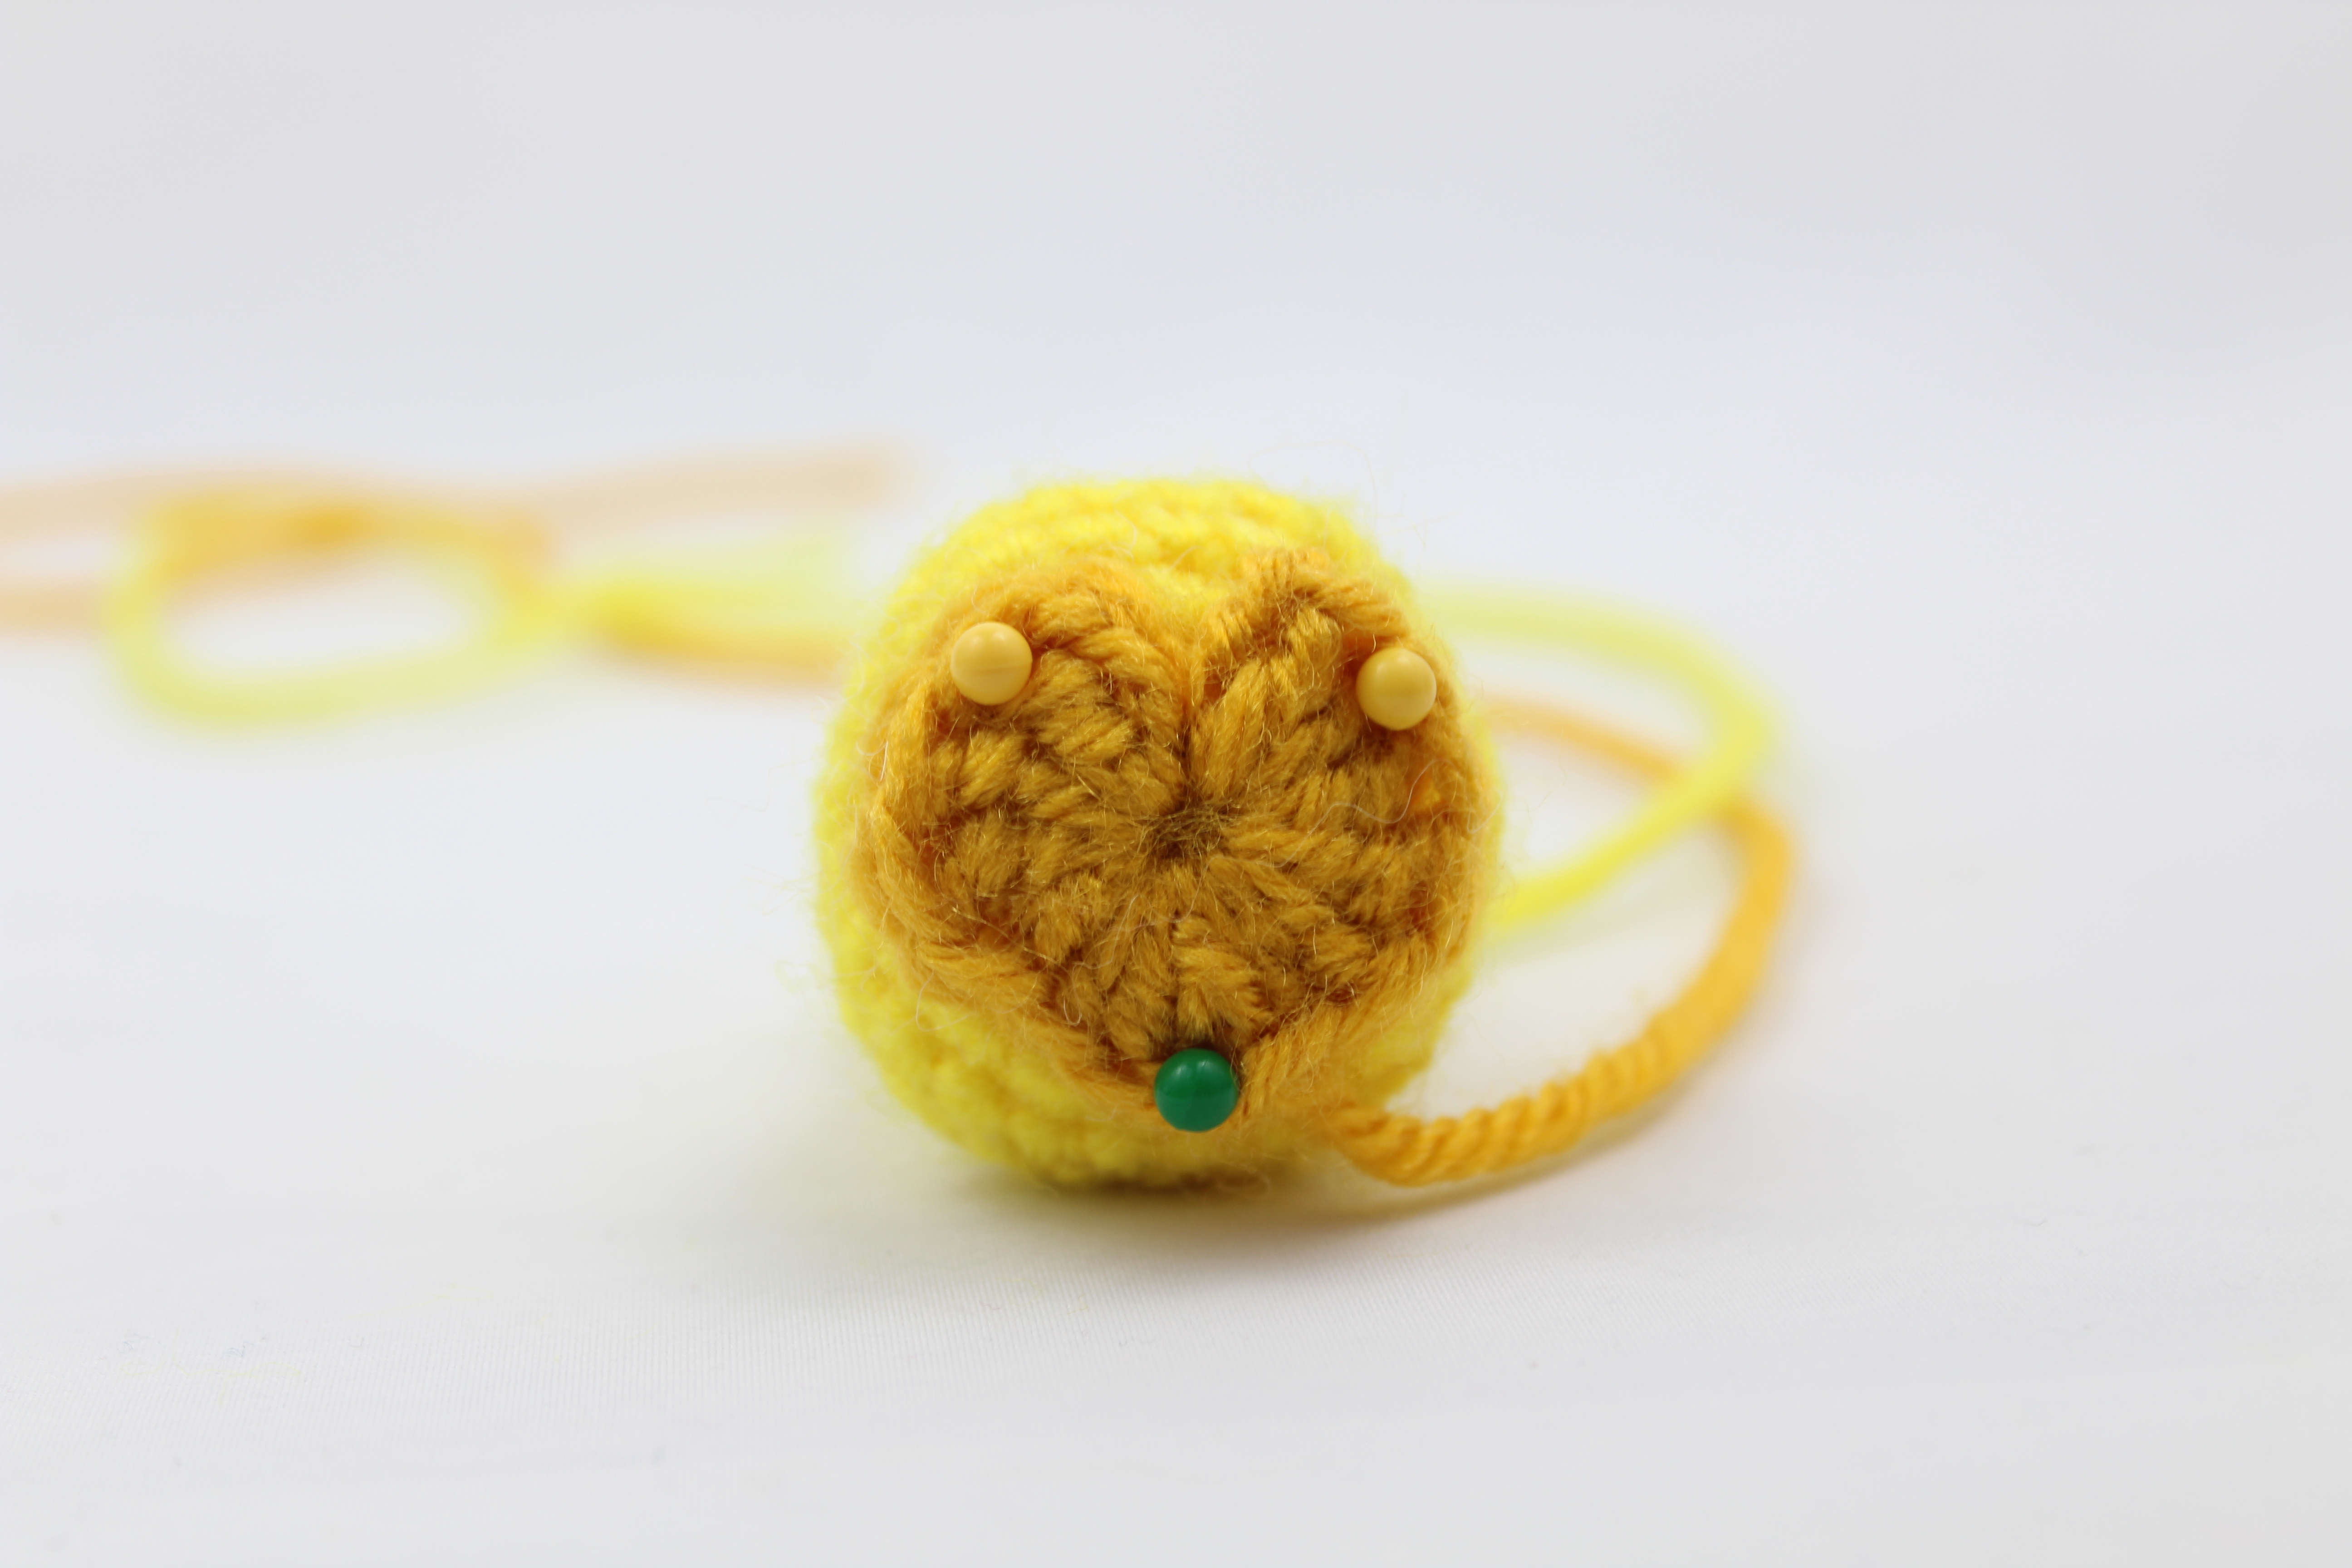
In Contrast Color
Round 1: In Contrast Color. Make a Magic Ring. Ch 3, Make 3 Trc in your Magic Ring. Dc 2 in Magic Ring. Trc 1, Dc 2, Trc 3. Pull string to shut. Ch 3 and SlSt into Magic Ring. Finish off and sew to the feet.
Body Assembly:
Sew legs and arms to the body.
Belly Patch:
In White
Round 1: In White, 6 Sc in Magic Ring (6)
Round 2: *Inc* all around (12)
Round 3: *Inc, Sc* all around (18)
Round 4: *Inc, 2 Sc* all around (24)
Round 5: *Inc, 3 Sc* all around (30)
Round 6: *Inc, 4 Sc* all around (36)
Round 7: *Inc, 5 Sc* all around (42)
Finish off and pin to the middle of the belly.
Rainbow Applique:
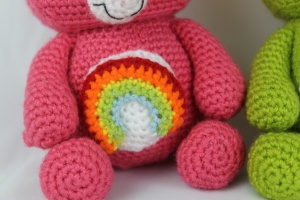
Round 1: In Blue, Ch 13.
Round 2: Switch to Green, Turn, Inc in 2nd ch from hook, Sc in next st. Repeat *Inc, Sc* 5 times (18)
Round 3: Switch to Yellow. Turn, Sc in next 18 st.
Round 4: Switch to Orange. Turn, *Inc, Sc 2* 6 times (24)
Round 5: Switch to Red. Turn, Sc in next 24 st. (24)
Finish off and pin to the Belly Patch. Now sew onto Belly Patch & Belly.
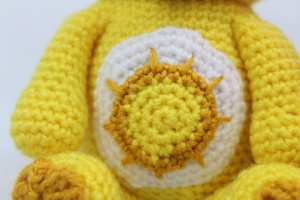
Sun Applique:
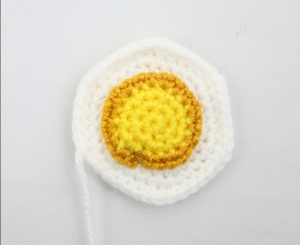
Round 1: In Bright Yellow, 6 Sc in Magic Ring (6)
Round 2: *Inc* all around (12)
Round 3: *Inc, Sc* all around (18)
Round 4: Switch to Dark Yellow. *Inc, 2 Sc* all around (24)
Finish off and pin to the Belly Patch. Sew on. Now sew on sun rays with Dark Yellow. Sew on sun’s smiley face if desired. Now sew on Belly.
Clover Applique
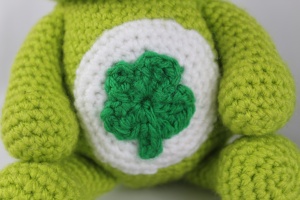
Round 1: In Dark Green, make a Magic Ring and working in the Magic Ring, Ch 3. Trc 3, Ch 3, and SlSt. Repeat *Ch 3, Trc 3, Ch 3, and SlSt* in Magic Ring 3 more times. Ch 4 and Sc in 2nd Ch from hook. Sc in next 2 Ch and slst to Magic Ring. Finish off. Now sew onto Belly Patch & Belly.
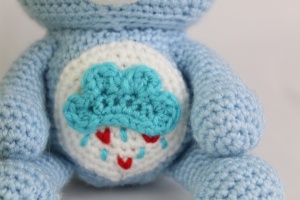
Raincloud Applique
Round 1: In Dark Blue, Ch 7. Sc in 2nd Ch from hook. Sc in next 5 St. Turn to the other side of the Ch. Sc in next 6 St. (12)
Round 2: *SlSt in next St. Dc 4 in same St, Slst in same St. SlSt in next st.* 4 times. SlSt in last 4 St. (28)
Finish off and sew to Belly Patch. In Dark Blue, sew small lines as raindrops below the cloud. In Red, sew small hearts with the raindrops. Now sew onto Belly Patch & Belly.
![]()
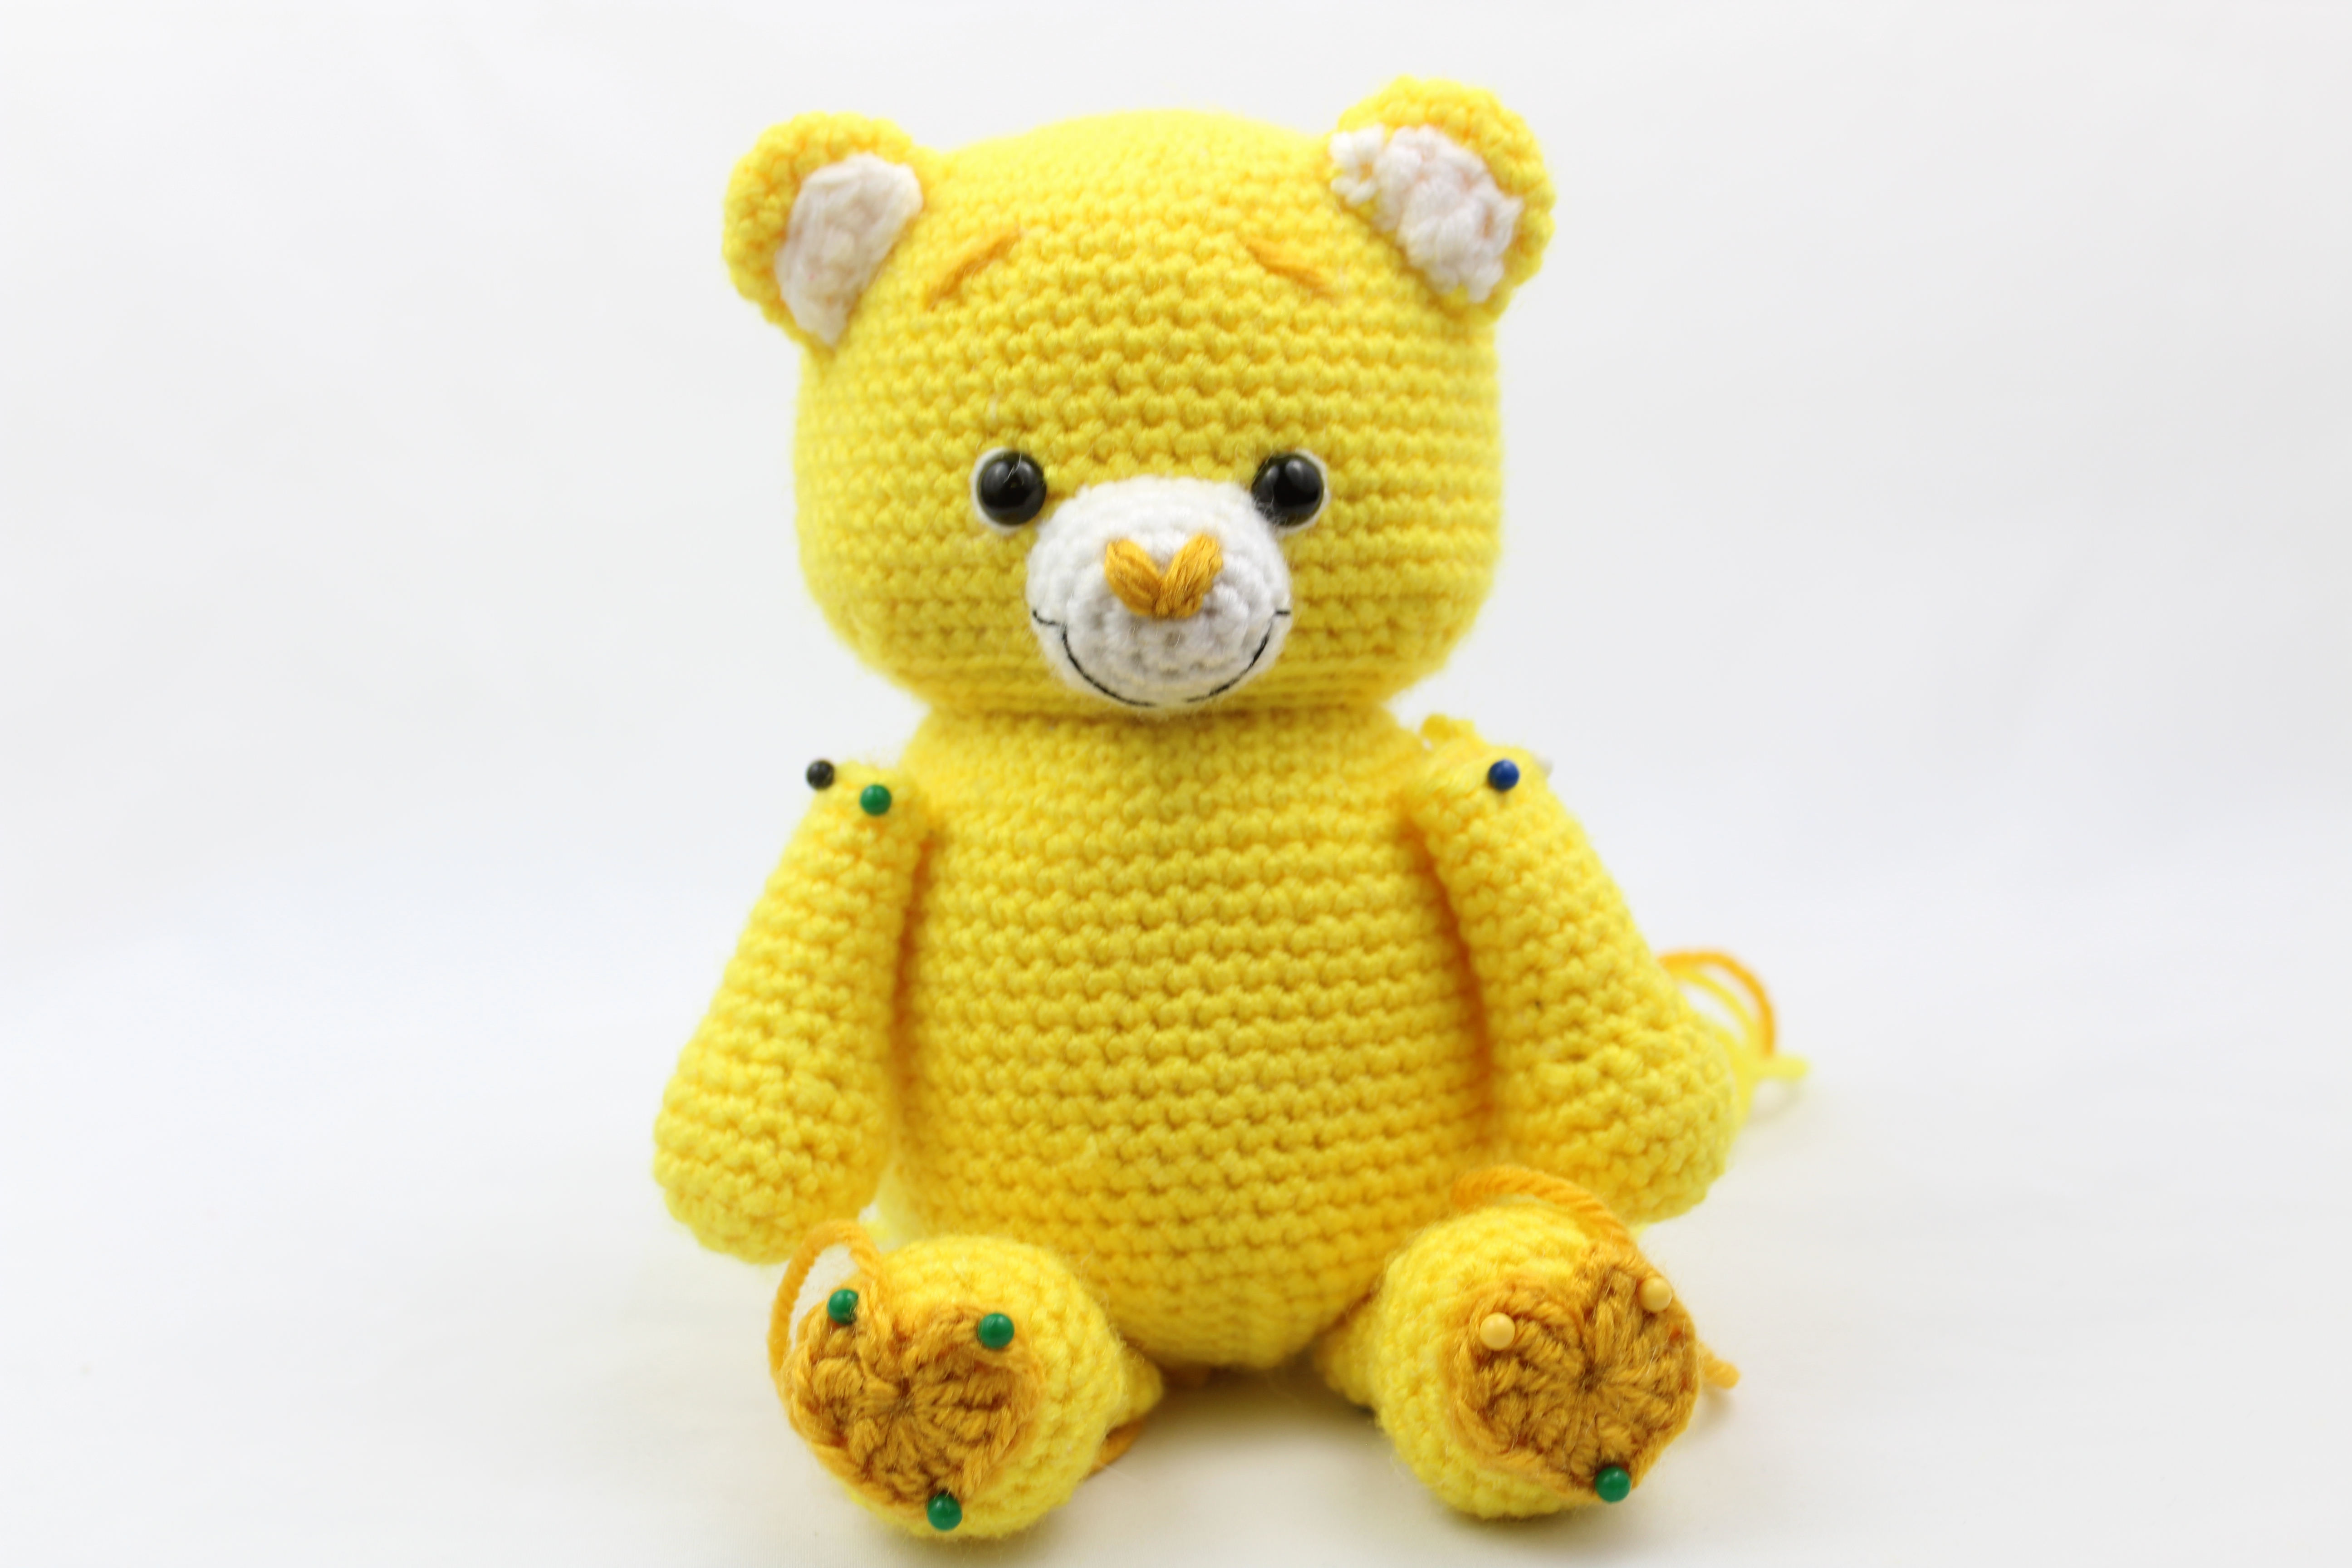
Now you’re done! If you made a bear, I would be SO HAPPY if you could upload a photo to the Ravelry project page, or tag me on Instagram @StringyDingDing, or “try” it on Pinterest!


90 Comments
Thank you for the clear information and pictures. They are very helpful.
Thank you Diane! I’m glad you find them helpful, I always try to make my patterns easy to understand 🙂
They are easy to understand, but to print off it is over 100 pages!
Hi there, if you’re interested in printing the pattern there’s a PDF I’ve made for this pattern – it’s very clean and well put together and comes to only 9 pages! And you can always redownload the PDF after purchase. You can click here to see the PDF shop listing and see if it’s something you’d be interested in. If you would like to learn why I charge to download a pattern PDF you can read this blog post I wrote. Thanks so much for your time and I would love to see if you crochet one of these bears! And feel free to let me know if you have any questions 🙂
Sono bellissime grazie
Just wondering what size they turn out to be?
Hi Carla,
With one sitting, I measured 5″ height and a little over 2″ width. I hope that helps!
Wow I must have done something wrong. My bear sitting turns out to be 11″ high. Not that I mind. Maybe I crochet looser. Thank you for these bears. They are very cute!
Haha oh no! I crochet more on the tighter side and use a 4mm hook, so that may be why we came out with different sizes 🙂 Maybe next time you can go down a hook size if you tend to crochet looser. I’m so glad you like the bear though! Have a great day <3
Hi.
I made the bear (loved it! Super cute) but mine is also much bigger. I have tight stitches, so I’m wondering what I did that’s wrong.
Thank you!
Hello, thank you so much for making this available to make. I’m still new to crochet and am still learning. I have made several amigurumi animals lately and have been very successful. I was wondering if you could please help me with step 18 for the head. Is it “inc every 6 sc ” or inc for 6 spaces” im a little confused how to add 12 additional sc. I appreciate any help you offer and thank you so very much for the opportunity to make this! Thanks
Hi Francis,
I’m so glad to hear you’ve started to make some amigurumis! That’s really awesome, especially to a newer crocheter.
For Round 18, it would actually be a little different from wheat you had in mind 🙂 You would Increase in the next stitch, then Sc in the next stitch. Repeat that sequence a total of 6 times. So, *Inc, Sc* 6 times means Inc, Sc. Inc, Sc. Inc, Sc. Inc, Sc. Inc, Sc. Inc, Sc. After you do *Increase in next Stitch, Sc in next Stitch* 6 times, Sc in the next 15 stitches. Now again repeat the *Inc, Sc* sequence 6 times, Sc in remaining 15 St. At this point you should be at the end of Round 18 and ready to start Round 19.
I hope that made sense! If not no worries, just let me know! I can explain another way. 🙂
These are amazing! Thank you so much for sharing the pattern. My daughter will go nuts! I gave her my care bear from childhood, and she adores it so much. I know these guys will bring her just as much joy.
Wow thank you so much! I think it’s really kind you want to make her one of the bears, I just know she would love that! You can personalize it for her with her favorite color and an applique of her favorite thing or her first letter of her name!
Thank you for such a kind comment, I really appreciate it! 🙂
What bran of yarn did you use I can’t seem to find the right colors.
Hi there,
For the pink bear I used an old skien with no band on it sadly. The closest color I could find to it is Red Heart With Love in color Bubblegum or Red Heart Super Saver in Hot Pink.
The green bear uses Big Twist in color Lime for the body, and I Love This Yarn in Jelly Bean for the eyebrows and clover.
The blue bear uses Red Heart Super Saver in Light Blue for the body and Super Saver Turqua for the eyebrows and cloud.
The yellow bear uses Red Heart Super Saver in Bright Yellow for the body and Super Saver Gold for the eyebrows and sun.
As for the white, I used Big Twist Value in color White.
I’m so sorry I couldn’t figure out the pink one, but that color I suggested should be fairly close! Please let me know if you have any questions and I’m more than happy to help 🙂
Thank you so much for sharing these favorite bears that my younger sisters grew up with, sorta.
I am a newer Crutcher, relearning. I am not following how to do the “Inc.” I think you are saying to stitch in the next chain stitch 4 or 6 stitches to increase the number of stitches in the row?
Am I correct? This is the only part that I have been confused on. The rest was so clear, I can’t believe how awesome you did with the designer and instructions.
Thank you again for all your wisdom and sharing.
Hi Annette,
Yay that’s so cool! I hope you can make her one of the bears 🙂 “Inc” means single crochet 2 times in the next stitch. So you will stitch only 2 stitches to increase. So for example Round 3 says “Inc, Sc”. This means Single crochet 2 times in the next stitch, single crochet once in the next stitch. You repeat that pattern until you meet your stitch marker at the end of the round.
Which Round are you on? I can help you with the specific Round you’re on if you need!
These are the cutest bears!! I am planning on making one or 2 for my grandson. I would love to make them bigger though. Big enough he can have them as his buddies. Do you have any ideas?
Hi Staci,
Thank you! That would be so cute, there are actually a few things you can do! It depend on how much bigger you would like the bears. If you want them slightly bigger, just use a 5mm hook.
If you would like them jumbo, you can use a 6mm hook (or a little bigger of a hook if you prefer) and hold 3 skeins of yarn together (technically 3 strands of yarn together) and crochet with the 3 skeins as if it was only 1 skein. This way each stitch will be bigger, and the hook will make the stitches bigger as well. You can use all 3 of the same color, or if you want a multicolor bear you can use 3 different colors. I’m not too sure if they will come out around his size, but with that method you can at least get them pretty big!
One other way is you can use Bernat baby yarn and the recommended hook size on the band. This will make them kind of puffy and soft, and bigger as well. I think if I were to pick from all 3 of these methods, I would try the second method I suggested 🙂 It will look closest to the bears in the pictures, while being bigger.
Please let me know if you try this! I really hope it works out for you 🙂
Hi I would like to say how much I like your patterns. I haven’t been doing amigurumi very long but I have been crocheting since I was seven. Ism enjoying making your toys and would like to know if we would be aloud to sell them with your name and where we got the pattern from?
Hi Karen,
That’s so great that you’re starting to make amigurumi! The past few years it seems as if amigurumi has become pretty popular in the crochet world, so I’m really glad you’re making some 🙂
Yes, you are completely allowed to sell anything you make from my patterns! The only thing I don’t allow is selling the written pattern. But anything you make from my patterns you can sell. I hope that makes sense haha, thank you for your question!
Thank you for this pattern it’s very detailed they are beautiful thank you
Thank you so much! I’m really happy you like the pattern 🙂
I was just wondering if these were worked in the round or if there is a join.
Hi there, these are worked in a round!
Does this mean you don’t close each round?
The only issue I have with the pattern is I’m not sure if I close my rounds or go in a spiral
I have crocheted for years, but never by following a pattern. This is my 1st by doing so. My daughter loves blue and yellow as well as stars. I can clearly understand your pattern and I greatly appreciate you having shared it.
Hopefully this pic uploads, but pic of my progress. Just have to sew on the legs and arms, then add details.
Got it finished. Absolutely love it
Got it finished now. It is too cute.
Thank you so much for this patten. It is amazing out well written it is! It is so much appreciated!! 🙂
Yay you are so nice! Your words mean so much <3 Thank you and I'm so happy you like the pattern!
Hello! Sorry for my bad English. Just wanna tell you that I LOVE these little bears. When I’m done, I’m gonna give them to my niece who loves the Care Bears.
I also have a question, which row do you attach the ears? Mine looks weird and the two doesn’t match ://
Thanks again <333 Love from Sweden
Hi there! You have great English, so no worries! I’m so glad you enjoy the pattern and it’s so great to hear you will be gifting them to your niece 🙂
So for the ears, I attach the top part of the ear on Round 14, then the bottom part of the ear on Round 18. I slightly tilt the ear to the left for the left ear and tilt the ear slightly to the right for the right ear. I hope this helps you out! Please let me know if I can help you out some more! Thanks so much <3
Hi I’m a new crocheter. This is my first stuffed animal. On found 24 to 26 you just say it’s picture d . Do you just sc those rounds cause I I don’t think I should dec anymore.
Hi there! I think it’s awesome that you’re crocheting your first stuffed animal 🙂 So for the Body of Round 24-26, there is the written instructions as well as the photos below the instructions showing you what the Rounds look like after completing. Follow the decrease instructions in those 24-26 rounds, or else the rest of the pattern won’t add up 🙁 After Round 26, we will start to increase again, which will make the body. Here are Rounds 24-26 for reference:
Round 24: In BLO (Back Loop Only) *Dec, Sc 6* all around (42).
Round 25: In BLO, *Dec, Sc 5* all around (36)
Round 26: In BLO, *Dec, Sc 4* all around (30)
I hope this helps! Please let me know if you have any more questions 🙂
Hello!! Thank you sooo much for this pattern!!! I am new to crochet, and have started making amigurumi. 😍 I love it!! Your pattern is by far one of the best I’ve tried!! I just have a question, I’m having a hard time finding 10mm eyes in stores near me… All I can find are 9mm and 12mm… Which would be better?? Thank you sooo much again!!
Hi! Wow that’s really great to hear, I’m really happy you’re making amigurumi 🙂 I’m so glad and honored you said my pattern is one of the best, thank you so much <3 If all you can find are 9mm and 12mm, I think picking 9mm would be better. Please feel free to let me know if I can help you further. Happy crocheting and good luck on your amigurumi!
If I use Bernat blanket yarn, how much yarn would I need? Will 2 skeins be enough? Need to purchase and looking for quantity
Hi, I think 2 skeins would be enough for 1 bear. The blanket yarn tends to run out pretty fast so be safe and get 2 skeins 🙂
Thank you
I really love this website.
I’m so happy to hear that Cynthia 🙂 Please check back soon for more patterns!
hi new to it all when u say 2 sc inc then the next is sc in and so on so is it sc,then 2sc and 1 sc 2sc which add up to 24
Hi Mandy, so it would be “Two single crochet in the next stitch aka increase, single crochet one in the next two stitches”, and you do this pattern the entire round, which would be a total of 6 times. The number of stitches at the end of this round is 24 🙂 Please let me know if you have any questions!
Hei! Wishes from Finland. 🙋
These bears look so cute I decided to make one. But as always, I did it on my own way. 😃 My bear is without arms & legs now. Continuing my project. But could you “translate” me meaning of the pattern of those cute hearts for legs. Meaning: What are Ch, Trc, Dc? Thank you😃
Hi Sari!! Haha it’s fun to make a crochet pattern in your own way! I think Finland is so beautiful by the way <3 So for the stitches, here is what they mean:
Ch - Chain - Ketjusilmukka
Trc - Triple Crochet - Kaksoispylvas
Dc - Double Crochet -Kolmoispylvas
I hope that makes sense and can help! If you have any questions please let me know 🙂
Hi thank you for this pattern. I really enjoyed crocheting it. However I’m now stuck on putting the face together.
Im unsure on how to do the eyebrows. From the picture it looks like you go in the cheek and out above the eye, back in a cross the top and out above the other eye, down towards the eye and back out the cheek. But how do you secure the eyebrows in place? Or will they just stay there? Thanks
Hi Hannah, I’m glad you enjoy this pattern! You’d be correct on how to do the eyebrows. I see your question about how to secure them. So we will have two tails of yarn you have from putting the eyebrows in. Tie a very firm knot with each tail. Now pull the tail inside the head and they will secure!
Thank you very much for your easy to understand pattern.
Thanks so much for your kind comment Cabbie! I’m so happy that you find the pattern easy to understand 🙂
Hey, I was looking for a pattern for these for a long time. Found some, but this looks really good. Am definitely going to make these Care Bears. Loved the cartoons too🥰🥰🥰🥰.
Thank you so very much! I’m really happy you like them ❤️ Please let me know if you have any questions 🙂
Haha love it I did have a knitted pattern but it got lost
Hi Jenny! Oh my goodness those are SUPER adorable 😍 I love them so much ❤️ The pink one is especially adorable because I love how you did her hearts 🙂 I’m sure knitting them they would come out just as cute!
Loved making these care Bears done 2 new ones too . My grandkids will love them
Wow!!! They all look so amazing, I want one 😆 I know your grandkids will love them because the bears you made are so CUTE! My favorite has to the the white one with the snowflake 🙂 Thank you so much for sharing, this totally made my day 😍
Do you know how much yarn this pattern needs? I’m using Red Heart Super Saver Multis with a 5.0 mm hook, as I don’t have a 4.0mm. I’m really happy with how it’s turning out so far, but I’m scared I’ll run out of yarn.
Hi there! I’m not sure how much this pattern needs unfortunately 🙁 I never measure yarn usage, sorry about that! I should though! I think you will have enoug with a 5mm hook since it isn’t a huge difference 🙂 Please let me know if I can help answer any questions ❤️
Love this pattern! Worked up really nicely for me and super easy to follow!
Oh my gosh he came out SO CUTE! 😍 Awww your bear looks adorable, even if he is sad! Thank you so much for sharing a picture, this made my day! You have a talent for crochet for sure 🥰❤️
Made the yellow happy bear for my four year old. She is so excited
Hi I love these bears, I’m quite new to doing things like this. Just one question so far…I’m on the head part and I’m a little confused at the term dec sc 7 all around. Does this mean I do them all at the same time as dec the a sc then dec then a sc etc or do i have to dec then so many sc then dec again. Hope you get what I mean…I’m slightly confusing myself lol. Thank you.
Hi there, Jo! Thank you for your question, I hope I can help with this 🙂
First, we see these *stars*. Anytime we see stars, we must repeat the stitches inside them for the stated amount of times. So it says *Dec, Sc 7* all around.
So we will repeat *Make 1 decrease stitch, Single crochet 1 time in the next 7 stitches*. Repeat this all around until we meet the stitch marker.
Decrease, Single crochet in the next 7 stitches. Decrease, Single crochet in the next 7 stitches. Decrease, Single crochet in the next 7 stitches. Etc!
This will also apply for the following rounds, like *Dec, Sc 6* all around!
I hope this was able to help! Please let me know if I can help with anything else, I’m always happy to clarify anything! ❤️ 🙂
Hi, im super excited to see how these turn out! I have done all the separate pieces for the bear but am unsure how to attach them without the yarn being visible. Also, how do you get the eye brows, mouth etc. To stay in place and hide the excess string so well?
Thank you so much ❤💛💚💙
Oh, and I must ask! Will you ever do patches for other bears? I would love to make more of them if not all. But I am a very follow the instructions person and NEED a pattern to follow lol
Hi there, Brea!
I think it’s so exciting that you’re almost done with your bears! You have a great question when it comes to sewing. I’ll try to explain what I do, apologies if it’s confusing!
First, make sure your toy limb (arm/leg) is pinned onto the bear where you want it. This will really help you keep it in place, resulting in it being stitches on tighter and cleaner. After this, I place the long tail of yarn we left from the arm onto a sewing needle. Now we will start sewing, insert your needle into the bear using a stitch closest to the tail end of yarn (Pic 1), and pull your needle out right under the next stitch of the limb (Pic 2). Your yarn will now be under the first stitch of the arm (Pic 3). Insert your needle into the stitch of the arm (Pic 4) and pull the yarn through (Pic 5).
Repeat the process of:
1. Inserting your needle into a needle into the stitch of the bear’s body we just went through
2. Pulling the needle out to under the next stitch of the bear’s arm
3. Inserting the needle through that arm stitch. Pull the yarn through.
Your sewing yarn will still be visible, but much less so because this method sews things together very closely that there’s little room to see the yarn sewing it together 🙂 I hope this could help!
As for getting the eyebrows, mouth, and such to stay in place and hide the yarn, I have another method! Once you sew it to your desired areas, take the tail end of yarn and tie it into a firm knot, when you tie this knot be sure to lead it very closesly to the toy’s surface. Tie a knot in the same spot a few times until it becomes a larger knot. After you do this, insert your hook into your crochet toy and pull your hook tip out right into the area where you made the knot. Yarn over your crochet hook with the remaining tail end of yarn we used to make the knot, then pull your crochet hook into your bear. This will bring the knot into the bear and hide the knot, while also firmly securing the eyebrows/mouth! You may have excess yarn from the “knot string”, cut any excess yarn.
I would love to do patches for other bears, but I had a tough time making the four patches LOL! But I know what you can do if you want other patches 🙂 Look up “crochet applique patterns” and you will find tons of patterns that will be suitable to belly patches. There’s tons to choose from, so fair warning, it may be hard to decide which one to use!
I hope I was able to help. If there’s any part I can clarify, please let me know, I’m always happy to help! 🙂
Olive
I’ve just finch this one, I love it. Thank you very much for the clear instruction
Hi, I have the original “care bear” pattern and I just come across your pattern. I have now tried both. Your pattern is a little different and much easier to follow. Thank you for that. I am 78 and I crochet to keep my hands busy and for my mind to keep it sharp. Reading and following a pattern is not a challenge any more. I will try to remember to send you pics.
Thank you so much for this pattern. I really enjoyed making Grumpy Bear
Does this mean you don’t close each round?
The only issue I have with the pattern is I’m not sure if I close my rounds or go in a spiral
I didn’t do so well on the smile but I used your pattern to make my daughter a bear for her high-school graduation present. Thanks for helping me give her a smile.
My first attempt using this pattern. I don’t have safety eyes (yet) but I will definitely be using this again! I love it so much I wanna cry.
Loved making these! They took quite a long time, as there’s a lot of detail but they turned out cute!
had so much fun making these! 🙂 thanks so much!
Hello!
I love this pattern! Has anyone tried making care bear cousins? Or made a pattern for it? Please advise.
I took some creative freedom for the belly patch but great pattern thank you!
Hallo 🙂
My English isnt so good 🙈 hope you Can read what I mean.
I just find your pattern and want to crochet one of this sweet bears. But is it cotton yarn 8/4, or another yarn?
Is there anyone who have crochet one of this bears in cotton yarn 8/4, and how much yarn? And how big in cm??
I love your pattern 🥰
It definitely turned out bigger than what was mentioned in the comments, but I think it still looks pretty cute! Thanks!
I would love to make these bears but I am not allowed to print them out. It makes it easier to for me to show which row I am on.
This Crochet Pattern is absolute Amazing!! Here is my Work with your Pattern. Thank you!!!
I just started crocheting 5 weeks ago, so very much a beginner. I used super chunky yarn and a 8mm hook which I knew would make this bigger, but didn’t realize how much bigger! Beginner lesson learned. Sitting it’s about 12” tall. I know there are a lot of little mistakes throughout my piece, but overall I am happy with how it turned out. Thank you for making the pattern so well written and easy to follow!
HI I downloaded this pattern I see head,muzzle, ears and ear patch arms and legs but where is the body pattern?? have i missed something, i havent started the pattern yet. just dont want to start and not be able to finish
It’s in the applique section ! I hope this helped !
I absolutely loved completing this project. It was so easy, thank you so much!
Anyone else have teouble finding the body part of the pattern? I don’t see it anywhere here… I’m already deep into the head and arms and legs!
I am making this bear and am confused as to how many skeins of yarn are meeded. It says 4/medium weight yarn. Does that mean 4 skeins of yarn?
Can’t wait to make the sunshine bear for my new gr-grandaughter. Thank you!
I was enjoying the pattern ubtil I hit the wall off not positioning instructions. I made all the parts holding off thinking the assembly notes would include this but there are no positioning notes only pictures with bad angles for showing positions so that will be wonky.
Also following the i structions I had a bear with eyes above his left cheek. I know this is a tension thing but no warning of this left me having to pull stuffing and cut eyes out having trusted the pattern.
I love how the arm and leg shape were made and the head shape is very cute.
First made the lucky bear and thought I tagged you in instagram. But now completed the grumpy one.
This pattern is so cute I’ll have to make a whole army of different colored bears!