
![]()

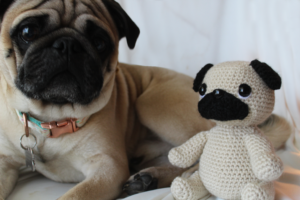
Pug
Purchase the PDF version here
You are 100% allowed to sell anything you make from my patterns anywhere, no credit needed, please just don’t sell the actual pattern itself (the written pattern), nor repost the actual pattern itself anywhere (the written pattern). Of course you can link my patterns on your site!
Pattern Difficulty: Beginner
The finished Pug is about 6″ or 15cm for height and 4″ or 10cm for width.
Supplies:
4.0mm Crochet Hook, Stuffing, Tapestry Needle, Scissors, 10mm Safety Eyes and Safety Nose.
Yarn Used: 4/Medium Weight in Tan, Black, White, Red, and Yellow
Stitches Used: Magic Ring, Sc, Inc, Dec, Hdc, Dc, and Ch.
Head:
Round 1: In tan, 6 Sc in Magic Ring (6)
Round 2: *Inc* all around (12)
Round 3: *Inc, Sc* all around (18)
Round 4: *Inc, 2 Sc* all around (24)
Round 5: *Inc, 3 Sc* all around (30)
Round 6: *Inc, 4 Sc* all around (36)
Round 7: *Inc, 5 Sc* all around (42)
Round 8: *Inc, 6 Sc* all around (48)
Round 9-15: *Sc* all around (48)
Round 16: Sc 16, *Inc, Sc* 4 times, Sc in next 16 st, *Inc, Sc* 4 times (56)
Round 17-19: *Sc* all around (56)
Round 20: Sc 16, *Dec, Sc* 4 times, Sc in next 16 st, *Dec, Sc* 4 times (48)
Round 21: *Dec, 6 Sc* all around (42)
Round 22: *Dec, 5 Sc* all around (36)
I start to assemble the face pieces here, but it’s optional if you’d rather close the head first.
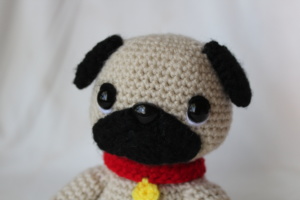
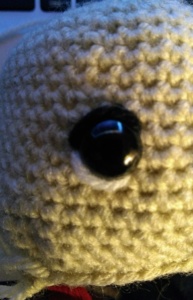
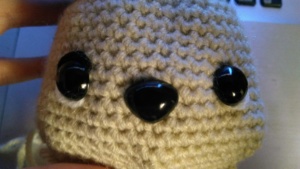
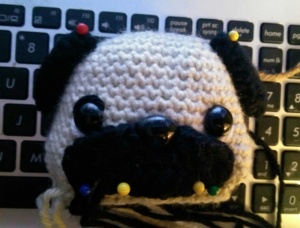
Assembly: Now we insert the safety eyes in on Row 13- about 11 stitches apart. Make sure you count each stitch, even if it’s hidden under the safety eye. Now you can sew on eye detail if you desire. I take black yarn and line the top half of the eye with it. Now I take white yarn and line the bottom half of the eye. Make sure you don’t line the entire eye.
Now we insert the nose in on Row 15 , in between the two eyes, making sure there’s about an even number of stitches between the nose and eyes. Don’t secure the safety nose yet.
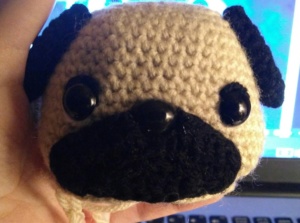
I make the ears and mouth and sew them on, and then put the safety nose on top of the mouth. Stuff the head firmly. Now continue closing the head.
Round 23: *Dec, 4 Sc* all around (30)
Round 24: *Dec, 3 Sc* all around (24)
Round 25: *Dec, 2 Sc* all around (18)
Round 26: *Dec, Sc* all around (12)
Round 27: *Dec* all around (6)
Stuff any additional stuffing, making sure to stuff firmly and sew shut
Top Mouth Mask:
Round 1: In black, Ch 12. 4 DC in 2nd ch from hook, DC in next 9 st, 4 DC in last st.
Finish off and pin between two eyes.
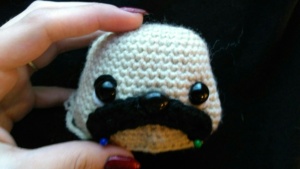
Bottom Mouth Mask:
Round 1: Ch 7, Dc in 2nd Ch from hook. Dc in next 5 St (6)
Finish off and pin below Top Mouth Mask. Make sure to bend the bottom mouth to fit to the top of the mouth.
Ears:
Make 2
Round 1: In black, 4 Sc in Magic Ring (4)
Round 2: *Sc* all around (4)
Round 3: *Inc* all around (8)
Round 4: *Sc* all around (8)
Round 5: *Inc, Sc* all around (12)
Round 6: *Sc* all around (12)
Round 7: *Inc, Sc 2* all around (16)
Round 8-9: *Sc* all around (16)
Finish off and pin to the sides of the head. Don’t stuff the ears.
Body:
Round 1: In tan, 6 Sc in Magic Ring (6)
Round 2: *Inc* all around (12)
Round 3: *Inc, Sc* all around (18)
Round 4: *Inc, 2 Sc* all around (24)
Round 5: *Inc, 3 Sc* all around (30)
Round 6: *Inc, 4 Sc* all around (36)
Round 7: *Inc, 5 Sc* all around (42)
Round 8: *Inc, 6 Sc* all around (48)
Round 9: *Inc, 7 Sc* all around (54)
Round 10-13: *Sc* all around (54)
Round 14: *Dec, 7 Sc* (48)
Round 15-17: *Sc* all around (48)
Round 18: *Dec, 6 Sc* all around (42)
Round 19-22: *Sc* all around (42)
Round 23: *Dec, 5 Sc* all around (36)
Round 24: *Sc* all around (36)
Stuff at this point
Round 25: *Dec, 4 Sc* all around (30)
Round 26: *Dec, 3 Sc* all around (24)
Finish off and add any additional stuffing.
Legs:

Round 1: In tan, 6 Sc in Magic Ring (6)
Round 2: *Inc* all around (12)
Round 3: *Inc, Sc* all around (18)
Round 4: *Sc* all around (18)
Round 5: Sc in next 3 st, Dec 1 time, Sc in next 13 st (17)
Round 6: Sc 1, *Dec* 3 times, Sc in next 10 st (14)
Round 7: Sc 2, *Dec* 1 time, Sc in next 10 st (13)
Round 8-13:*Sc* all around (13)
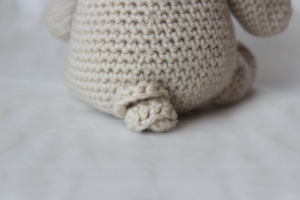
Finish off and stuff. Pin to the bottom part of the body.
Arms:
Round 1: In tan, 6 Sc in Magic Ring (6)
Round 2: *Inc* all around (12)
Round 3: *Inc, Sc* all around (18)
Round 4-5: *Sc* all around (18)
Round 6: Sc in next 3 st, Dec 1 time, Sc in next 13 st (17)
Round 7: Sc 1, *Dec* 3 times, Sc in next 10 st (14)
Round 8: Sc 2, *Dec* 1 time, Sc in next 10 st (13)
Round 9-14:*Sc* all around (13)
Finish off and stuff. If you want your arms in the front, Sc around an extra 4 rows to be long enough to put on the front.
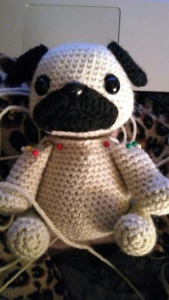
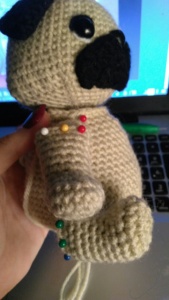
Arms and legs should look like this when being pinned on the body:
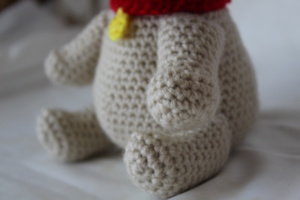
Tail:
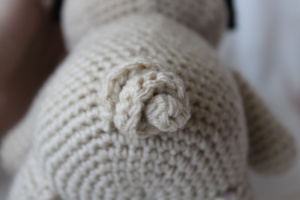
Round 1: In tan, Ch 8. 3 DC in 2nd Ch from hook. 3 DC in each st in the next 6 st.
Finish off. The tail should curl. You can twist it to curl it even more.
Collar:

Round 1: In red, ch 32. Hdc in 2nd ch from hook. Hdc in next 30 st.
Finish off.
Collar Chain:
Round 1: In yellow, 6 sc in Magic Ring (6)
Finish off and sew to collar.
If you finished this pattern, I would be SO HAPPY if you could upload a picture here or tag me on Instagram @StringyDingDing


36 Comments
Super cute!! I can’t wait to make this for my son!!
Yay thank you so much! I hope your son will love it 🙂
I love this it is very easy to do
I’m so glad to hear that! Thank you for letting me know you enjoyed it 🙂
Lovely thanks made one for my brother for Christmas
Aw that is so kind of you to crochet that for him!! I hope he enjoys his new friend 🙂 Merry Christmas <3
Does the paid pattern have greater detail? I don’t understand the increase the way it’s written. I’ve even tried to make a graph and it doesn’t add up
Hi Lisa, the PDF version is exactly what you see on this page but formatted better for printing. I am happy to help you with the increases. To make an increase, simply do two single crochets into one stitch. this will make one increase. Is there a certain Round you’re stuck on? If so please let me know and I can help explain that round 🙂
I also dont understand the increases. I’m on round 3 and if you increase all around it should be 24 and not 18. Or am I not understanding what is being said.
Nevermind. I totally figured it out. 🙂
Great! I’m glad to hear that, please let me know if you run into any other issues 🙂
I’m having trouble with the increase on row 16, please help!!!
Hi Evelyn, so Round 16 for the head reads as follows: Round 16: Sc 16, *Inc, Sc* 4 times, Sc in next 16 st, *Inc, Sc* 4 times (56)
To break this down, Sc in the next 16 stitches. Now repeat *Increase in the next stitch, Single crochet in the next stitch* a total of 4 times. Single crochet in the next 16 stitches. Now repeat *Increase in the next stitch, Single crochet in the next stitch* a total of 4 times. You will now be at the end of the round and have a total of (56) stitches.
If I can help clarify further please just let me know!
Hi, thanks for your pattern. It is amazing. I just wonder at the mouth of it. I can’t bend it like your picture. It looks like missing something.
Hi there! Thank you, I’m happy you like the pattern 🙂 Are you talking about the top part of the mouth? For the top part, when you crochet it, it will be more of a flat straight piece. When you pin it onto the face you must bend it down at the edges to give it the bent look. Also be sure to do 4 Dc in both the first ch and the last ch, as this will give it a more bent look. I hope that helps!
Hi! I’m not sure how to attach the body to the head. Do you sew the body closed ? Where do you sew it? Sorry I’m a beginner so don’t have a lot of practice/ experience with this.
Hi Marisa! No worries at all – I hope I can help you out with this 🙂
So once you’ve completely made the body, leave a long tail of yarn when finishing off. Don’t sew the body closed. You will see that the body has a pretty big opening. We will pin and sew the head to that opening part of the body. Now pin the head to the body opening, we do this by taking a pin and poking it through one stitch of the body then also poke it through the head. Do this with about 6-8 pins to hold it firmly.
Now let’s sew the body to the head. Go ahead and take a needle and place the long tail of yarn you left from the body onto the sewing needle. Poke the sewing needle through one stitch of the body (preferably a stitch from the last round), then poke it through the bottom of the head. Now pull the needle out one stitch to the left out of the head. Now poke the needle back into the next stitch of the body. Repeat this process until you sew the body and head together entirely.
I hope that made sense! If you have any questions at all please just let me know! I’m happy to clarify 🙂
Having trouble with the mouth sewing part
I’m sorry to hear that! What are you having trouble with? Is it difficult to sew it to the pug or is it making sure the mouth looks right before sewing it on? Let me know, I hope to help!
Hello! Firstly thanks for the pattern, it’s very cute. I’m also having some difficulty to understand the mouth. I think because it’s black, it’s hard to see the details in the picture. The lower part of the mouth is just 1DC stitch in every chain? How did you do to fit so perfect one with the top part?
Hi Paula! I’m so happy you like the pattern 🙂 I’m sure your pug will come out so cute!
For the mouth, try pinning the bottom mouth on first and then pinning the top mouth around the bottom mouth. This is so you can bend the top part of the mouth around the bottom! It will fit a lot better if you so it like that 🙂 I hope it makes sense. Sorry for any confusion – maybe I can update the photos for this pattern! Please let me know if I can help any further! 🙂
Thanks a lot for the explanation! I’ll try to do that. Soon I’ll post a pic on Instagram and tag you! 😊
I am having trouble understanding row 16. It says Sc 16, increase ,sc*
Do we single crochet 16 times in the next stitch or we single crochet once in 16 stitches. Would love to hear back
Thanks!
What is the biggest hook i can use with this pattern, I want to make it bigger. The increases seem to make the head wave. Im assuming these are continuous rows.
Hi there Keyt! If you’re using regular 4/Medium weight yarn, I would suggest the biggest hook to use be a 6mm crochet hook. Using a 6mm hook will make it much bigger, but you might have looser stitches since it’s not very tightly crocheted with a larger hook! 😍 Also, you are correct that this pattern is worked in continuous rounds 🙂
As for the increases making the head wave, this usually happens when we put way too many increases in a small section! So I wonder if you accidentally interpreted the pattern wrong? Here’s how the pattern goes in a bit more detail:
Round 3: *Inc, Sc* all around (18)
First off, we see starts like this *example*. Repeat what’s inside the starts for the stated amount of times. So *Increase in the next stitch, Single crochet in the next stitch* we repeat that “all around” until we meet the stitch marker, so technically we repeat that 6 times! *Increase in the next stitch, Single crochet in the next stitch* 6 times, we end up with (18) stitches at the end of the round! (Because 2 stitches from the increase + 1 single crochet= 3. 3 stitches x 6 repeats = 18 stitches)
Make sure to NOT do an increase and single crochet in the very same stitch! That will make the head have too many stitches and result in a wavy head! 🥰
For another example, Round 4: *Inc, Sc 2* all around (24)
Here we would repeat *Increase in the next st, Single crochet 1 in the next 2 stitches* all around until we meet the stitch marker (so technically 6 times) We end up with a stitch count of 24 stitches! (Because 2+2=4. 4×6=24).
I hope this was able to help! If I can clarify anything I’m more than happy to help 🙂 ❤️❤️❤️❤️
Thank you so very much! You have helped tremendously! 😁
No problem! ❤️ I’m so glad I was able to help 🙂
Ich Häckel noch nicht lange und verstehe die Abkürzungen der Stiche nicht und wird in runden gehäkelt oder wie eine Schnecke? Ich möchte den Mops für meinen Neffen machen.
Love this pattern works up so quickly and so cute. Thank you!!
Las orejas son 4 piezas es decir cada oreja va doble? Y otra pregunta pb es punto bajo y sc también es punto Bajo me confunde ver los dos abreviaturas ..es lo mismo o es diferente? Te agradecería si me respondes.. saludos
Que es diciembre?
Thank you for your beautiful easy pattern my daughter loves the pug I made i am a beginner. So thank you for sharing ❤
Love be this pattern. Can’t wIt to try it out. My friend has two pugs and would love be to make it for her. Thanks you for posting it
hello! i love this pattern so much, thank u for making it. i am relatively new to this so I’m struggling a little bit. I am working on marking the top part of the mouth. I did the 4 DC in the 2nd stitch from the hook, but now I am stuck. When i go to the next stitch to DC, it is making a loop like shown in the photo. do u know what i could be doing wrong? THank you so much!!
This is my first time making a stringy ding ding pattern. Very easy to follow, this is only the 3rd amigurumi I have made. Not happy with the shape so I am going to try making this again as my skills improve.
Thank you for providing great free patterns.
Thank you so much for sharing..!! this is one of the cutest patterns I’ve seen I can’t wait to start making him thank you