
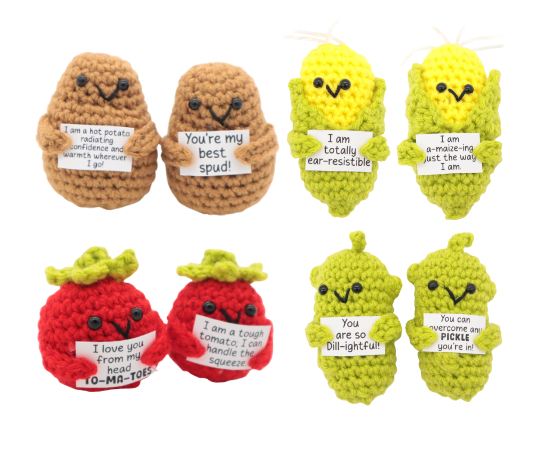
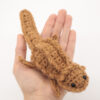
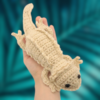
Positive Veggies: Corn, Potato, Pickle, and Tomato Amigurumi – Free Crochet Pattern


Print this pattern out – purchase the PDF version here!


 Supplies:
• Yarn 4/Medium Weight Yarn in…
Brown for potato. Green for pickle.
Yellow, green, and white for corn. Red and green for tomato.
•4mm Crochet Hook
•6mm safety eyes
•Tapestry needle
•Scissors
•Stuffing
•Black embroidery thread
•230GSM cardstock paper for the signs
•Hot glue
Additional Information:
•Difficulty: Easy
These positive vegetables are quick and easy to make. They are perfect for craft fairs because they’re so easy to whip and and make for an adorable display! These would also be great keychains.
How to do a popcorn stitch
You will need to make a popcorn stitch for the pickle. Here is a tutorial on how to do a popcorn stitch.
Dc 4 times into the next st. Remove your hook from the current working loop and insert it into the first Dc made (Pic 2). Now also reinsert your hook into the current working loop (Pic 3). You will have two loops on your hook. Yarn over (Pic 4) and pull through both loops (Pic 5). You have just made one popcorn stitch (Pic 6).

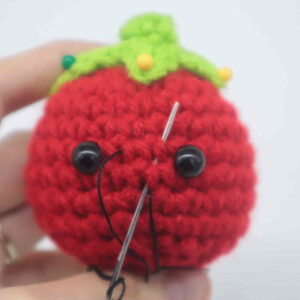
Smile:
In Black Embroidery Thread
Insert needle into the middle area of the tomato as shown (Pic 1) and pull needle out at the left of the toy’s eye as shown (Pic 1).
1.
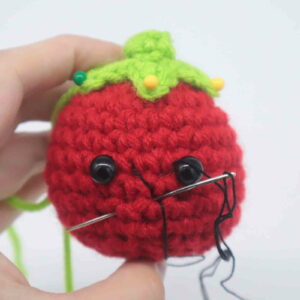
Reinsert needle into the middle of the toy (Pic 2) and pull needle out next to the toy’s right eye (Pic 2).
2.
Reinsert needle into the middle of the toy as shown (Pic 3) and pull needle out nearby. Tie ends of thread into firm knots and bring knots inside the toy to hide. Cut any excess yarn.
3. 4.
4.
Print out the signs page shown below. Click here.


Corn:
Start in green

Round 1: 6 Sc into a Magic Ring (6)
Round 2: In the BLO, *Sc* all around (6)
Round 3: In BOTH loops, *Inc* all around (12)
Round 4: *Inc, Sc in the next st* all around (18)
Round 5-9: *Sc* all around (18)
Round 10: Change to yellow. In the BLO, *Sc* all around (18)
Round 11-14: In BOTH loops, *Sc* all around (18)
Now we will mark where to place the safety eyes. Add a different colored stitch marker into the 11th and 13th stitch in Round 14. Later we will replace these stitch markers with safety eyes.
Round 15-17: In BOTH loops, *Sc* all around (18)
Add the safety eyes into the marked areas now.
Round 18: *Dec, Sc in the next st* all around (12)
Stuff firmly here.
Round 19: *Dec* all around (6)
Finish off, leaving a long tail for sewing. Sew the remaining stitches closed. Weave in ends and cut any excess yarn.
Corn Leaves:
Start in Green

Row 1: We left the front loops only on Round 10. Insert your hook into the obvious divot in this front loop (Pic 1). Yarn over with green yarn and pull the yarn through the loop (Pic 2-3). Now Ch 1. Sc in the next 8 st (Pic 4). (8)
Row 2: Ch 1 and turn. Dec 1 time, Sc in the next 4 st, Dec 1 time (6)
Row 3: Ch 1 and turn. Dec 1 time, Sc in the next 2 st, Dec 1 time (4)
Row 4: Ch 1 and turn. Dec 2 times (2)
Row 5: Ch 1 and turn. Dec 1 time (1)
Finish off, leaving a tail for sewing. Weave in ends and cut any excess yarn. (Pic 5).
Repeat this process on the other side of the corn (Pic 6), you will have 9 stitches left to repeat this process with.
1. 2.
2. 3.
3. 4.
4. 5.
5. 6.
6. 7.
7.
Corn Arms: (Make 2)
Start in Green

Row 1: Ch 7. Sc in the 2nd Ch from the hook. Sc in the next 5 ch (6)
Finish off, leaving a long tail for sewing. Pin the arms on as shown and sew on. Once done, weave in ends and cut any excess yarn.

Corn Hair:
In White Yarn
Using a thinner 3 weight yarn is best for this. Cut a ~4 inch piece of yarn (Pic 1). Insert your hook into the top of the corn (Pic 2) and yarn over with the white yarn, making sure evens amount of yarn are on each side of the hook (Pic 2).
1. 2.
2.
Pull it through the corn’s head (Pic 3). Yarn over with both ends of yarn (Pic 4), and pull the strands through the loop on your hook.
3. 4.
4.
This just attached one stand of hair to the corn. Repeat this 4 more times. Now trim the hair to your liking. I trimmed mine to be a little over an inch tall (Pic 6).
5. 6.
6. 7.
7.
Smile:
Make a smile following the smile directions at the top of the page.
Sign:
Print out the page of signs. Use the “I am totally ear-resistible” and “I am a-maize-ing just the way I am.” signs. Once cut, apply a very light amount of hot glue to the inside tip of the corn’s left hand, then place the hand onto the sign, making sure to not cover the words with the hand. Hold it in place for about 10 to 15 seconds to secure. Repeat this with the right hand.
Pickle:
Start in Green

Round 1: Make 3 Sc into a Magic Ring (Pic 1). Ch 5. Sc in the 2nd Ch from the hook. Sc in the next 3 Ch (Pic 2). Working back in the Magic Ring, Sc 3 times into that magic ring, then tighten the ring (Pic 3-4).
1. 2.
2. 3.
3. 4.
4.
Round 2: Inc in the next 3 st (Pic 5). Move the Ch piece towards you as shown (Pic 6). Skip the Ch piece and working in the following last 3 stitches, make an increase in each of the last 3 stitches (Pic 7-8) (12)
5. 6.
6. 7.
7.
 8.
8.
Round 3: *Inc, Sc in the next st* all around (18)
Round 4: *Sc* all around (18)
Round 5: Sc in the next 5 st. Popcorn st in the next st, Sc in the next 12 st (18)
Round 6: Sc in the next 15 st. Popcorn st in the next st. Sc in the next 2 st (18)
Now we will mark where to place the safety eyes. Add a different colored stitch marker into the 11th and 14th stitch. Later we will replace these stitch markers with safety eyes.
Round 7-12: *Sc* all around (18)
Add the safety eyes into the marked areas now.
Round 13: Sc in the next 12 st. Popcorn st in the next st. Sc in the next 5 st (18)
Round 14-15: *Sc* all around (18)
Stuff now. Continue stuffing after each round.
Round 16: *Dec, Sc in the next st* all around (12)
Round 17: *Dec* all around (6)
Finish off, leaving a long tail for sewing. Sew the remaining stitches closed. Once done, weave in ends. Cut any excess yarn.
Pickle Arms: (Make 2)
Start in Green
Row 1: Ch 7. Sc in the 2nd Ch from the hook. Sc in the next 5 ch (6)
Finish off, leaving a long tail for sewing. Pin the arms on as shown and sew on. Once done, weave in ends and cut any excess yarn.

Smile:
Make a smile following the smile directions at the top of the page.
Sign:
Print out the page of signs. Use the “You are so Dill-ightful!” and “You can overcome any pickle you’re in!” signs. Once cut, apply a very light amount of hot glue to the inside tip of the pickle’s left hand, then place the hand onto the sign, making sure to not cover the words with the hand. Hold it in place for about 10 to 15 seconds to secure. Repeat this with the right hand.
Potato:
Start in Brown

Round 1: 6 Sc into a Magic Ring (6)
Round 2: *Inc* all around (12)
Round 3: *Inc, Sc in the next st* all around (18)
Round 4: *Sc* all around (18)
Now we will mark where to place the safety eyes. Add a different colored stitch marker into the 7th and 10th stitch in Round 4. Later we will replace these stitch markers with safety eyes.
Round 5-6: *Sc* all around (18)
Round 7: Sc in the next 5 st. Working in the FLO, Inc in the next 6 st. Working in BOTH loops, Sc 7 st (24)
Add the safety eyes into the marked areas now.
Round 8-14: *Sc* all around (24)
Round 15: *Dec, Sc in the next 2 st* all around (18)
Round 16: *Dec, Sc in the next st* all around (12)
Stuff firmly here.
Round 17: *Dec* all around (6)
Finish off, leaving a long tail for sewing. Sew the remaining stitches closed and weave in ends. Cut any excess yarn.
Potato Arms: (Make 2)
Start in Brown

Row 1: Ch 7. Sc in the 2nd Ch from the hook. Sc in the next 5 ch (6)
Finish off, leaving a long tail for sewing. Pin the arms on as shown and sew on. Once done, weave in ends and cut any excess yarn.

Smile:
Make a smile following the smile directions at the top of the page.
Sign:
Print out the page of signs. Use the “You’re my best spud!” and “I am a hot potato radiating confidence and warmth wherever I go!” signs. Once cut, apply a very light amount of hot glue to the inside tip of the potato’s left hand, then place the hand onto the sign, making sure to not cover the words with the hand. Hold it in place for about 10 to 15 seconds to secure. Repeat this with the right hand.
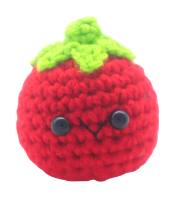
Tomato:
Start in Red

Round 1: 6 Sc into a Magic Ring (6)
Round 2: *Inc* all around (12)
Round 3: *Inc, Sc in the next st* all around (18)
Round 4: *Inc, Sc in the next 2 st* all around (24)
Now we will mark where to place the safety eyes. Using a different colored stitch marker, place a marker in the 10th and 13th stitch in Round 4. Later we will replace these markers with safety eyes.
Round 5-10: *Sc* all around (24)
Add the safety eyes into the marked areas now.
Round 11: *Dec, Sc in the next 2 st* all around (18)
Round 12: *Dec, Sc in the next st* all around (12)
Stuff firmly now.
Round 13: *Dec* all around (6)
Finish off leaving a long tail for sewing. Sew the remaining stitches closed and weave in ends. Cut any excess yarn.
Tomato Arms: (Make 2)
Start in Red

Row 1: Ch 7. Sc in the 2nd Ch from the hook. Sc in the next 5 ch (6)
Finish off, leaving a long tail for sewing. Pin the arms on as shown and sew on. Once done, weave in ends and cut any excess yarn.

Tomato Top:
Start in Green

Round 1: 6 Sc into a Magic Ring (6)
Round 2: In the BLO, *Sc* all around (6)
Round 3: In the FLO, repeat *Ch 3. Sc in the 2nd Ch from the hook, Hdc in the next Ch. SlSt in the next FLO* 5 times. SlSt in the next st.
Finish off leaving a long tail for sewing. Pin the tomato top on as shown and sew on. Weave in ends, then cut any excess yarn.

Smile:
Make a smile following the smile directions at the top of the page.
Sign:
Print out the page of signs. Use the “I love you from my head to-ma-toes!” and “I am a tough tomato, I can handle the squeeze” signs. Once cut, apply a very light amount of hot glue to the inside tip of the tomato’s left hand, then place the hand onto the sign, making sure to not cover the words with the hand. Hold it in place for about 10 to 15 seconds to secure. Repeat this with the right hand.


1 Comment
I purchased this pattern and printed the labels. I just completed an ear of corn. It is so stinkin cute. Thank you so much for providing adorable designs such as these.