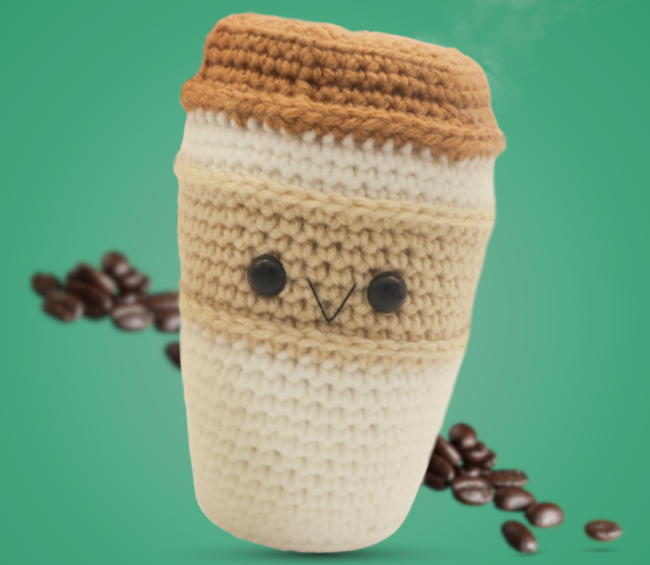
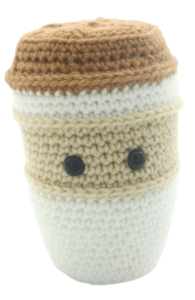
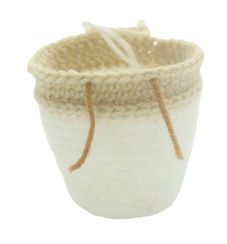
Coffee Cup Amigurumi – Free Crochet Pattern
Hello there! This week we have a super cute pattern for you – a free coffee cup amigurumi pattern! Nearly everyone on Earth loves coffee, which means this is a FANTASTIC amigurumi to make for the coffee lovers in your life. I actually thought that this would be a cute mascot for your coffee station at work – or if you have a coffee station at home! This pattern involves no sewing on pieces, as the cup is made in one continuous piece. Yay for simplicity! Now let’s get started!
Print this pattern out – purchase the PDF version here!
 Supplies:
• Yarn 4/Medium Weight in:
white, cream, and brown
•4mm Crochet Hook
•Tapestry needle
•Scissors
•Stuffing
•12mm safety eyes
•Black Embroidery Thread
Additional Information:
Difficulty: Easy
Let’s get started!
This coffee cup is a fantastic gift for any coffee lover out there! It might even make for a cute mascot at your work’s coffee station 🙂 This pattern is fairly easy – however, we will be working in the front and back loops often. This is easy to, simply insert your hook into either the front loop (the one closest to you) or the back loop (the one furthest from you). This pattern also involves NO sewing! It’s all made in one continuous piece. We’ll be starting at the bottom of the cup and working our way up to the top. Let’s get started!
Coffee:
In white
Round 1: 6 Sc into a Magic Ring (6)
Round 2: *Inc* all around (12)
Round 3: *Inc, Sc in the next st* all around (18)
Round 4: *Inc, Sc in the next 2 st* all around (24)
Round 5: *Inc, Sc in the next 3 st* all around (30)
Round 6: *Inc, Sc in the next 4 st* all around (36)
Round 7: In the BLO, *Sc* all around (36)
Round 8-12: *Sc* all around (36)
Round 13: *Inc, Sc in the next 5 st* all around (42)
Round 14-17: *Sc* all around (42)
Round 18: Change to cream color. *Hdc* all around (42)
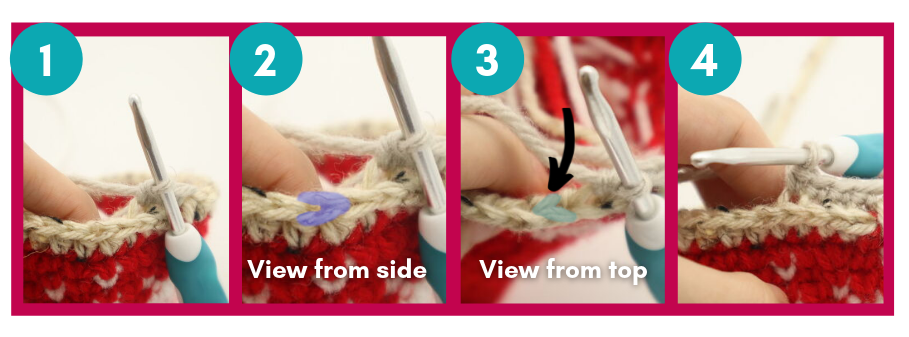
Now we will form the 3d ridge seen on the cup’s cover. To do this, we will crochet behind the half double crochets! Here’s how:
If you look at the Hdc as they are right in front of you, you will see the “v” facing you (Pic 2). This is how we see ours stitches regularly. However, if you look at the Hdc from the top facing you, you will see a new “v” (Pic 3). Insert your hook going between that top v, and make a Sc.
Round 19: Change to white. Working in the back of the Hdc, *Sc* all around (42)
Round 20-21: In BOTH loops, *Sc* all around (42)
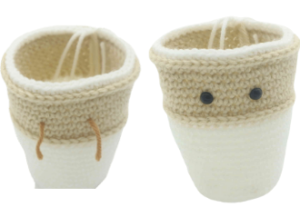
Now we will mark where to place the safety eyes later. Add a different colored stitch marker into the 15th and 20th stitch in Round 20.
Round 22-23: *Sc* all around (42)
Round 24: *Inc, Sc in the next 6 st* all around (48)
Round 25: *Hdc* all around (48)
Round 26: Change to white. Working BEHIND the half double crochets as we did before, *Sc* all around (42)
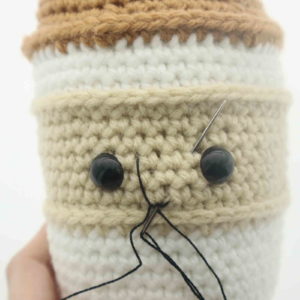
Add eyes into the marked areas now.
Round 27-28: In BOTH loops, *Sc*all around (42)
Round 29: Change to brown. Repeat *2 Hdc in the next st, Hdc 1 time in each of the next 7 st* (48)
Round 30: In the BLO, repet *Dec, Sc in the next 7 st* all around (48)
Round 31: In BOTH loops, repeat *Dec, Sc in the next 6 st* all around (42)
Round 32: In the FLO, *Sc* all around (42)
Round 33: In BOTH loops, *Sc* all around (42)
Finish off and sew remaining stitches closed.
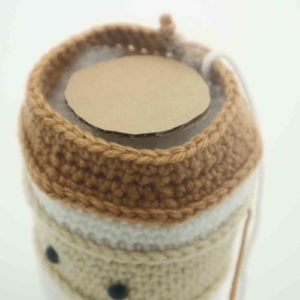
Now we will add in cardboard so the bottom and top of the cup sit flat!
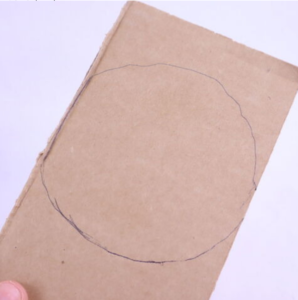
Step 1. Place the cup on cardboard and trace around the entire bottom of the cup (Pic 1)
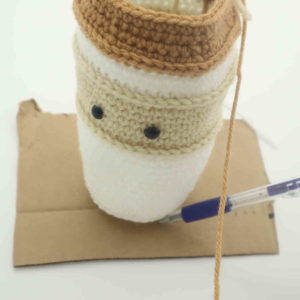
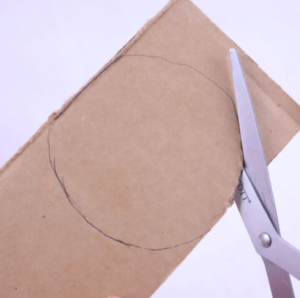
Step 2. You will have a circle (Pic 2). Cut around the circle with scissors (Pic 3-4)
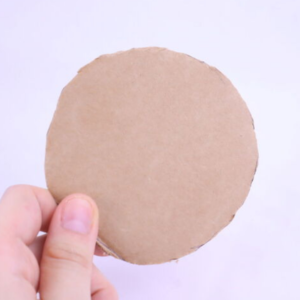
Step 3. Repeat steps 1-2 again. You will now have a total of 2 cardboard pieces. Place one piece into the bottom of the cup (Pic 5), stuff the cup firmly, then place the second piece of cardboard into the cup now (Pic 6).
Round 35: In the BLO, repeat *Dec, Sc in the next 5 st* all around (36)
Round 36: In BOTH loops, repeat *Dec, Sc in the next 4 st* all around (30)
Round 37: *Dec, Sc in the next 3 st* all around (24)
Round 38: *Dec, Sc in the next 2 st* all around (18)
Round 39: *Dec, Sc in the next st* all around (12)
Round 40: *Dec* all around (6)
Finish off, leaving a long tail for sewing. Sew the remaining stitches closed, then weave in ends. Cut any excess yarn.
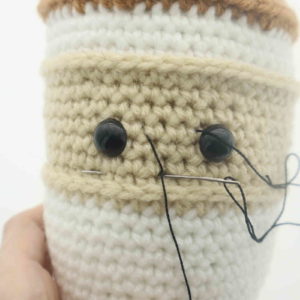
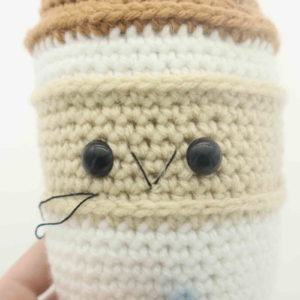
Smile:
In black embroidery thread
Insert needle with thread one stitch over from the right eye, and pull needle out to the middle mouth area as shown (Pic 1). Reinsert needle into the same stitch by the right eye, and pull needle out one stitch over by the left eye (Pic 2). Reinsert needle into the middle mouth area and pull out where shown (Pic 3). Tie both ends into a knot and bring the knot into the amigurumi to hide!


17 Comments
Coffee cup is super super cute ❣️❣️❣️
I need some help please? In round 19 it says to change to white, but in round 26 it says to change to white. What round to I change a different color? Then in round 29 and 30 it has the same stitch number but 30 is supposed to be a decrease, where do I decrease? And what number should I have?
I’m totally lost.
Because in row 18 u r working in cream color n in row 19 u r changing to white.
I also have a question about this in row 20 where it says to SC in BOTH loops which ones? White or cream?
But why would you only do one row of cream and switch back to white? Then you won’t get the sleeve shown in the photo. That’s what’s being asked here I believe.
I’m confused about switching at rnd 19 as well!
Okay, I think I figured it out, because I was also confused. I think the author of the pattern just didn’t mean to put to switch there. I personally wasn’t changing colors, but it was confusing to me too! From my understanding, you switch colors at row 18, then switch back at row 26. I know it’s over a year later, but I hopes this helps someone!
How big is the finished product?
Wonderful and easy to follow pattern
I tried your pattern. It came out good. I wish it was not so fat around center. I think I mis counted and it got larger then I wanted.
But why would you only do one row of cream and switch to white? Then you won’t get the sleeve as seen in the photo…
Love this pattern…
It turned out sooo great. Love the pattern. Thankyou for designing it ❤️❤️❤️.
(The image was not showing so I uploaded it again)
Super cute. Came out larger than I expected but it was fun to make!
It turned out great, thank you for the pattern!
Love this pattern, thanks for sharing it! I’m working it up as a gift right now. I am wondering if I’m missing something, though, when Round 25 has 48 stitches, and Round 26 goes down to 42? In Round 28, it goes back up to 48 stitches, but the increase is described there–Round 26 doesn’t include a decrease that I can see.