
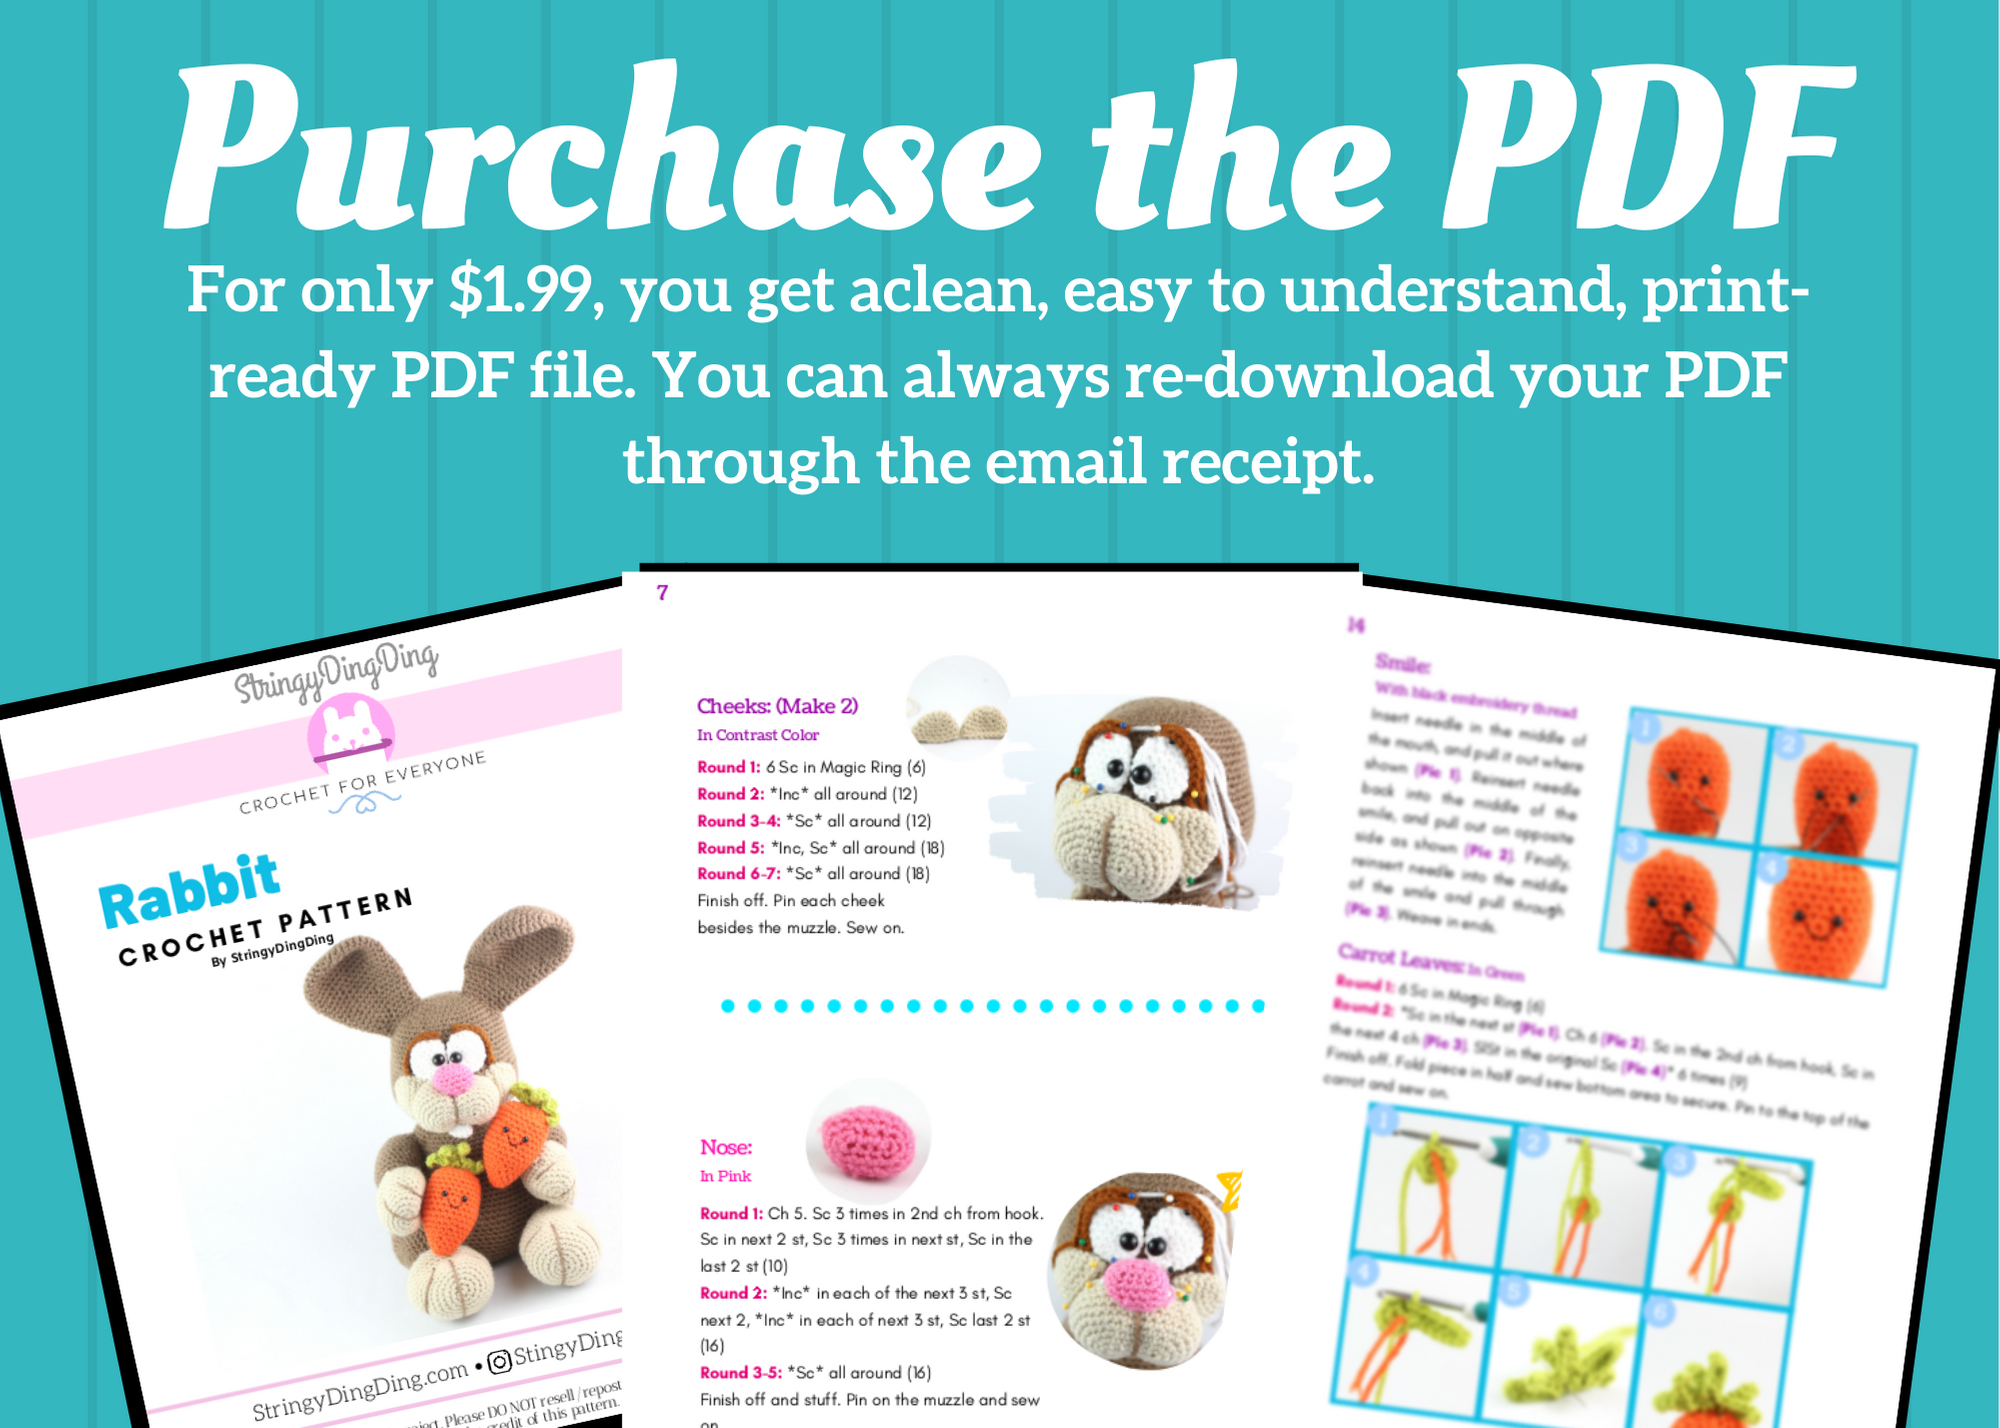
Purchase the PDF version here

Supplies:
4mm crochet hook, 4/Medium weight yarn in any desired main and contrast color, pink for the nose, white for the tooth, orange and green for the carrot. Black embroidery thread, 10mm safety eyes, tapestry needle, scissors, and stuffing.
Additional Information:
Difficulty: Easy
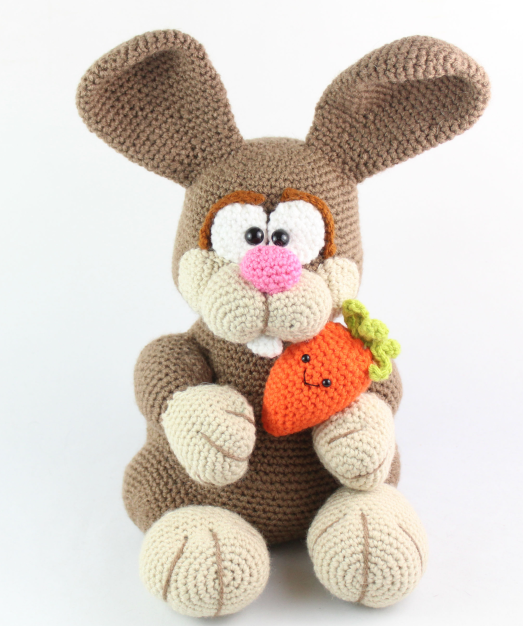
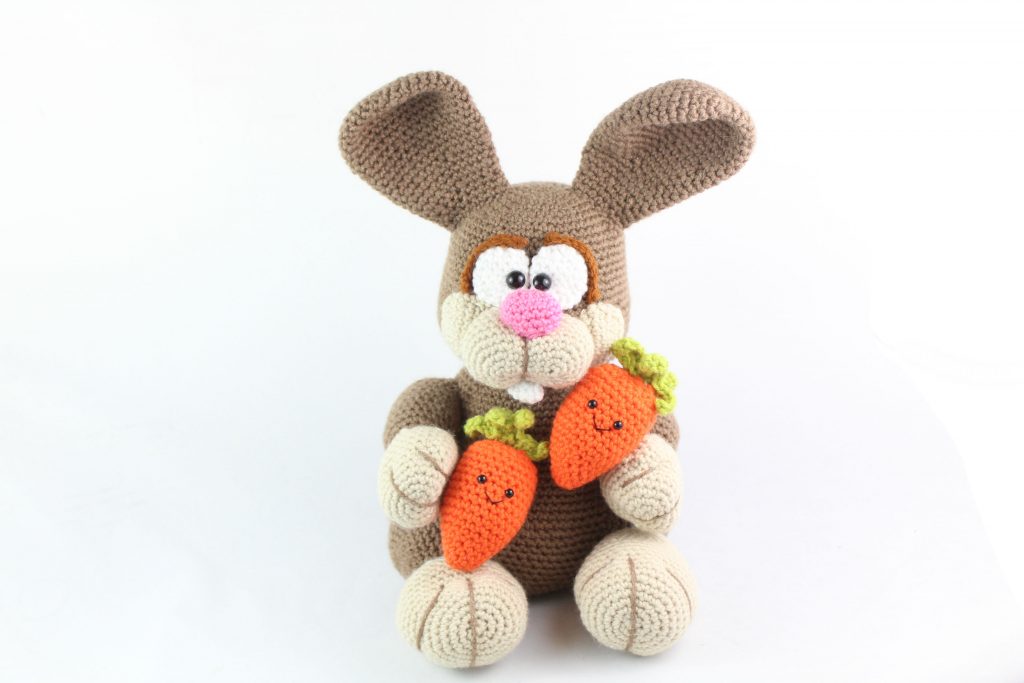
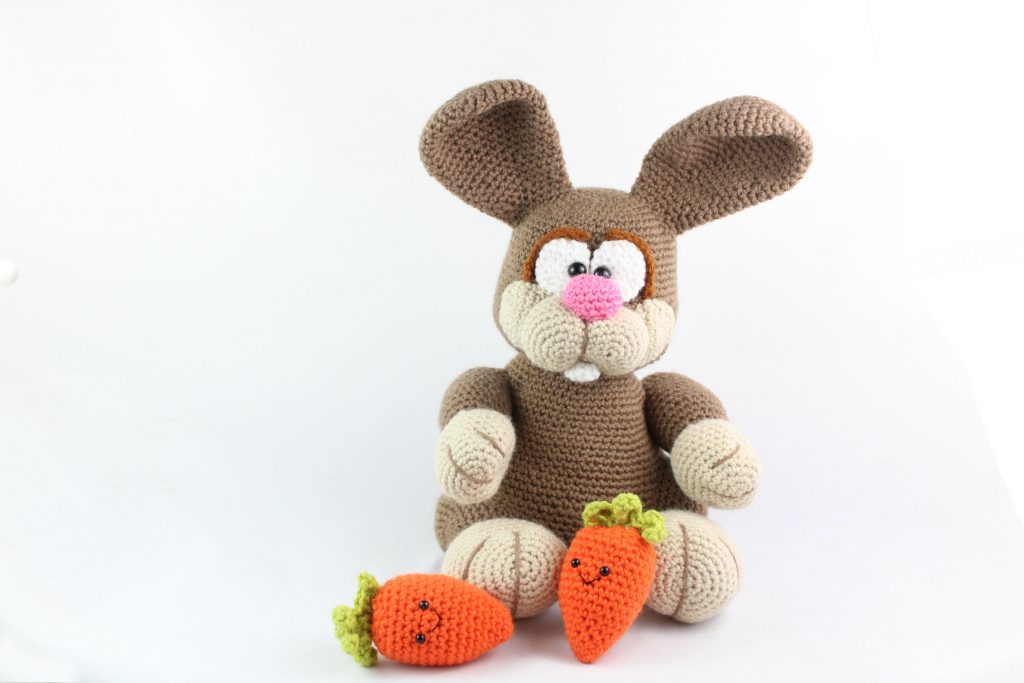
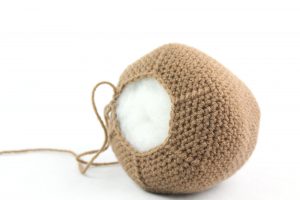
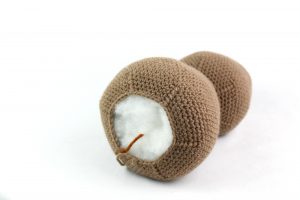
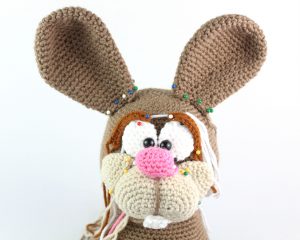
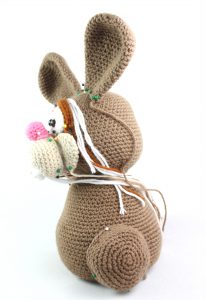
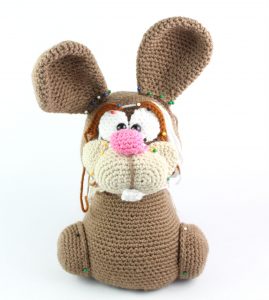
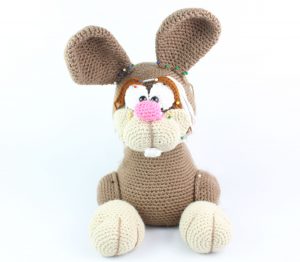
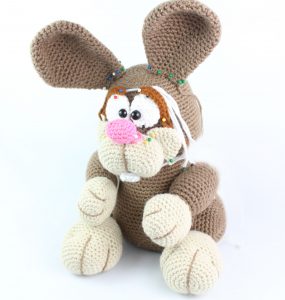
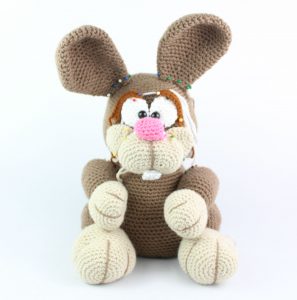
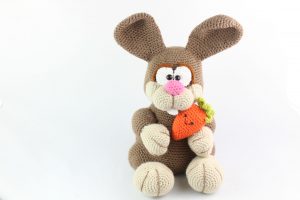
The rabbit is 11″ tall not counting ears, and 15.5″ tall with ears. This pattern refers to “Main Color”, which is the main color you want your rabbit to be, and “Contrast Color” as the opposing color. I used brown as the “Main Color” and cream as the “Contrast Color”. You can use any color you want. First, we start by making head, which leads into the body. They are one piece. Next, we make all the face pieces, then the ears. Then we create the arms, legs, and tail. Finally, we make the carrot!
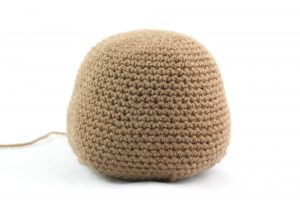
Head:
In Main Color
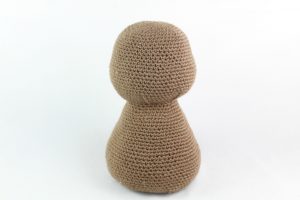
Round 1: 6 Sc in Magic Ring (6)
Round 2: *Inc* all around (12)
Round 3: *Inc, Sc* all around (18)
Round 4: *Inc, Sc 2* all around (24)
Round 5: *Inc, Sc 3* all around (30)
Round 6: *Inc, Sc 4* all around (36)
Round 7: *Inc, Sc 5* all around (42)
Round 8: *Inc, Sc 6* all around (48)
Round 9: *Inc, Sc 7* all around (54)
Round 10-16: *Sc* all around (54)
Round 17: *Inc, Sc 8* all around (60)
Round 18-19:*Sc* all around (60)
Round 20: *Inc, Sc 9* all around (66)
Round 21-27: *Sc* all around (66)
Round 28: *Dec, Sc 9* all around (60)
Round 29: *Dec, Sc 8* all around (54)
Round 30: *Dec, Sc 7* all around (48)
Round 31: *Dec, Sc 6* all around (42)
Round 32: *Dec, Sc 5* all around (36)
Stuff head here
Round 33: *Dec, Sc 4* all around (30)
Round 34: *Inc, Sc 4* all around (36)
Round 35: *Inc, Sc 5* all around (42)
Round 36: *Inc, Sc 6* all around (48)
Round 37: *Inc, Sc 7* all around (54)
Round 38-41: *Sc* all around (54)
Round 42: *Inc, Sc 8* all around (60)
Round 43-44: *Sc* all around (60)
Round 45: *Inc, Sc 9* all around (66)
Round 46-47: *Sc* all around (66)
Round 48: *Inc, Sc 10* all around (72)
Round 49-60: *Sc* all around (72)
Round 61: *Dec, Sc 10* all around (66)
Round 62: *Dec, Sc 9* all around (60)
Round 63: *Dec, Sc 8* all around (54)
Round 64: *Dec, Sc 7* all around (48)
Round 65: *Dec, Sc 6* all around (42)
Stuff here. Continue stuffing as completing the following rounds
Round 66: *Dec, Sc 5* all around (36)
Round 67: *Dec, Sc 4* all around (30)
Round 68: *Dec, Sc 3* all around (24)
Round 69: *Dec, Sc 2* all around (18)
Round 70: *Dec, Sc* all around (12)
Round 71: *Dec* all around (6)
Finish off. Add any additional stuffing and sew closed.
Eyes: (Make 2)
In White
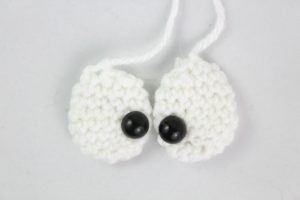
Round 1: 6 Sc in Magic Ring (6)
Round 2: *Inc* all around (12)
Round 3-7: *Sc* all around (12)
Add eye in now between round 4 & 5. Secure with safety eye washer back.
Round 8: *Dec* all around (6)
Finish off. Sew closed.
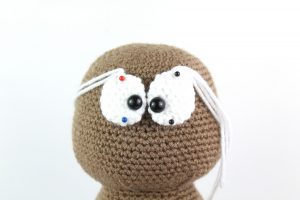
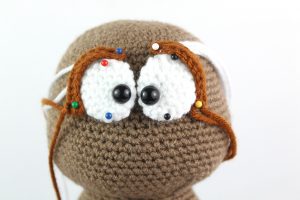
Eyelids: (Make 2)
In Darker Main Color
Row 1: Ch 12. Sc in the 2nd Ch from hook. Sc in the next 10 st (12)
Finish off. Pin on the eyes. Sew eyes and eyelids on now.
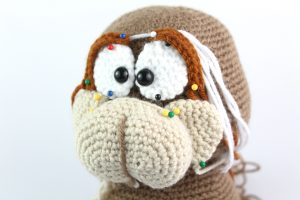
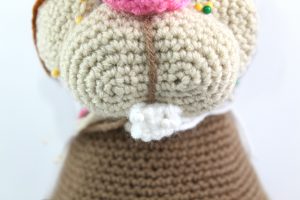
Muzzle:
In Tan
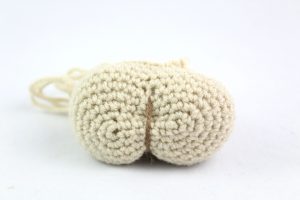
Round 1: Ch 7. Sc 3 times in 2nd ch from hook. Sc in the next 4 st, Sc 3 times in next st, Sc in the last 3 st (14)
Round 2: *Inc* in the next 3 st, Sc in the next 4 st, *Inc* in the next 3 st, Sc in the last 4 (20)
Round 3: *Inc in the next st, Sc in the next st* 3 times, Sc in the next 4 st, *Inc in the next st, Sc in the next st* 3 times, Sc in the last 4 st (26)
Round 4: *Inc, Sc 2* 3 times, Sc in the next 4 st, *Inc, Sc 2* 3 times, Sc in the last 4 st (32)
Round 5: *Inc, Sc 3* 3 times, Sc in the next 4 st, *Inc, Sc 3* 3 times, Sc in the last 4 st (38)
Round 6-9: *Sc* all around (38)
Round 10: Sc in the next 5 st, *Dec, Sc 3* 3 times, Sc in the next 3 st, *Dec, Sc 3* 3 times (32)
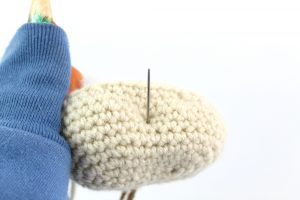
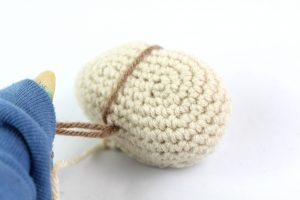
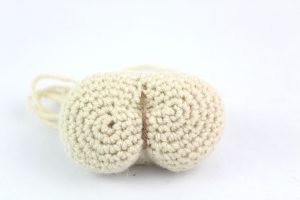
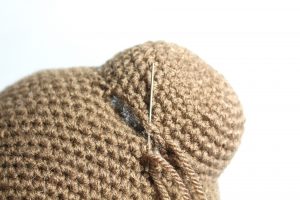
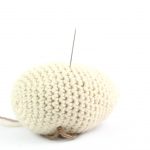
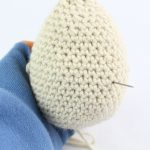
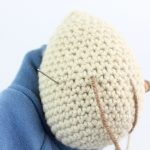
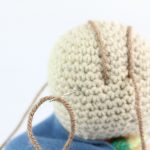
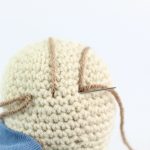
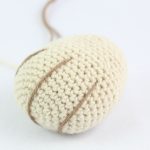
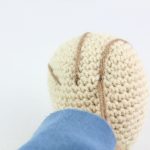
Finish off. Get main color and insert it into the bottom middle area of the muzzle (Pic 1). Pull out on the opposite side (Pic 2). Reinsert needle into original insertion spot. Pull both ends of yarn and weave in ends (Pic 4).

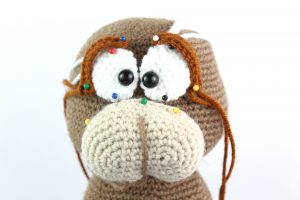
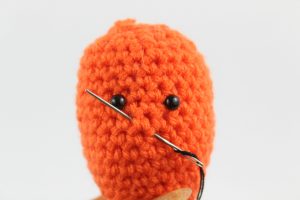
Pin on now, below the eyes. Sew on.
Cheeks: (Make 2)
In Contrast Color
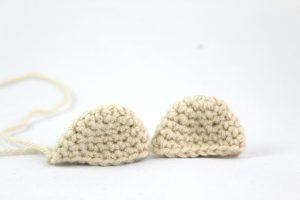
Round 1: 6 Sc in Magic Ring (6)
Round 2: *Inc* all around (12)
Round 3-4: *Sc* all around (12)
Round 5: *Inc, Sc* all around (18)
Round 6-7: *Sc* all around (18)
Finish off. Pin each cheek besides the muzzle. Sew on.
Nose:
In Pink
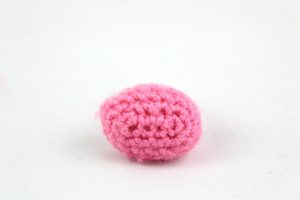
Round 1: Ch 5. Sc 3 times in 2nd ch from hook. Sc in next 2 st, Sc 3 times in next st, Sc in the last 2 st (10)
Round 2: *Inc* in each of the next 3 st, Sc next 2, *Inc* in each of next 3 st, Sc last 2 st (16)
Round 3-5: *Sc* all around (16)
Finish off and stuff. Pin on the muzzle and sew on.
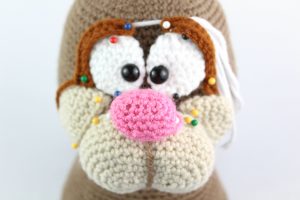
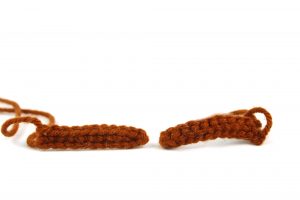
Teeth:
In White
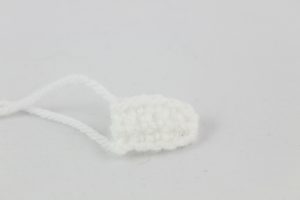
Row 1: Ch 7. Sc in the 2nd Ch from the hook. Sc in the next 5 st (6)
Row 2: Turn, Sc in the next 6 st (6)
Finish off. Fold this piece in half and sew together. This makes the tooth thicker. Pin on the muzzle and sew on.
Ears: (Make 2)
In Main Color
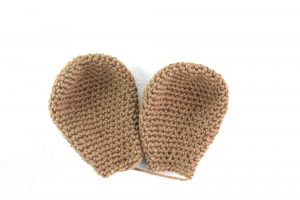
Round 1: 6 Sc in Magic Ring (6)
Round 2: *Inc* all around (12)
Round 3: *Inc, Sc* all around (18)
Round 4: *Inc, Sc 2* all around (24)
Round 5: *Inc, Sc 3* all around (30)
Round 6: *Inc, Sc 4* all around (36)
Round 7-11: *Sc* all around (36)
Round 12: *Dec, Sc 4* all around (30)
Round 13-16: *Sc* all around (30)
Round 17: *Dec, Sc 3* all around (24)
Round 18-20: *Sc* all around (24)
Round 21: *Dec, Sc 2* all around (18)
Round 22-24: *Sc* all around (18)
Finish off. Pin on the top of the head and sew on.
Legs: (Make 2)
In Main Color
Round 1: 6 Sc in Magic Ring (6)
Round 2: *Inc* all around (12)
Round 3: *Inc, Sc* all around (18)
Round 4: *Inc, Sc 2* all around (24)
Round 5: *Inc, Sc 3* all around (30)
Round 6: *Inc, Sc 4* all around (36)
Round 7-11: *Sc* all around (36)
Finish off. Pin each leg on the sides of the body. Sew to the body and stuff before fully sewing shut.
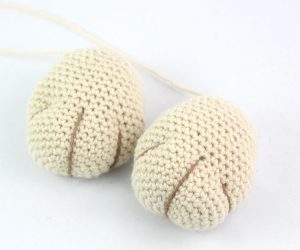
Feet: (Make 2)
In Contrast Color
Round 1: 6 Sc in Magic Ring (6)
Round 2: *Inc* all around (12)
Round 3: *Inc, Sc* all around (18)
Round 4: *Inc, Sc 2* all around (24)
Round 5: *Inc, Sc 3* all around (30)
Round 6: *Inc, Sc 4* all around (36)
Round 7-15:*Sc* all around (36)
Round 16: *Dec, Sc 4* all around (30)
Round 17-19: *Sc* all around (30)
Round 20: *Dec, Sc 3* all around (24)
Round 21: *Sc* all around (24)
Round 22: *Dec, Sc 2* all around (18)
Stuff feet here
Round 23: *Sc* all around (18)
Round 24: *Dec, Sc* all around (12)
Finish off. Add any additional stuffing. Continue on next instructions for toe assembly.
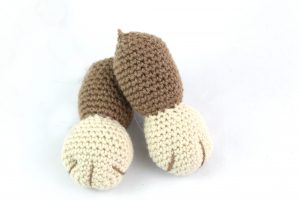
Toe Assembly:
In Main Color
To form the first toe indent, insert needle with thread into the bottom right area of the foot (Pic 1). Pull the needle out on the other side of the foot (Pic 2-3). Reinsert needle into original insertion spot (Pic 4), and pull needle out of the top middle of the foot (Pic 5). Reinsert needle into the bottom middle of the foot (Pic 6), and pull out of the top left of the foot (Pic 7). Pull both ends of yarn at the same time to tighten toes. Reinsert needle into the bottom left of the foot (Pic 8) and pull needle out of the original insertion spot (Pic 9). Pull both ends of the thread to tighten (Pic 11). Done!


 Pin the feet on the legs. Sew on.
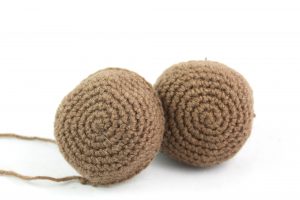
Arms: (Make 2)
In Contrast Color
Round 1: 6 Sc in Magic Ring (6)
Round 2: *Inc* all around (12)
Round 3: *Inc, Sc* all around (18)
Round 4: *Inc, Sc 2* all around (24)
Round 5: *Inc, Sc 3* all around (30)
Round 6-12: *Sc* all around (30)
Round 13: *Dec, Sc 3* all around (24)
Round 14: *Dec, Sc 2* all around (18)
Round 15: *Dec, Sc* all around (12)
Switch to Main Color. Stuff hand here.
Round 16: *Inc, Sc* all around (18)
Round 17: *Inc, Sc 2* all around (24)
Round 18-27: *Sc* all around (24)
Round 28: *Dec, Sc 2* all around (18)
Round 29: *Dec, Sc* all around (12)
Stuff arm here.
Round 30: *Dec* all around (6)
Finish off and any additional stuffing. Add finger indents by following toe indent instructions mentioned earlier, as the instructions are the same for the fingers. Finally, pin the arms to the side of the body and sew on.
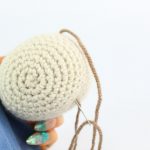
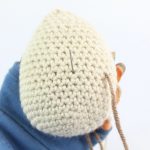
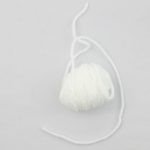
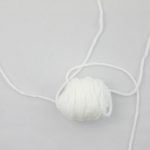
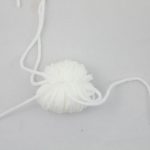
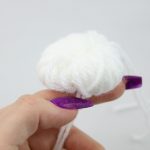
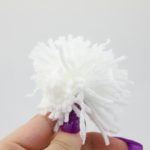
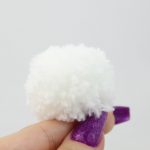
Pom Pom Tail:
In White
First, cut a 12″ piece of white yarn and set aside for later. Now, take white yarn and wrap it around for 3 fingers 80 times (Pic 1, 2, & 3). Now take the yarn off your fingers (Pic 4). Wrap the 12″ piece of yarn around the yarn a few times (Pic 5-6). Do this tightly to secure. Now, cut the loops of yarn as shown (Pic 7-10). Be sure to cut all the longer pieces of yarn off to get a puffy ball. Finally, sew the pom pom to the back of the rabbit.


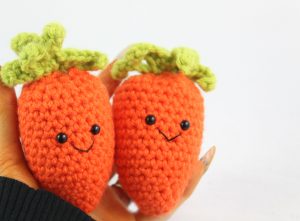
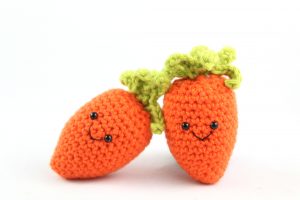
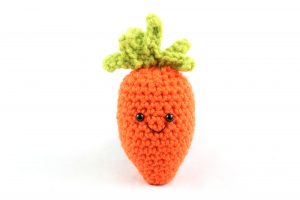
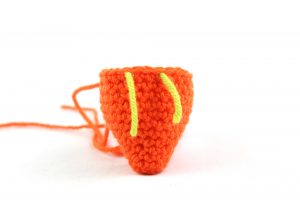
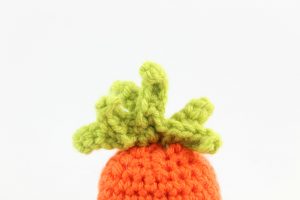
Carrot:
In Orange
Round 1: 6 Sc in Magic Ring (6)
Round 2: *Inc, Sc* all around (9)
Round 3: *Sc* all around (9)
Round 4: *Inc, Sc 2* all around (12)
Round 5: *Sc* all around (12)
Round 6: *Inc, Sc* all around (18)
Round 7: *Sc* all around (18)
Round 8: *Inc, Sc 2* all around (24)
Round 9-12: *Sc* all around (24)
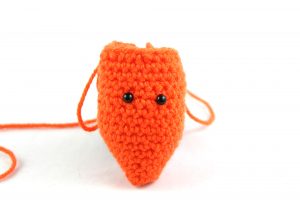
Round 13: Sc in the next 10 st. Sc in the next st and add a different colored stitch marker to the Sc just made. This marks where to place the eye. Sc in the next 2 st. Sc in the next st and add a different colored stitch marker to the Sc just made. Sc in the next 10 st (24)
Round 14-17: *Sc* all around (24)
Round 18: *Dec, Sc 2* all around (18)
Add eyes here. Stuff now.

Round 19: *Dec, Sc* all around (12)
Round 20: *Dec* all around (6)
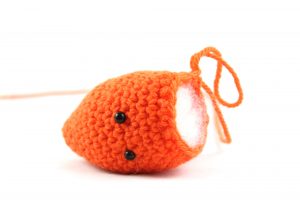
Finish off. Sew closed.
Smile:
In Black Embroidery Thread
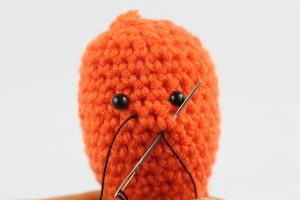
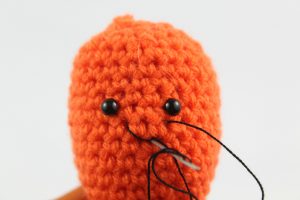
Insert needle in the middle of the mouth, and pull it out where shown (Pic 1). Reinsert needle back into the middle of the smile, and pull out on opposite side as shown (Pic 2). Finally, reinsert needle into the middle of the smile and pull through (Pic 3). Weave in ends.
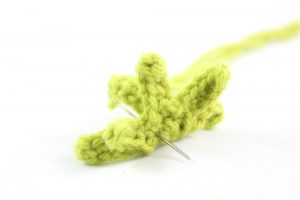
Carrot Leaves:
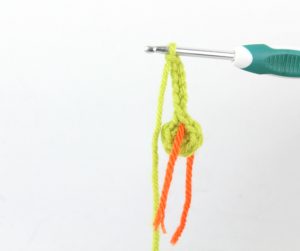
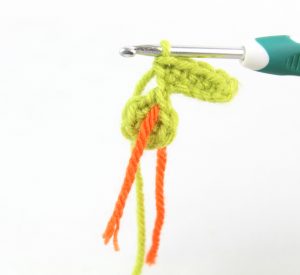
In Green
Round 1: 6 Sc in Magic Ring (6)
Round 2: *Sc in the next st (Pic 1). Ch 6 (Pic 2). Sc in the 2nd ch from hook, Sc in the next 4 ch (Pic 3). SlSt in the original Sc (Pic 4)* 6 times (9)
Finish off. Fold piece in half and sew bottom area to secure. Pin to the top of the carrot and sew on.


 Done! If you finished this pattern, I would be SO HAPPY if you


21 Comments
You Your patterns are wonderful! Than k you so much!
Thank you so much! I’m really happy to hear that you like them 🙂
Love this pattern, very well written . I have 2 left to make out of 5 and I’m definitely going to try this bunny pattern. Thank so much for sharing.
Hi Violet, I’m so happy to hear that you like this pattern. That means so much to me 🙂 You’ve made a lot of these rabbits, I would love to see! Thank you so much for your kind comment
Hi love the pattern but having problems with nose and muzzle in the making them. Do I work down other side of chain?
Hi Liz! Yes, you work around the other side of the chain as well 🙂
Hi I’m loving this pattern. For muzzle round one says total stitch at the end should be fourteen but I end up with thirteen. What am I not understanding?
Hi Freida, thank you! For the muzzle I updated it to Chain 7, which should result in 14 stitches at the end of the round. Please let me know if you have any questions!
Thank you a pattern I can actually follow. Happy Easter
That’s so awesome to hear Lynn, thank you! Happy Easter, I hope you have a great one this year <3
Eine großartige Anleitung sehr verständlich und das Ende ein tolles Ostergeschenk. Danke es war eine Freude es zu häkeln wie gesagt das Ergebnis ein wow .
Hi I am stuck on the eyes. It says to do in the round. But you have done in rows. I don’t know how many stitches to do in rows also any Inc stitches
Hi there Jacki!
The eyes are done in a round, please follow the instructions under the “Eyes” to see how many stitches to make into a magic ring, and when to increase 🙂 The eyelids that go on top of the eyes are done in rows, though. I hope this could help! Please just let me know if I can clarify anything ❤️
When starting the muzzle, the stitches don’t work out right for row 1 please explain
How much of each yarn color do you need? I didn’t see it in the post.
I have this saved to make it by April 1st but can’t until I make sure I have enough
Thank you so much for this pattern and info on the yarn.
Debbie
I have the same question. It would not be much fun to end up with a shortage of yarn.
Great free pattern . Thank you !
I procrastinated on doing this pattern for a while because it looked hard to do but it was very easy to and regret not doing it sooner!! I love the way it turned out and I love how cartoony it feels!
Love thr way it turned out. Thanks for the pattern.
Love the way it turned out. Thanks for the pattern.
Hi 😁 Loving the pattern – it is going very well but I am having a hard time getting the muzzle right. I am not understanding the pattern. The numbers are not equaling out. When I chain 7 and work the sts my sts go past the chain 7 but do not go all the way around to the end of other side of chain. Please if you could help me, I would be very appreciative 😁 Lisa B. Thank you 😊