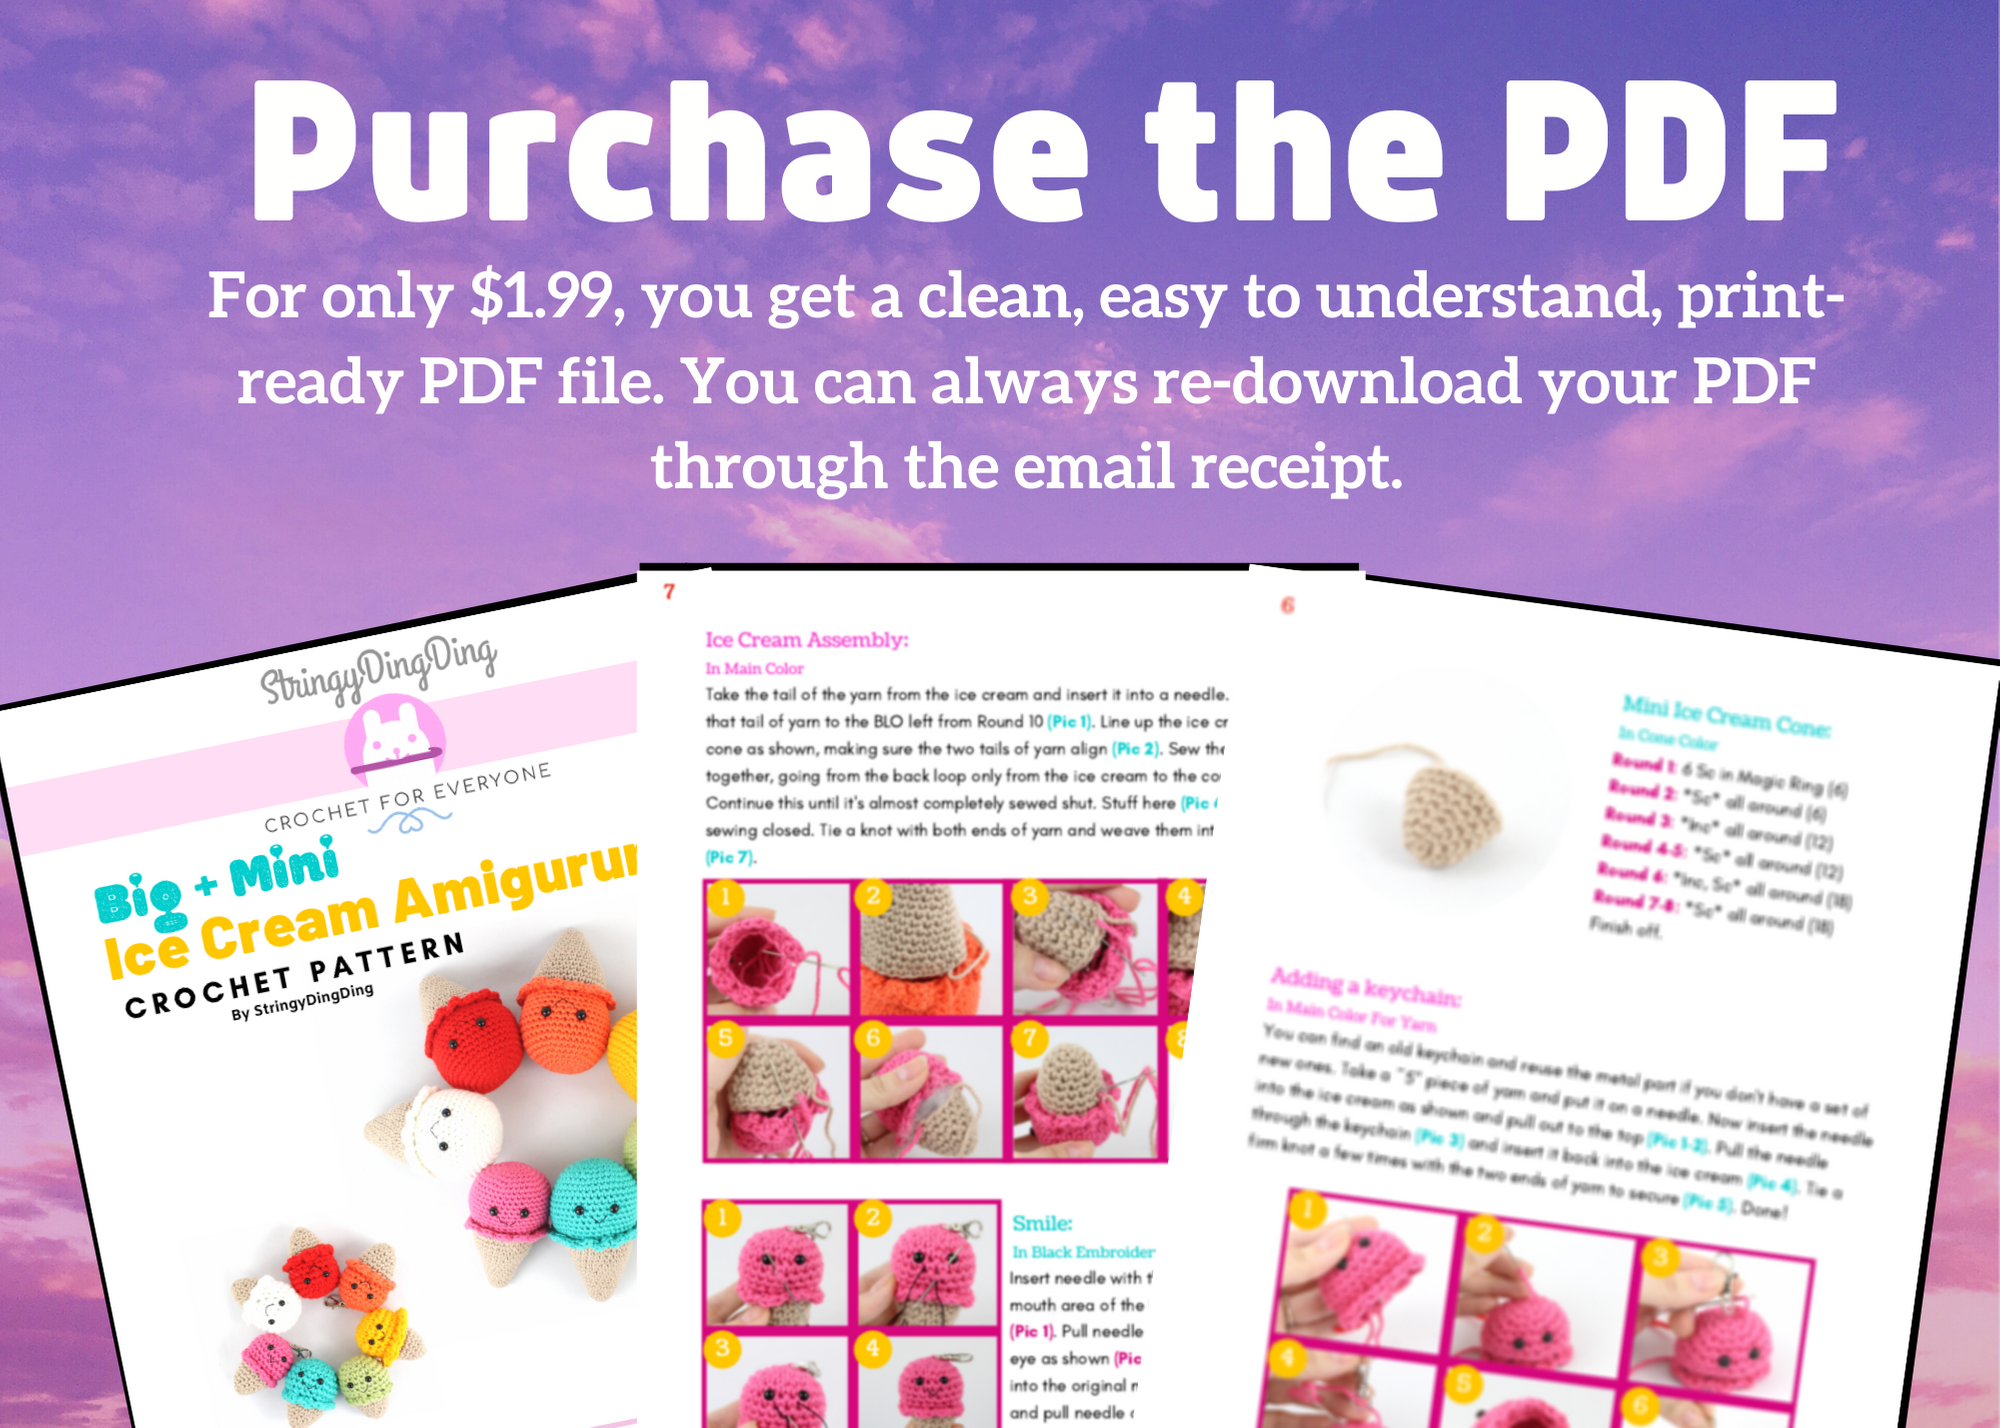
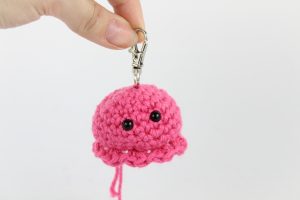
Purchase the PDF version here

Supplies:
4mm crochet hook, 4/Medium weight yarn in Main Color and Cone Color. 9mm safety eyes for big ice cream, 6mm safety eyes for small keychain ice cream tapestry needle, scissors, keychain (optional), and stuffing.
Additional Information:
Difficulty: Easy
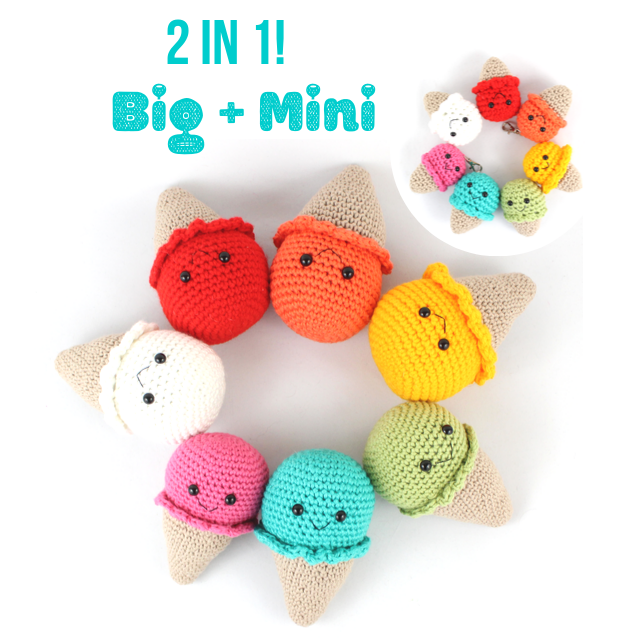
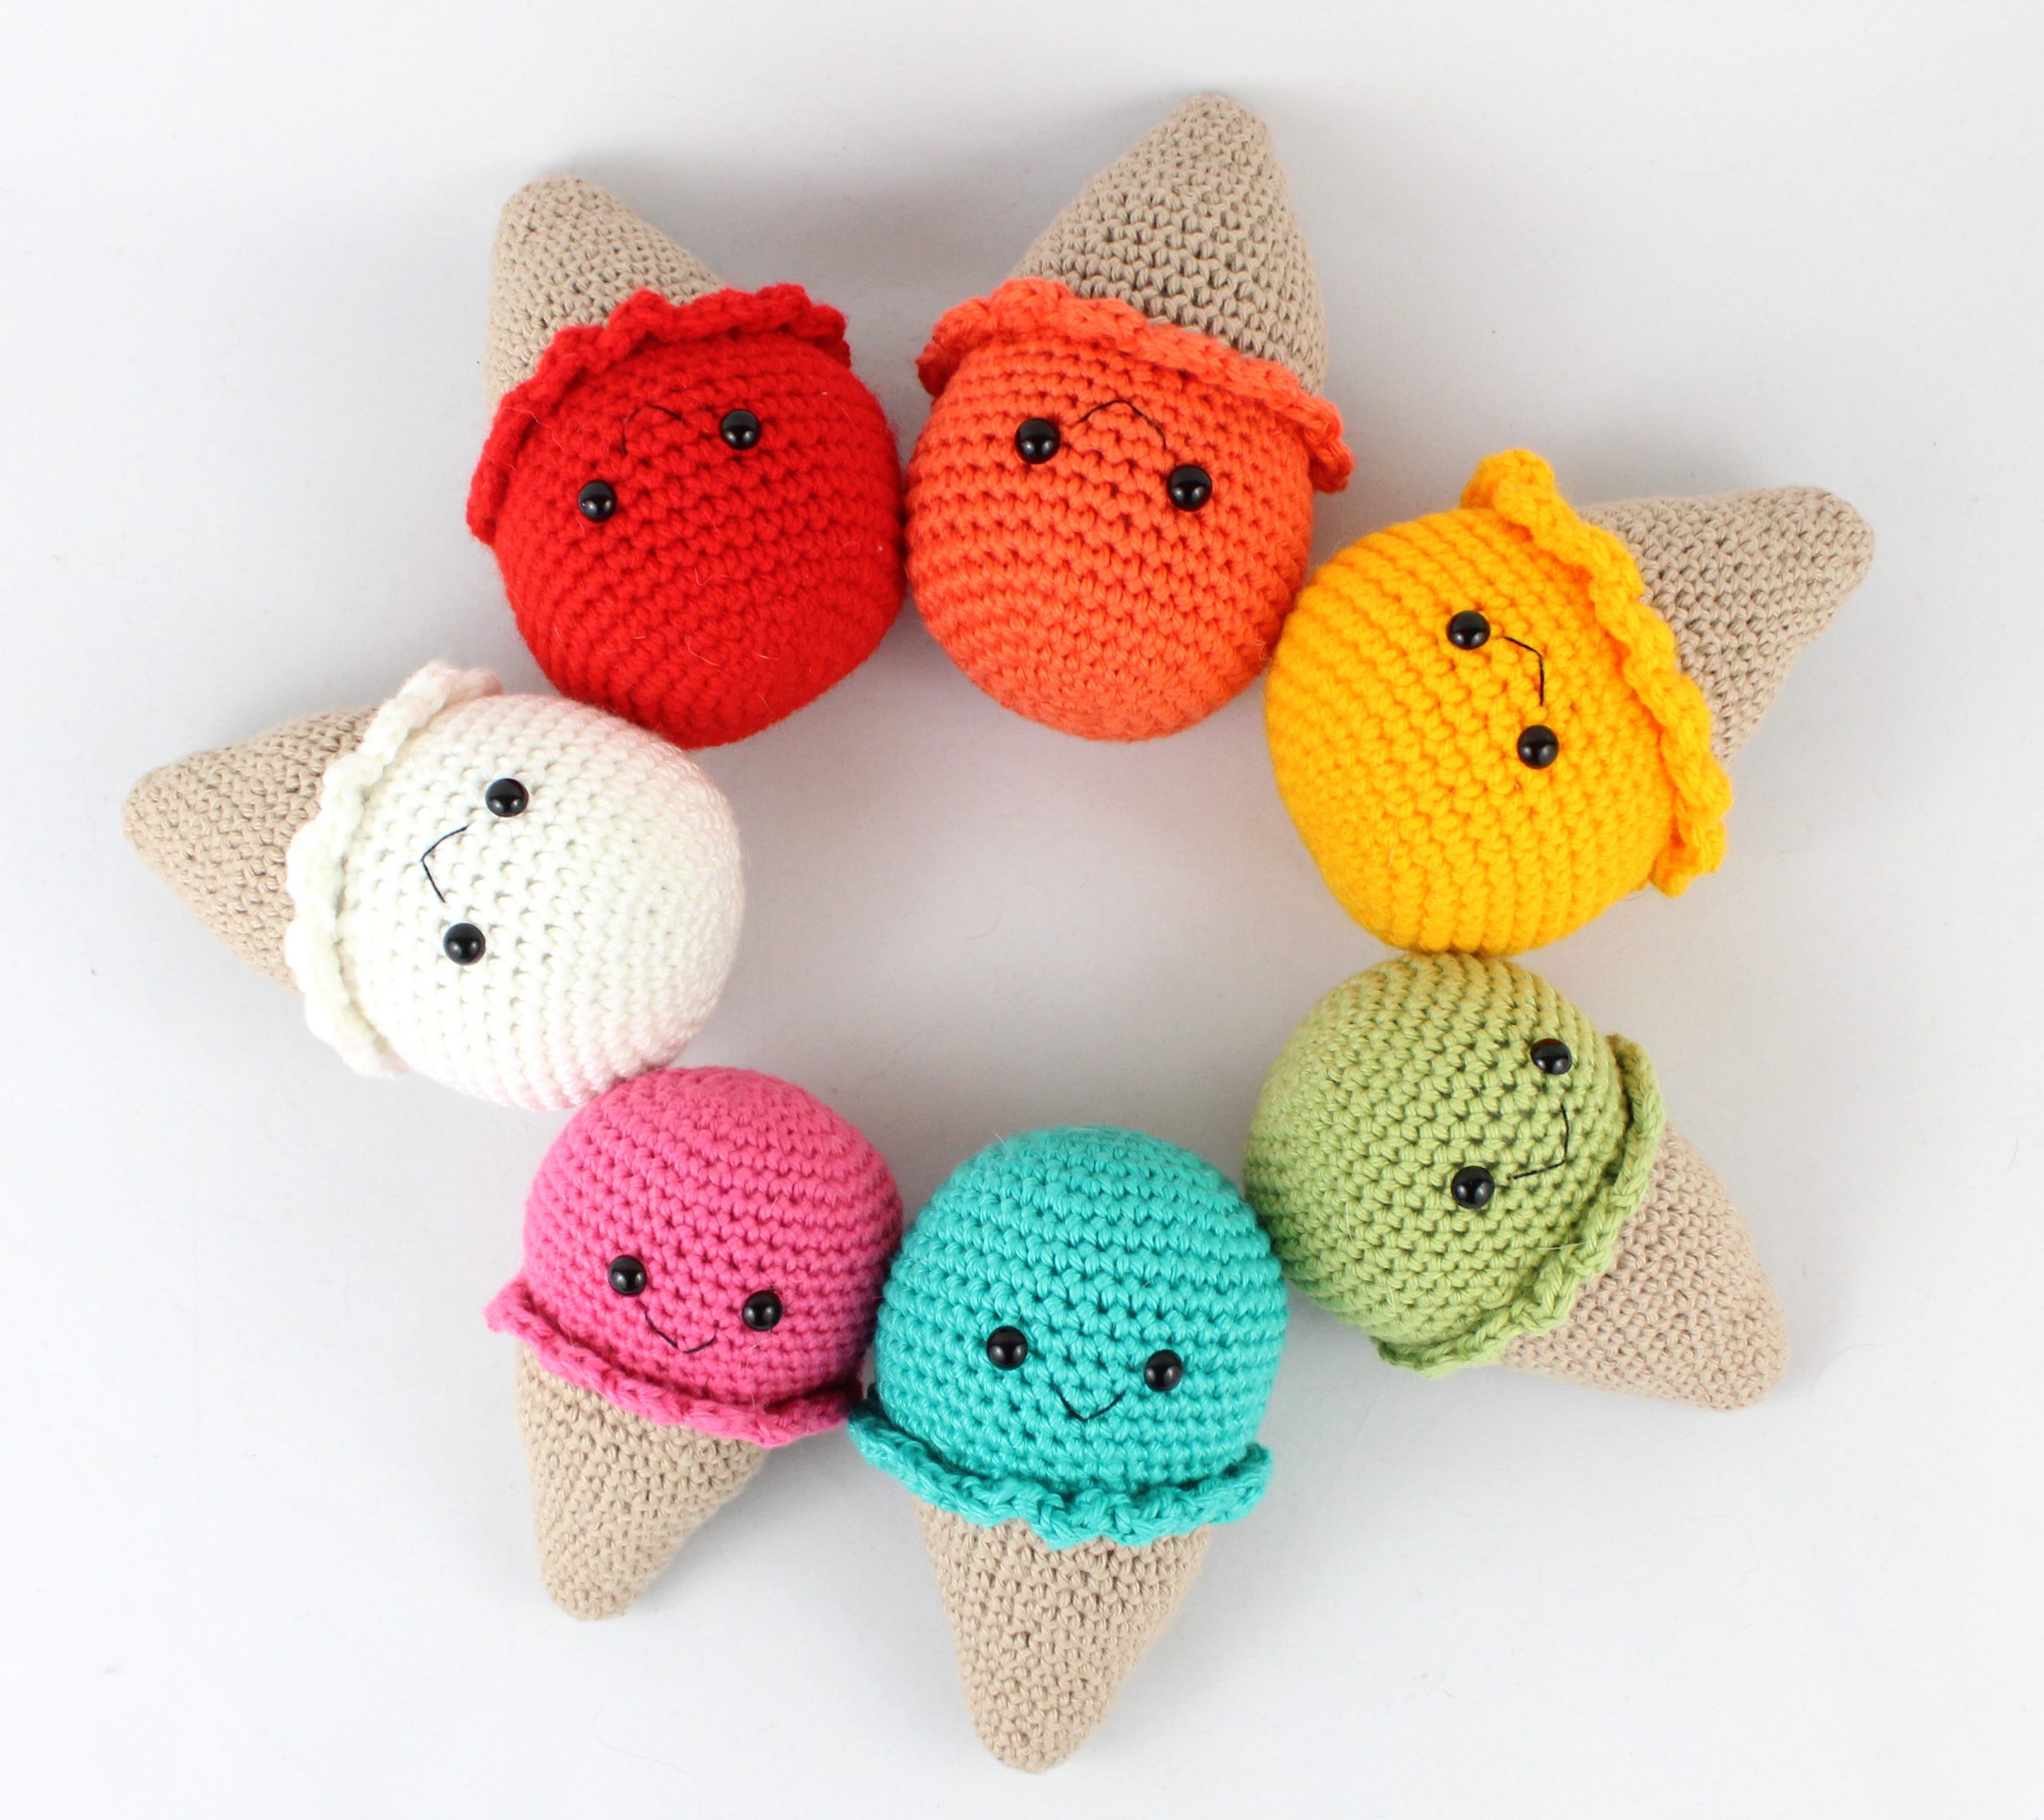
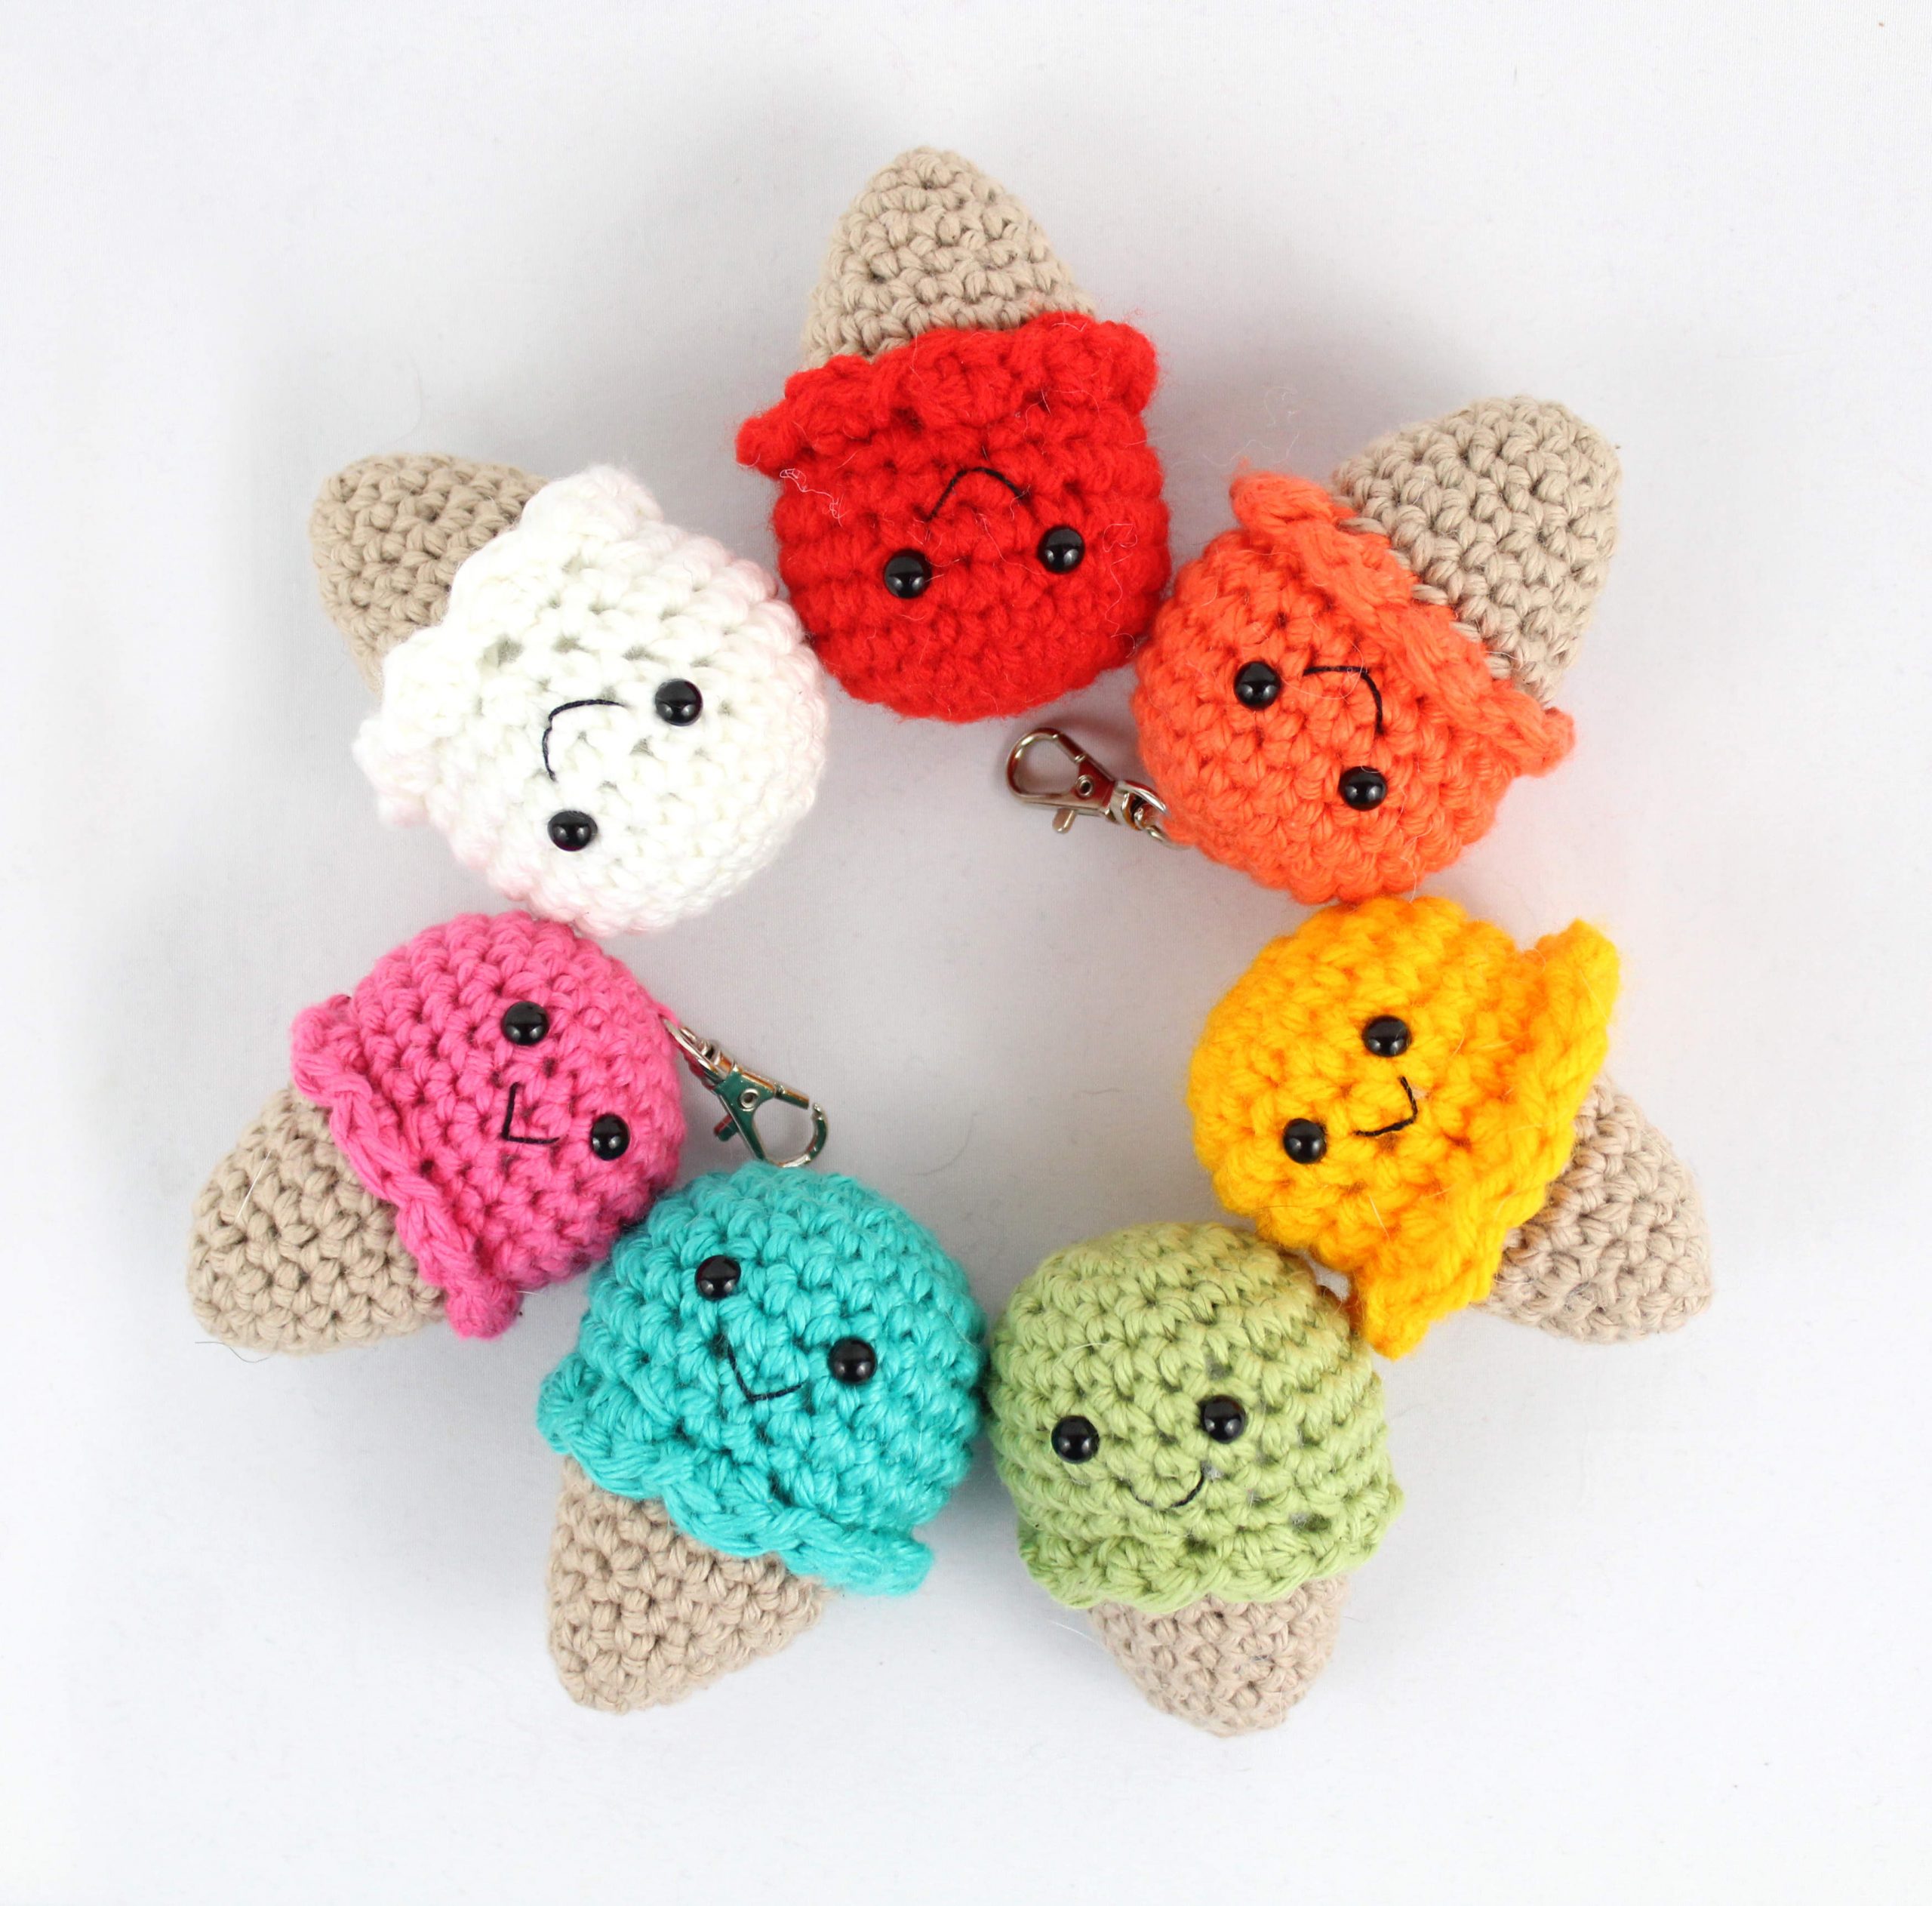
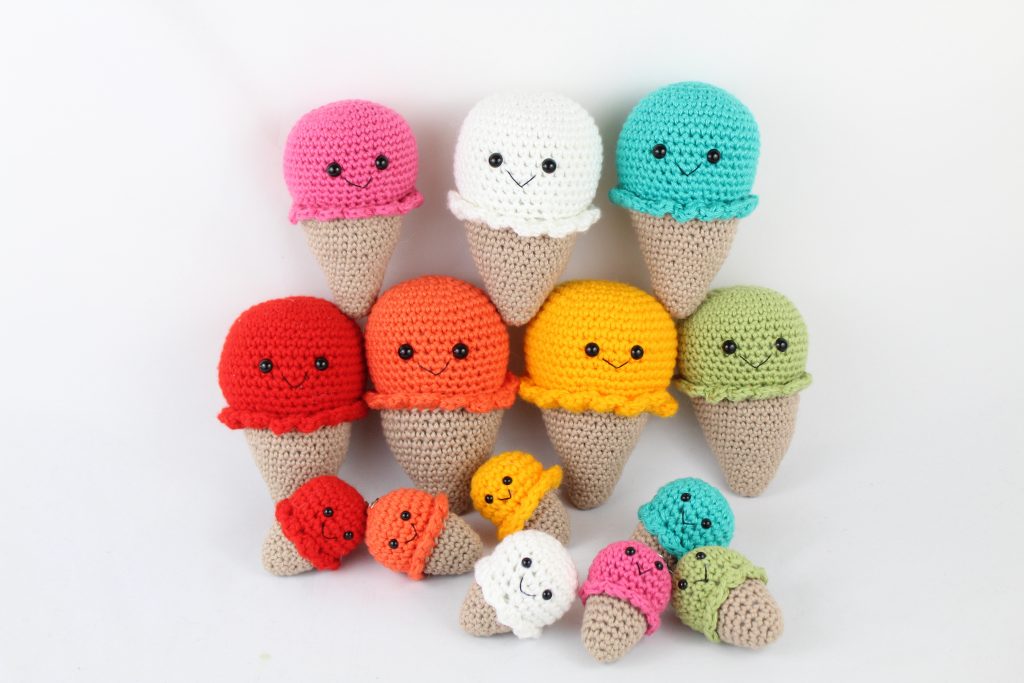
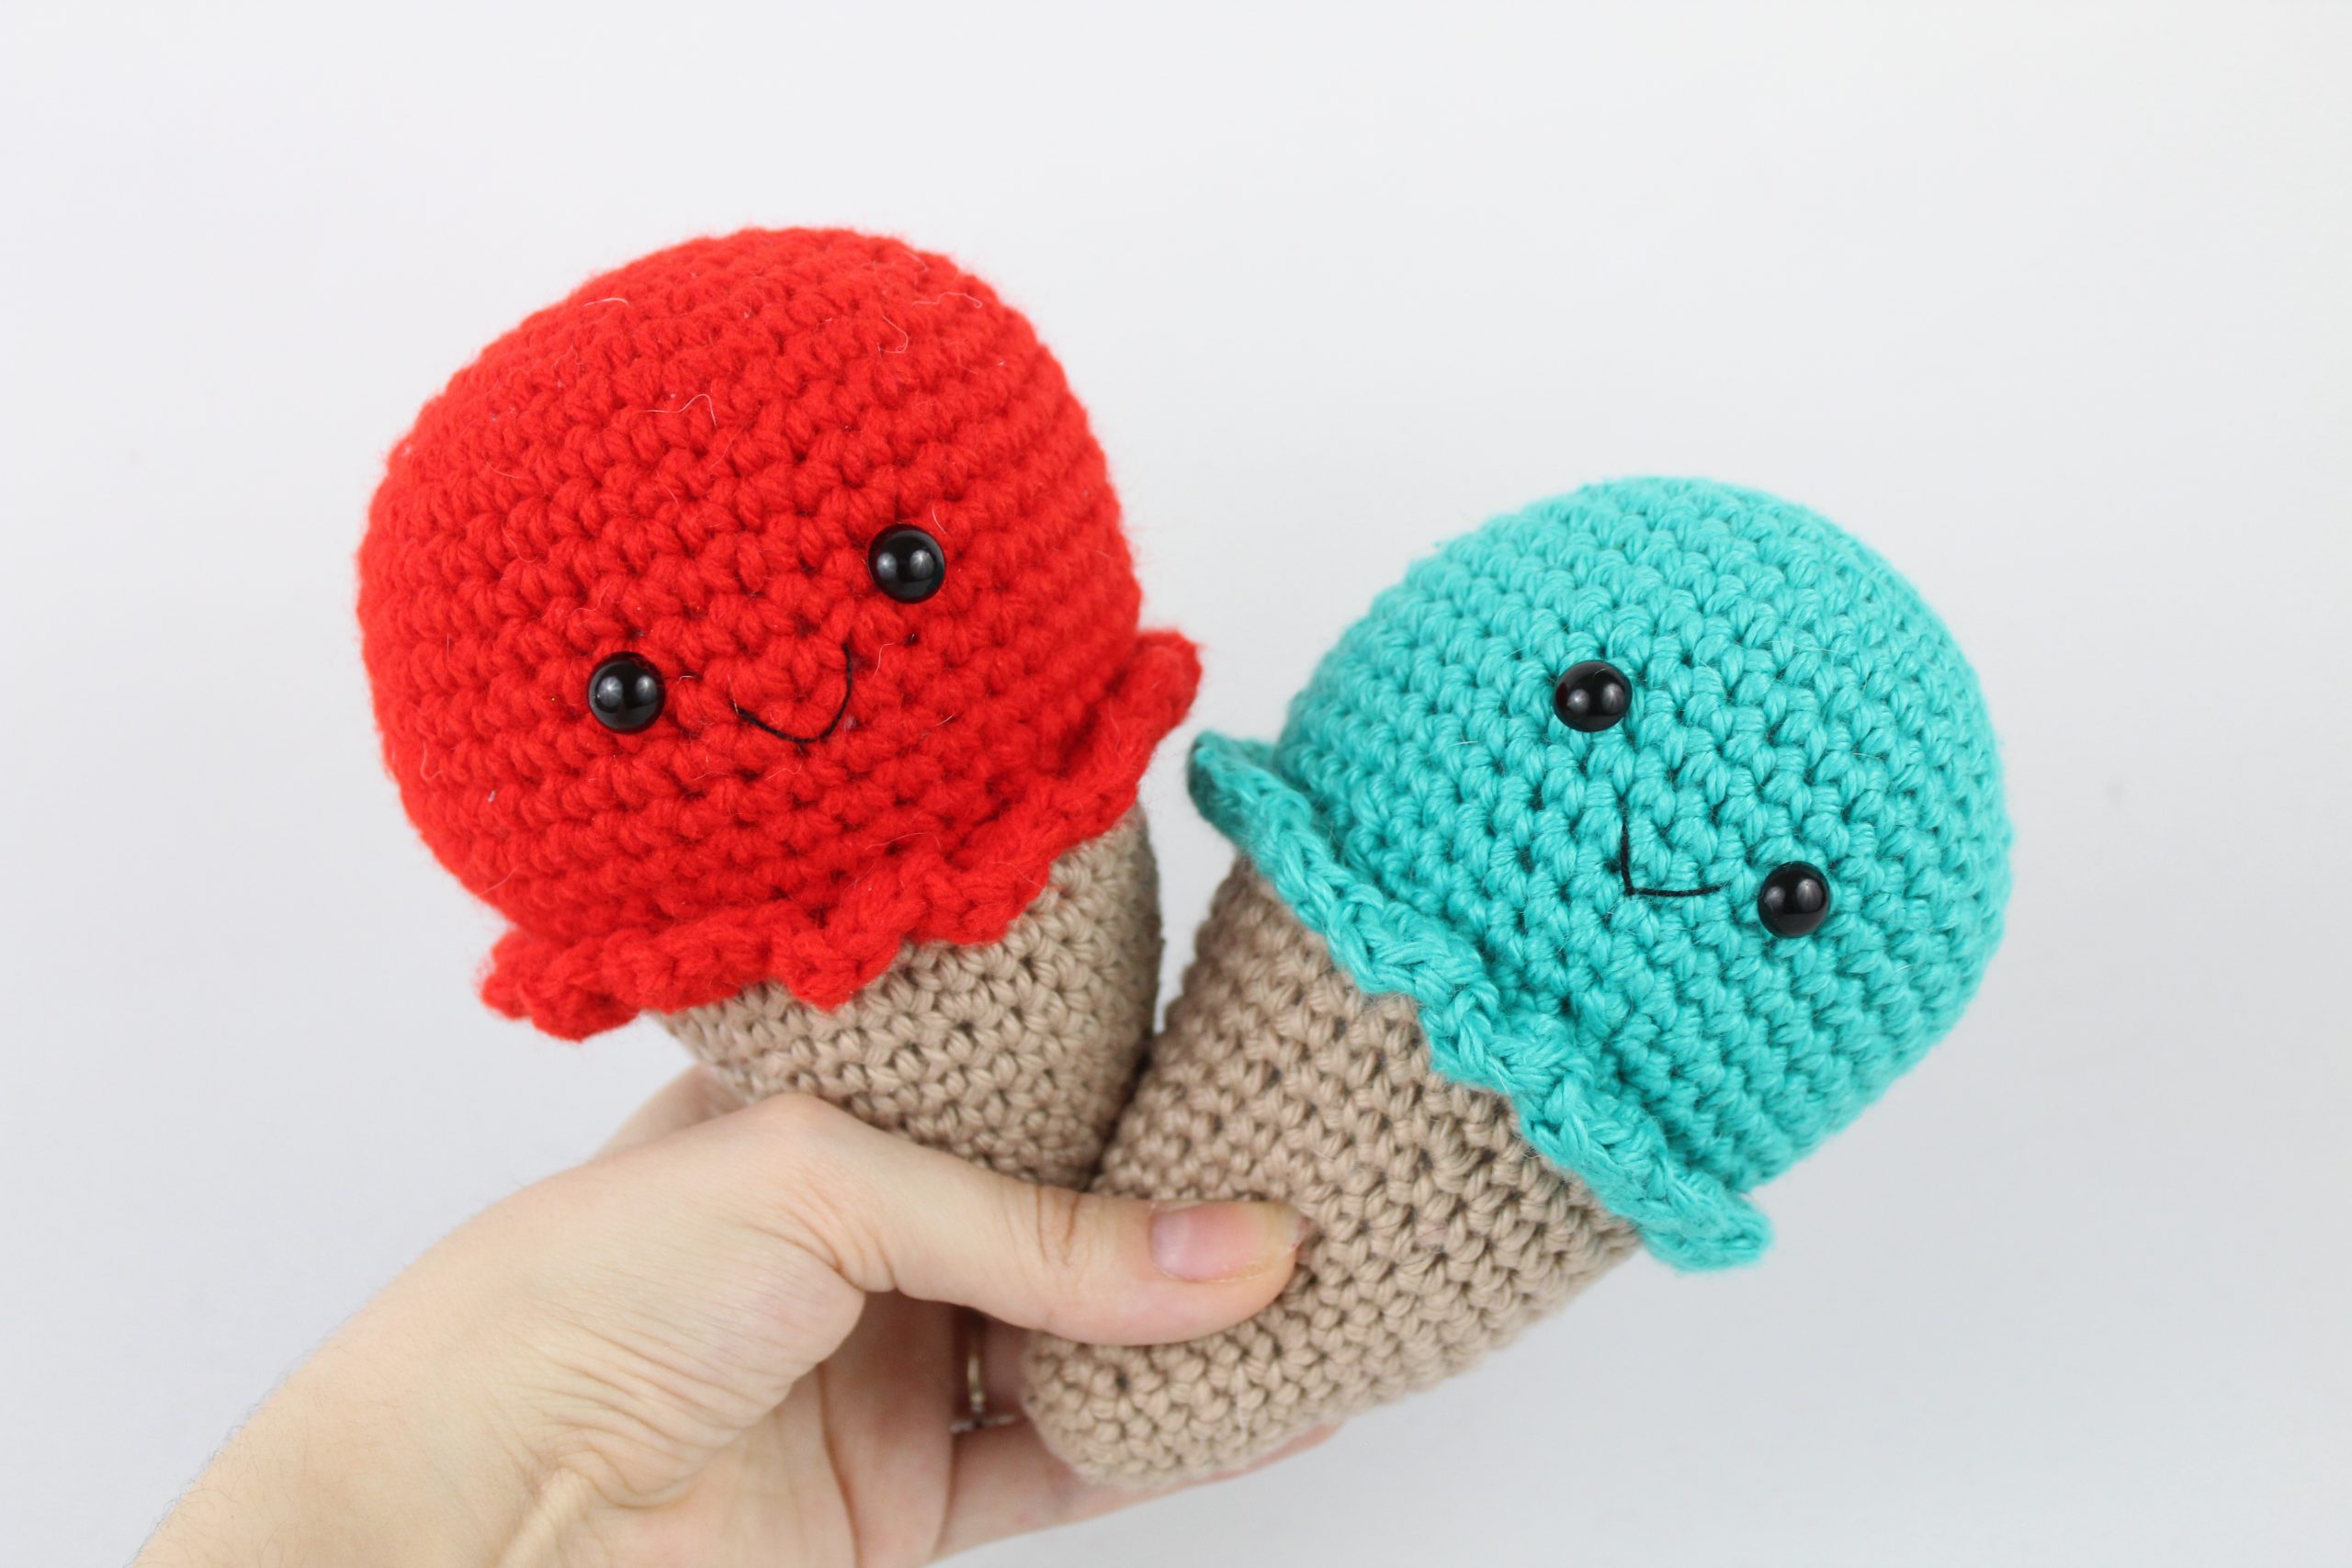
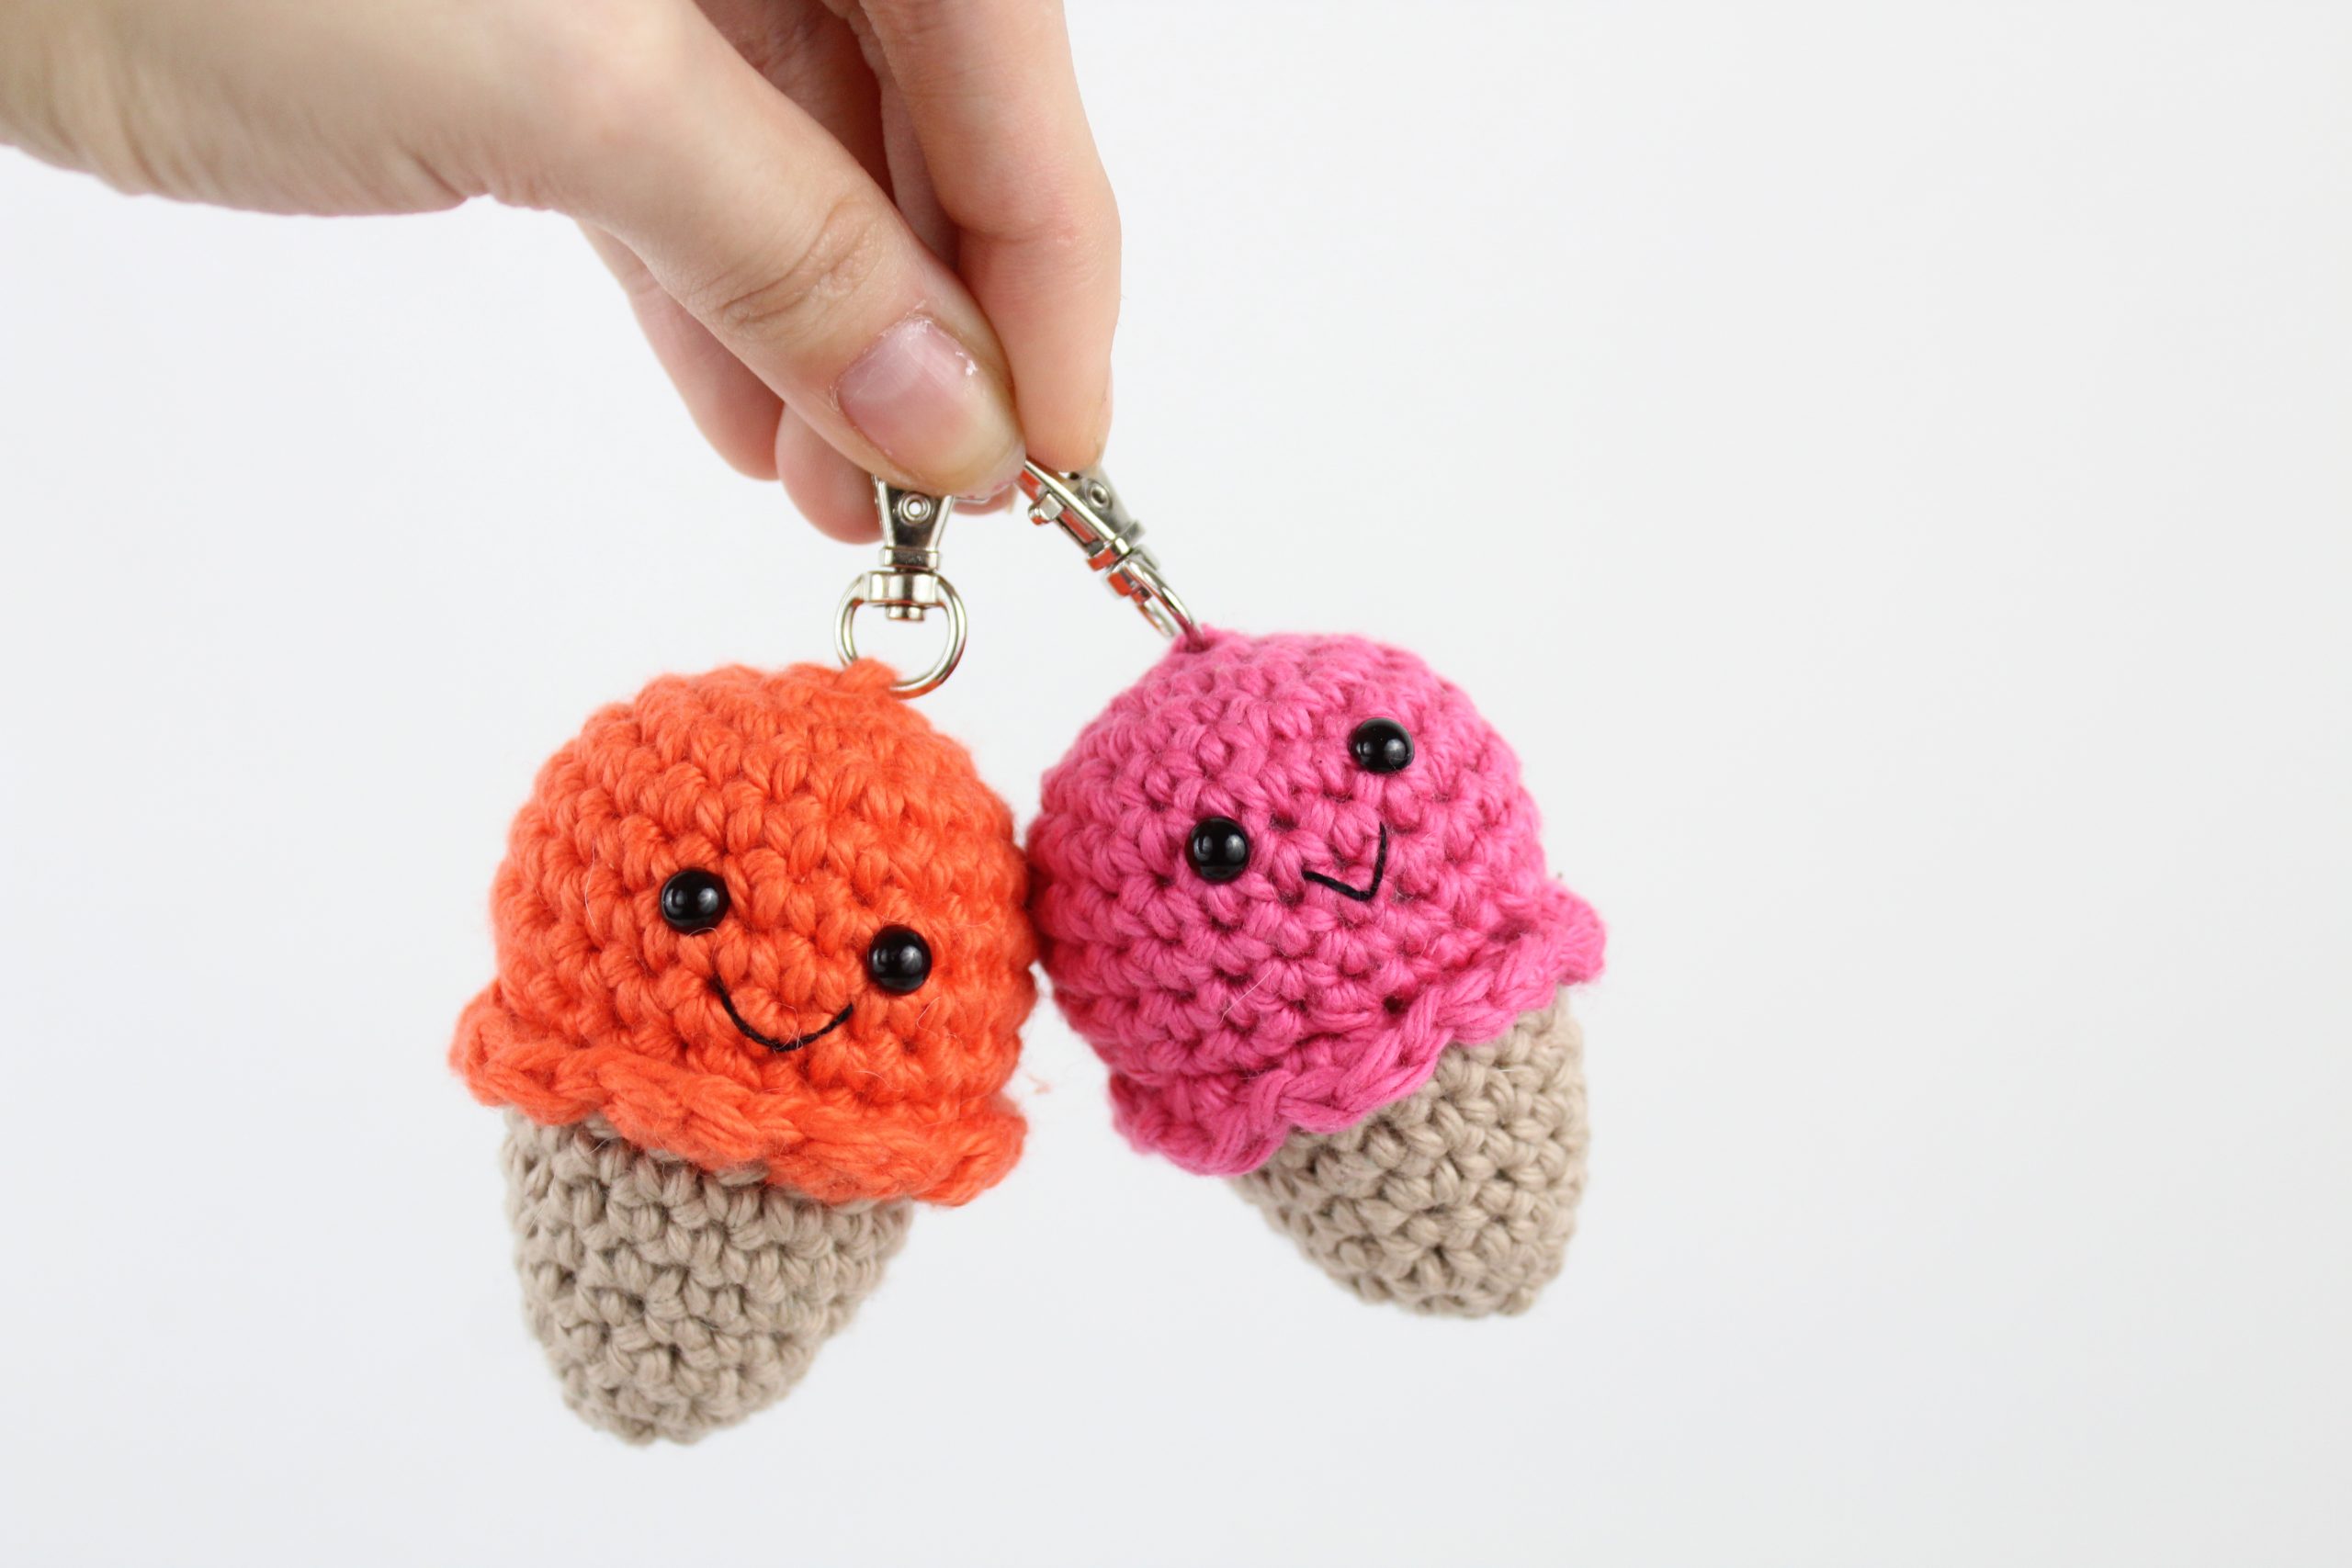
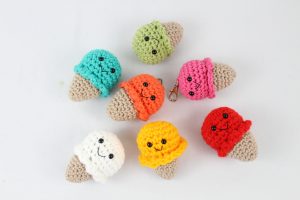
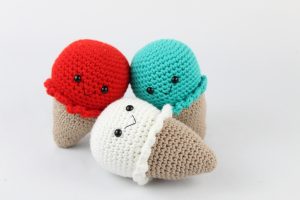
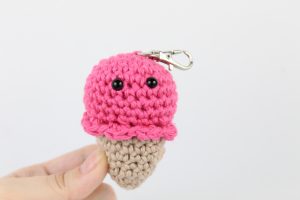
Make a big ice cream and a mini scrap,/keychain version! This pattern refers to “Main Color”. This is the main color you will use for your ice cream. We start by creating the ice cream top, then the cone, and we then sew them together. Next, you can create a mini ice cream, in which we sew on a keychain and then assemble the cone and ice cream together.
Ice Cream Top:
In Main Color
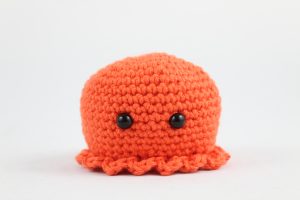
Round 1: 6 Sc in Magic Ring (6)
Round 2: *Inc* all around (12)
Round 3: *Inc, Sc* all around (18)
Round 4: *Inc, Sc 2* all around (24)
Round 5: *Inc, Sc 3* all around (30)
Round 6: *Inc, Sc 4* all around (36)
Round 7: *Inc, Sc 5* all around (42)
Round 8-11: *Sc* all around (42)
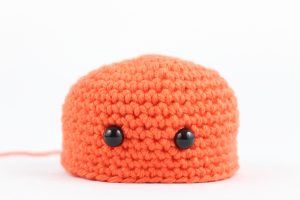
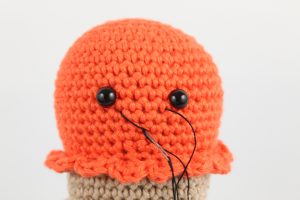
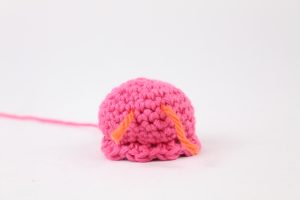
Round 12: Sc in the next 12 st. Sc in the next st and add a different colored stitch marker to the sc just made. This marks where to place the safety eye later. Sc in the next 4 st. Sc in the next st and add a different colored stitch marker to the sc just made. Sc in the next 24 st (42)
Round 12 eye markers pictures below
Round 13-16: *Sc* all around (42)
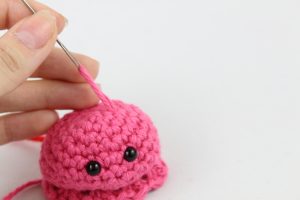
Add safety eyes in marked areas now.
Round 17: *Dec, Sc 5* all around (36)
Round 18: *Dec, Sc 4* all around (30)
Round 19: In the FLO (Front Loop Only),*Dc 4 times in the next stitch, SlSt in the next stitch* all around (75)
Finish off and leave a long tail for sewing. Set the ice cream aside for now and we will assemble it to the cone later.
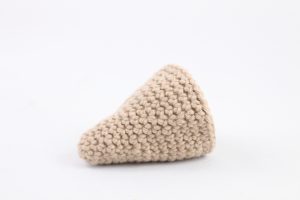
Cone:
In Cone Color
Round 1: 6 Sc in Magic Ring (6)
Round 2: *Inc* all around (12)
Round 3-4: *Sc* all around (12)
Round 5: *Inc, Sc* all around (18)
Round 6-8: *Sc* all around (18)
Round 9: *Inc, Sc 2* all around (24)
Round 10-11: *Sc* all around (24)
Round 12: *Inc, Sc 3* all around (30)
Round 13-14: *Sc* all around (30)
Round 15: *Inc, Sc 4* all around (36)
Round 16-17: *Sc* all around (36)
Finish off. Continue to “Assembly”.
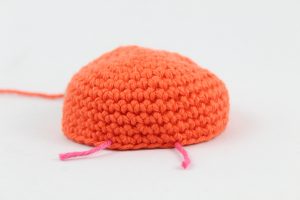
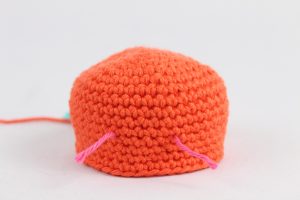
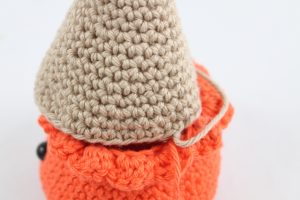
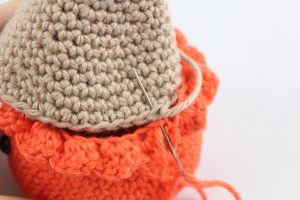
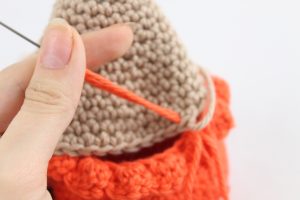
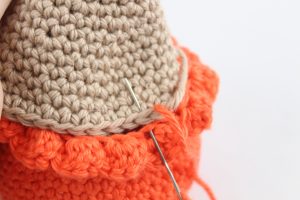
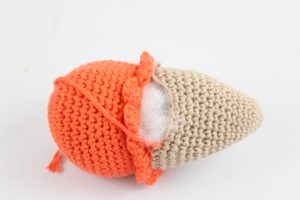
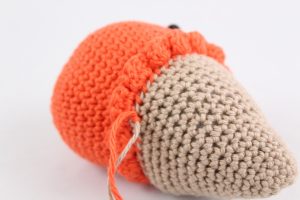
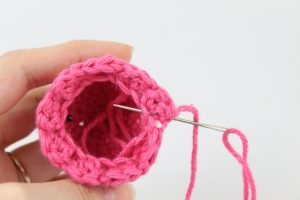
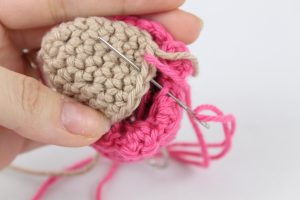
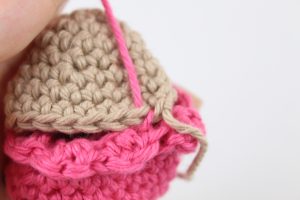
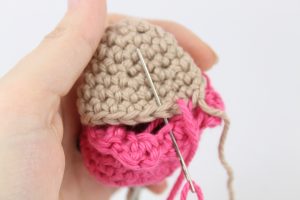
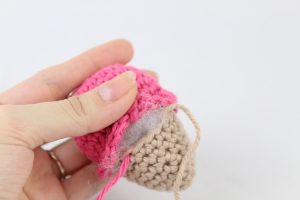
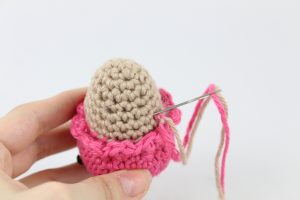
Ice Cream Assembly:
In Main Color
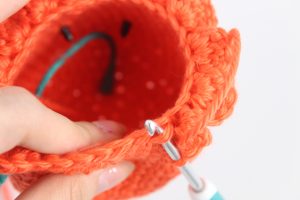
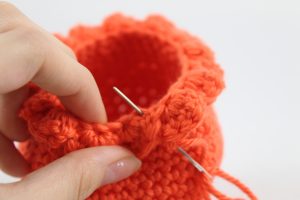
Take the tail of the yarn from the ice cream and insert it into a needle. Weave that tail of yarn to the BLO left from Round 19 (Pic 1). Line up the ice cream and cone as shown, making sure the two tails of yarn align (Pic 2). Sew them together, going from the back loop only from the ice cream to the cone (Pic 3-5). Continue this until it’s almost completely sewed shut. Stuff here (Pic 6). Continue sewing closed. Tie a knot with both ends of yarn and weave them into the cone (Pic 7).
1. 2.
2.
3. 4.
4.
5. 6.
6.
7. 8.
8.
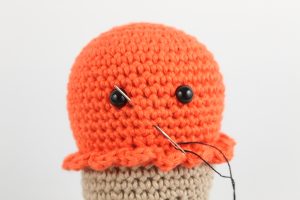
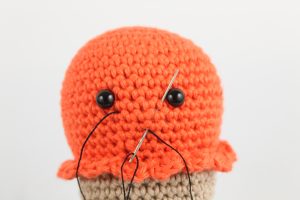
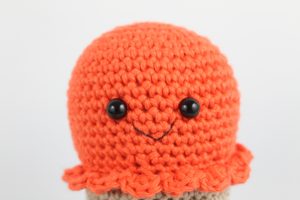
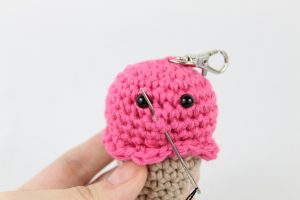
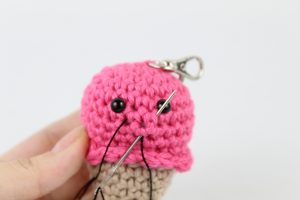
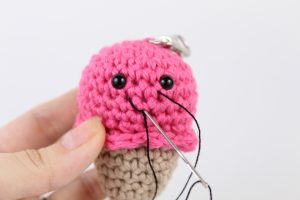
Smile:
In Black Embroidery Thread
Insert needle with thread into the middle mouth area of the ice cream and pull needle out around the left eye as shown (Pic 1). Reinsert needle into the original middle insertion spot and pull needle out around the right eye as shown (Pic 2). Reinsert needle into the original insertion spot (Pic 3). Done!
1. 2.
2.
3. 4.
4.
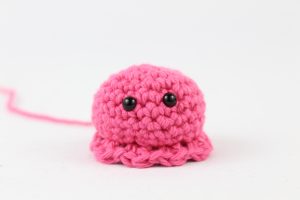
Mini Ice Cream Top:
In Main Color
Round 1: 6 Sc in Magic Ring (6)
Round 2: *Inc* all around (12)
Round 3: *Inc, Sc* all around (18)
Round 4: *Inc, Sc 2* all around (24)
Round 5: *Sc* all around (24)
Round 6: Sc in the next 8 st. Sc in the next st and add a different colored st marker to the Sc just made. Sc in the next 2 st. Sc in the next st and add a different colored st marker to the Sc just made. Sc in the next 12 st
Round 6 eye marked pictures below
Round 7-8: *Sc* all around (24)
Round 9: *Dec, Sc 2* all around (18)
Round 10: In the FLO (Front Loop Only) Repeat *2 Dc in the next stitch, SlSt in the next stitch* all around (27)
Finish off and leave a long tail for sewing. Add safety eyes in the marked areas from Round 6.
Set aside, we will assemble the ice cream to the cone soon.
Mini Ice Cream Cone:
In Cone Color

Round 1: 6 Sc in Magic Ring (6)
Round 2: *Sc* all around (6)
Round 3: *Inc* all around (12)
Round 4-5: *Sc* all around (12)
Round 6: *Inc, Sc* all around (18)
Round 7-8: *Sc* all around (18)
Finish off.
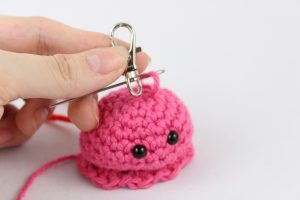
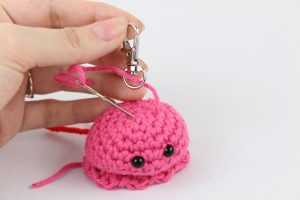
Adding a keychain:
In Main Color for Yarn
You can find an old keychain and reuse the metal part if you don’t have a set of new ones. Take a ~5″ piece of yarn and put it on a needle. Now insert the needle into the ice cream as shown and pull out to the top (Pic 1-2). Pull the needle through the keychain (Pic 3) and insert it back into the ice cream (Pic 4). Tie a firm knot a few times with the two ends of yarn to secure (Pic 5). Done!
1. 2.
2.
3. 4.
4.
5. 6.
6.
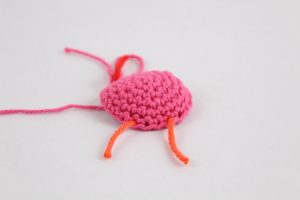
Cone Assembly:
In main Color
Take the tail of the yarn from the ice cream and insert it into a needle. Weave that tail of yarn to the BLO left from Round 10 (Pic 1). Line up the ice cream and cone as shown, making sure the two tails of yarn align (Pic 2). Sew them together, going from the back loop only from the ice cream to the cone (Pic 3-5). Continue this until it’s almost completely sewed shut. Stuff here (Pic 6). Continue sewing closed. Tie a knot with both ends of yarn and weave them into the cone (Pic 7).
1. 2.
2.
3. 4.
4.
5. 6.
6.
7. 8.
8.
Smile:
In Black Embroidery Thread
Insert needle with thread into the middle mouth area of the ice cream and pull needle out around the left eye as shown (Pic 1). Reinsert needle into the original middle insertion spot and pull needle out around the right eye as shown (Pic 2). Reinsert needle into the original insertion spot (Pic 3). Done!
1. 2.
2.
3. 4.
4.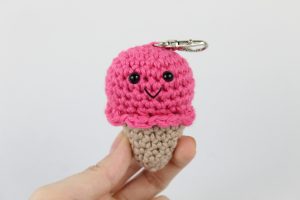
Done! I hope you enjoyed this pattern. If you made it I would LOVE to see! You can “try” it on Pinterest to show me.


57 Comments
I didn’t know what was really going on when I made this pattern but I attempted to make the big ice cream cone with “Caron” yarn and it just wasnt taking shape. I first thought that I must be the yarn I was useing but I came to the conclusion that there was some kind of mistake in the pattern because you should be able to use any pattern with any type of yarn. I was very disapointed in this because I was hoping to give this stuffy as a gift to a close friend of mine.
Hi Mary Ann! Thank you so much for reaching out ❤️ I’m so sorry to hear that you’re having trouble with this pattern 🙁
A lot of people have successfully made this ice cream pattern, so I don’t think there’s any issues with it unless an error has completely skipped by me! If you came across a part where you think there’s an error please let me know and I will take a look 🥰
It also shouldn’t matter what yarn you use with this pattern, as long as you use the appropriate hook size with the yarn. So you could even make this pattern using blanket yarn (size 5 bulky) with a 6mm crochet hook and the pattern should come out right!
Maybe is there a misunderstanding when it comes to reading this pattern? If so, please let me know and I’m happy to try and explain it! You can also let me know what specific Caron yarn you’re using! One last thing is you can also post a picture to show me how the cone is coming out, so I can see what may be going on.
I’m so sorry again for the inconvenience, I hope to help!
I’m sorry for replaying here I could not figure out how to leave an original comment, but I am having some issues with sewing the two pieces together. At the end of the ice cream, I’m left with 30 back loops to work in, but at the end of the cone, there are 36 stitches on the last round. This caused there to be a gap at the end of sewing as there were more stitches on the cone than the ice cream. I am going to fix this by doing some double stitches in random spots with two from the cone into one of the ice cream but I just wanted to know if I am missing something or reading the pattern wrong.
I had no issue with this pattern at all !
Hello. Do you know what size of hook fits with milk cotton? Thanks
Hi Kristine! I have used a 4mm hook with milk cotton yarn and it works perfectly fine 🙂 Please let me know if that works out for you or if you have any questions!
Thank you.
Of course, I hope you like the pattern! 😍
it is really cute
Hi I just wanted to ask if you think an invisible decrease would work in place of the decreases as well?
Hi Nic! I think an invisible decrease would work out just fine in this pattern 🙂 I haven’t tried for myself, but I think it would work with no problems! Please let me know if you have any other questions ❤️
Can you post a finished project picture? I would using invisible decrease if it’s better than double decrease.
I made this with a larger yarn and an invisible decrease! I couldn’t really tell if there’s much of a difference because of the colour changes in the yarn tho. but love the pattern!
I finished mine and it came out ok. I made an error with stitching the top to the bottom but I still like it
Your ice cream is so cute!!! I love the smile on it, he looks adorable 🙂 I wouldn’t have ever guessed you made an error because it looks perfect! Thank you for sharing a picture ❤️
Do you know what size safety eyes are for the keychain ice cream? I’m almost done, just have to add the eyes!
Hi Emily! Please use 6mm safety eyes for the small ice cream 🙂 I’m sorry to not have that information in the beginning, I will add that!
Hii! I’m making the small version, but I don’t know what “dc” stands for in the 10th round! Mind explaining me that round?
Hi there, María! Thank you so much for your question, I’m happy to help 😄
“Dc” stands for the stitch “Double Crochet”. If you haven’t came across this stitch before, I have a tutorial on my StringyDingDing Member’s website here: https://members.stringydingding.com/how-to-make-a-double-crochet/
You can also find many tutorials on Youtube!
It says, “Round 10: In the FLO (Front Loop Only) Repeat *2 Dc in the next stitch, SlSt in the next stitch* all around (27)”
So for this round we are working in the front loop only! Repeat making 2 Double Crochets into the next 1 stitch. Then, make 1 Slip Stitch in the next stitch. Repeat this all around until you meet the stitch marker!
I hope this was able to help 🙂 Please feel free to let me know if I can answer any other questions or clarify anything 😍
Oh, I see! In Spain that’s called “high stitch”. I get it now haha thanks! It’s looking lovely so far 🙂
I was wondering if there is an error in the pattern, In the large ice cream top, row 18 ends with 30 stitches and in the cone row 17 ends with 36 stitches so they will not sew together evenly. The mini ice cream top and the cone both end with 18 stitches so sews together very well. Easy enough the make the large one go together but was wondering if there is an error or not. Thank you.
Hi there, Kim!
This isn’t an error, but I could see how it may be seen as one! What I did is to sew through the cone part 2 times in certain parts, and then only sew 1 time through the ice cream part. Everything should sew together nicely, but if you prefer to have everything to totally line up, you can skip Round 18 of the ice cream and continue to Round 20. This will make the ice cream match the 36 stitches of the ice cream 🙂
I hope this could help! Thanks so much for the question and please feel free to let me know if you have any more I could help answer ❤️
You’ve done very well when it comes to acknowledging replies and answering any questions that are being asked! Kudos for being on top of things!
Aww thank you so much, I try hard to be good at answering questions and such 😁 It means a lot that you noticed! Nobody’s ever mentioned what you have before, so it means a lot.
Sometimes I get behind and don’t get to thing right away, but I try to get to everyone haha 🙂 Let me know if you ever have a question or want to show me a picture of your finished amigurumi, I’d love to see it!
Hello! I love this pattern so much!! Would it be okay if I sold a few of the ice cream cones that I’ve made so far?
Hi there Shannon! I’m so happy to hear that you like this pattern 😁 You can definitely sell the finished ice cream toy you make from this pattern 🙂 I only ask to not sell the actual written pattern. I wish you the best of luck on selling your ice creams, I know you’ll do great! 😍
I did an icecream keychain and I’m ten my mom is teaching me how to do Amigurumi and I did a small icecream . And i come from goa. My name is Evelyn
For the ice cream i ended up doing puff stitches for the last round because I wanted to try a new stitch.
It is good but I do not like how you made a puff to me it does not look like a Ice cream.
Hola una duda que es dec y SISt y como se hacen
I love the mini cones!! They are adorable!! Thank you so much for sharing your pattern!! I belong to Random Acts of Crocheting Kindness on Facebook and would love to make several to leave around my town for people to find and make them smile, but I wanted to make sure that it’s ok with you first before I place any out. I never put my name on anything I hide. I just add a cute note to let finders know the item is theirs to keep, if desired. Thanks again for sharing your pattern.
I love this icecream sooo much i made it I’m only ten my mom is teaching me how to do Amigurumi . my name is Evelyn. And i live in goa
I did it I am only ten years old . My name is Evelyn. I live in goa.
I made mine with 5.0 crochet, cotton yarn for ice cream and mercerized macrame yarn for cone.
It’s a beautiful patter, mi puppy loves his new friend, thank u💕
I am so confused right from the beginning. If I have six stitches after the magic ring and inc all around then I have 12 stitches like the patter says. Then it says increase SC all around. If I increase all around in 12 stitches that would give me 24 stitches not 18. What am I missing?
I think what the pattern is referring to is a *SC and then an INC* repeated for that row. Whenever there are multiple stitches together between * it means to repeat it until the round is finished, so SC, INC, SC, INC, and so on until the end. doing this will leave you with
I love this pattern I am just starting to crochet so this is my first time doing it.
I love this pattern I am just starting to crochet.
Me and my mom are absent with this patteren
Ran out of brown scraps so made some color customizations requested by my 4 year old, added rainbow sprinkles, blush, and eyelashes!! Obsessed with how cute this is.
I think mine came out nice as a beginner! Was slightly confused on how to snip off the thread of the smile without unraveling so any tips are appreciated!
mine was a bit big but i am working on it 🙂
thank you so much bc i am trying to crochet a cat bc my moms cat died and so far i need to put on the ears and the tail and iam doing a ice cream bc my moms cat used to lick my ice cream
thank you so much bc i am trying to crochet a cat bc my moms cat died and so far i need to put on the ears and the tail and iam doing a ice cream bc my moms cat used to lick my ice cream
sorry for saying the same things 3 times
LOVE!
So adorable!!! 😄 Thank you for sharing!
I love this pattern and I am loving playing around with different flavor combinations! Thank You!
Love it!!
I love this pattern! Thank you so much!
I dont know why, but it ended up kind of hexagonal type. I went really slowly. I do not blame you. But it has happened to me before when i am working on curved objects. Do you have any tips?
Mine’s a little bit wonky, but it’s super cute. I didn’t add a smile. I’m sorry. I just realized right now. I used the biggest safety eyes I had. Im sorry. I think one of the reasons that it’s kinda wonky is because I used yarn scraps. I don’t have enough money for polyester fill. Hope you like. Open to crituiques.
your ice cream is really good and really cute. and using yarn scraps to stuff it is a great idea too
Merci pour votre patron. Cette petite glace et trop mimi!!!!
Par contre, je n’ai pas bien compris le rang de la collerette. J’ai fais : *2brides dans une maille puis 1 demi-bride dans la suivante*
Ça dois pas être ça car le résultat est différent du votre. Pouvez vous me dire ce que signifie “2B”
Je aussi fait 2 rang de plus sur le cône.
View source works, and snipping tool does as well. 🙂
hello?
This was my first ever project and I had so much fun! I must have messed up somewhere bc all 3 are different sizes and have their own quirks lol but the pattern was great and so easy to follow.
Made some of the minis today!