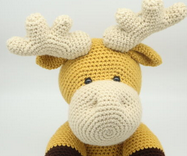
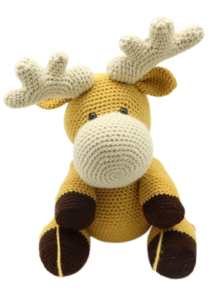
Big Moose Amigurumi – Free Crochet Pattern
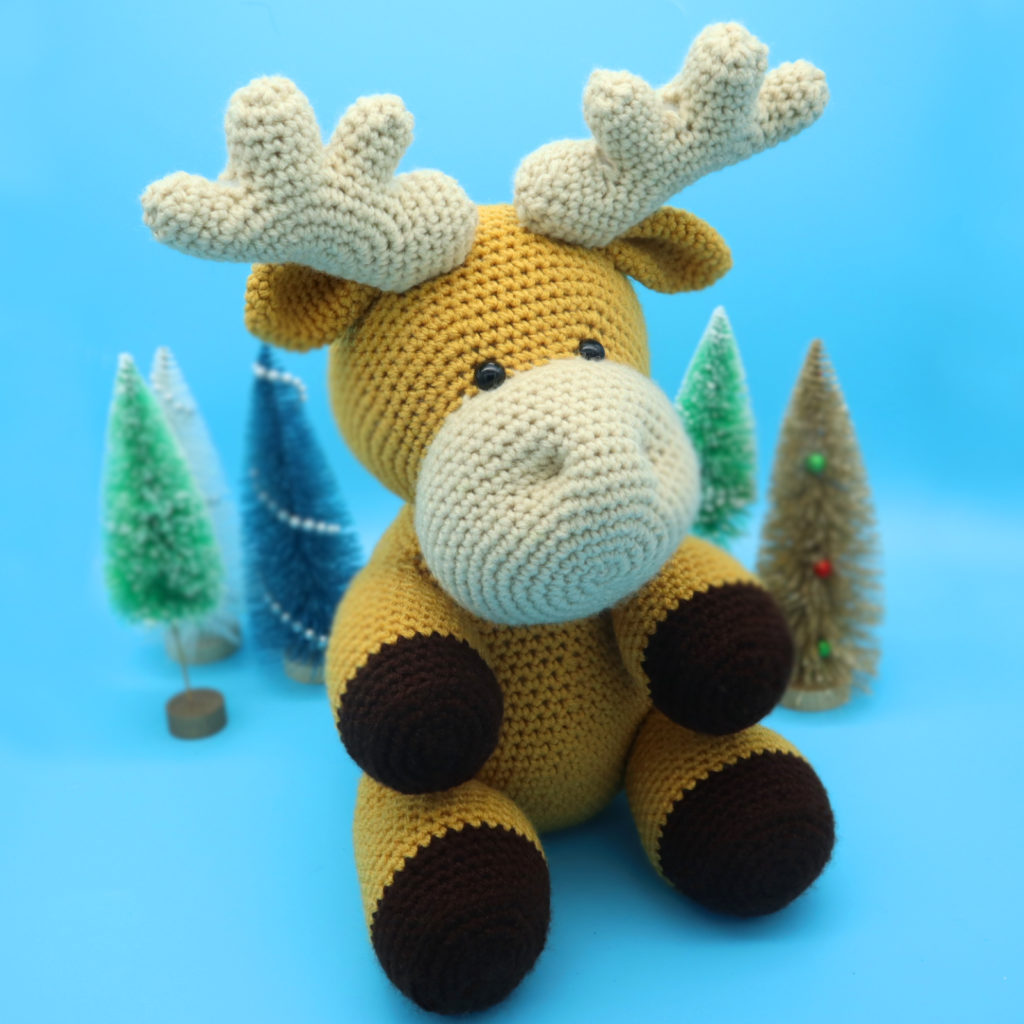
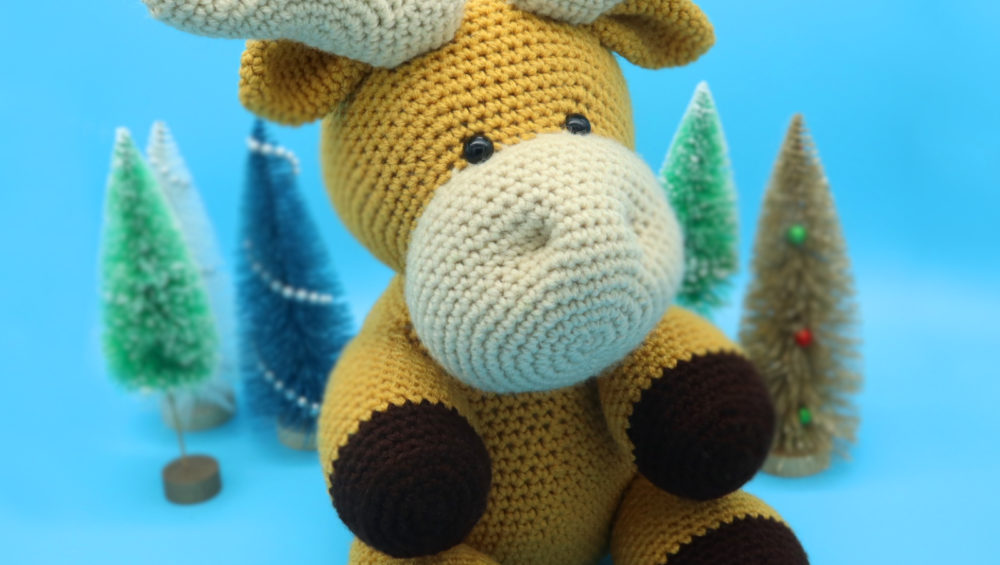
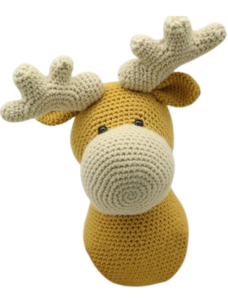
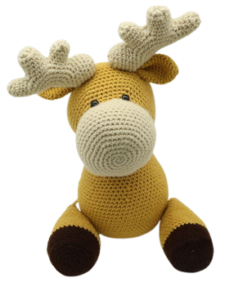
Hello! This week I’m releasing this free moose amigurumi crochet pattern! I had a real fun time making this moose. My goal was to make him big so he’s able to be cuddled by little ones. He’s a fantastic project in the winter time, but honestly, a moose is a great toy for anytime of the year! You can give him a little Christmas spiting by adding a Santa hat or a red nose to look like Rudolph – it’s all up to you!
Let me know if there’s any other winter patterns you’d like to see in the future by commenting below this post! I thought a husky, polar bear, or penguin would be cute. I hope you have a fun time making this moose!
Print this pattern out – purchase the PDF version here!

 Supplies:
• Yarn 4/Medium Weight in…
Light brown for head and body, Dark brown for hooves, Light cream color for nose and antlers
•4mm Crochet Hook
•Tapestry needle
•Scissors
•Stuffing
•12mm safety eyes
Additional Information:
Difficulty: Intermediate
• Before we get started…
This moose is BIG, so he will take a while to make. Luckily, most of his pattern is easy. We will first start by making the nose, which will lead into the head. The nose and head are made in one continuous piece. After this, we will make the ears and do the nose shaping.
The antlers are made next, and they are also made in one piece with no sewing. I include lots of photos of the antler process! Finally, we will make his body and limbs.
Let’s get started!
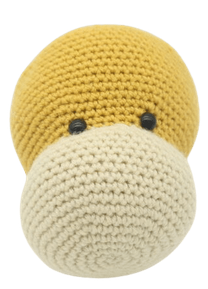
Head:
In Light Brown
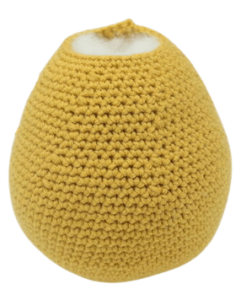
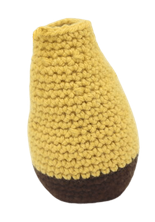
To make the head, we will start at the nose, then work our way to the head. The nose and head are worked in one continuous piece. Let’s get started!
Round 1: 6 Sc into a Magic Ring (6)
Round 2: *Inc* all around (12)
Round 3: *Inc, Sc in the next st* all around (18)
Round 4: *Inc, Sc in the next 2 st* all around (24)
Round 5: *Inc, Sc in the next 3 st* all around (30)
Round 6: *Inc, Sc in the next 4 st* all around (36)
Round 7: *Inc, Sc in the next 5 st* all around (42)
Round 8: *Inc, Sc in the next 6 st* all around (48)
Round 9-17: *Sc* all around (48)
Round 18: *Dec, Sc in the next 6 st* all around (42)
Round 19: *Dec, Sc in the next 5 st* all around (36)
Round 20: Change to light brown now. In the FLO, *Inc, Sc in the next 5 st* all around (42)
Now we will mark where to place the safety eyes later. Add 2 eye stitch markers into Round 20 – 1 stitch marker in the 15th stitch, and another in the 21st stitch.
Round 21: *Inc, Sc in the next 6 st* all around (48)
Round 22: *Inc, Sc in the next 7 st* all around (54)
Stuff the nose firmly now.
Round 23: *Inc, Sc in the next 8 st* all around (60)
Round 24: *Inc, Sc in the next 9 st* all around (66)
Round 25-35: *Sc* all around (66)
Round 36: *Dec, Sc in the next 9 st* all around (60)
Round 37: *Dec, Sc in the next 8 st* all around (54)
Round 38: *Dec, Sc in the next 7 st* all around (48)
Round 39: *Dec, Sc in the next 6 st* all around (42)
Round 40: *Dec, Sc in the next 5 st* all around (36)
Round 41: *Dec, Sc in the next 4 st* all around (30)
Round 42: *Dec, Sc in the next 3 st* all around (24)
Add the eyes into the marked areas now. Stuff the head now, continue stuffing after each round.
Round 43: *Dec, Sc in the next 2 st* all around (18)
Round 44: *Dec, Sc in the next st* all around (12)
Round 45: *Dec* all around (6)
Finish off, leaving a tail for sewing. Sew the remaining stitches closed.
Ears: (Make 2)
In light brown

Round 1: 6 Sc into a Magic Ring (6)
Round 2: *Inc* all around (12)
Round 3: *Sc* all around (12)
Round 4: *Inc, Sc in the next st* all around (18)
Round 5: *Sc* all around (18)
Round 6-12: *Sc* all around (18)
Round 13: *Dec, Sc in the next st* all around (12)
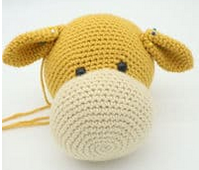
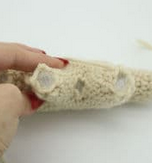
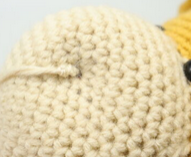
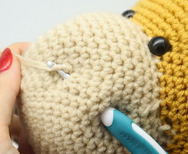
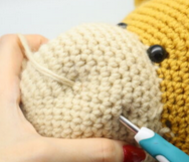
Finish off now, leaving a long tail for sewing. Fold the ear in half as shown (Pic 2). The stitches will line up next to each other, sew those stitches together. Pin the ears onto the moose as shown (Pic 3) and sew on. Once sewn on, tie the tail end of yarn into a firm knot. Bring this knot back into the moose to hide and cut excess yarn. This will hide the knot and secure the piece firmly.
1. 2.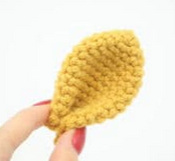 3.
3.
Antlers: (Make 2)
In light brown
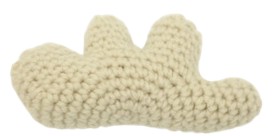
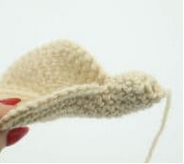
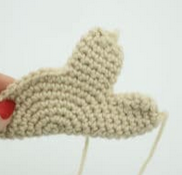
The antlers are made by creating a taco shape, folding it in half, then crocheting rounds in small sections to form the tips of the antlers.
Round 1: 6 Sc into a Magic Ring (6)
Round 2: *Inc* all around (12)
Round 3: *Inc, Sc in the next st* all around (18)
Round 4: *Inc, Sc in the next 2 st* all around (24)
Round 5: *Inc, Sc in the next 3 st* all around (30)
Round 6: *Inc, Sc in the next 4 st* all around (36)
Round 7: *Inc, Sc in the next 5 st* all around (42)
Round 8: *Inc, Sc in the next 6 st* all around (48)
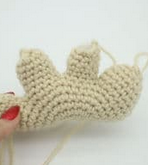
In the following rounds, we will be forming the antler pieces. We will do this by working small sections in a round to 4 different parts.
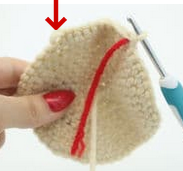
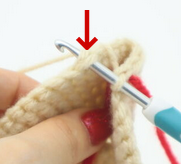
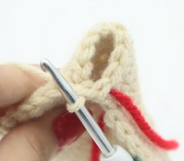
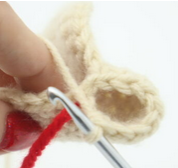
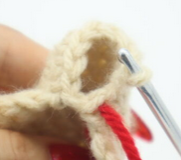
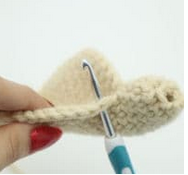
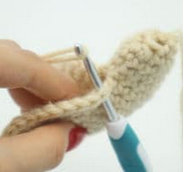
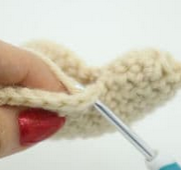
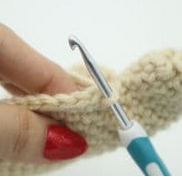
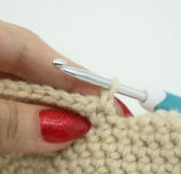
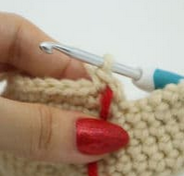
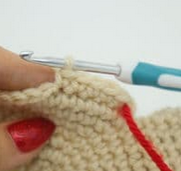
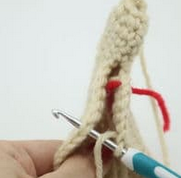
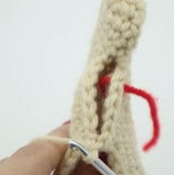
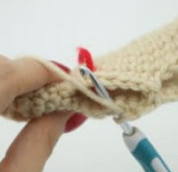
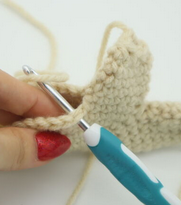
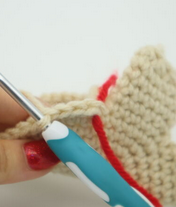
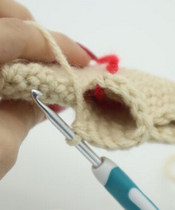
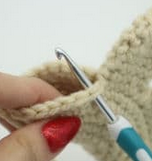
Round 9: Sc in the next st. Add your stitch marker into this stitch you just made – this will mark your rounds (Pic 1). Count to the 40th stitch in the round (Pic 1, red arrow shows 40th stitch). Place your hook into that 40th stitch (Pic 2). Make a Sc into that stitch (Pic 3). Sc in the next 8 st (Pic 4-6. Stitch Count: 10) Now we’ve created a round on the antler. Continue working in this round to make this antler piece longer.
1.
 2.
2. 3.
3. 4.
4. 5.
5. 6.
6. 7.
7. 8.
8.
Round 10-12: *Sc* all around (10)
Round 13: *Dec* all around (Pic 8, Stitch Count: 5)
Finish off, leaving a tail for sewing. Don’t sew closed yet.
Second Antler Piece:
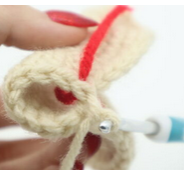
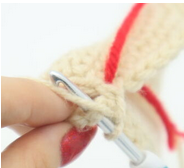
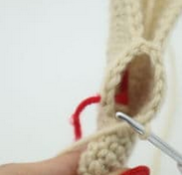
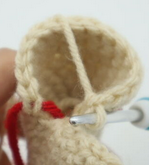
Round 1: Attach your hook to the next stitch on the antler (Pic 1). Yarn over and pull up a loop (Pic 2-4). Ch 1 (Pic 5). Sc in the next st. Add a stitch marker into the Ch 1 you made (Pic 6). This stitch marker will mark the rounds. Sc in the next 4 st (Pic 7). On the left side of the antler, count 6 stitches down from the first antler (red arrow shows where this 6th stitch is, Pic 8) and insert your hook into that 6th stitch as shown (Pic 8). Create a Sc in that st (Pic 9). Continuing on that side (Pic 10), Sc in the next 5 st (Stitch count: 12)
Now we’ve created a round on the antler. Continue working in this round to make this antler piece longer. (Pic 11)
1. 2.
2. 3.
3. 4.
4. 5.
5. 6.
6. 7.
7. 8.
8. 9.
9. 10.
10. 11.
11. 12.
12.
Round 2-5: *Sc* all around (12)
Round 6: *Dec* all around (Pic 12, Stitch Count: 6)
Finish off, leaving a tail for sewing. Don’t sew closed yet.
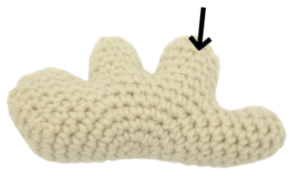
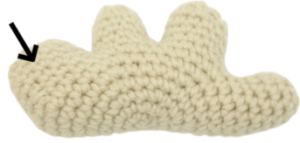
Third Antler Piece:
We’re continuing to make the small antler pieces. Right now we’re working on the third antler piece. The black arrow shows which piece this is.
Round 1: Attach your hook to the next stitch on the antler (Pic 1). Yarn over and pull up a loop. Ch 1. Sc in the next st. Add a stitch marker into the Ch 1 you made. This stitch marker will mark the rounds. Sc in the next 4 st (Pic 2). On the left side of the antler, count 5 stitches down from the second antler. Insert your hook into that 5th stitch as shown (Pic 3). Create a Sc in that st. Sc in the next 4 st (Pic 4, Stitch Count: 10)
Now we’ve created a round on the antler. Continue working in this round to make this antler piece longer.
1. 2.
2. 3.
3. 4.
4.
Round 2-5: *Sc* all around (10)
Round 6: *Dec* all around (6)
Finish off, leaving a tail for sewing. Don’t sew closed yet.
Fourth Antler Piece:
Round 1: Attach your hook to the next stitch on the antler (Pic 1). Yarn over and pull up a loop. Ch 1. Sc in the next st. Add a stitch marker into the Ch 1 you made. This stitch marker will mark the rounds. Sc in the next 3 st. *Dec* 3 times. Sc in the next 4 st. *Inc* in the next 2 st (15)
1.
Now we’ve created a round on the antler. Continue working in this round to make this antler piece longer (Pic 2).
2.
Round 2: *Inc* in the next st, Sc in the next 14 st (16)
Round 3-4: *Sc* all around (16)
Round 5: *Dec, Sc in the next st* 5 times. Sc in the next st (11)
Add stuffing into this antler area now. When you’re adding stuffing into this area, push the stuffing down to fill the rest of the antler. Stuff the tips of each antler as well (Pic 3-5).
3. 4.
4. 5.
5.
Round 6: *Dec* 5 times, Sc in the next st (6)
Finish off, leaving a tail for sewing. Sew the remaining stitches closed. Sew the rest of the antler tips closed. Weave in ends.
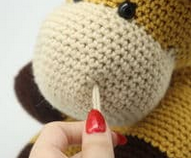
Nose Shaping:
In Light Cream Color
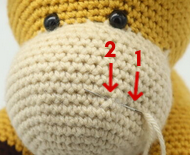
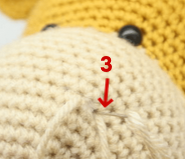
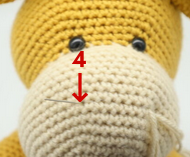
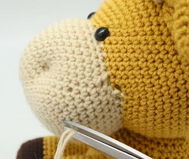
Insert needle with thread into the toy’s nose on the right side, pulling needle out one stitch to the left as shown (Pic 1). Reinsert needle into one stitch to the right (Pic 2). Pull needle out at the left side of the toy’s nose as shown (Pic 3). Reinsert needle one stitch to the left (Pic 4).
1. 2.
2. 3.
3. 4.
4.
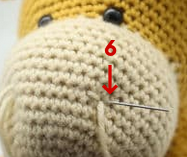
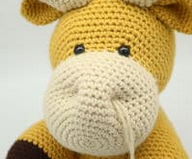
Pull needle out at the same stitch where the tail end of yarn it (Pic 5). Pull both ends of yarn firmly at the same time (Pic 6). This will define the nose holes (Pic 7). Tie the tail ends of yarn together into a firm knot 4 times (Pic 8)
5. 6.
6. 7.
7. 8.
8.
Bring this knot back into the toy’s head to hide (Pic 9-10) and cut excess yarn (Pic 11). This will hide the knot and secure the piece firmly. Done! (Pic 12)
9. 10.
10. 11.
11. 12.
12.
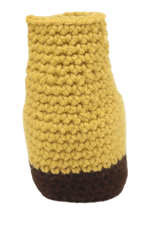
Body:
In light brown
Round 1: 6 Sc into a Magic Ring (6)
Round 2: *Inc* all around (12)
Round 3: *Inc, Sc in the next st* all around (18)
Round 4: *Inc, Sc in the next 2 st* all around (24)
Round 5: *Inc, Sc in the next 3 st* all around (30)
Round 6: *Inc, Sc in the next 4 st* all around (36)
Round 7: *Inc, Sc in the next 5 st* all around (42)
Round 8: *Inc, Sc in the next 6 st* all around (48)
Round 9: *Inc, Sc in the next 7 st* all around (54)
Round 10: *Inc, Sc in the next 8 st* all around (60)
Round 11-23: *Sc* all around (60)
Round 24: *Dec, Sc in the next 8 st* all around (54)
Round 25-26: *Sc* all around (54)
Round 27: *Dec, Sc in the next 7 st* all around (48)
Round 28-30: *Sc* all around (48)
Round 31: *Dec, Sc in the next 6 st* all around (42)
Round 32-33: *Sc* all around (42)
Round 34: *Dec, Sc in the next 5 st* all around (36)
Round 35-39: *Sc* all around (36)
Round 40: *Dec, Sc in the next 4 st* all around (40)
Finish off, leaving a long tail for sewing. Stuff the body firmly now.
Pin the head to the body as shown. Sew it on.
Once sewn on, tie the tail end of yarn into a firm knot. Bring the knot into the toy’s head to hide.
Cut any excess yarn.
Legs: (Make 2)
In dark brown
Round 1: 6 Sc into a Magic Ring (6)
Round 2: *Inc* all around (12)
Round 3: *Inc, Sc in the next st* all around (18)
Round 4: *Inc, Sc in the next 2 st* all around (24)
Round 5: *Inc, Sc in the next 3 st* all around (30)
Round 6: *Inc, Sc in the next 4 st* all around (36)
Round 7: In the BLO, *Sc* all around (36)
Round 8-11: In BOTH Loops, *Sc* all around (36)
Round 12-17: Change to light brown. *Sc* all around (36)
Round 18: *Dec, Sc in the next 4 st* all around (30)
Round 19-22: *Sc* all around (30)
Round 23: *Dec, Sc in the next 3 st* all around (24)
Round 24-26: *Sc* all around (24)
Round 27: *Dec, Sc in the next 2 st* all around (18)
Round 28-30: *Sc* all around (18)
Finish off, leaving a long tail for sewing. Stuff the leg firmly now. Pin the legs onto the sides of the moose as shown. Sew on. Weave in ends.
Arms: (Make 2)
In dark brown
Round 1: 6 Sc into a Magic Ring (6)
Round 2: *Inc* all around (12)
Round 3: *Inc, Sc in the next st* all around (18)
Round 4: *Inc, Sc in the next 2 st* all around (24)
Round 5: *Inc, Sc in the next 3 st* all around (30)
Round 6: In the BLO, *Sc* all around (30)
Round 7-9: In BOTH Loops, *Sc* all around (30)
Round 10-15: Change to light brown. *Sc* all around (30)
Round 16: *Dec, Sc in the next 3 st* all around (24)
Round 17-19: *Sc* all around (24)
Round 20: *Dec, Sc in the next 2 st* all around (18)
Round 21-25: *Sc* all around (18)
Finish off, leaving a long tail for sewing. Stuff the arms firmly now. Pin the arms onto the sides of the moose as shown. Sew on. Weave in ends.
Done! If you made this moose, I would LOVE to see! You can show me by posting a picture in the comments section underneath this post 🙂


24 Comments
How about a big cuddly gingerbread man or lady? I love your patterns!!!
I love this pattern! I will definitely be making him soon. 😀 You say he is BIG, but nowhere do I see an average size. Is he 12″ or 24″ tall? Somewhere in between? How tall is he? 🙂 And thank you for all the free patterns that my brain can actually read!
I have the same question. No where can I find out how big this is.
Great pattern! Thank you for sharing!
he is so cute! I made a little scarf for him. he is for a friend
Finished today. Thanks for the pattern!!
Just finished him today. Thanks for the pattern!!
This pattern was so fun and time consuming because of how big the moose ended up being. I love how this colorful moose turned out. I used Red Heart Jumbo Stripes as the main color.
Thanks for the wonderful pattern I really enjoyed making him and he’s so lovely
Great pattern! Thank you so much. This pattern has clear instructions and enough pictures that you’re not guessing on how to do it. It came together very quickly and was so easy. ❤️
Thanks for this pattern! The moose turned out great 🙂
Fun to make!!!
Thanks for the great pattern!
I love him 💚💚
.
Thank you for the pattern. I made this for my soon to be born great nephew.
Great pattern, easy to follow! I was trying to use up some old yarn, I like the way it came out using only “one color”
Loved making him, added the scarf in friends favorite color. Was really fun to make, although it was hard doing the antlers as the pattern didn’t make sense when working on 2nd tip of the antler the picture was point to 3rd one. It worked out in the end
My brother specifically asked for a moose for his birthday, and I am beyond happy with my finished product. I love this big guy!!
I just finished mine tonight. My 2 and a half year old asked for a moose for Christmas so I made him this. I made some crochet eyes, just because it is for my little guy and I haven’t had any experience with the other eyes as to if they would get pulled out. It isn’t perfect by any means, but this is the first time I have ever tried to crochet animals. The pattern was very straightforward and easy to follow, except for putting the arms and legs on. I wish there was a side view for that part. Other than that, super fun and easy pattern.
I made me a biggie in plush-yarn and I love it! His name is Mooses
He’s a big plushie. Loved this one, named him Bruce. ❤️
Made this Purple Moose over a year ago but forgot to. post a pic of how it turned out. Great pattern. Easy to follow along.
Loved working in it though I will say the angers were my hardest challenge out of this piece. This is definitely my biggest project I’m still new to crochet world and amigurumi in general but loved working on this hope the mother in law likes it 😅