
Purchase the PDF version here!

From October 10-November 10 Only!
Supplies:
• Yarn 4/Medium Weight Yarn in…
Main Color & Contrast Color, White for Chest
• 4mm Crochet Hook
•12mm safety eyes
•Tapestry needle
•Scissors
•Stuffing
•Plastic Pellets for Stuffing (Optional)
Additional Information:
Difficulty: Intermediate
• Getting started
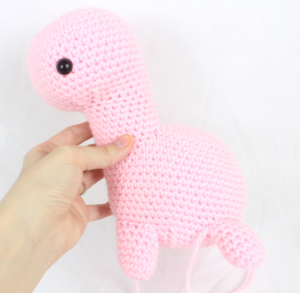
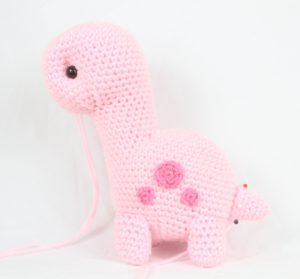
This dinosaur’s body is worked into all one piece. However, we first start by making the back of the dinosaur. After this, we will make the head, which leads into the neck as one continuous piece. We then crochet the back and neck together to start to from the body!
We then make the limbs, spots, tail, do face shaping, and make the chest if desired.
• Also included
Included in this post is a guide on how to sew the limbs on so they don’t stick out!
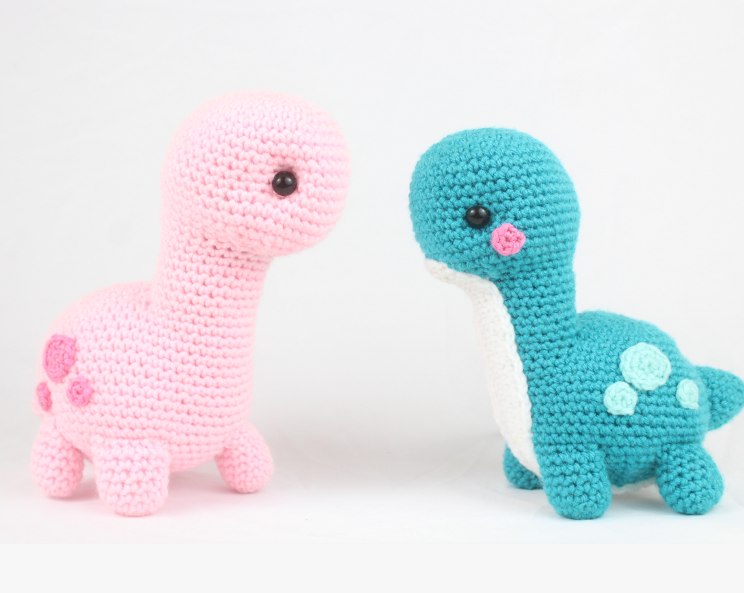
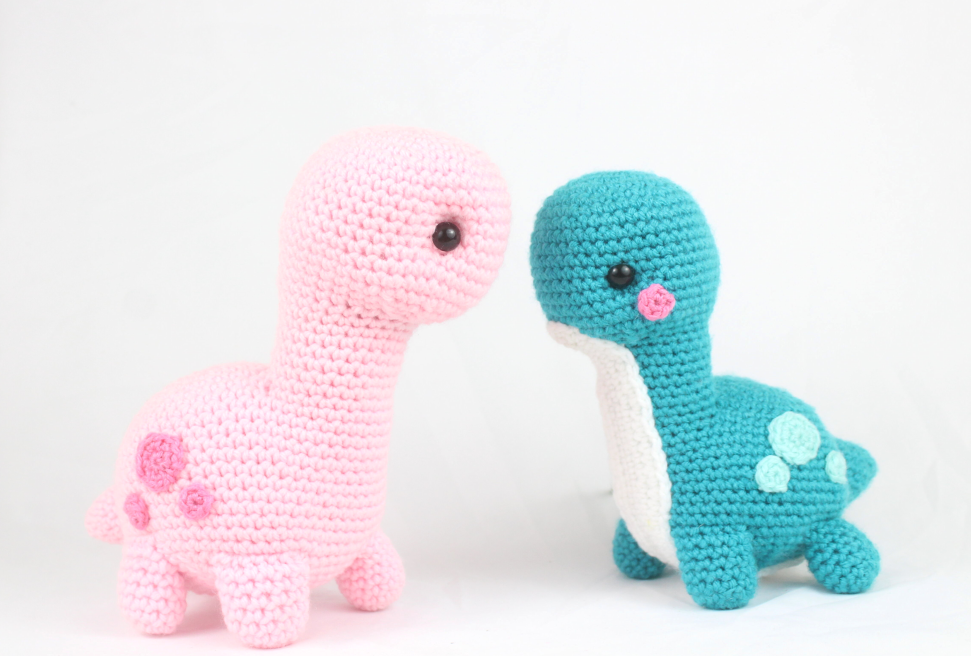
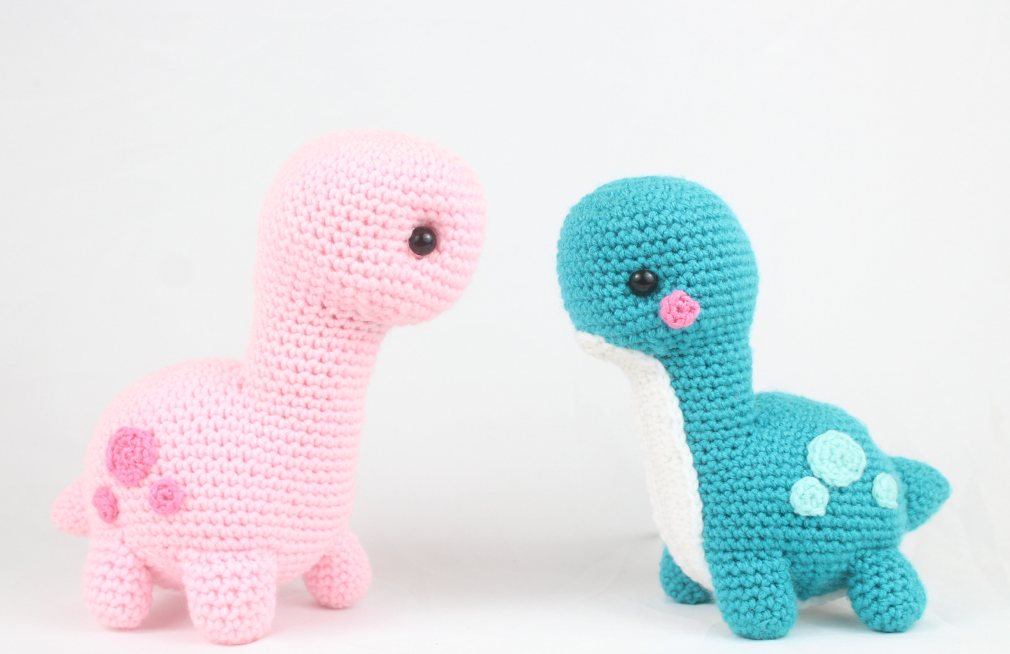
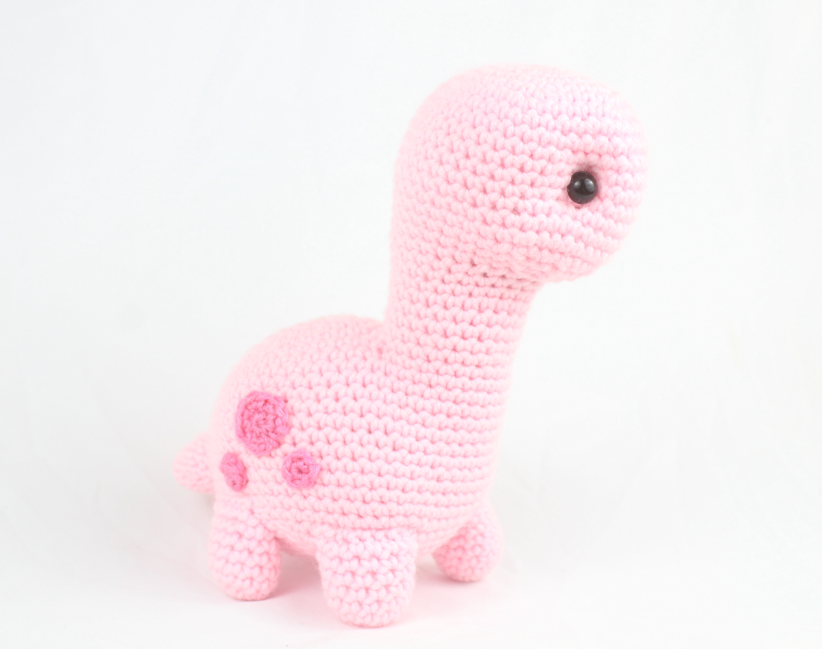
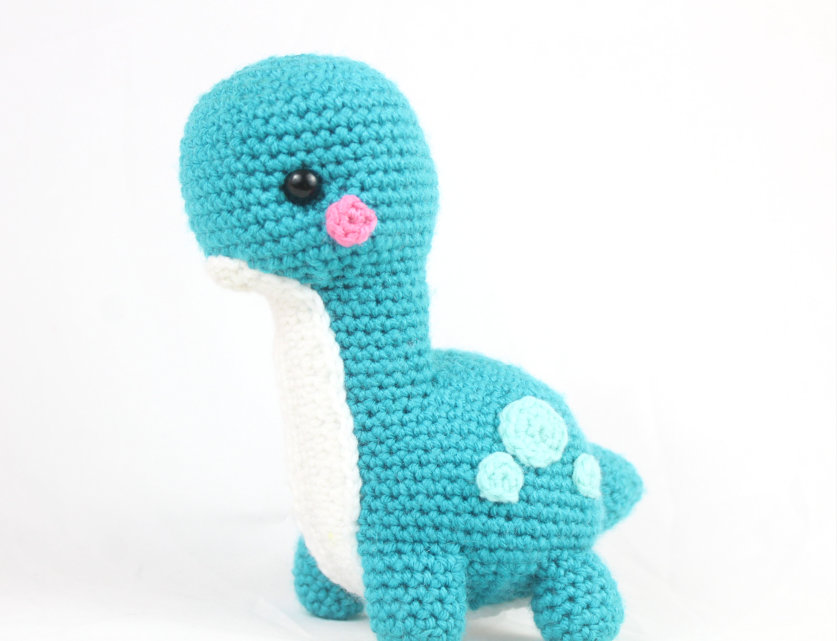
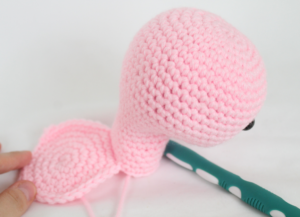
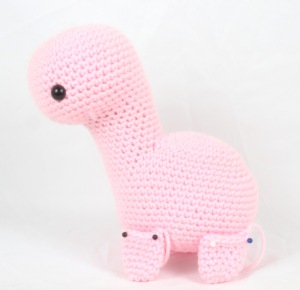
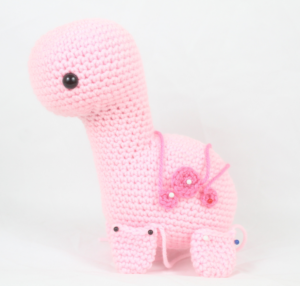
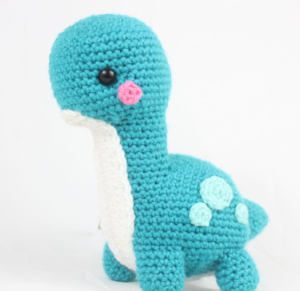
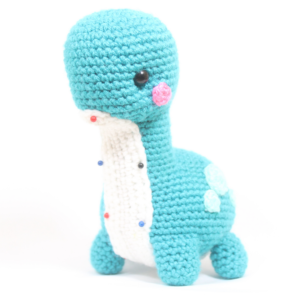
Brontosaurus:
To start, we will first make the back of the dinosaur. After making the back, we will finish off and start making the head, which leads into the neck as one continuous piece.
Then we will crochet the neck and the back together to form the body. So let’s start making the back!
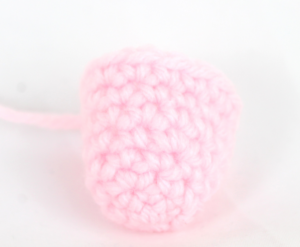
Back:
In Main Color
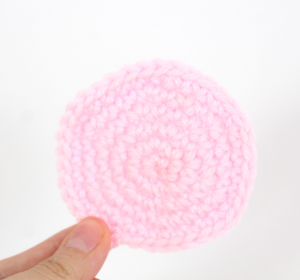
Round 1: 6 Sc into a Magic Ring (6)
Round 2: *Inc* in each stitch all around (12)
Round 3: Repeat *Inc in the next st, Sc in the next st* all around (18)
Round 4: Repeat *Inc in the next st, Sc in the next 2 stitches* all around (24)
Round 5: Repeat *Inc, Sc in the next 3 st* all around (30)
Round 6: *Inc, Sc 4* all around (36)
Finish off now. Set the back of the dinosaur aside for now. We will now continue on to making the head on the next page!
Head/Body:
Now we will start making the dinosaurs head. The head works down into the neck as one piece.
Head:
In Main Color
Round 1: 6 Sc into a Magic Ring (6)
Round 2: *Inc* in each stitch all around (12)
Round 3: Repeat *Inc in the next st, Sc in the next st* all around (18)
Round 4: Repeat *Inc in the next st, Sc in the next 2 stitches* all around (24)
Round 5: Repeat *Inc, Sc 3* all around (30)
Round 6: *Inc, Sc 4* all around (36)
Round 7: *Inc, Sc 5* all around (42)
Round 8-11: *Sc* all around (42)
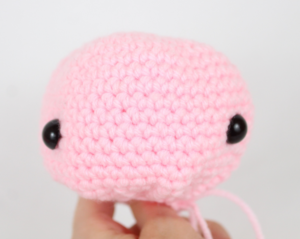
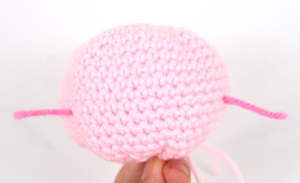
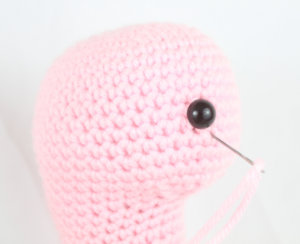
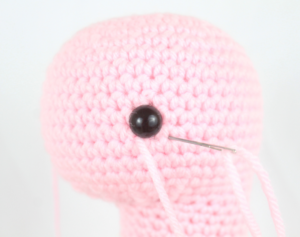
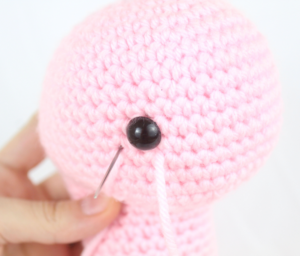
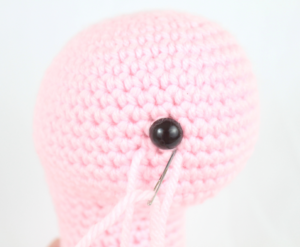
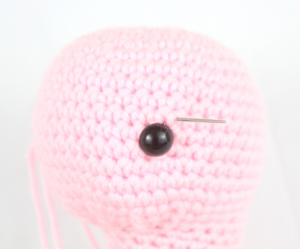
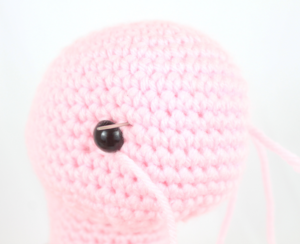
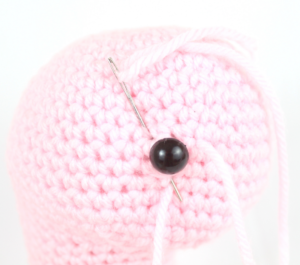
In the next round we will add 2 stitch markers. These will mark where to place the safety eyes later.
Round 12: Sc in the next 14 stitches. Sc in the next st and add a different colored st marker to the Sc just made. Now Sc in the next 13 st. Sc in the next st and add a different colored st marker to the Sc just made. Sc in the next 13 stitches (42)
Round 13-15: *Sc* all around (42)
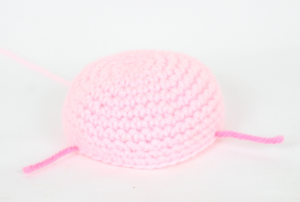
Round 16: Sc in the next 12 stitches. Repeat *Dec, Sc in the next 2 stitches* a total of 6 times. Sc in the next 6 st (36)
Round 17: Sc in the next 12 stitches. Repeat *Dec, Sc in the next st* 6 times. Sc in the next 6 st (30)
Round 18: Sc in the next 12 st. Repeat *Dec* 6 times. Sc in the next 6 st (24)
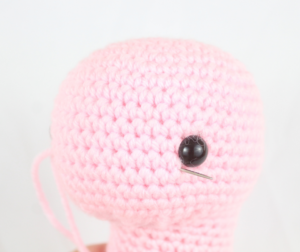
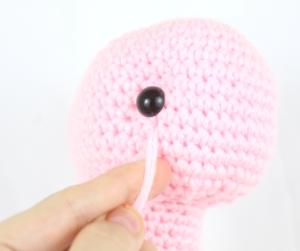
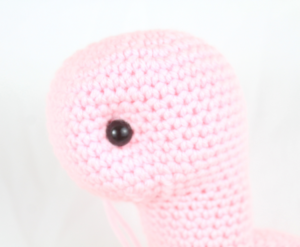
Add safety eyes in the marked areas from Round 12 now. Stuff head after.
Now we are forming the neck!
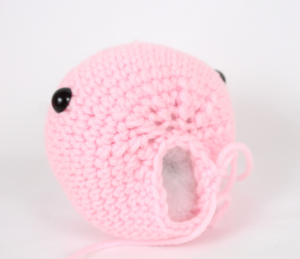
Round 19-25: *Sc* all around (24)
From October 10-November 10 Only!
In the next round we will attach the back and neck together. This will form the body.
Now we will line up the neck to the back and crochet them together!
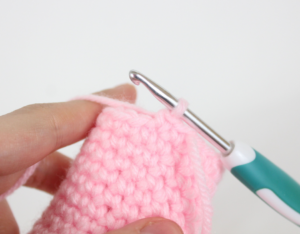
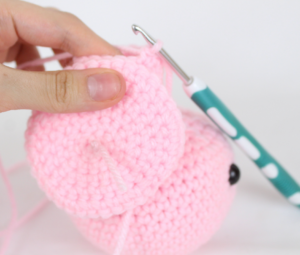
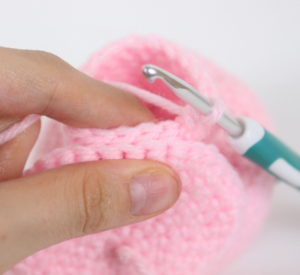
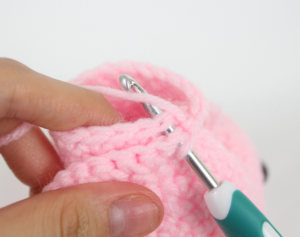
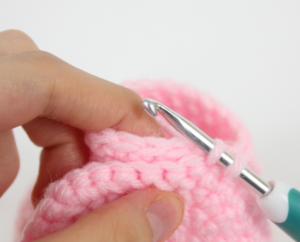
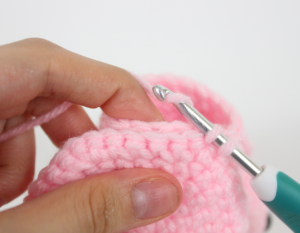
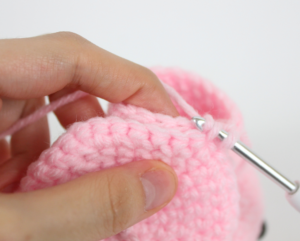
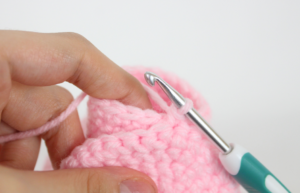
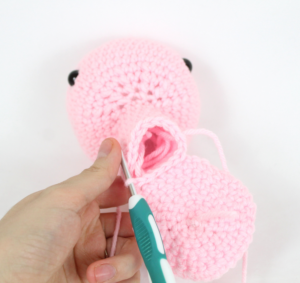
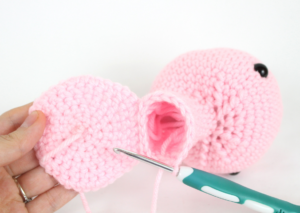
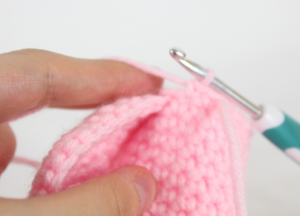
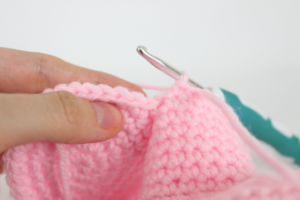
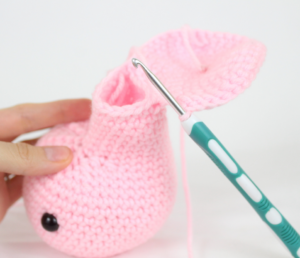
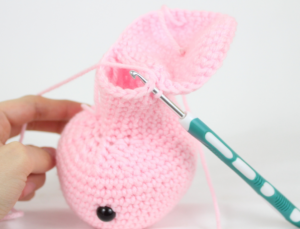
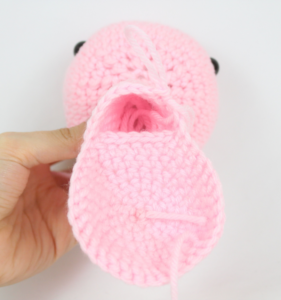
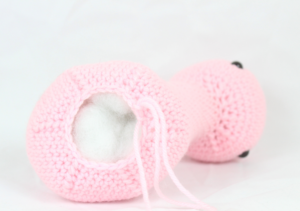
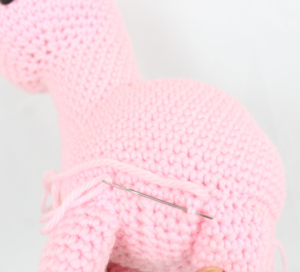
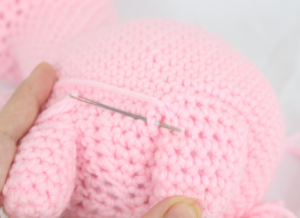
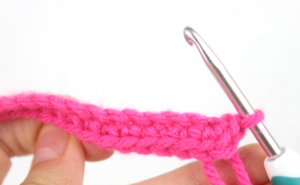
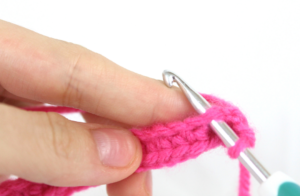
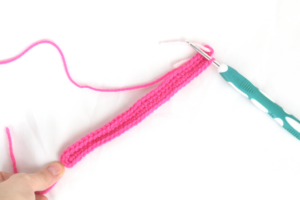
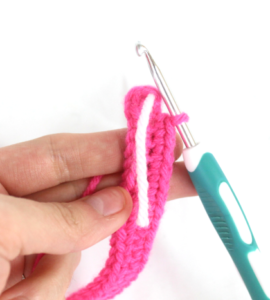
Round 26: Sc in the next 2 stitches (Pic 1). Be sure to add your stitch marker to that first stitch made in this round. Now line up the back to the dinosaur’s next neck stitches. (The back part’s wrong side should be facing you, as shown in Pic 3. The right side will face right next to the neck.) Insert your crochet hook under BOTH the neck and body stitches (Pic 5).
1. 2.
2.
3. 4.
4.
5.
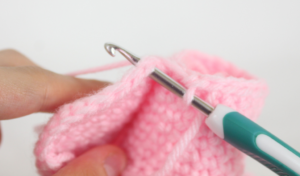
Sc in the next st (Pic 6-11)
6. 7.
7.
8. 9.
9.
10. 11.
11.
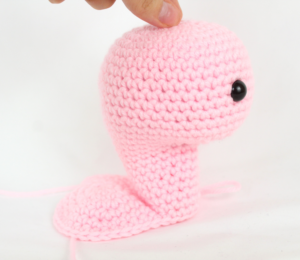
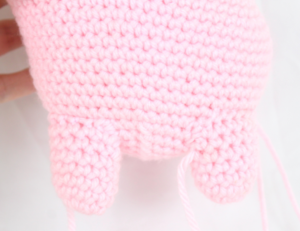
Round 26: Going through BOTH stitches, Sc in the next 5 st (Pic 12) Now we have finished attaching the back to the neck. Continuing on only the neck, Sc in the next 16 st of the neck (Pic 13) At this point we will meet the stitch marker, meaning we completed Round 26! Your dinosaur should look like Pic 15.
12. 13.
13.
14. 15.
15.
Stitch count: We will have 30 stitches on the back, 6 stitches connecting the neck and body, and 18 neck stitches
Round 27: Sc in the next 2 st (Pic 1-2). Now we meet the back. Sc in the next 30 st of the back (Pic 3-4).
1. 2.
2.
3. 4.
4.
Now we’re working on the neck, Sc in the next 16 st (Pic 5-6) (48)
5. 6.
6.
7.
Round 28-29: *Sc* all around (48)
Stuff the neck now.
Round 30: Sc in the next 14 st, *Inc* in the next 6 st, Sc in the next 28 st (54)
Round 31-39: *Sc* in each stitch all around (54)
Round 40: Repeat *Dec, Sc in the next 7 st* all around (48)
Round 41: *Dec, Sc 6* all around (42)
Round 42: *Dec, Sc 5* all around (36)
Round 43: *Dec, Sc 4* all around (30)
Add stuffing now and after each round.
Note that the dinosaur is top heavy due to the long neck and large head. To make extra sure your dinosaur doesn’t fall forward, I would recommend placing pellets (like poly pellets, the same brand as poly fill stuffing!) into a secure bag like a pantyhose tied firmly shut. Place the bag into the dinosaur now and then add stuffing around the bag. I do not recommend doing this for a child’s toy since small plastic pieces can be harmful.
Round 44: *Dec, Sc 3* all around (24)
Round 45: *Dec, Sc 2* all around (18)
Round 46: *Dec, Sc* all around (12)
Round 47: *Dec* all around (6)
Finish off, leaving a long tail for sewing the body closed. Add any additional stuffing, then weave the end closed. Weave the tail end of yarn into the dinosaur and clip any excess yarn.
Limbs: (Make 4)
In Main Color
Round 1: 6 Sc into a Magic Ring (6)
Round 2: *Inc* in each stitch all around (12)
Round 3-8: *Sc* all around (12)
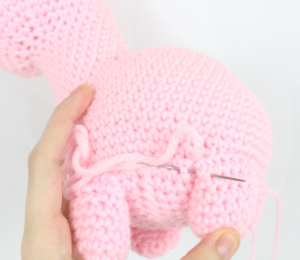
Finish off, leaving a long tail for sewing. Pin each limb to the dinosaur as shown.
(Specifically the top part of the limb on Round 39 and the bottom part of the limb on Round 40. Place the limbs about 5 stitches apart from the side, 6 stitches apart from the back, 7 stitches apart in the front, or wherever they hold the dinosaur the best.) Make sure the limbs are pinned evenly and align with the other limbs! If the limbs aren’t pinned and sewed on evenly, the dinosaur will not stand firmly.
Sewing on:
Tips to make the limbs better!
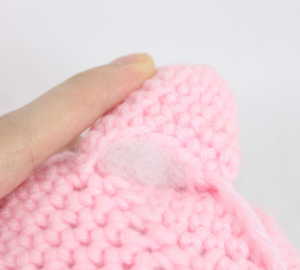
To have the limbs hold the dinosaur’s weight firmly so he can stand correctly, we can follow this easy trick! First, sew the limb on as normal, making sure to add stuffing when it’s almost closed (Pic 1). Now your limb might look like the right one shown in Pic 2. Fold the limb down (Pic 3). Find the corner of the limb. Insert your needle one stitch beside that corner into the dinosaur (Pic 4).
1. 2.
2.
3. 4.
4.
Insert your needle into that corner of the limb and pull the yarn through (Pic 5). Reinsert your needle into the dinosaur’s body, just one stitch down from where we previously put our needle (Pic 6). Now, reinsert your needle into the limb, just one stitch down from where we previously put our needle and pull the yarn through (Pic 7). Insert your needle into the next stitch of the dinosaurs body and pull needle out at the other side of the corner limb and repeat this process from steps 3-7.
5. 6.
6.
7. 8.
8.
This will tie the limb to the dinosaur’s body, so now your limb will not stick out! Compare Pics 2 and 8. to see the difference. Some people may only sew the top and bottom stitches of the limbs to an amigurumi. This results in poking out limbs. To combat this, just always follow the guide above!
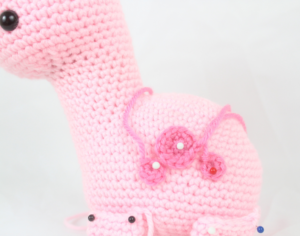
Spots:
Now we will make the spots for the dinosaur. These are optional, but make them look so cute 🙂

Little Spots: (Make 4, 2 for each side)
In Contrast Color
Round 1: 6 Sc into a Magic Ring (6)
Finish off, leaving a long tail for sewing. Pin the spots where shown, 4 stitches apart. Specifically, Round 34-35. Sew on.
Note: You can also pin the small spots on as cheeks.
Big Spot: (Make 2, 1 for each side)
In Contrast Color
Round 1: 6 Sc into a Magic Ring (6)
Round 2: *Inc* all around (12)
Finish off, leaving a long tail for sewing. Pin the big spot up and between the little spots, specifically on Round 31-34. Sew on.
Tail:
In Main Color

Round 1: 6 Sc into a Magic Ring (6)
Round 2: *Sc* all around (6)
Round 3: *Inc, Sc* all around (9)
Round 4: *Sc* all around (9)
Round 5: *Inc, Sc 2* all around (12)
Round 6: *Sc* all around (12)
Round 7: *Inc, Sc 3* all around (15)
Round 8: *Sc* all around (15)
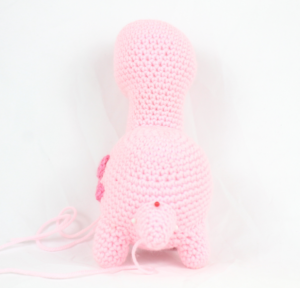
Finish off, leaving a long tail for sewing. Pin the tail to the dinosaur as shown and sew on. Be sure to stuff the tail before fully sewing on.
Face Shaping:
In Main Color
To make the dinosaur have some extra cute character, we can make indents where the eyes are. This is optional, but I like it!
Take a needle with yarn and insert it at the bottom right corner of the left eye as shown (Pic 1) Pull the needle out at the bottom left corner of the right eye as shown (Pic 2). Note that you may have to squish the head to have the needle fit through! Now, reinsert the needle 1-2 stitches to the right (Pic 3). Pull the needle out at the bottom left area of the left eye (Pic 4).
1. 2.
2.
3. 4.
4.
Insert needle 1-2 stitches to the right (Pic 5). Pull needle out at the top right corner of the right eye (Pic 6).
5. 6.
6.
Insert needle 1-2 stitches to the left (Pic 7). Pull needle out at the top right corner of the left eye (Pic 8). Finally, insert needle 1-2 stitches to the left, and pull needle out where the tail end of yarn is coming out of (Pic 9). Pull both ends of yarn firmly at the same time to tighten the head definition (Pic 10-11). Be sure to not pull too tight or the yarn might break!
7. 8.
8.
9. 10.
10.
11. 12.
12.
Tie both ends of yarn together to form a firm knot and weave the knot into the dinosaur to hide the excess yarn. Cut any extra yarn off.
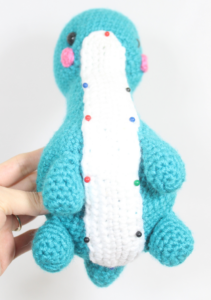
Chest: (Optional)
In White or Contrast Color
To make the chest, we will be making a chain and working around the chain entirely to make a round. Most times when we make a chain, we turn our work and work over the stitches we just made. However, this time we will crochet down our chain and when we reach the end of it, we will turn to the opposite side where we haven’t crocheted any stitches! Remember, we aren’t turning out work and crocheting on top of the stitches we just made. Then you will be working in a round, and this will end up forming an oval.
Note: Try to not have a very tight tension when making this piece!
Chest:
Round 1: Ch 36 (Pic 1). Sc 3 times in the 2nd Ch from the hook. Be sure to add your stitch marker to the first Sc you made. Sc in the next 33 st, Sc 3 times in the next st. Now we are at the end of the chain (Pic 2). Turn your crochet work to the other side of the piece, where we haven’t crocheted any stitches yet (Pic 4). These unworked stitches will only have 1 loop, and our already worked stitches will have 2 loops.
1.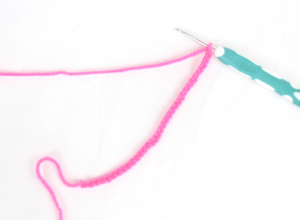 2.
2.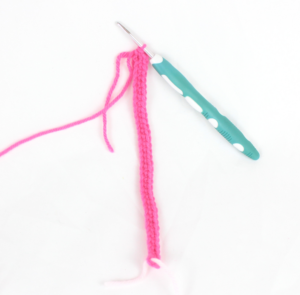
3. 4.
4.
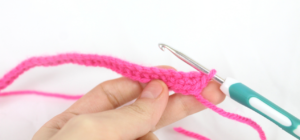
Sc next 33 st on that other side (Pic 5-6). Now we meet out stitch marker (Pic 7). Continue on the next round! (72)
5. 6.
6.
7.
Round 2: Repeat *Inc, Sc in the next 5 st* all around (84)
Round 3: Repeat *Inc, Sc in the next 6 st* all around (96)
Finish off, leaving a very long tail for sewing. Pin the chest piece on as shown and sew on. Now weave the ends into the dinosaur and clip off any excess yarn.
All done! If you made a dinosaur I would LOVE to see! You can show me by adding a photo to this comments section.


155 Comments
AWW! That is the cutest amigurumi brontosaurus I have ever seen!
Hi Stasia, thank you so very much! That’s a big compliment to me, especially coming from you! 🥰
Hiii! I just made this dinosaur for my dad’s birthday in 1 day because his birthday was coming up.
Also, this is what happened when I used a larger hook. 😂
HI, I tried to make the dinosaur in a dyed wool.
It was adorbs! I just made it! I loved it sm!
I absolutely adore this pattern! Also, thanks for the tip on poly fill pellets, I wouldn’t have thought to use them
Hi Piper! I love your name so much 🥰 Oh my goodness your brontosaurus is so cute, I LOVE the eyes and chest color! I hope you gave him a name 🙂 He’s so cute that you gotta name him haha! Thank you so much for sharing, I hope you had fun making the pattern and I’m so glad you found a nice way to use some of the poly pellets ❤️
<3
Aw your dinosaur is super super cute! I love that beautiful blue color you used 😍 Thank you so much for sharing, how super adorable!!
I was wondering what does repeat mean when shown in round 3 on the back
nevermind
Sorry I couldn’t get back to your question in time! I am happy you git it, please just let me know if you come across any other questions ❤️
Hiii! I just made this dinosaur for my dad’s birthday in 1 day because his birthday was coming up.
Thats super cute
Hi. So I’m a little confused on round 16 for the head. Everytime I do the round I always end up having 12 stitches left instead of 6!!! Please let me know what I’m doing wrong!
Hi there Jenna!
I would double check to make sure for the previous round (Round 15) you end up with 42 stitches! This will make sure that we can do Round 16 correctly, because if we have too little or too many stitches in the previous round, we won’t be able to do the next round correctly.
So for Round 16 make 1 single crochet into the next 12 stitches. Then repeat *Decrease in the next stitch, Single crochet in the next 2 stitches* a total of 6 times. (This uses up a total of 24 stitches). Now we should have 6 stitches left, make 1 single crochet in each of those 6 stitches.
I hope that explaining the round was able to help! I think what may have went wrong is following what’s inside the *stars*, or having too many stitches in the previous round!
Please feel free to let me know if I can help further 😍
Thank you so much! Sorry my comment went through twice Ahahha I’ll double check definitely!
Haha it’s totally fine, It happens! Please let me know if I can help 🙂 ❤️
oh thank you very much for the explanation. I also got lost on that round HAHAHA
I just started working on this, its been a day since i started and almost finished! I was also stuck on round 16 but thanks to this comment i was able to figure out what I was doing wrong (Was only doing one sc instead of two 😅). I loved this pattern very much thank u so much for sharing!
These are so cute! I self taught and trying to make these but keep making mistakes. Do you have a knit-along available for this?
Thank you so much! This was amazing😍 I’m really happy with the result… Bye from Italy
Oh my gosh that is SO cute!!! I love it 😍 Awww thank you so much for sharing ❤️ Have a lovely day in Italy!
I hate this you are so bad at crocheting do not try it again
Just a joke :7 really nice dinosaur
😅 I’m glad you like it! Thank you ❤️
How much yarn do you need to make one of these really cute dinosaurs?🥰
Hi there! Roughly I would say about ~180 yards for the main color of the dinosaur 🙂
how many skeins of yarn did you use? and could you estimate how many yards of each color?
Hi there! I used about 1/3rd of a skein, so about 180 yards is a rough estimate of how much you’d need! Since the contrast color for the dots are so small, you would need only a scrap size of yarn. Maybe about ~30 yards?
I hope that was able to help! Please feel free to let me know if you have any other questions 🙂
I’ve made two so far and it only used not even half a 100g skein of the main colour i can get back to you on the specific number tho as im going to weigh it soon
Thank you for the free pattern!
Your dino is simply too adorable! You picked awesome colors too, and the eye looks like it has a cute shimmer to it! Aw thank you so much for sharing ♥️♥️♥️ I love it!
hi! i love this pattern — i’m just struggling with it a little bit, and i’m not sure what i’m doing wrong! it seems like i have the right number of stitches per row up until row 13, and then from there it looks like i have one too many. i’ve counted each row a few times and can’t find where i’m missing it, but when it comes time to do the decreases, the stitch markers for the eyes aren’t lined up with the place the decreases are supposed to go according to the pictures.
do you have any advice for me? thanks so much, this is a wonderful pattern 🙂
Hi Caitlyn! I’m so happy you’re enjoying the pattern so far 🙂
So starting from Round 8-15 we will always end up with 42 stitches, since we aren’t doing any additional increases or decreases. I think where you will end up with too many stitches is in Round 7, because this is the last round where we’re making increases at the head. I would undo your stitches until you’re at Round 7 again, and count your stitches to make sure you’ve repeated *Increase in the next stitch, Make 1 single crochet in the next 5 stitches*. You should have that done a total of 6 times!
After this, you may have accidentally made 2 stitches into 1 single crochet when you were *Sc* all around in Rounds 8-13! I do this all the time, you can undo the round until you find where you did it 🙂
As for the decreases and eye markers lining up, if there was an error made in how many stitches were made like you mentioned – this will definitely throw off where the eye markers are placed 🙁 So my best advice is undo until you meet a round that has the right number of stitches! Then continue making the dinosaur, counting after each round to have the correct number of stitches 🙂 This will ensure the eye markers will be lined up correctly. Sorry that my best advice is “undo and redo”, but sometimes that’s what we have to do! Please don’t hesitate to let me know if you have any other questions, I’m happy to help 😍
Hi, what’s a repeat decrease? I’m stuck on row 16 on the head 🥺
Hi Clara!
I will try to break down Round 16 🙂
Round 16: Sc in the next 12 stitches. Repeat *Dec, Sc in the next 2 stitches* a total of 6 times. Sc in the next 6 st (36)
First you will make 1 Single crochet into the next 12 stitches. Then what we see inside the *stars*, we will repeat that sequence for the stated amount of times. So we will repeat *Decrease in the next stitch, Single crochet in the next 2 stitches*, and we repeat that sequence a total of 6 times. So dec, sc 2. dec, sc 2. dec, sc 2. dec, sc 2. dec, sc 2. dec, sc 2.
After this we will make 1 single crochet into the last 6 stitches!
I hope this was able to help, if you have any other questions please let me know 🙂
Such a cute pattern! Thank you!! 🙂
Awww that is so adorable! I love that blue color so much, especially paired with the pink 🙂 Thank you so much for sharing with me, I love that!
Thank you for the great pattern . I’ve just started crocheting and it’s the first amigurumi I make that isn’t just a ball.😇 I only have small yarn ball so I ran out twice but I really like the result non the less. I’m planning to make it a bow tie 🙂
Thank U!! I’m in love with your pattern! This is super cute! Thank u!thank u!thank u!❤️I need more Dino patterns!😭
Absolutely love this design, may I ask how and when you switched colors of your yarn?
What brand yarn did you use? Or what type of yarn??? Love this design
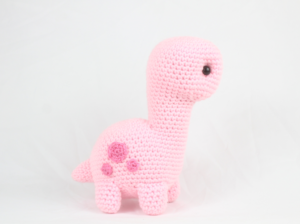
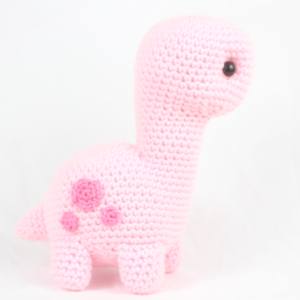
I’m so glad you like this design! For the pink dinosaur I used Red Heart in Petal Pink. The darker pink is Pretty in Pink from Red Heart 🙂
For the blue dinosaur, I used I Love This Yarn in Peacock. The lighter blue is Red Heart Super Saver in Light Blue! I hope this was able to help, if you have any other questions please let me know ❤️❤️❤️
Thank you for responding so fast. Sadly i bought a cotton/nylon/polyester yarn before i saw this comment and started doing the back of the dino and its SUPER FUZZY. Fuzz on my fingers and its overall not really looking like your beautiful dinosaur. I am a beginner and don’t know a lot about crochet yet, so should i wash the yarn?
(After I use this yarn I will buy the one you suggested cuz im obsessed with this pattern). Thanks!
Hi there, Raven! Oh no, I’m so sorry to hear about the yarn 🙁 I don’t think there’s any way to smooth fuzzy yarn, unfortunately. If anything, washing it may make it fuzzier! Is it the kind of yarn that’s intentionally very fluffy, like furry? If so, that yarn is a little hard to use for beginners, just because it’s really hard to see where your stitches are and you’ll have to “feel” for your stitches instead of actually seeing them.
If the yarn is kind of like regular yarn but has a little fuzz coming off the strand, you can simply snip away the little fuzz after you complete the dinosaur. I hope this can help! For the closest results to the dinosaurs in the picture, you’ll have to use the yarn I used 🙁 But I’m sure the yarn you’re using is looking really cute for the dinosaur! ❤️
Hey my decreases left pretty big holes on my dinosaurs chin, is there by any chance some way to fix it? or make the holes smaller?
Hi there Evanea! Thank you so much for your question, I hope to help!
Lucky you – there’s a way to fix big holes when making a decrease! 🙂 You can use the “invisible decrease” method. It’s easy to do after you get the hang of it, please follow this tutorial: https://www.planetjune.com/blog/amigurumi-help/invisible-decrease/
This will make your decreases much tighter and stuffing won’t show through. I hope this helped, please feel free to let me know if I can answer any other questions ❤️❤️❤️
I saw this comment after my first three dinosaurs haha! I’m just redoing the one I’m working on right now to make the invisible decreases, and it looks great so far.
This is an adorable little Bronto! Definitely going to make it again. Thank you for the pattern. 💜
Hi Lauryn! Your dinosaur came out so cute, he looks exactly like a classic dinosaur! 😍 I really love how you made his chest piece in green, it looks fantastic that way! Plus his tail is adorable 🙂 Thank you so much for sharing a picture, you made such a cute dinosaur!! I would love to see any additional ones you make 🥰
Thank you for sharing this pattern! It worked really well! I enjoyed making this little dinosaur for a baby gift. 🙂
Aww how cute, that will make the perfect baby gift! You are so nice to make that for them, they’ll cherish it forever ❤️ 🙂
Thanks soo much for this pattern, Love how mine turned out!!
The belly part got a little big at mine, but I think I handled it good. It’s really cute and easy to follow. I loved the tips, they helped me a lot!
This is so cute, I love how you did the colors on it! I would never have guessed the belly was too big, it looks perfect 🙂 So glad you liked this pattern, you did an awesome job ❤️ Thank you so much for sharing a picture!
I LOVE THIS! How did you do the lil’ smile? I find your dinosaur adorable, I think it look so cute with the big belly. I can’t wait to try this pattern!
I love this pattern thank you so much for sharing <3 i made him as a baby gift and they told me that he is in love with his new toy. Im glad^^
this is rlly cute
I LOVE the tail❤
Thank you for the amazing pattern! It was so easy to follow and all the little extra little hints and tips were mega useful. I sort of went off road with her once she was finished, but I had a lot of fun with this one 🙂
Thank you so much for this pattern! It was super easy to follow and all the extra hints and tips were wonderful.
I made these two for my mom! I loved making them so much!!! I’m not sure why the blue dinosaur is a little bigger than the pink because I used the same size and weight of yarn for both, lol. However, I am so happy with how they turned out and I know my mom will love them!!! Thank you for the fun pattern and easy to follow instructions! 😊
I absolutely love this, I wished my turned out this cute, I love the colors you chose to!!!!!
that is super cute and i think the reason the blue one is bigger bc of the size of crochet hook 🙂
I really love this pattern! It is SO cute!
Oh my gosh this is adorable! I love how super small you made it, how did you do that?! It looks super fantastic, you make me want to try out tiny amigurumi 🙂 Thank you so much for sharing, you are so talented!
So cute! What size hook and weight of yarn did you use for your brontosaurus? I know, your comment is like three years old by now but if you can recall, please let me know! Thank you!
Being stuck at home the past 9 months has been…. great!! So much crochet 😸
This was one of the first large patterns I tried and loved! The yarn was leftover bulk from my teenage years and the eyes are made of plastic star beads.
Hahaha I know right?! I love being comfy in bed with some crochet by my side, nothing can beat that 🙂 Your dinosaur looks so cute, those eyes are to die for! I had never considered using something like beads for eyes but it looks so cute. He looks like a dino-star lol! You did a great job on him, keep it up with the bigger projects! You’re doing such a nice job 😍
Hola, muchas gracias por compartir el patrón . Te mando la fotito del mío 🥰
I really enjoyed this pattern!
Hi Gwyneth! Wow, I love that dinosaur you made so much! 😍 You did an amazing job putting him all together, and I really love how you embroidered the eyes. Do you have any plans for your dino? I feel like he’d make a great gift 🙂 Thank you so much for sharing a picture, you did an awesome job!
Love the pattern, thank you!
Hi Sonya!
Oh my gosh he’s so HUGE! Hahaha I love that sooo much, wow that’s just crazy how big your dinosaur came out 😁 Did you use blanket yarn on the big one? I just bought some so maybe I’ll also make a big dinosaur like yours. Thank you so much for sharing a picture, I’m really in love with your dinosaurs!
Olive
Thank you! Sorry for the super late reply… I used the bernat blanket yarn.
I enjoyed this pattern! I loved how it turned out! Thank you!😊
Whoa I’m so in awe of those amazing colors you used! They blend so well and make the perfect dinosaur 😍 What a great job, April!!! Thank you so much for sharing, I’m really happy you had fun with this pattern. Your dinosaur is too cute!
I wanted my first amigurumi to be special so I made your dinosaur for my son; it is yellow for childhood cancer awareness 💛 and has emerald green spots for liver cancer awareness 💚 He was diagnosed in April and I just started crocheting then; your pattern was super easy to follow and my son loves it so much.
Hi Jessica! Wow, your first amigurumi looks AMAZING! You are a very, very strong mom and I can only imagine how much your son loves and appreciates you. Having somebody so supportive as yourself will make a world of difference to him! I wish I could give you and your son a big hug. I’m so happy he loves the dino you made for him and I hope he has tons of fun playing with it, it came out soooo cute 🥰
I’m sending you the biggest of wishes and prayers. You’re doing a great job being there for your son 🙂 ❤️
Olive
This is the second one I made so far! Can I sell the finished product?
Oh my gosh he came out adorable! I’m so envious of your stitching work, it looks so clean! 😍 I must know your secret! You can sell the finished toy you made from my pattern 🙂 I only ask to not sell the written pattern itself! I wish you the best of luck selling your dinosaur, I bet there will be lots of buyers!
Thank u for this patern ,love it
Muy agradecida por compartir el patron
Yo decidí hacer un dinosaurio pequeño y estoy enamorada 😍
I made one using blanket yarn and its the most adorable dino ive ever made! Thanks so much for the great pattern 1🥰
thanks for this pattern! I love it! My friend picked it out for their Christmas present and picked out a yarn they liked and it turned out great! 🥰
Thanks for the pattern. It is really cute and easy. I used a bag with rice instead of pellets to give it weight in the body. My daughter loves it 😊😊
how tall do these dinos measure? they look super cute!
This pattern was great, I added some fluffy cheeks, a flower crown and turned the spots on the dinos back into hearts instead and she turned out so cute!! Thank you!
This is photo 1 of two his hat folds down to a ski mask (:
Pic 2/2
Pic 2/2
This pattern was amazing. I made some with magnates and they turned out amazing 😍🤩
Lovely design. I will try to make it more with thinner yarn with a chest
Hi I’m Leslie 😊thank you so much for the patterns they are absolutely beautiful 🤩!
A very cute and quick pattern to whip up in an afternoon
Hi! I was wondering if you could help, in round 8-11 it says 42 stitches, but Is that for all 4 words or do I repeat it? Sorry if it’s a bit of a dumb question, I’m still very new to crochet 😅
Also, this is what happened when I used a larger hook. 😂
Thank you for the awesome, detailed pattern!
Here’s an idea for the stuffing step: instead of using poly pellets you can replace it with fabric scraps, which are a bit heavier than stuffing and safe for children!
Hi, can I ask what does repeat mean in round 3?
Great pattern! Keep up the great work!
I’m attaching the back to the neck. To attach, it said “sc into the next 5 stitches” but when doing stitch count, it counted 6 for the attachment? I don’t understand if I did 5 sc why it would connect using 6?
Thank you for this cute pattern!! I’m not great with amigurumi so I’m thrilled with the outcome 🙂
that is riily cute and i lovee that green
Made this one in August 2022. Absolutely adore this pattern
Thanks for the pattern! I had to skip the plastic eyes since it’s a gift for an infant. I just recreated one of the spots and made it into an eye.
oh i love that color its so cute! and I always stitch on the eyes bc i dont have any plastic ones <3
I’ve tried to fix his back twice and I keep getting this weird hump in his body. Help!
ive crocheted for years and im still not all that great, but my best way to help is to maybe check the pattern and make sure you are counting and doing it right
hello! Sorry this is a bit late, but I believe your issue is that this pattern was made for worsted weight yarn and you’re using jumbo yarn, so your stitches are larger and puff up a little bit. To avoid this, you can skip the first row and crochet the number of stitches you would have at the end of the second row (12 in this case) into the magic ring. I hope this helps 🙂
Thanks soo much for this pattern, Love how mine turned out!!
Thanks sooo much for this pattern! Love ittt
This was awesome. This was only my second project where I used a pattern. Up until now, I could only do scarves and stuffed balls. Thank you for this. it was easy enough that I believed I could do it and hard enough to feel like I accomplished something special.
Can you please make a video/YouTube channel for those of us that aren’t that good at reading patterns and it would be a great way to get more eyes and if you already have please let me know
P.s. you are so good love the dino
For sewing on the limbs how do you do that? Do you sew through both sides so it’s flattering then stuff, or keep the area they join in a circle? If that makes any sense?
I have the same question!
Thank you for this pattern, I have LOVED making this for my little dude. He chose his wool and Dina the Dino is his new best bud!
So adorable I think I might make a little Dino army!
Hallo, deze leuke Dino ben ik voor mijn kleinzoon aan het haken, ik mis alleen tour 17 en 18 in het patroon, misschien mis ik iets…
Thank you this is my creation with your pattern I love him I just did the spots a little different!
Thank you this is my creation with your pattern I love him I just did the spots a little different!
I absolutely loved this pattern!❤️ I’ve been looking for the perfect brontosaurus pattern and when I saw this pattern I knew I had found it. Thank you so much for the free pattern!!😁😁
Thank you for the pattern! I’ve only been crocheting a couple of weeks, but found it pretty easy to follow.
Thank you so much. Your pattern was easy to follow. I fell in love with them.
Fantastic pattern which was easy to follow & turned out better than expected. Now waiting for next baby to be born in the family.
Thank you for the pattern!
I am having trouble with the chest! I do the chain, then SC down the one side and turn to SC down the other side. I’ve frogged it multiple times, but I always end up with a line of holes down the middle! What am I doing wrong?
your chain might be a bit loos. but you’re not doing anything wrong. sorry i’m a bit late
This is mine
I used fluffy yarn and lost count of the stitches for the body so I had to compromise but overall it looks amazing 🤩 thank you for the pattern!!
Any tips on how to make the neck less floppy when using chenille yarn?
Such a fun pattern. Made this for my daughter’s 2nd birthday. She loves little foot from land before time. I love how versatile the pattern is! I was able to make a Dino with I believe size 5 or size 6 yarn donated from my babies nana.
My son LOOOOOVES his new dino friend – flaws and all.. 🥰
Hello! I love your dinosaur pattern, thank you for making it! I made some for me and my friends (in the picture, I’m keeping the orange one for myself 🥰). I wanted to check if it was alright for me to sell future ones I make, I would credit you for the pattern and include a link to this page of your website. Thanks again for the pattern, it was super fun to make these guys!
Hello, I just made your pattern as a birthday present for my roommate. I am sure she will absolutely love her new cutie. Thank you for your pattern!
Hi I’m a beginner, can I know what round 2: repeat increase means? like is it as in inc a full round or as in just once? :’)
I figured it out !
Wow! So cute! Does messing up a row destroy the product? I am used to crocheting scarves and hats.
Absolutely loved making this! Thank you for the pattern!
This pattern is so cool! I am a bit confused on how to attach the legs though. I have been crocheting for a couple months so I’m not sure about all of my techniques so if anyone would mind helping me out I would greatly appreciate it.
My large dinosaur. I made this for my great granddaughter for Christmas. Thanks so much for the pattern I had fun making her
I LOVED this design! It was easy to follow and really cute❤ I ended up making the tail a little bigger because I liked it that way. I also added a fishing weight to the tail to balance the head. Thank you for all the great tips!
This is so cute I’m using peach sweet snuggles yarn I’m only on the head and it’s already so big
I decided to make this in bernat blanket yarn and a size 8 hook and while i absolutely love it i may have also underestimated the total size of this thing lol
Hi I was just wondering if you allow people to sell the Dino they have made if they give you pattern credits?
I’ve done this pattern twice now and it’s just so cute. I messed up the head inc/dec on the green one but he’s still cute. Thank you for this easy to read and deliciously repeatable pattern 🙂
Hello, can you use a weighted yarn of 5 bulky and a hook size of 9mm to make this dinosaur?
Hi, thanks for sharing this pattern and tricks. It’s the very first amigurumi I have crocheted. Learnt a lot meanwhile I had fun making it! 🙂
Just to clarify before I start, the numbers at the end in parentheses is how many times to repeat that round?
It’s the amount of stitches there should be in that round! I’m a bit late so I hope this still helps haha
I crocheted this just for fun for myself (also because Dino is my bias in Seventeen haha) it was so fun to make since it was very easy, too! He turned out so cute and I’m really happy with the result! Thank you sm for this amazing tutorial!
great pattern,
Mine turned out super cute. The Hubby has claimed it to take to work. Guess I’ll have to make another one for me.