![]()

I saw this idea on Pinterest here, but instead of crochet it was a sewing pattern. Since my sewing is very basic, I decided to crochet my own version instead! I hope you like it and please post a picture on my Ravelry project page if you made this! I’d really love to see it!
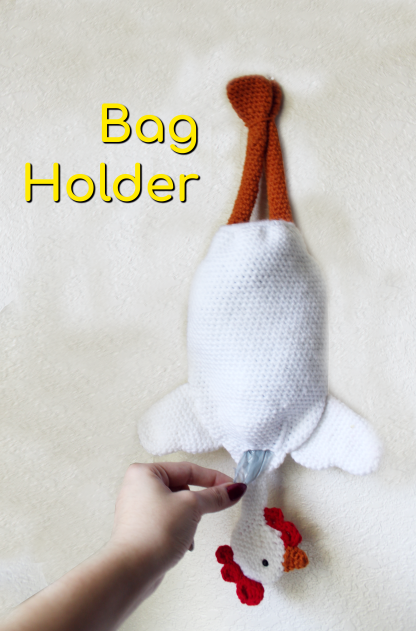
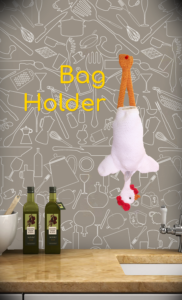
The chicken can hang either upside down or head up, but I made it to hang upside down. You insert bags into the elastic side, and pull bags out on the head side.
Purchase the PDF version here
You are 100% allowed to sell anything you make from my patterns anywhere, no credit needed, please just don’t sell the actual pattern itself (the written pattern), nor repost the actual pattern itself anywhere (the written pattern). Of course you can link my patterns on your site!
Chicken Bag Holder
Supplies:
4.00mm Crochet Hook (You can use a size 5.0mm or 6.0mm hook for a bigger chicken), Scissors, Tapestry Needle, 6mm Safety Eye, and Elastic Band/Hair Tie for Bag Opening
Yarn in Colors: White, Red, and Orange
Bags
Stitches Used:
Magic Ring, Sc, Inc, Dec, Dc, Trc, Slst, Ch, BLO
Difficulty: Easy/Beginner
Body
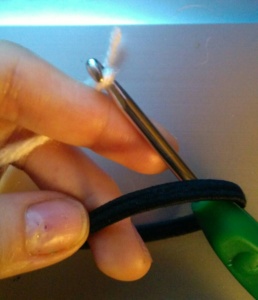
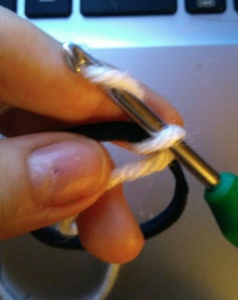
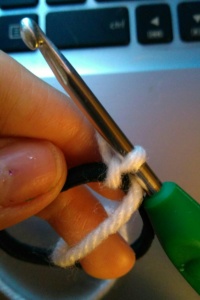
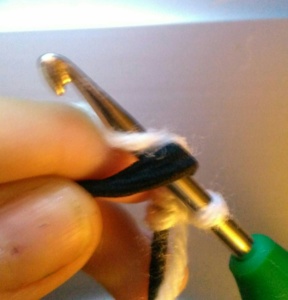
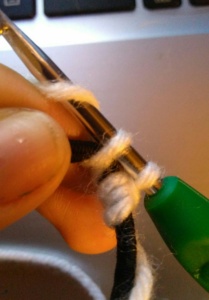
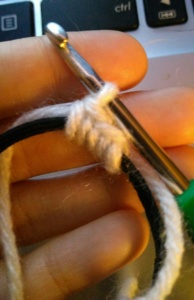
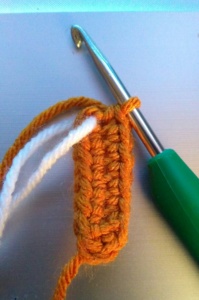
Round 1: Make a slipknot onto your hook. In elastic band/pony tail, Sc 46 Sc into band. Move loops to equally cover band once all 46 Sc are on the band.
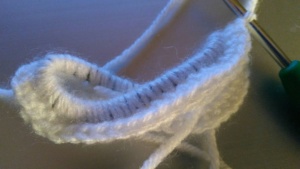
Round 2-7: *Sc* all around (46)
Round 8: Sc 17, *inc* 6 times, Sc in next 17 st, *inc* 6 times. (58)
Round 9-32: *Sc* all around (58)
Round 33: *Dec, Sc 9* all around, *Dec, Sc 1* in last 3 st. (52)
Round 34-40: *Sc* all around. (52)
Round 41: *Dec, Sc 8* 5 times, *Dec* in last st (46)
Round 42: *Sc* in the next 44 st, *Dec* in the last st (45)
Round 43: *Dec, Sc 7* all around (40)
Round 44: *Dec, Sc 6* all around (35)
Round 45: *Dec, Sc 5* all around (30)
Round 46: *Dec Sc 4* all around (25)
Round 47: *Dec, Sc 3* all around (20)
Round 48: *Dec, Sc 2* all around (15)
Finish off.
Head:
Round 1: In white, 6 Sc in Magic Ring (6)
Round 2: *Inc* all around (12)
Round 3: *Inc, Sc* all around (18)
Round 4: *Inc, 2 Sc* all around (24)
Round 5-9: *Sc* all around (24)
Round 10: *Dec, Sc* 4 times, Sc in next 2 st, *Dec, Sc 3* 2 times (18)
Round 11: *Sc* all around (18)
Round 12: *Dec* 4 times, Sc in net 8 st, Dec in last 2 st (13)
Round 13: *Dec* 3 times, Sc in next 5 st, Dec in last 2 st (9)
Round 14-25: *Sc* all around (9)
Round 26: Sc in first 2 st, *Inc* 3 times, Sc in next 2 st, *Inc* 2 times (14)
Round 27: *Sc* all around (14)
Round 28: Sc in next 4 st, *Inc* 4 times, Sc in next 3 st, *Inc* 3 times (21)
Finish off and sew to the small opening of the bag, NOT the elastic end of the bag. Make sure to not sew the bag closed while sewing on the head.
Head Piece:
Part 1
Round 1: In red, 6 Sc in Magic Ring (6)
Round 2: *Inc* all around (12)
Finish Off
Part 2
Round 1: In red, 4 Sc in Magic Ring (4)
Round 2: *Inc* all around (8)
Finish Off
Part 3
Round 1: In red, 6 Sc in Magic Ring (6)
Finish Off
Assembly of Head Pieces:
Pin each piece to the top of the head in order of Part 1-3, or biggest to smallest. Sew each piece on, making sure to sew them together.
Beak
Round 1: In orange, 4 sc in magic Ring (4)
Round 2-3: *Sc* all around (4)
Round 4: *Inc* all around (8)
Finish off and sew to the middle/side of the head.
Neck Flap:
Round 1: In red, Ch 7. Sc in 2nd ch from hook. In same st, *Dc 1, Trc 1*, in next st, *Dc, Slst*. Slst in next st. In next st, *Sc, Dc,* In last st *Dc, slst*.
Finish off and sew below Beak.
Wings (Make 2):
Round 1: In white, 6 Sc in Magic Ring (6)
Round 2: *Inc* all around* (12)
Round 3: *Inc, Sc* all around (18)
Round 4-9: *Sc* all around (18)
Round 10: Sc in next 7 st, *Inc* 4 times, Sc in next 7 st (22)
Round 11: Sc in next 7 st, *Sc, Inc* 4 times, Sc in last 7 st (26)
Round 12-16: *Sc* all around (26)
Round 17: *Dec, Sc 11* all around (24)
Round 18: Sc in next 11 st, *Dec* 3 times, Sc in last 7 st (21)
Finish off and sew to the head side of the chicken. Make sure to sew only of the back side of the chicken, so you don’t sew the bag closed.
Legs (Make 2):

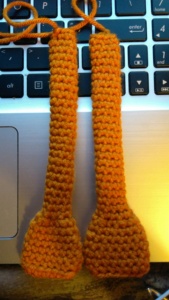
Round 1: In orange, ch 9. Sc in 2nd ch from hook. Sc in next 7 st. Turn to the other side of ch, Sc in next 8 st (16)
Round 2: In BLO (Back Loop Only) , Sc around (16)
Round 3-5: In BOTH loops, *Sc* around (16)
Round 6: Dec, Sc in next 6 st, Dec, Sc in next 6 st (14)
Round 7: *Sc* all around (14)
Round 8: *Dec, Sc 1* 4 times, Dec in last 2 st (9)
Round 9: Dec, Sc in next 7 st (8)
Round 10-34: *Sc* all around (8)
Finish off and sew to the back of the chicken, on the elastic side of the chicken. Make sure not to sew the bag closed. Only sew on the back side of the chicken.
Now you’re done! If you finished this project, I would be so happy if you uploaded a picture here!


63 Comments
On the head of chicken pattern incorrect. I need help please
Are there pattern corrections posted?
Hi Terri,
Thanks for letting me know! Which round are you having trouble on? It looks like I have a typo on Round 5-9. The typo was 30 Stitches but the correct number of stitches is 24 stitches. I went ahead and corrected it! Does it work for you now? If not, please let me know! I’d love to hep you further!
Hi on the body of the chicken it says sc 17 increase 6 times and then sc 17 increase 6 times =58 sc. am I suppose to sc 6 times in one stitch?
Hi Theresa,
You would increase in the next 6 stitches, don’t increase 6 times in the same stitch. Another way to look at that could be “Sc in next 17 stitches, Increase in the next 6 stitches, Sc in the next 17 stitches, Increase in the last 6 stitches (58)”
I hope this helped, please let me know if you have any more questions and I’m more than happy to help 🙂
Have a great day!
This was my question also – I don’t really read crochet patterns (Youtube is my friend) so your answer here explained perfectly.
(Sc 17 sts, then inc 6x) twice.
I love this chicken bag! What kind of yarn did you use, please?
Hi Donna,
Aw yay I’m so happy you like it! I used 4/Medium weight yarn. Specifically, I used Big Twist Value in the color White, which is sold at Joann’s. A similar yarn is Red Heart Super Saver in White, which you can find at most craft stores 🙂 Either one is perfect for this pattern.
Thanks for you question and please let me know if you need any further help!
Love the pattern. I used sugar and cream. Cotton. Just have to see together
Hi Dorothy,
Oh what a good choice in yarn! I’m sure it looks super cute 🙂 I’m so happy you liked the pattern, thanks for the feedback. I hope the sewing part goes well!
Do you crochet in the round or slip stitch to the first stitch and ch?
Hi! I crochet in this round for this pattern.
I’m having a problem from line 26 on. Line 25 you get 9 sc, but on line 26 you want me to (Sc in next 2 sc, 2 sc in next sc) 3 times, (Sc in next 2 sc, 2 sc in next sc) 2 times. (14). There are not enough sc to do all this. You would need 15 sc in order to do this. Help.
Hi there!
I think you may have read the pattern wrong, let me explain these Rounds.
So for the head on Round 25 you will have 9 Sc.
Now for Round 26. Sc in the first 2 St, Inc in the next 3 st, Sc in the next 2 st, and Inc in the last 2 st. (14)
This uses all 9 of the stitches from the previous Round, and gives us a total of 14 stitches. The stitches in the *example* stars mean repeat only whats in the *example* stars, don’t repeat anything not in the stars. I hope that makes sense! Please don’t hesitate to let me know if I could explain better or if you need any more help 🙂
How should line 28 go.
Also, do you stuff the head?
I figured out line 28 but do you stuff the head?
Hi, I didn’t stuff the head but you can if you would like.
Hi thankyou for the free Avocado pattern i have not started it yet,but just read through it you say to use safety eyes or beads but you must have to put the safety eyes on before you completley saw it together am i right ,but the picture shows it all sawn together then it says to put the eyes on and mouth or am i reading it wrong xxx
Hi there, if you’re using safety eyes I would definitely add them in before completely sewing/crocheting the avocado shut. But I used sew on beads, so if you use sew on beads you can sew them on either before or after shutting the avocado.
If you use safety eyes, just go ahead and add them in and secure them with the washer. Then go ahead and stuff and shut the avocado 🙂 I hope that helps and feel free to let me know if you have any questions.
This is so cute. I chuckled all the while making it. I hung mine upside down so the bags come our his rear end. Kinda goes with my chicken butt coaster.
Hi Gail, aw that is really funny and cute! I hope you aren’t pulling brown colored bags out of the chicken’s butt… (But that would be pretty funny if that happened to be the case). I hope you can make more chicken themed things! That coaster sounds so cute 🙂
Thank you so much for your pattern! I am making it right now as we speak! It’s for a friend/boss’ birthday this Sunday. She loves chickens and when I saw this I knew she would love it! God Bless you and thank you again. I will post a picture when I am done ♥Ginger♥
Aw that is so cute, you are such a kind friend to do that! I bet she loves it, who doesn’t love chickens? 🙂 Thank you so much for your comment Ginger <3
I don’t understand the last bit. The little oval like shape under the leg portion? I understand how to make it but WHAT is it and WHERE does it go?
Thank you!
Hi there, that would be the foot which leads into the leg
Having an issue with line 11. If I *sc, inc* four times I don’t end up with 7 stitches left. I have tried only sc six in the beginning and using the 7th as the beging of the *sc, inc* but either way I don’t end up with 26 stitches around. What am I doing wrong?
Line 11 of the wing
Hi Courtney! There’s two things that may be causing this. First, when you do Round 10, make sure you’re increasing in the next 4 stitches and not the same stitch. Let me rewrite that round so it makes a bit more sense.
Round 10: Sc in next 7 st, *Inc* 1 time in each of the next 4 stitches, Sc in next 7 st (22)
Now if that round is done correctly, I can see how Round 11 may be misinterpreted! For Round 11, could you possible be doing *Inc, Sc* in the same stitch? Let me write out that section so it makes more sense 🙂
Round 11: Sc in next 7 st, *Sc in the next st, Inc in the next st* 4 times, Sc in last 7 st (26)
This way you should be getting the correct stitch count. I hope this helps, but if you have any other questions or need clarification please just let me know! ❤️
Bonjour, je vous remercie pour ce tuto que je trouve bien expliqué et en plus il y a le nombre de point à la fin de chaque rangs ce qui aide à vérifier que l’on à bien compris , je viens d’en finir un mais comme je le trouve un peu petit (crochet 4) , je vais en refaire avec un fil plus gros. j’aurai bien mis la photo mais je ne sais pas ou la mettre.
Salut, je suis tellement content d’entendre que vous avez apprécié le motif 🙂 Cela signifie beaucoup pour moi, merci beaucoup. Je pouvais voir comment l’utilisation d’un crochet en taille 4 rendrait le poulet trop petit, donc je pense que l’essayer dans une taille 6 mm le rendrait plus grand. Je suis d’accord avec vous, je pourrais aussi essayer d’en faire un autre dans un crochet de taille 6! Si vous souhaitez me montrer une photo de votre objet fini, vous pouvez l’essayer sur Pinterest ❤️
Ça y est, j’ai mis ma photos sur Pinterest.
why does it say “Free” crochet pattern, but then you have to pay? I don’t understand.
Hi Brenda! The pattern is free – no paying required! Just scroll up to the pattern above the comments and you’ll find it in it’s entirety 🥰 However, if you’d like to get the printable PDF version, you can purchase it for only $1.99 here: https://stringydingding.com/product/chicken-bag-holder-pdf/
If you’d like to find out why I do this, you can read more here: https://stringydingding.com/how-a-crochet-pattern-comes-to-life/
Please let me know if you have any questions, I’m always happy to help in any way I can ❤️❤️
I love the chicken. I also plan to put the hole in the back and I’m adding a squeaker to the head. They will be Christmas gifts for my married adult children. They are going to get such a kick out of them. I do have a question. I’m on line 12 and it looks like a little bowl with the sides turning up. Should it be flat? My numbers are right. I have no idea what I’m doing wrong. Help please!
Hi Sheila,
Aw that is such a hilarious idea, I love it! Haha I’m sure your kids will love it too, that’s such a funny idea 🙂 Already time to start making Christmas gifts!!
I hope I can help answer your question! For Round 12 of the body I would say it’s correct if it currently looks like a bowl. If it’s possible could you perhaps upload a picture to the comments so I can see what it looks like?
When I did mine, the body turned out to look more like a tube. I would say make a few more rounds for the tube to take shape! It will be more flared out the first few rounds since it’s just straightening out from the tight elastic part 🙂 I hope that helps answer your question, but if we want to be extra sure just upload a picture! Please feel free to let me know if you have any other questions or if I can clarify anything ❤️❤️ I love your idea with the chickens head!
Thank you for the free pattern. I am making this for my mother for Christmas – her nickname is Free Range 🙂
Been double checking myself, but getting stuck on round 41 of the body. If there are 5 repeats, of 1 dec and 8 sc, you should have 2 stitches left at the end instead of one as the pattern says? To match your stitch count, I decided to dec over the two. But then when I get to round 43, I have a similar issue. Again, if there are 5 repeats, of 1 dec and 7 sc, you have 1 stitch left at the end instead of zero as the pattern says?
Hi there Cathy, I am so happy that you’ll be making this as a gift for your mom! That is so sweet 🙂
I looked at the part you were having trouble with and it looks like Round 41 was off by 1 stitch like you mentioned, so I went ahead and fixed it! Now Round 41 and on should be able to be right. It doesn’t make a huge difference since it’s only a stitch, so no worries if you crocheted it as the pattern was before! I hope that you have an easier time with it now, thank you so much for pointing that out to me 😍 If you come across anything else or have any questions, please just let me know 🙂 I hope your mom loves her gift, I gotta admit this would be such a cool one to receive!
That was fast! Thank you!
No problem! ❤️
Please help. The head and neck has the open end so When sewing the neck onto the body do you sew the open end of the neck closed while sewing it onto the body? Also do you sew it on the back of the body or on the inside of the hole of the body?
Hi there Margaret,
Thank you so much for your comment and your feedback! I’m so sorry to hear that you’re having trouble in certain parts of this pattern, it’s one of my very first and I didn’t take as many pictures as I do today with my patterns. I’ll put it on the list of video tutorials I want to do in the future 🙂
As for your question, the head and neck are made in one piece, so the end of the neck will have an open end, while the head part will be closed because we made it in a magic ring. When we assemble the neck to the body, we sew the end of the neck to the end of the bag that does NOT have the elastic opening (so we will sew it to the smaller opening of the bag). We’ll also be sewing the opening of the neck closed as we’re sewing it to the bag, so make sure you’re going through those open neck stitches when sewing the neck to the body. Make sure you’re placing the neck to the back of the body!
I made a picture explaining how to sew on the the neck, please click on the image below to make it larger. I hope it makes sense, basically we sew through all layers of the chicken when we’re at the first 2 stitches, and last 2 stitches of the corners of the bag. However, you only sew though the neck and the BOTTOM layer of the bag when you meet the middle of the opening. This will make sure the neck’s sewn to the bag, and leave an opening.
Thank you. When you make the tutorial I hope I’ll be able to find it. Maybe you could send me an email when you post it.
Do you already have tutorials on YouTube? I would love to follow you.
I don’t have any on Youtube, I have them over at my member’s website! I try to be super thorough on them, so it’s easy for visual learners to see how to make some of my cutest amigurumi patterns 😁 You can see them here: https://members.stringydingding.com/amigurumi-video-tutorials/
I’ve been very busy between life and making patterns that I haven’t been able to make time out for a video tutorial the past few months, sadly 🙁 I really hope to make another one soon! You can subscribe to my newsletter, as I always inform you when there’s a new pattern or video tutorial through that 🙂 ❤️
I would like to request a YouTube video tutorial for this pattern. It would help so much to be able to follow along instead of trying to figure out what everything means on this written pattern. I’ve been crocheting for 43 yrs but I did have trouble with figuring this pattern out in several areas. Not trying to be ugly or critical, I really love it.
Hola, me gustaría hacer ése hermoso pollo para guardar mis bolsas pero no entiendo las explicaciones, (sc, st, ch, dc, slst, sc,dc, trc, pb, no se que significan ninguna de esas letras) soy de Buenos Aires Argentina,
Puede hacer un video con el paso a paso así me doy cuenta como es lo hago por favor 🙏
What’s the best way to keep track of how many stitches you’re increasing with how many stitches you need to have in a row I have a counter to keep track of what round I’m on but I have to keep going back to count how many stitches I have in the round to make sure those are correct any suggestions would be great? I am very new to amigurumi.
Do I have to use the magic ring or is there a way I can slip stitch anything else in the round to close, I struggle with the magic ring?
Not sure if I did row 33 correctly, but I ended up with 52 stitches 😉
I just think this is darn cute
Absolutely love this pattern! The instructions are very clear and it works up fast. You are a pattern genius!
I’m having issues with the head. It says make magic circle the 6 sc in ring. Round 2 *inc* all round (12) ,rnd 3 *inc,sc *all round(18) and so on but then I do this I’m not reaching my first stitch am I missing something.?
What row do you put the safety eyes on the chicken?
I wanted to show you the chicken I made for my 52 year old son who collects the Squawking chickens.
He loved it 😁. He keeps his clean rags in it for working on his cars and things in the garage 😁
I absolutely love your patterns. I just completed the tea pot w/cups coffee hamburger no sew hot dog tacos and cookies for my granddaughters birthday today. I now have started the chicken bag holder can’t wait till it’s finished. The only issue I have is I never received the avocado pattern when I signed up and would love it make that to go with her tacos. Hopefully you can email to me. TIA
What size hair tie is recommended?
I really don’t understand the wings.
Rounds 4-9 on wing say to avoid in 18 stitches. That makes it not be flat.
crochet ( not avoid)
I found this by accident and knew I had to make one for my Wally World sacks, got it finished with cotton which isn’t my favorite but it is absolutely adorable ! Hung it inside my pantry door. How cute is he. I forgot the safety eyes until it was sewn together so used button, which worked fine. Thanks so much for this adorable pattern.
Is there a video on how to assemable this chicken. I have it made but can’t seem to put it tigether
So happy I found your pattern and couldn’t wait to make it! It’s turning out adorable but I have a question about hanging it. Are the feet crossed then sewn together? Or is it attached another way? I was thinking of tying some string or twine around the legs above the feet. Or putting a snap on the feet to hold them together so you can hang it! Not really sure what would work for hanging it! Your suggestions would be greatly appreciated and thank you for this pattern!!! I love it and want to make it in some colorful yarns for fun!!
It looks like, from the pictures posted that they sewed the legs together so they could hang the chicken. The crisscross is cute but also just laying them flat with a couple of stitches would work also. The pattern doesn’t state about sewing them together but I do like this idea so the chicken can be hung up on a door/drawer.