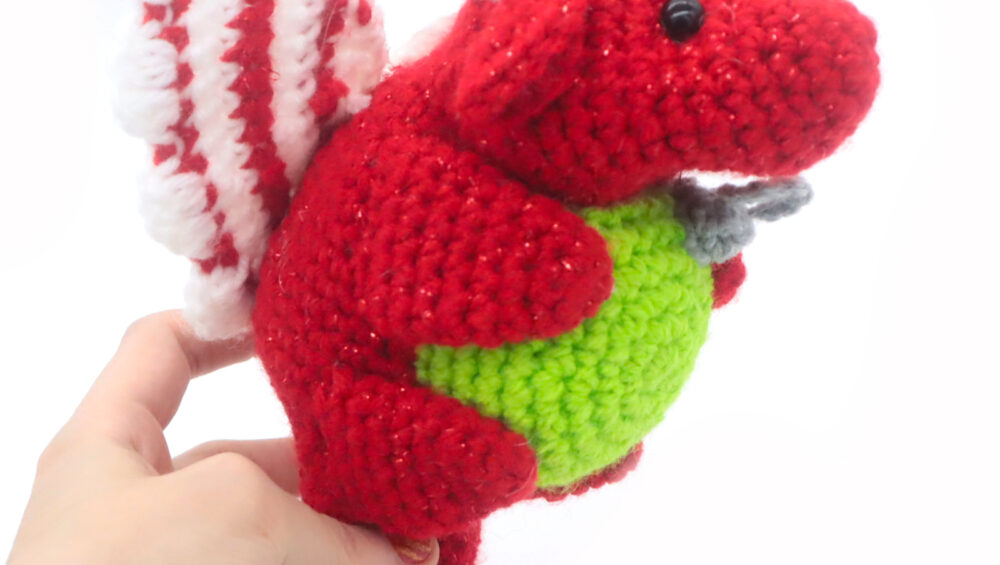
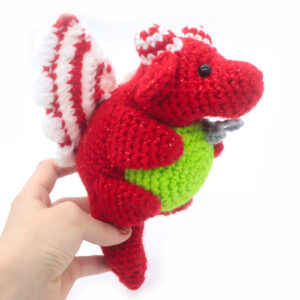
Christmas Dragon Amigurumi – Free Crochet Pattern

Print this pattern out – purchase the PDF here!

 Supplies:
• Yarn 4/Medium Weight Yarn in…
Red, green, white, and grey
•4mm Crochet Hook
•Tapestry needle
•Scissors
•Stuffing
•9mm safety eyes
Additional Information:
•Difficulty: Easy
•Size: 8″ tall
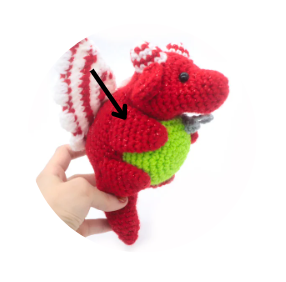
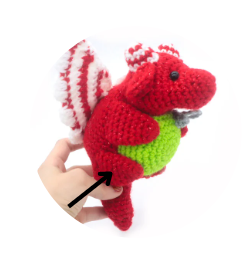
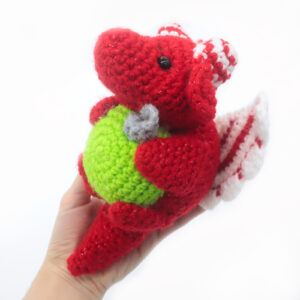
Dragons love Christmas too! This adorable dragon is hugging a Christmas ornament just like how dragons hug onto orbs! While this is a great pattern for Christmas, you can also make this pattern for anytime of year simply by not making the ornament’s grey top. This pattern is perfect for any fantasy lover in your life!
This pattern is easy! We start by making the head, which leads into the body and tail as one continuous piece. After that, we make the face pieces, arms, legs, and ornament. Let’s get started!
Head/Body/Tail:
In Red
We start out by making the head. The head leads
into the body and tail as one continuous piece.
Round 1: 6 Sc into a Magic Ring (6)
Round 2: *Inc* all around (12)
Round 3-4: *Sc* all around (12)
Round 5: *Inc, Sc in the next st* all around (18)
Round 6-7: *Sc* all around (18)
Now we will mark where to place the safety eyes. Add a different colored stitch marker into the 5th and 9th stitch in Round 7. Later we will replace these eye stitch markers with safety eyes.
Round 8: Sc in the next 4 st. Working in the Front Loop Only (FLO), Inc in each of the next 6 st. Working in BOTH loops, Sc in the next 8 st (24)
Round 9: Sc in the next 2 st. Repeat *Inc, Sc in the next 2 st* 6 times. Sc in the next 4 st (30)
Round 10-14: *Sc* all around (30)
Round 15: Sc in the next 6 st. Repeat *Dec, Sc in the next 3 st* 4 times. Sc in the next 4 st (26)
Round 16: Sc in the next 6 st. Repeat *Dec, Sc in the next 2 st* 4 times. Sc in the next 4 st (22)
Round 17: Sc in the next 6 st. *Dec, Sc in the next st* 4 times. Sc in the next 4 st (18)
Round 18-19: *Sc* all around (18)
Round 20: Sc in the next 4 st. Repeat *Inc, Sc in the next 2 st* 4 times. Inc in the next st, Sc in the next st (23)
Stuff the head firmly now.
Round 21: Sc in the next 4 st. Repeat *Inc, Sc in the next 3 st* 4 times. Inc in the next st, Sc in the next 2 st (28)
Round 22: Sc in the next 4 st. Repeat *Inc, Sc in the next 4 st* 4 times. Inc in the next st, Sc in the next 3 st (33)
Round 23-32: *Sc* all around (33)
Round 33: Sc in the next 11 st. Repeat *Dec, Sc in the next 3 st* 4 times. Dec 1 time (28)
Round 34: Sc in the next 11 st. Repeat *Dec, Sc in the next 2 st* 4 times. Sc in the next st (24)
Round 35: Sc in the next 11 st. Repeat *Dec, Sc in the next st* 4 times. Sc in the next st (20)
Round 36-40: *Sc* all around (20)
Round 41: *Dec, Sc in the next st* 6 times. Dec 1 time (13)
Stuff the body firmly now. Continue stuffing after each round.
Round 42-46: *Sc* all around (13)
Round 47: *Dec* 6 times. Sc in the next st (7)
Round 48-49: *Sc* all around (7)
Finish off, leaving a long tail for sewing. Sew the remaining stitches closed now and weave in ends. Cut any excess yarn.
Ears: (Make 2)
In Red
Round 1: 6 Sc into a Magic Ring (6)
Round 2: *Inc* all around (12)
Round 3: *Inc, Sc in the next st* all around (18)
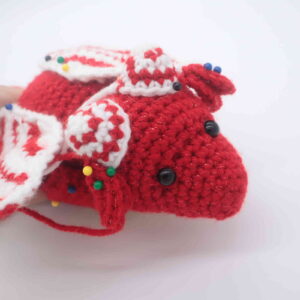
Finish off, leaving a long tail for sewing. Fold the ears in half and pin the ears on as shown. Sew on. Once done, weave in ends and cut any excess yarn.
Horns: (Make 2)
In White
Round 1: 6 Sc into a Magic Ring (6)
Round 2: In red, *Sc* all around (6)
Round 3: In white, *Inc* all around (12)
Round 4: In red, *Sc* all around (12)
Round 5: In white, *Sc* all around (12)
Finish off, leaving a long tail for sewing. Pin the horns on as shown and sew on. Be sure to add stuffing before fully sewing closed. Weave in ends and cut any excess yarn.
Arms: (Make 2)
In Red
Round 1: 6 Sc into a Magic Ring (6)
Round 2: *Inc* all around (12)
Round 3: *Sc* all around (12)
Round 4: *Inc, Sc in the next st* all around (18)
Round 5: *Sc* all around (18)
Round 6: *Inc, Sc in the next 2 st* all around (24)
Round 7-11: *Sc* all around (24)
Finish off, leaving a long tail for sewing. Pin the arms on as shown. Sew on. Once sewn on, weave in ends and cut any excess yarn.
Legs: (Make 2)
In red
Round 1: 6 Sc into a Magic Ring (6)
Round 2: *Sc* all around (6)
Round 3: *Inc, Sc in the next st* all around (9)
Round 4: *Inc, Sc in the next 2 st* all around (12)
Round 5-8: *Sc* all around (12)
Finish off, leaving a long tail for sewing. Pin the legs on as shown. Sew on. Once sewn on, weave in ends and cut any excess yarn.
Wings: (Make 2)
In White
Row 1: In white, Ch 3. Sc in the 2nd Ch from the hook. Sc in that same st. Inc in the next st (4)
Row 2: Ch 1 and turn. Inc in the next st, Sc in the next 2 st, Inc in the next st (6)
Row 3: In red, Ch 1 and turn. Inc in the next st, Sc in the next 4 st, Inc in the next st (8)
Row 4: In white, Ch 1 and turn. Inc in the next st, Sc in the next 6 st, Inc in the next st (10)
Row 5: Ch 1 and turn. Inc in the next st, Sc in the next 8 st, Inc in the next st (12)
Row 6: Ch red, Ch 1 and turn. Inc in the next st, Sc in the next 10 st, Inc in the next st (14)
Row 7: In white, Ch 1 and turn. Inc in the next st, Sc in the next 12 st, Inc in the next st (16)
Row 8: Ch 1 and turn. Inc in the next st, Sc in the next 14 st, Inc in the next st (18)
Row 9: Change to red. Ch 1 and turn. Sc in the next 18 st (18)
Row 10: Change to white. SlSt in the next st. Repeat *2 Dc in each of the next 2 st, SlSt in the next 2 st* 4 times. SlSt in the next st (26)
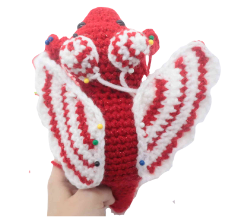
Row 11: In white, Sc around the edges of the wing to make the wings look cleaner. Once you meet the double crochets we made, finish off, leaving a long tail for sewing, and pin the wings onto the dragon. Sew or hot glue the wings on.
Ornament:
In Green
Round 1: 6 Sc into a Magic Ring (6)
Round 2: *Inc* all around (12)
Round 3: *Inc, Sc in the next st* all around (18)
Round 4: *Inc, Sc in the next 2 st* all around (24)
Round 5: *Inc, Sc in the next 3 st* all around (30)
Round 6-9: *Sc* all around (30)
Finish off, leaving a long tail for sewing. Pin the ball on as shown and sew on, making sure to add stuffing before fully sewing closed. Once done, weave in ends and cut any excess yarn
Ornament Top:
In Grey
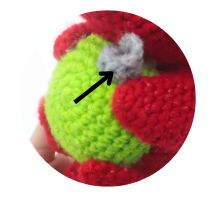
Round 1: 7 Sc into a Magic Ring (7)
Round 2: Working in the Back Loop Only, *Sc* all around (7)
Finish off, leaving a long tail for sewing. Pin the top part onto the ball as shown and sew on, making sure to add stuffing before fully sewing on. Once done, weave in ends and cut any excess yarn.
Ornament Loop:
In Grey
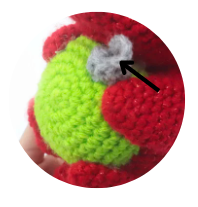
Row 1: Ch 7. Finish off, leaving a long tail for sewing. Pin the top loop onto the top piece as shown and sew on. Once done, weave in ends and cut any excess yarn.
Done! If you made a dragon, I would LOVE to see! You can show me by posting a picture in the comments section below this post 🙂


3 Comments
This is cool
nah this dragon is drippy
I had so much fun making this little guy easy and the pattern was simple to follow.