Purchase The PDF Version Here


Supplies:
4/Medium weight yarn in…
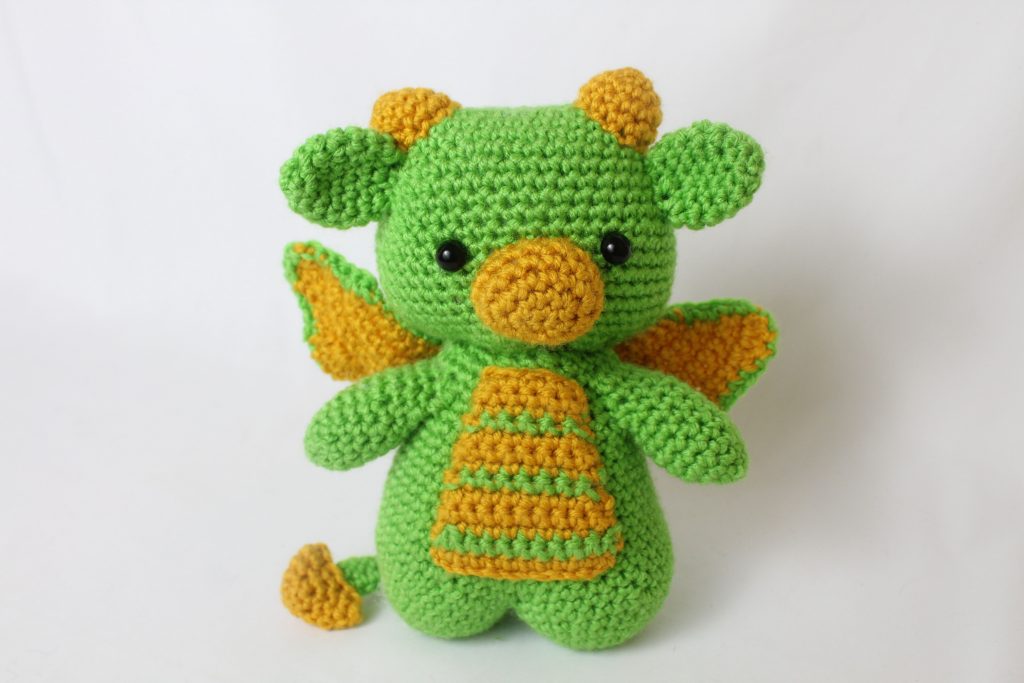
Main Color (I used green)
Contrast Color (I used yellow)
4mm crochet hook
9mm safety eyes, tapestry needle, scissors, and stuffing.
Additional Information:
Difficulty: Easy
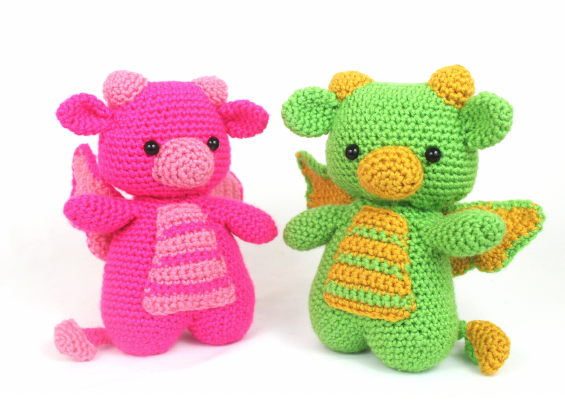
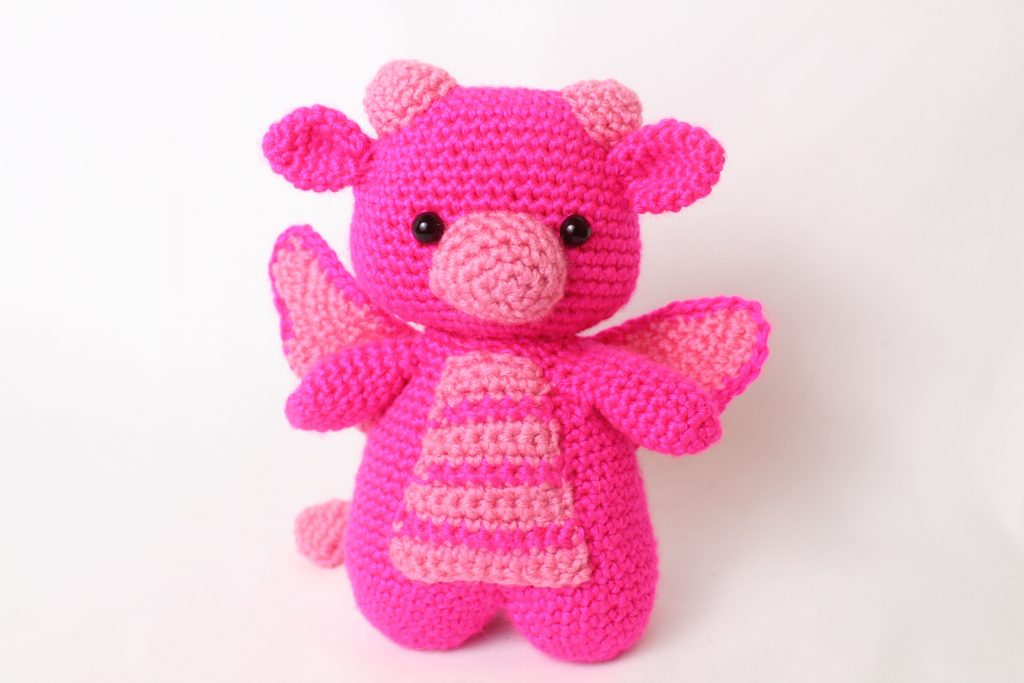
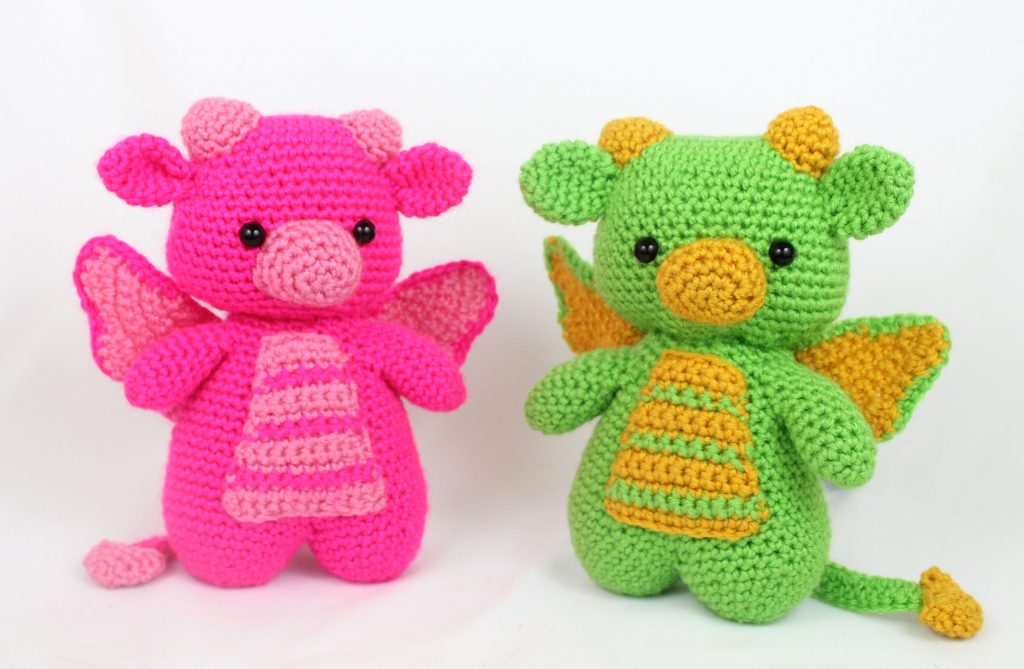
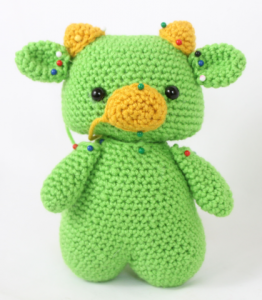
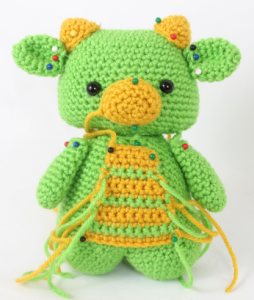
To make the dragon, we start by creating the head. We then make all of the head parts, such as the nose, horns, and ears. Next, we make the body. The body starts with two legs, then crochet the two legs together to form the body. We make the arms, chest, tail, wings, and finally you can make an optional tooth and cute eyes.
Note May 27, 2020: I added clarifications and photos to Round 1 of the head, as it’s much easier to understand that way. I also added this to the PDF. If you have purchased the PDF prior to this update, you can simply redownload the pattern from the email sent when you purchased the pattern titled “Your StringyDingDing Download is Now Available”. The updated version will download.
Thank you for Tammy’s kind comment to let me know she had trouble with the head! Comments like this help me improve patterns for the future, so if you have trouble with something please let me know! It’s likely to help others as well 🙂
Head:
In Main Color
Please note that the head is worked in rounds. We will make a chain and work around the chain in a round.
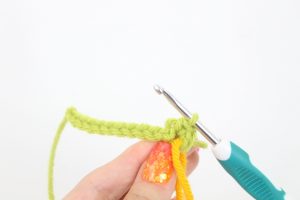
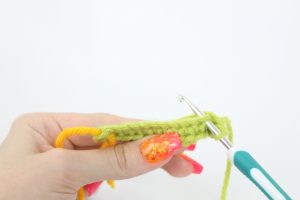
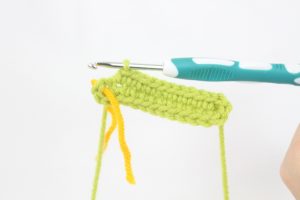
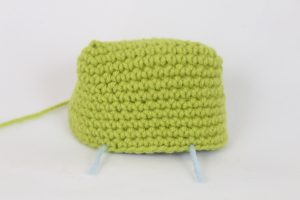
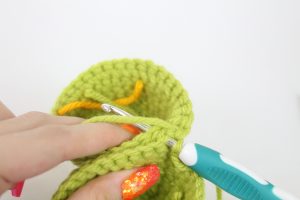
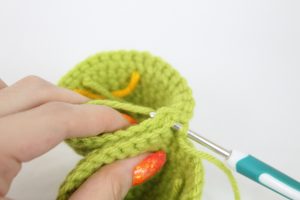
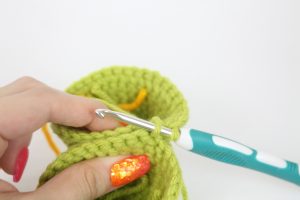
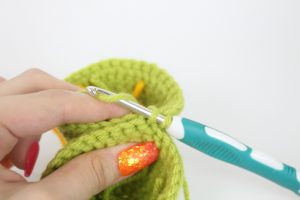
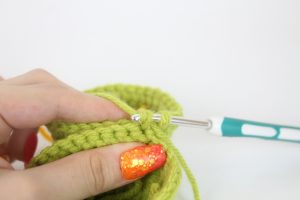
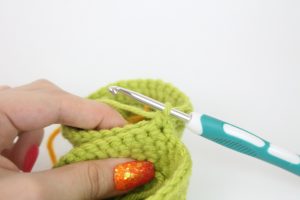
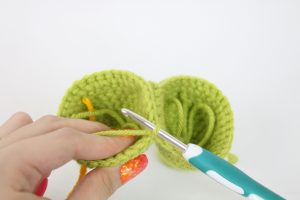
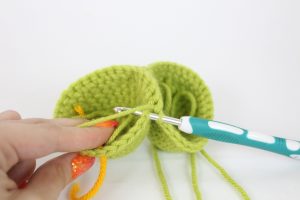
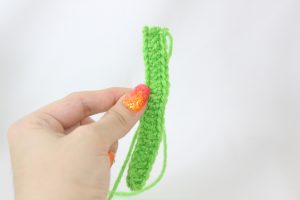
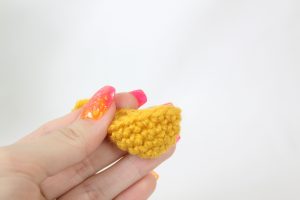
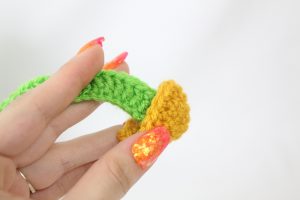
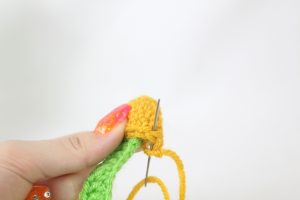
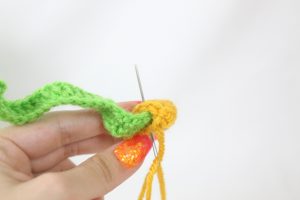
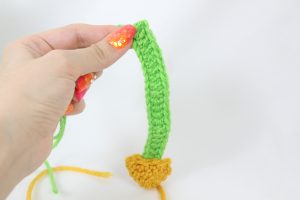
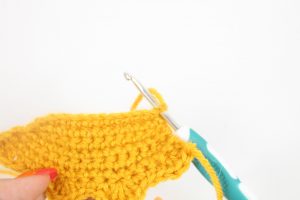
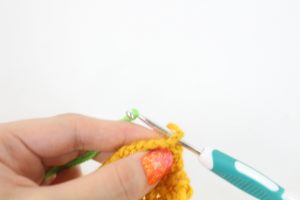
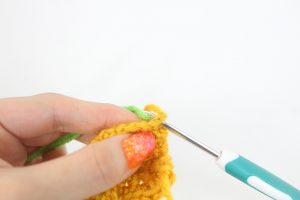
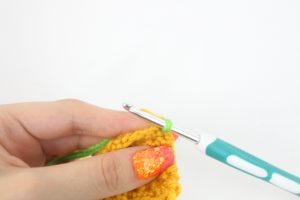
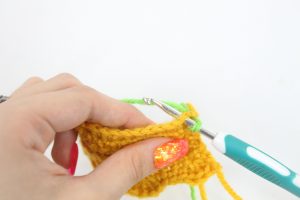
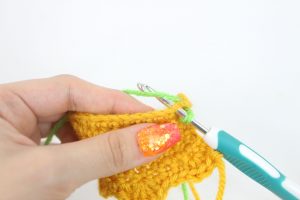
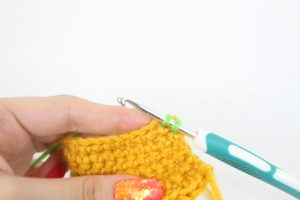
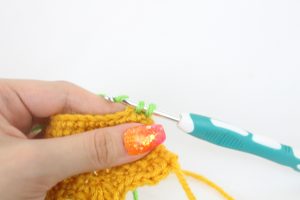
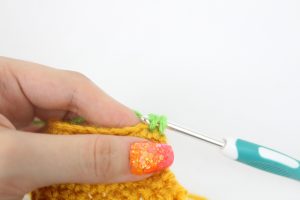
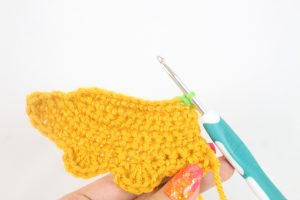
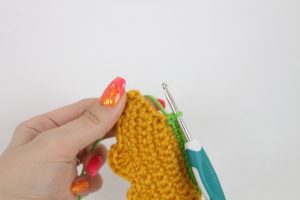
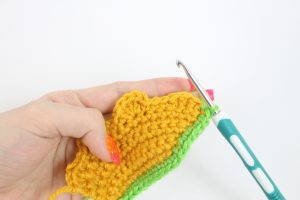
Round 1: Ch 13 (Pic 1). Sc in 2nd ch from the hook 3 times (Pic 2). Add a stitch marker to the very first single crochet made. Sc in the next 10 st, Sc 3 times in the next st (Pic 3). Now we are at the end of the chain. We will start working on the other end of the chain. Sc next 10 st on the other side of the chain (Pic 4-5) (26)
1.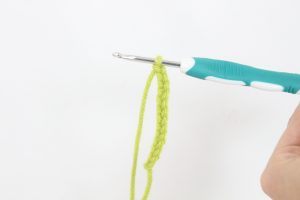 2.
2.
3.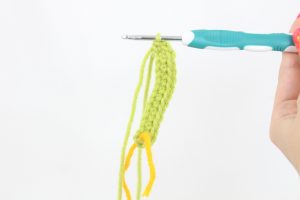 4.
4.
5.
Round 2: *Inc* in the next 3 st, Sc in the next 10 st, *Inc* in the next 3 st, Sc in the last 10 st (32)
Round 3-5: *Sc* all around (32)
Round 6: Sc in the next 3 st, *Inc* in the next 3 st, Sc in the next 13 st, *Inc* in the next 3 st, Sc in the last 10 st (38)
Round 7-8: *Sc* all around (38)
Round 9: Sc in the next 5 st, *Inc* in the next 3 st, Sc in the next 16 st, *Inc* in the next 3 st, Sc in the last 11 st (44)
Round 10: *Sc* all around (44)
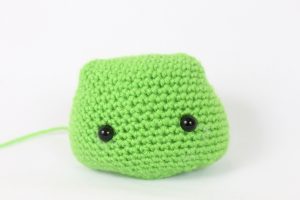
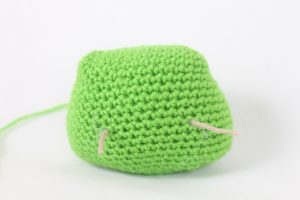
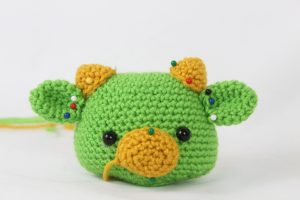
Round 11: Sc in the next 16 st. Sc in the next st and add a different colored st marker to the Sc just made. This marks where to place the eye. Sc in the next 7 st. Sc in the next st and add a different colored st marker to the Sc just made. Sc in the last 19 st (44)
Round 11 Eye Markers Pictured Below
Round 12-16: *Sc* all around (44)
Round 17: Sc in the next 7 st, *Dec* 3 times, Sc in the next 16 st, *Dec* 3 times, Sc in the last 9 st (38)
Round 18: Sc in the next 6 st, *Dec* 3 times, Sc in the next 13 st, *Dec* 3 times, Sc in the last 7 st (32)
Round 19: Sc in the next 4 st, *Dec* 3 times, Sc in the next 10 st, *Dec* 3 times, Sc in the last 6 st (26)
Round 20: Sc in the next 3 st, *Dec* 3 times, Sc in the next 7 st, *Dec* 3 times, Sc in the next 4 st (21)
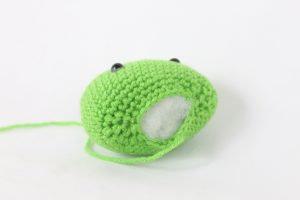
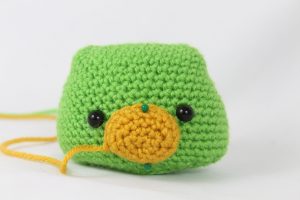
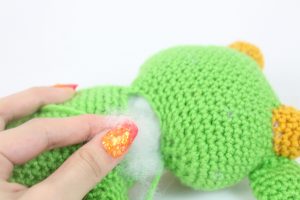
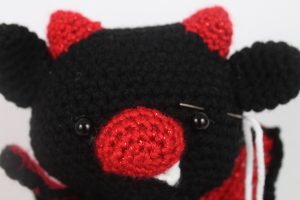
Finish off. Add the safety eyes in the marked areas from Round 11 now (Pic 1-2). Stuff the head (Pic 3) and set the head aside for now.
1. 2.
2.
3.
Nose:
In Contrast Color
Round 1: 7 Sc in Magic Ring (7)
Round 2: Sc in the next 2 st, *Sc* 3 times in the next st, Sc in the next 2 st, *Sc* 3 times in the next st, Sc in the last st (11)
Round 3: Sc in the next 3 st, *Sc* 3 times in the next st, Sc in the next 4 st, *Sc* 3 times in the next st, Sc in the next 2 st (15)
Round 4-5: *Sc* all around (15)
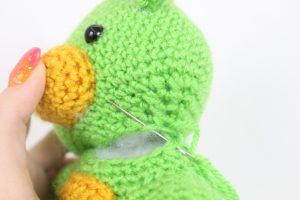
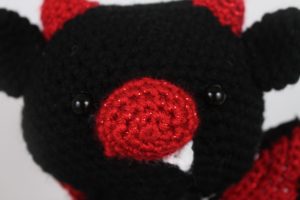
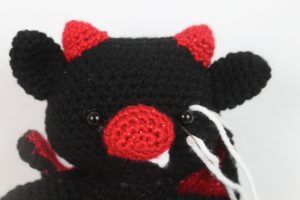
Finish off, leaving a long tail for sewing. Pin the nose below & between the two eyes as shown. Sew on, making sure to stuff the nose before fully sewing shut. Weave in ends.
Horns: (Make 2)
In Contrast Color
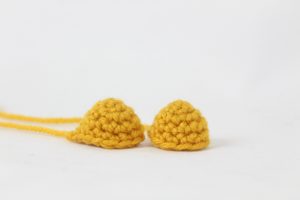
Round 1: 6 Sc in Magic Ring (6)
Round 2: *Sc* all around (6)
Round 3: *Inc* all around (12)
Round 4-5: *Sc* all around (12)
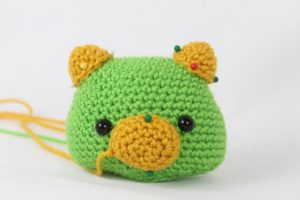
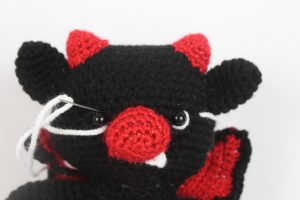
Finish off and leave a long tail for sewing. Pin each horn to the top of the head as shown. Sew on, making sure to stuff the horn before fully sewing closed.
Ears: (Make 2)
In Main Color
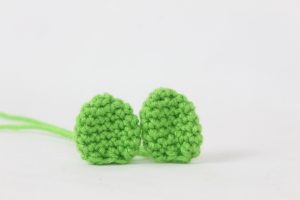
Round 1: 6 Sc in Magic Ring (6)
Round 2: *Sc* all around (6)
Round 3: *Inc* all around (12)
Round 4-7: *Sc* all around (12)
Round 8: *Dec* all around (6)
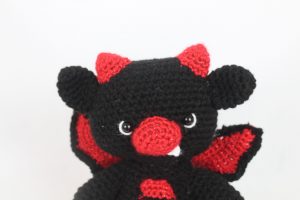
Finish off and leave a long tail for sewing. Pin each ear to each side of the dragon as shown. Sew on.
Body:
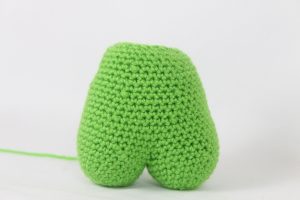
To start the dragon, we create the body. When we make the body, we start by making two legs. We crochet these legs together, which will then start forming the body. So the legs and body are one piece.
Legs: (Make 2)
In Main Color
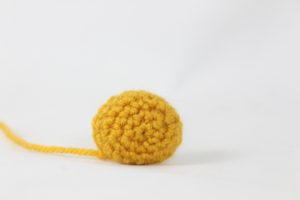
Round 1: 6 Sc in Magic Ring (6)
Round 2: *Inc* all around (12)
Round 3: In BLO (Back Loop Only), *Inc in the next st, Sc in the next st* all around (18)
Round 4: In BOTH Loops, *Sc* all around (18)
Round 5: *Inc, Sc 2* all around (24)
Round 6-7: *Sc* all around (24)
Round 8: *Inc, Sc 3* all around (30)
Note: Only do Round 9 when making the first leg. DON’T do Round 9 when making the second leg. Instead when making the second leg, continue on to Round 10.
Round 9: *Sc* all around (30)
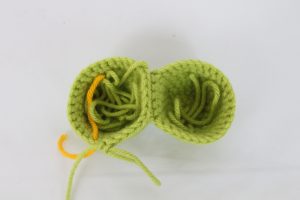
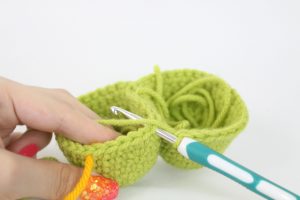
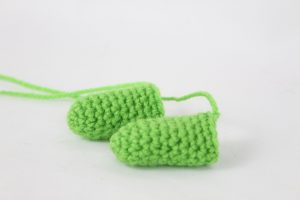
Round 10: On the second leg, Sc in the next 18 st (Pic 1). Now, take the first leg and line up the stitches next to each other (Pic 2).
1. 2.
2.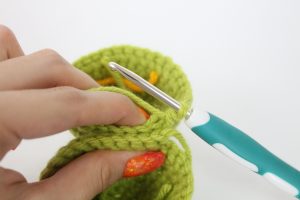
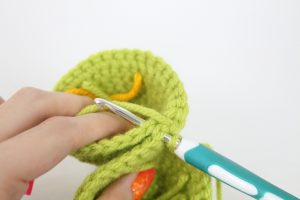
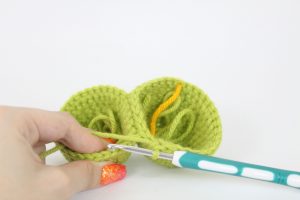
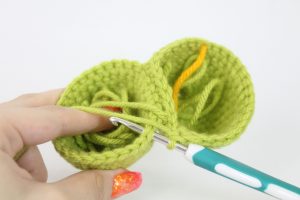
We will be crocheting through both leg stitches at once. Going through both legs, Sc in the next 6 st (Pic 3-10).
3. 4.
4.
5. 6.
6.
7. 8.
8.
9. 10.
10.
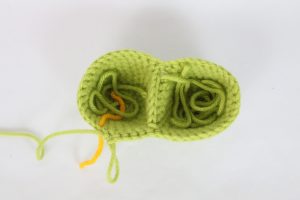
Continuing on the second leg only, Sc in the next 6 st (Pic 11)
(Stitch Count: 18 st on first leg, 18 st on second leg, 6 st connecting both legs)
11. 12.
12.
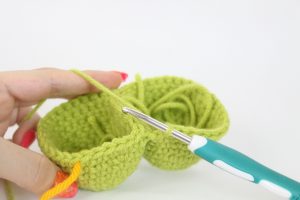
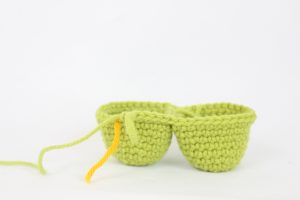
Round 11: Sc in the next 18 st (Pic 1). Now we meet the first leg. Sc in the next 24 st on the first leg (Pic 2).
1. 2.
2.
Now we meet the second leg. Sc in the next 6 st on the second leg (Pic 3-4) (48)
3. 4.
4.
5. 6.
6.
Round 12-15: *Sc* all around (48)
Round 16: *Dec, Sc 6* all around (42)
Round 17-19: *Sc* all around (42)
Round 20: *Dec, Sc 5* all around (36)
Round 21-23: *Sc* all around (36)
Round 24: *Dec, Sc 4* all around (30)
Stuff the body here. Continue adding stuffing after each round.
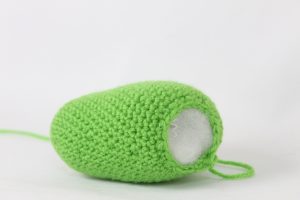
Round 25-27: *Sc* all around (30)
Round 28: *Dec in the next st, Sc in the next st* 9 times. Sc in the last 3 st (21)
Finish off. Set the body aside for now.
Attaching The Head To The Body:
In Main Color
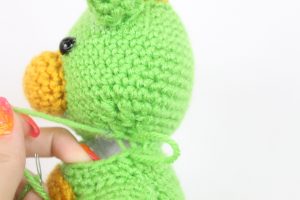
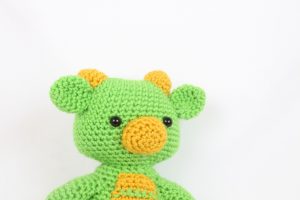
Pin the head to the body as shown (Pic 1). Place the tail of yarn left from the head onto a needle. Now sew the head to the body going from the neck stitch (Pic 2) up to the head stitch (Pic 3-5). Repeat these steps around. Before fully sewing closed, place extra stuffing in the neck and head to support the neck (Pic 6). Done!
1. 2.
2.
3. 4.
4.
5. 6.
6.
7.
Arms: (Make 2)
In Main Color
Round 1: 6 Sc in Magic Ring (6)
Round 2: *Sc* all around (6)
Round 3: *Inc* all around (12)
Round 4-12: *Sc* all around (12)
Finish off and leave a long tail for sewing. Stuff the arm now. Next, pin each arm onto the dragon as shown. Sew on.
Chest:
Note: There are a few color changes made in the chest. This can create a lot of ends to weave in. I don’t mind weaving in ends, but if you really dislike weave them in then you can do a few things. First, you can carry your yarn through the piece. The second option is you can crochet the chest all in one color.
Chest:
In Main Color
Row 1: Ch 13. Sc in the 2nd Ch from the hook. Sc in the next 11 st (12)
Row 2: Turn, Sc in the next 12 st (12)
Row 3: Change to Main Color. Sc in the next 12 st (12)
Row 4: Change to Contrast Color. Turn, skip the first stitch and single crochet in the next st. Sc in the next 8 st. Skip the next st and Sc in the last st (10)
Row 5-6: Turn, Sc in the next 10 st (10)
Row 7: Change to Main Color. Turn, skip the first stitch and single crochet in the next st. Sc in the next 6 st. Skip the next st and Sc in the last st (8)
Row 8-10: Change to Contrast Color. Turn, Sc in the next 8 st (8)
Row 11: Change to Main Color. Turn, skip the first stitch and single crochet in the next st. Sc in the next 4 st. Skip the next st and Sc in the last st (6)
Row 12-14: Change to Contrast Color. Turn, Sc in the next 6 st (6)
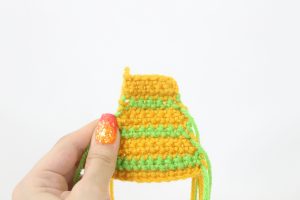
Finish off. Weave in any ends. Now, pin the chest onto the dragon and sew on.
Tail:
In Main Color
Row 1: Ch 23. Dc in the 2nd Ch from the hook. Dc in the next 21 st (22)
Finish off and leave a long tail of yarn for sewing. Set tail aside for now.
Tail Tip:
In Contrast Color
Round 1: 6 Sc in Magic Ring (6)
Round 2: *Sc* all around (6)
Round 3: *Inc* all around (12)
Round 4-5: *Sc* all around (12)
Finish off and leave a long tail for sewing.
Tail Assembly:
In Main Color
Insert the tail into the tail tip as shown (Pic 1). Sew the tail tip closed (Pic 2), then sew the tail end/tip to the tail (Pic 3), and finally sew the other end of the tail tip closed. Now, pin the tail to the dragon as shown (Pic 5). Sew on.
1. 2.
2.
3. 4.
4.
5.
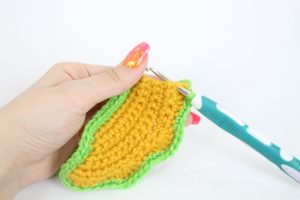
Right Side Wing:
In Contrast Color
Row 1: Ch 13. Sc in the 2nd Ch from the hook, Sc in the next 11 ch (12)
Row 2: Turn, *Inc* in the first st, Sc in the next 11 st (13)
Row 3: Turn, Sc in the next 12 st, *Inc* in the last st (14)
Round 4: Turn, *Inc* in the first st, Sc in the next 13 st (15)
Row 5: Turn, Sc in the next 14 st, *Inc* in the last st (16)
Row 6: Turn, *Inc* in the first st, Sc in the next 15 st (17)
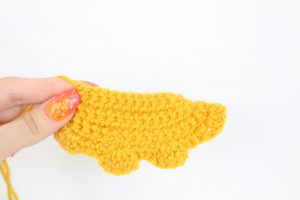
Row 7: Turn, Sc in the next st, *Dc* 3 times in the next st, Sc in the next 3 st, *Dc* 5 times in next st, Sc in the next 3 st, *Dc* 5 times in the next st, Sc in the next 3 st, Dc in the last 4 st (27)
Finish off. Now we will outline the wing in the Main Color. To learn how, refer to “Wing Outline Assembly”.
Left Side Wing:
In Contrast Color
Row 1: Ch 13. Sc in the 2nd Ch from the hook, Sc in the next 11 st (12)
Row 2: Turn, Sc in the next 11 st, *Inc* in the last st (13)
Row 3: Turn, *Inc* in the first st, Sc in the next 12 st (14)
Row 4: Turn, Sc in the next 13 st, *Inc* in the last st (15)
Row 5: Turn, *Inc* in the first st, Sc in the next 14 st (16)
Row 6: Turn, Sc in the next 15 st, *Inc* in the last st (17)
Row 7: Turn, Dc in the next 4 st, Sc in the next 3 st, *Dc* 5 times in the next st, Sc in the next 3 st, *Dc* 5 times in the next st, Sc in the next 3, *Dc* 3 times in the next st, Sc in the last st (27)
Finish off. Now we will outline the wing in the Main Color. To learn how, refer to “Wing Outline Assembly”.
Wing Outline Assembly:
In Main Color
Insert your crochet hook into the top corner as shown (Pic 1). Pull Main Color yarn through the corner of the wing (Pic 2-4).
1. 2.
2.
3. 4.
4.
Now, single crochet around the entire wing (Pic 5-11). This is a little wonky to do, since it may be hard to tell where a single crochet can go. No worries, it doesn’t have to be perfect! Just crochet around, turning to the other sides when you meet them (Pic 12-14).
5. 6.
6.
7. 8.
8.
9. 10.
10.
11. 12.
12.
13. 14.
14.
15.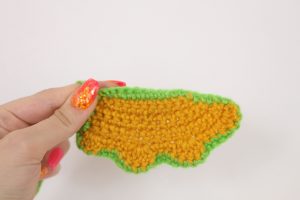
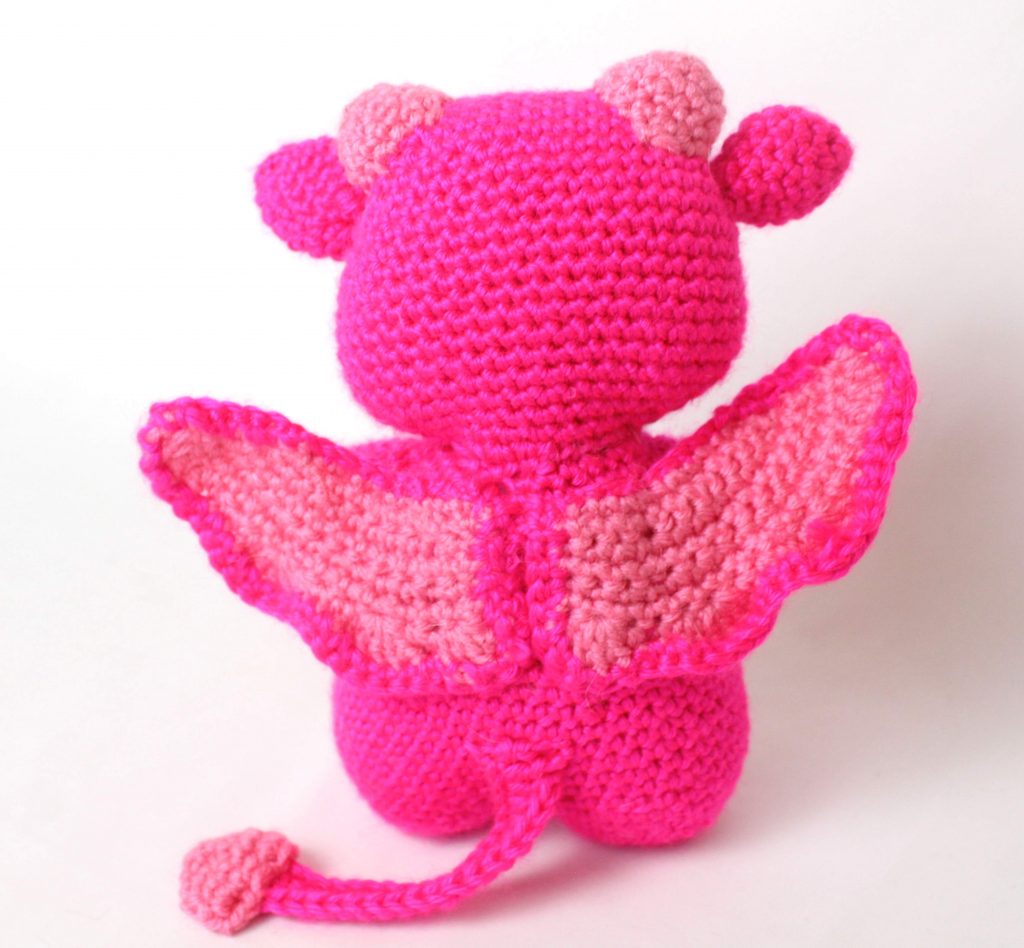
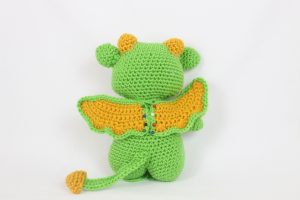
Once you’ve outlined the wings, pin each wing to the back as shown (Pic 16). Sew on.
Tooth: (Optional)
In White
Row 1: Ch 3. SlSt in the 2nd Ch from the hook, Sc in the next Ch.
Finish off and pin to the nose as shown. Sew on.
Eye Whites: (Optional)
In White
Insert needle with thread around the right eye, and pull out in the top right corner of the right eye (Pic 1). Reinsert needle into the bottom left corner of the right eye (Pic 2). Pull needle out at the bottom right corner of the left eye, and reinsert needle into the top left corner of the right eye (Pic 3). Pull needle with thread out of original insertion spot. Tie a knot with the toe ends of yarn and weave them into the dragon.
Done! I hope you enjoyed this pattern. Making it took forever to create much to my surprise! So I hope you really like it, a lot of hard work and love went into it 🙂 Onto the next pattern ❤️
If you made a dragon I would LOVE to see. You can “try” it on Pinterest to show me.


41 Comments
Will try this but when I started the head,is it in rows or rounds?thank you
Hi there, the head is worked in rounds 🙂 You can see if something is worked in rows or rounds by the beginning of the pattern. So for example, the head says “Round 1”, while the wings say “Row 1”. So you would work the head in rounds and the wings in rows. I hope that clears things up!
Hello!
Cute pattern but stuck on the very first round for the head. I have now been doing this repeatedly for six hours and already had to trash my first attempt because my sts weren’t the right count. I have done this first part of the round at least a hundred times and I’m not getting the same results and I’m getting more sts than I need. I am following the pattern word for word. I don’t think I’m understanding how you’re adding the 3sc in the same stitch. I am doing just exactly that and not getting the same results.
Update, all figured out! Currently using a thicker yarn and it’s hard to count sts. Thanks for this easy and lovely pattern.
My best friend is a huge fan of dragons and asked me to crochet her some. Unfortunately I’m stuck really bad at the beginning. I can’t get the numbers to work for the head. Can you please please help?? Is this crocheted in the round? It doesn’t say to connect… but it also doesn’t give instructions to turn the work. I’m so confused….
Hi Tammy, that’s so sweet of you to crochet her a dragon! I hope she loves it 🙂 So for the head it is crocheted in the round. We start by making a chain and work around the chain in a round. Most of the time when you’re working with a chain, you turn and work in rows for a flat piece like for a dishcloth – but if you’re making a bag, or this dragon head, you would make a chain and work in rounds around the chain to form a more oval shape.
So let me write out Round 1 of the head to help:
Round 1: Ch 13. Sc in the 2nd ch from the hook a total of 3 times (doing this will give the dragon a start to an oval shaped head. Add a stitch marker to the first single crochet made), Sc in the next 10 st, Sc 3 times in the next stitch.
At this point we’ve used up a total of our 13 chains. So now we will continue to work on the other side of the chain. So now working on the other side of the chain, single crochet in the next 10 stitches. We’re now at the end of Round 1. You should have a total 26 stitches.
I also went ahead and added a clearer explanation to Round 1 along with pictures 🙂 Thanks so much for letting me know you had trouble with this part, I hope that my clarifications can help you and others!
For some reason I’ve tried to make it twice and both times I could not get the head on straight no matter how many times I tried taking it off and readjusting it
I like it like that!
LOVE this. Haven’t finished my dragon quite yet, but this pattern is just absolutely adorable. I had a little trouble following the striping for his chest, but it was easy enough to just wing it. Other than that, it’s been easy to follow 😊 thank you for another awesome pattern.
Hi Alyssa,
Thank you so much, I’m really happy you like the dragon! I really appreciate that 🙂 I can see how the chest would be difficult, it’s for sure fiddly if you’re switching colors. I think opting for a variegated yarn might work better, since you wouldn’t have to change colors and may look cooler! Thank you so much for your comment, it’s so sweet to know you liked it. I hope you have an awesome day ❤️
Hi it says row 11 eye markers pictured below but dosen’t actually tell you what to do on the row could you explain please
Thank you
Hi there, thank you for the question! The picture that says “Round 11 Eye Markers Pictured Below”, right above that picture is Round 11 which tells you what to do. So the picture is what Round 11 will look like after completing it.
I could totally understand the confusion, so I hope that helped! If you have any questions please let me know 🙂
Pattern is easy to fallow and I’m having great fun with it…..but the head seems to be a little off at one side. Followed the pattern to the letter so can’t see if it’s me being ocd or the pattern.
Pattern is great making my hubby one for valentines
Hi Emma! I’m so happy that you’re having fun with the pattern, that’s so great! I hope the head is in the center, oh no! I’m not sure to be honest, all of my patterns follow a math pattern so things can be as uniform as possible, but sometimes that can go awry 😅 If it seems to be going to one side more than the other, you can sew one side down to match the other side 🙂
I hope your husband loves the dragon you’re making him! That’s such a sweet gift, I think anyone would be happy to get a cute dragon as a gift 😍 ❤️ You’re so nice!
Thank you so much! This is such an adorable little guy! Amazing job on the pattern, I will share mine with you when I finish it in a couple days, but here is the head. Very impressive!
Hi Jennifer! Oh my gosh your dragon is coming out so COOL already! I’m thinking yours looks even better than the ones in my photos, LOL! I’m super happy that you like pattern – it means a lot to hear that 😍 I am super excited to see what your dragon all finished looks like!
Round 19 is numbered incorrectly. BTW. It should end with 26 stitches not 27. Unless I did it wrong. Thanks.
Hi there! I just double checked that round and you’re right! It’s off by 1 stitch, so I went ahead and corrected it to the right number 🙂 Thank you so much for letting me know, I appreciate it so much! 😍 Please feel free to let me know if I can help with anything!
Thanks so much for this pattern! I made one for my Dungeons and Dragons dungeon master and I think he’s going to love it! I did struggle a bit with the chest piece but it adds a homemade charm 😂
Wow I LOVE your dragon! I think you knew exactly what colors to use, because he looks so adorable. I love that eye color too 😍 Your dungeon master better love it LOL! Cause if he doesn’t fall in love with that adorable dragon then he’s crazy hahaha 🙂 Your dragon’s chest looks totally fine, I know it can be confusing working in rows sometimes, especially when decreasing in them. I think it looks great! Thank you so much for sharing a picture – it is too cute!!!
I love this dragon! Just wondering if you have an estimate of yardage used. I have been crocheting for years but just getting into stuffies. Hoping I have some yarn in my stash that would work, but don’t want to come up short! Thank you!
I made one for my friends daughter! I wanted to make it a bit softer in colors. I really enjoyed your pattern!
Oh my gosh I love it, Megan! That pastel rainbow yarn is definitely one of my favorites. What a cute dragon, I’m sure your friend’s daughter loves it! Thank you so much for sharing a picture 😍
Hi! I was wondering if we were able to sell the final product but credit you when the product is being sold or am I only able to give this away as a gift?
I’m having a bit of trouble understanding round 28 of the body
How do I print this to use it later please?
Hi there I’m in love with this little dragon, my nice is going through her dragon faze 🥰 so I thought I would crochet her this cute little dragon for her birthday in the next 2 weeks however I have followed the directions exactly and my dragon head seems a bit wonky in the sense that the little ear pieces are centered however where the little cheeks should be one is towsrs the center of the face and the second is towards the back of the head 😅 I’m not sure what I’m doing wrong and would love some advice, thanks 💖💖
I didn’t know I could add a photo so I’m doing so now 🤣
In row three of the chest it says so change to main colour but it was already in main colour. Looking at the pictures, it starts with the contrast colour, is this correct?
In row three of the chest it says to change to main colour but it was already in main colour. Looking at the pictures, it starts with the contrast colour, is this correct?
I’m trying it with a thicker yarn and it’s going pretty well
I didn’t realize how to add a picture till now so here it is so far!
I love this pattern and can’t wait to make it. Do you think it would work with 7 weight yarn with a 7mm hook? I want it to be extra squishy
In round 3 of the legs… I’m really confused how one increase stitch results in 18 stitches all around when the last round was only 12 stitches…
Hi, i hope this is helpful but i believe the pattern should say for that row *inc,1 sc* until the end of that row equaling 18
For some reason I’ve tried to make it twice and both times I could not get the head on straight no matter how many times I tried taking it off and readjusting it
Such a cute pattern!! Thank you so much for sharing, it was so fun to make 🙂
Thanks for sharing your pattern with us!
I don’t see a key to your stitch abbreviations. *inc* what does this mean?
I made this guy with super bulky fuzzy yarn, so he’s bigggggg. His head is crooked and the wings don’t really hold up (wish I had crocheted over a pipe cleaner), but DANG he’s cute!
He came out pretty cute. Think I’ll add wire to the wings so they stay up. Thanks for the fun pattern.