
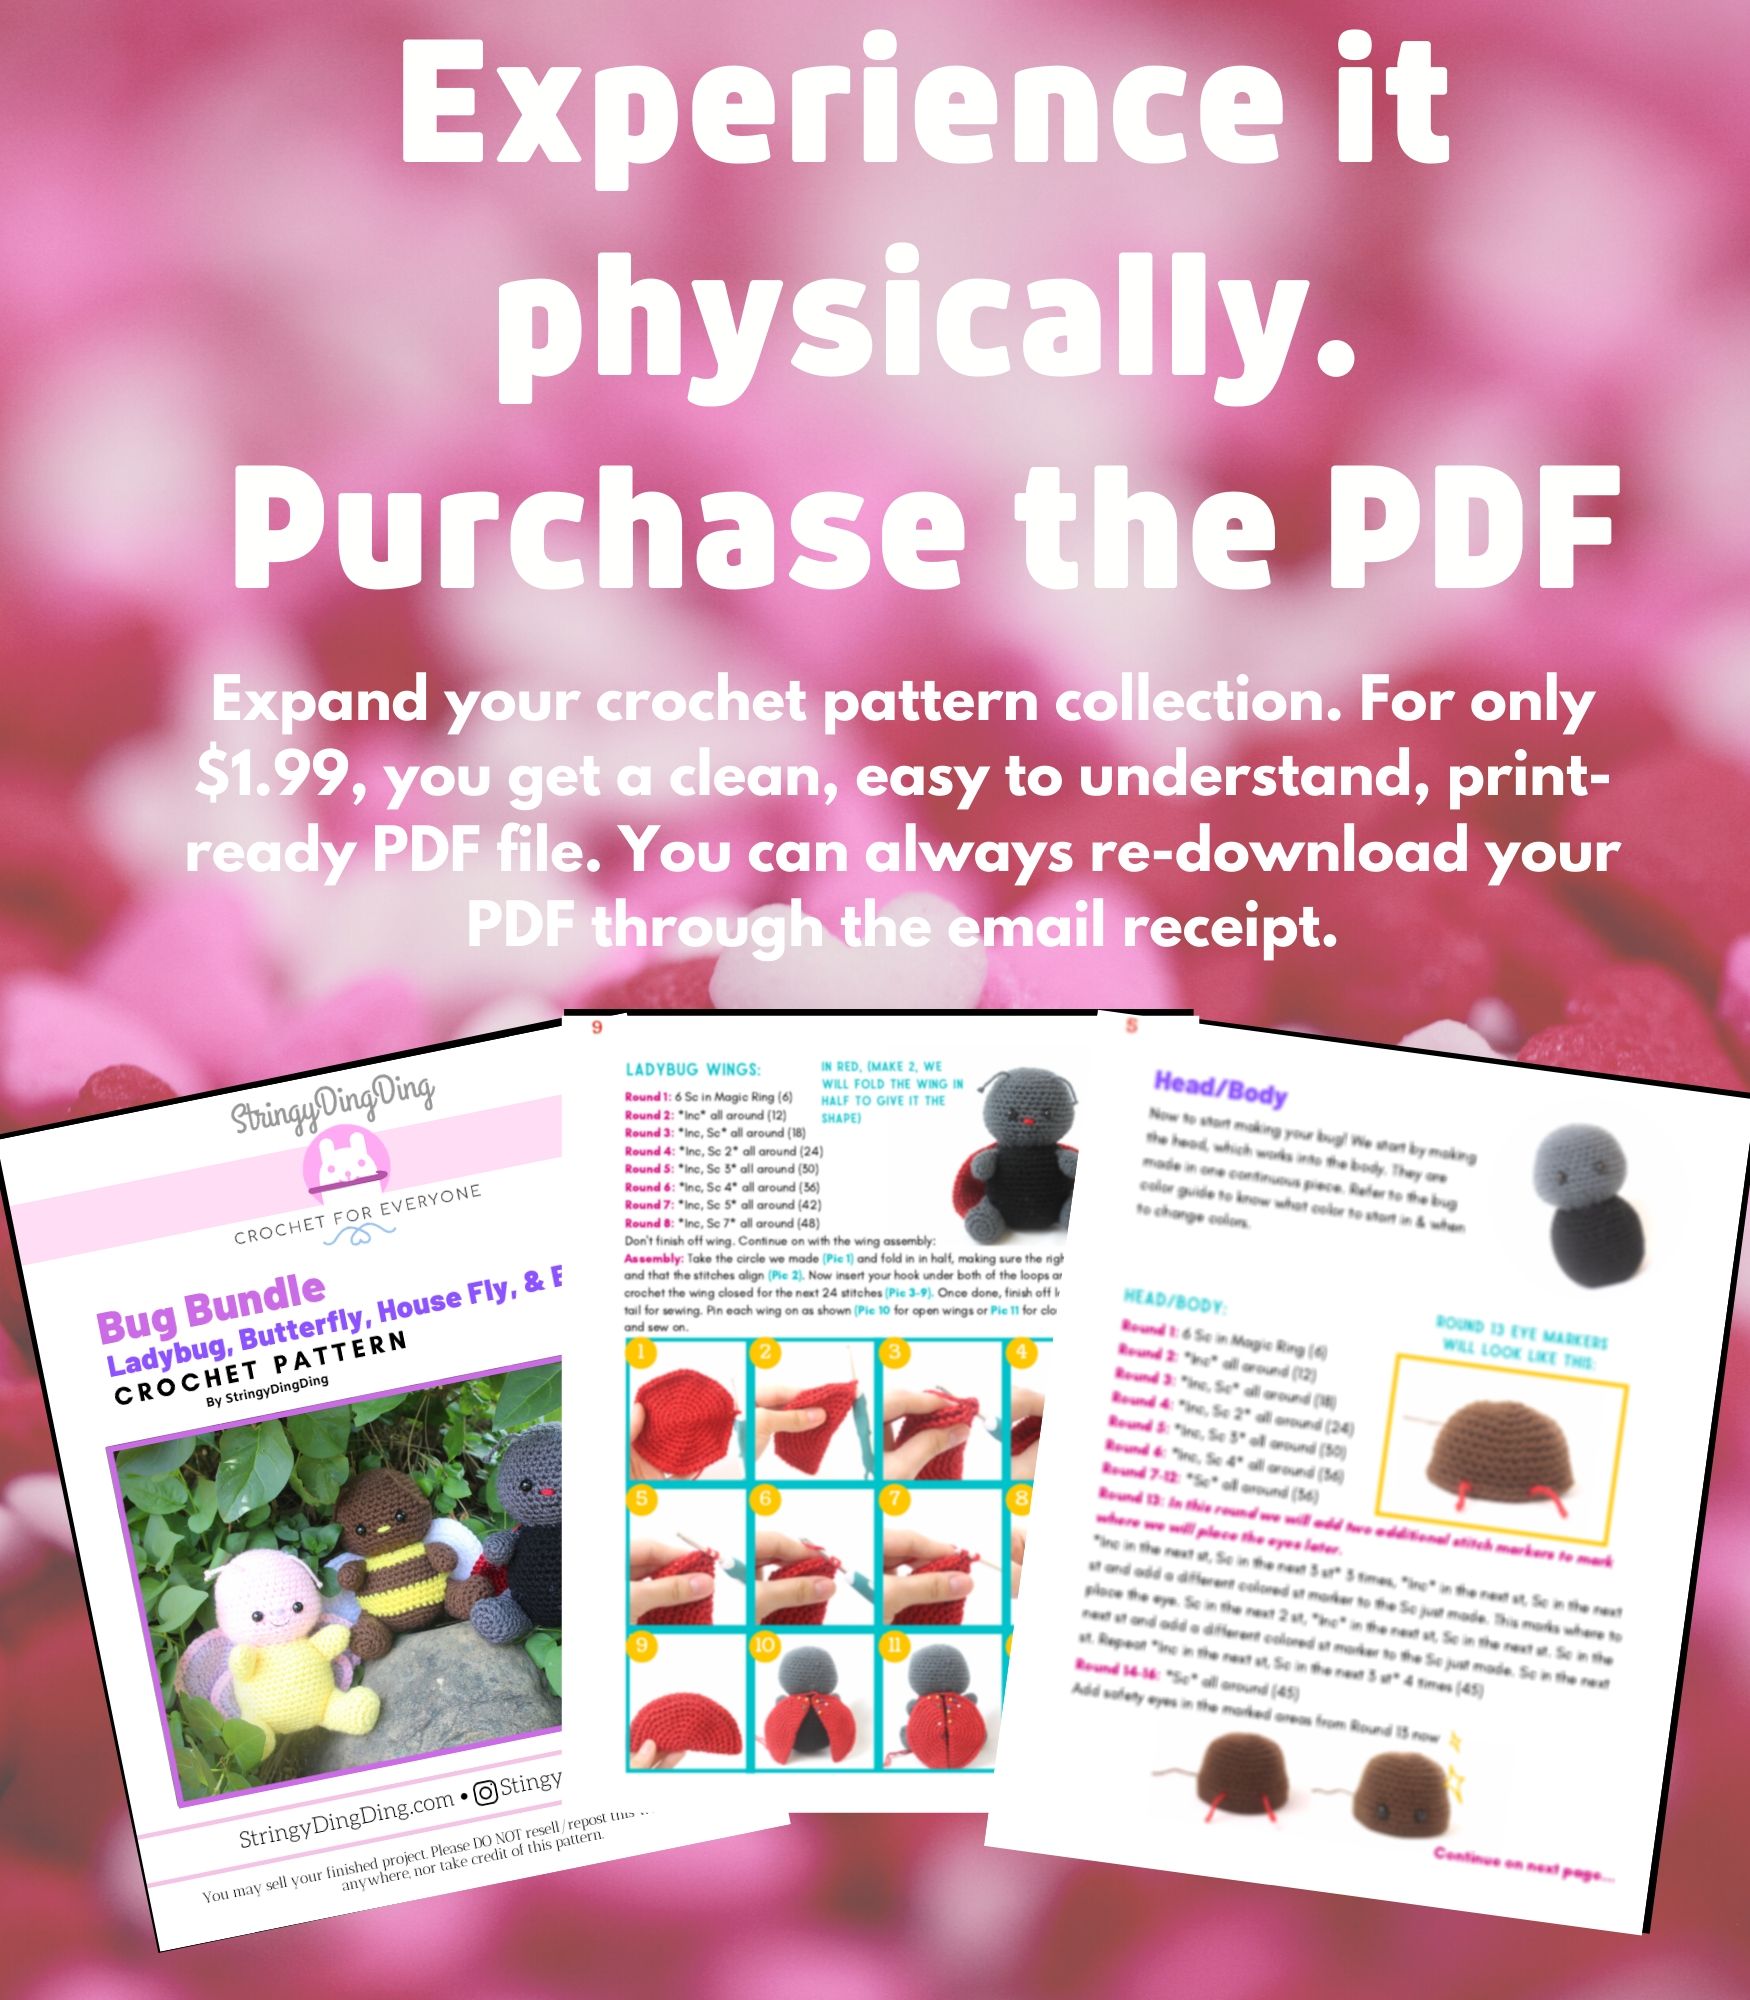
Purchase the PDF version here

Supplies:
4/Medium weight yarn in either black, grey, red, pink, yellow, purple, white
4mm crochet hook
9mm safety eyes, tapestry needle, scissors, black embroidery thread, and stuffing.
Additional Information:
Difficulty: Easy
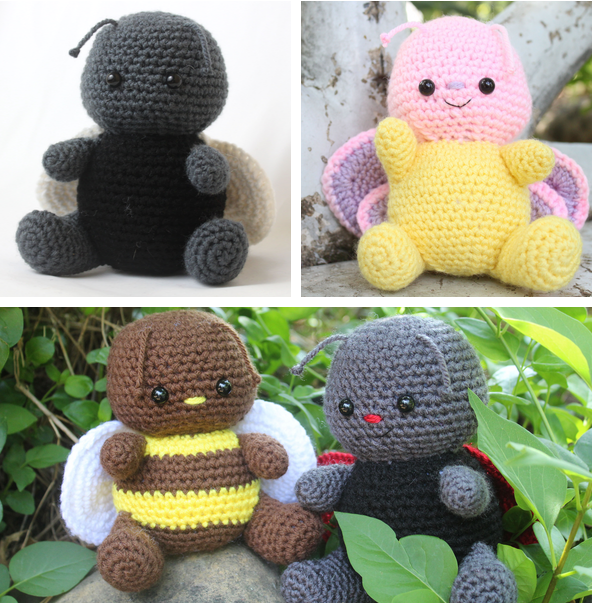
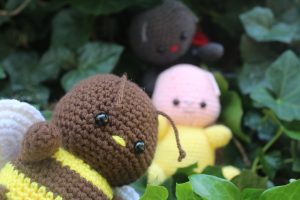
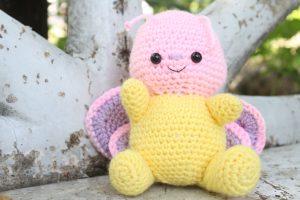
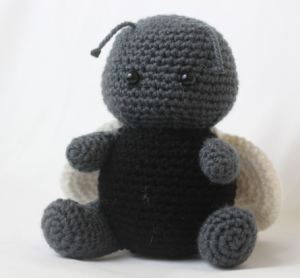
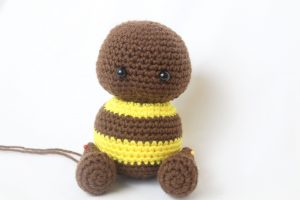
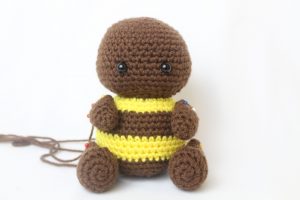
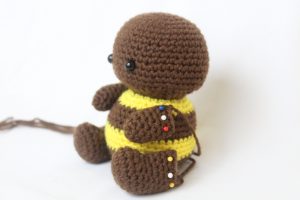
This pattern has the instructions to make a ladybug, bee, butterfly, and house fly!|
Before you start crocheting a bug, take a look at the bug color guide. This will let you know what colors you need for each bug, when to change colors for that specific bug, and even what color the parts (such as legs, nose, antenna) need to be in. After this, we create the head which works into the body. They are one piece. Next, we make the arms and legs. Then we create the wings for whichever bug you choose. We create the antennas, nose, and finally smile!
Bug Color Guide
We have so many bugs to choose from! So find which bug you’d like to make and follow it’s color guide. The color guide tells you what colors to use for each part of the pattern.
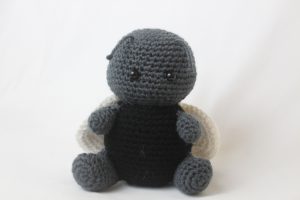
Ladybug:
Colors: Black, Grey, and Red
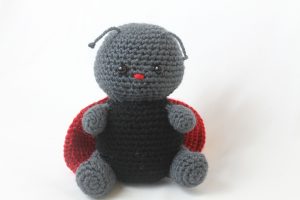
Head/body: Round 1-20 Grey, Round 21-40 Black
Arms/Legs: Grey
Wings Red
Antennas: Grey
Nose: Red
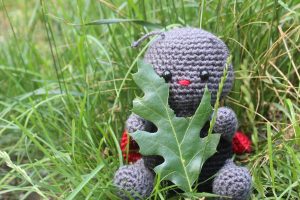
Housefly:
Colors: Black, Grey and white
Head/body: Round 1-20 Grey, Round 21-40 Black
Arms/Legs: Grey
Wings: White
Antennas: Grey
Nose: None or in Black
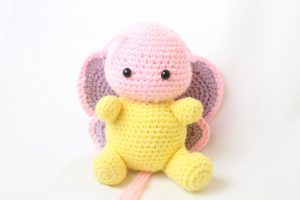
Butterfly:
Colors: Pink, Yellow, and Purple
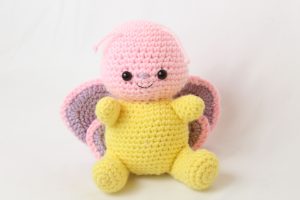
Head/body: Round 1-20 Pink, Round 21-40 Yellow
Arms/Legs: Yellow
Wings: Page 10-11. A pair of big & small wings in both purple & pink
Antennas: Pink
Nose: Purple
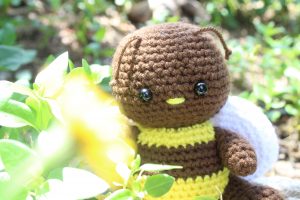
Bee:
Colors: Brown, Yellow, and White
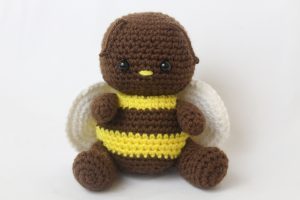
Head/body: Round 1-20 Brown, Round 21-23 Yellow, Round 24-27 Brown, Round 28-31 Yellow, Round 32-40 Brown
Arms/Legs: Brown
Wings: White
Antennas: Brown
Nose: Yellow
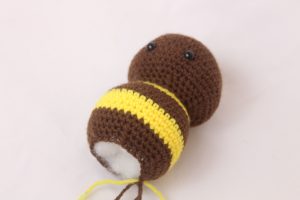
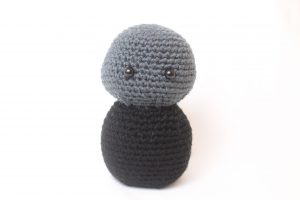
Head/Body:
Now to start making your bug! We start by making the head, which works into the body. They are made in one continuous piece. Refer to the bug color guide to know what color to start in & when to change colors.
Head/Body:

Round 1: 6 Sc in Magic Ring (6)
Round 2: *Inc* all around (12)
Round 3: *Inc, Sc* all around (18)
Round 4: *Inc, Sc 2* all around (24)
Round 5: *Inc, Sc 3* all around (30)
Round 6: *Inc, Sc 4* all around (36)
Round 7-12: *Sc* all around (36)
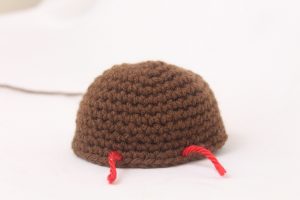
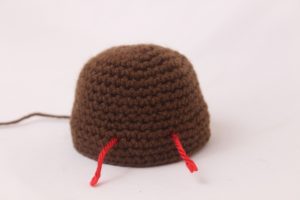
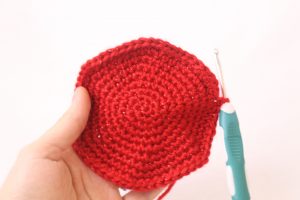
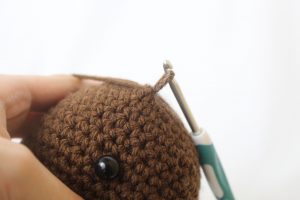
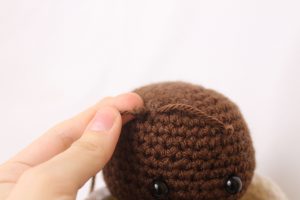
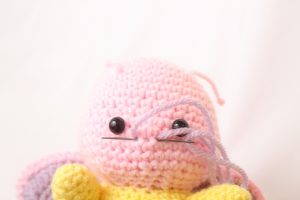
Round 13: In this round we will add two additional stitch markers to mark where we will place the eyes later.
*Inc in the next st, Sc in the next 3 st* 3 times, *Inc* in the next st, Sc in the next st and add a different colored st marker to the Sc just made. This marks where to place the eye. Sc in the next 2 st, *Inc* in the next st, Sc in the next st. Sc in the next st and add a different colored st marker to the Sc just made. Sc in the next st. Repeat *Inc in the next st, Sc in the next 3 st* 4 times (45)
Round 13 Eye Markers Will Look Like Photo Below
Round 14-16: *Sc* all around (45)
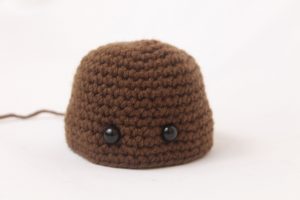
Add safety eyes in the marked areas from Round 13 now
Round 17: *Dec, Sc 3* all around (36)
Round 18: *Dec, Sc 4* all around (30)
Round 19: *Dec, Sc 3* all around (24)
Round 20: *Dec, Sc 2* all around (18)
You will have to change color now for Round 21. Check the color guide to see which color to change to, and if you’re making the bee, we’re going to make a few color changes for the body. Be sure to check the color guide for when to change colors
Round 21: In FLO (Front Loop Only), *Inc, Sc 2* all around (24)
Stuff head now
Round 22: In BOTH Loops, *Inc, Sc 3* all around (30)
Round 23: *Inc, Sc 4* all around (36)
Round 24: *Inc, Sc 5* all around (42)
Round 25-34: *Sc* all around (42)
Round 35: *Dec, Sc 5* all around (36)
Round 36: *Dec, Sc 4* all around (30)
Round 37: *Dec, Sc 3* all around (24)
Stuff the body here. Continue stuffing after each of the following rounds
Round 38: *Dec, Sc 2* all around (18)
Round 39: *Dec, Sc* all around (12)
Round 40: *Dec* all around (6)
Finish off and sew closed. Set aside for now.

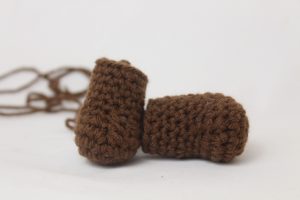
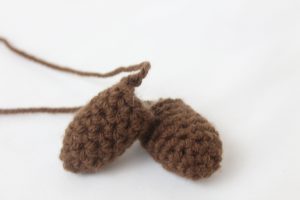
Legs: (Make 2)
In leg Color
Round 1: 6 Sc in Magic Ring (6)
Round 2: *Inc* all around (12)
Round 3: *Inc, Sc* all around (18)
Round 4: *Sc* all around (18)
Round 5: Sc in the next 3 st, *Dec* 1 time, Sc in the next 13 st (17)
Round 6: Sc in the next st, *Dec* 3 times, Sc in the next 10 st (14)
Round 7: Sc in the next 2 st, *Dec* 1 time, Sc in the next 10 st (13)
Round 8-12: *Sc* all around (13)
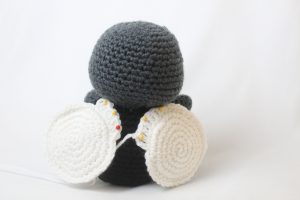
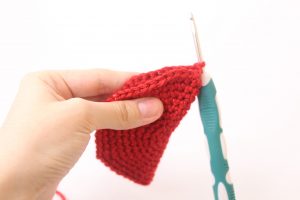
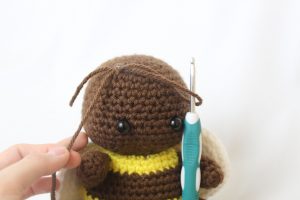
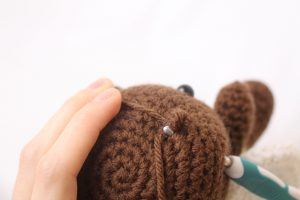
Finish off, leaving a long tail for sewing. Stuff the leg and pin onto the side of the bug as shown. Sew on.

Arms: (Make 2)
In Arm Color
Round 1: 6 Sc in Magic Ring (6)
Round 2: *Sc* all around (6)
Round 3: *Inc, Sc* all around (9)
Round 4-9: *Sc* all around (9)
Finish off, leaving a long tail for sewing. Stuff the arm lightly and pin onto the sides of the bug as shown. Sew on.
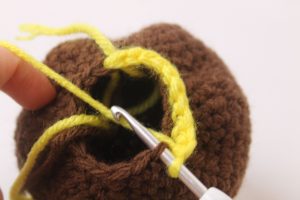
Now we’re going to make the wings
Bee & Housefly Wings:
In white, (Make 4 total, we will crochet 2 together to form 1 wing)
Round 1: 6 Sc in Magic Ring (6)
Round 2: *Inc* all around (12)
Round 3: *Inc, Sc* all around (18)
Round 4: *Inc, Sc 2* all around (24)
Round 5: *Inc, Sc 3* all around (30)
Round 6: *Inc, Sc 4* all around (36)
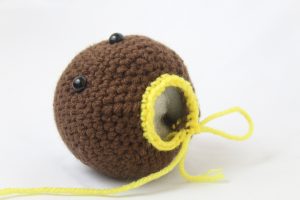
Finish off first wing. Don’t finish off the second wing. Continue on with the wing assembly:
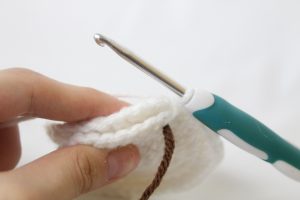
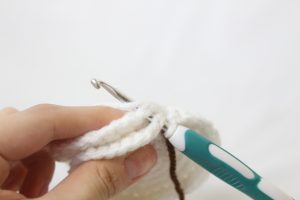
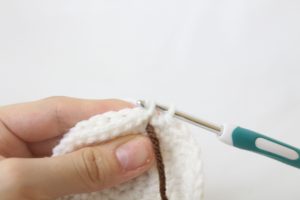
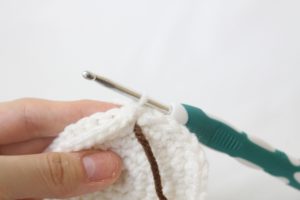
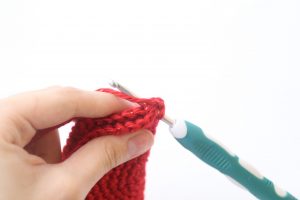
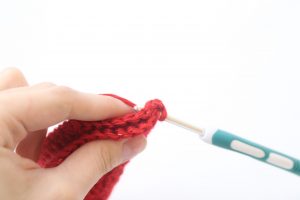
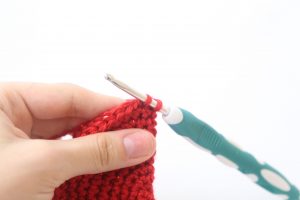
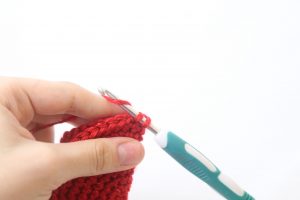
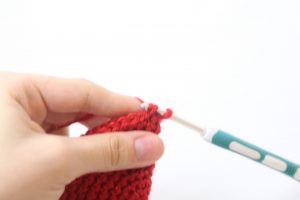
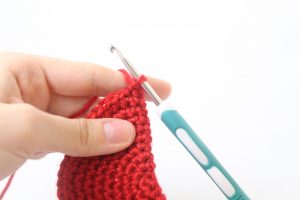
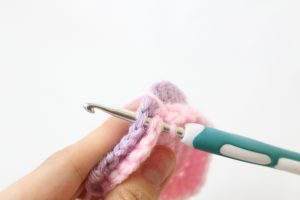
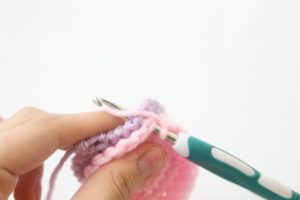
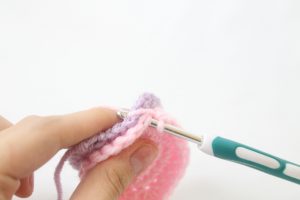
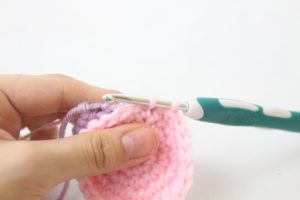
Assembly: Take both the finished off and current wing and place them together so their stitches align (Pic 1-2). Insert your hook into BOTH of the stitches of the wings, as we will crochet them together. Single crochet them together for a total of 28 stitches (Pic 3-8). SlSt in the next st, Dc in the next 7 st. Finish off and pin to the bee as shown or pin to the fly as shown. (The fly’s wings are pinned more upwards).
1. 2.
2.
3. 4.
4.
5.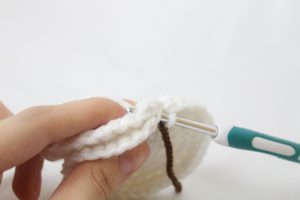 6.
6.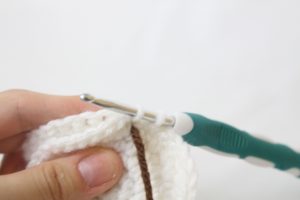
7. 8.
8.
9. 10.
10.
11. 12.
12.
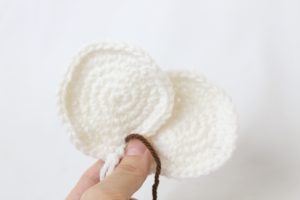
Ladybug Wings:
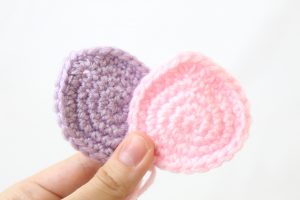
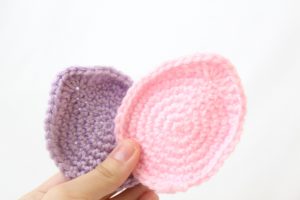
In Red, (Make 2, we will fold the wing in half to give it the shape)
Round 1: 6 Sc in Magic Ring (6)
Round 2: *Inc* all around (12)
Round 3: *Inc, Sc* all around (18)
Round 4: *Inc, Sc 2* all around (24)
Round 5: *Inc, Sc 3* all around (30)
Round 6: *Inc, Sc 4* all around (36)
Round 7: *Inc, Sc 5* all around (42)
Round 8: *Inc, Sc 6* all around (48)
Round 9: *Inc, Sc 7* all around (54)
Don’t finish off wing. Continue on with the wing assembly:
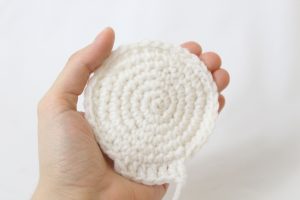
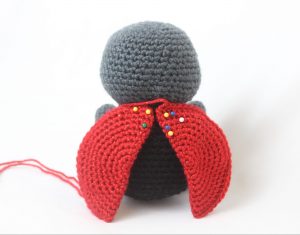
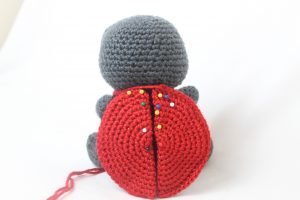
Assembly: Take the circle we made (Pic 1) and fold in in half, making sure the right side is out and that the stitches align (Pic 2). Now insert your hook under both of the loops and single crochet the wing closed for the next 27 stitches (Pic 3-9). Once done, finish off leaving a long tail for sewing. Pin each wing on as shown (Pic 10 for open wings or Pic 11 for closed wings) and sew on.
1. 2.
2.
3. 4.
4.
5. 6.
6.
7. 8.
8.
9. 10.
10.
11. 12.
12.
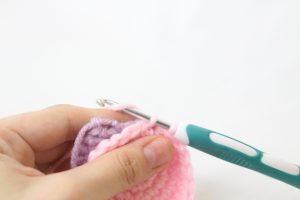
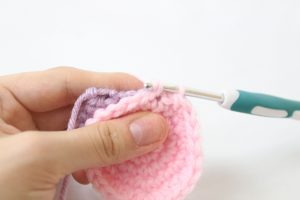
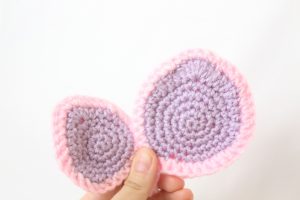
Butterfly Wings:
To make the butterfly wings we create 2 pairs of wings and crochet them together (4 total wings, crocheted together make 2 wings). We do this for both the small & big wings.
Small Butterfly Wings:
Make 4, 2 in Purple and 2 in Pink. Make the Purple ones first
Round 1: 6 Sc in Magic Ring (6)
Round 2: *Inc* all around (12)
Round 3: *Inc, Sc* all around (18)
Round 4: *Inc, Sc 2* all around (24)
Round 5: Sc in the next 9 st, Hdc in the next 4 st, Hdc 4 times in the next st, Hdc in the next 4 st, Sc in the next 6 st (27)
Finish off the purple color wings. Don’t finish off the pink color wings. Instead, continue on with Butterfly Wing Assembly.
Big Butterfly Wings:
Make 4, 2 in Purple and 2 in Pink. Make the Purple ones first
Round 1: 6 Sc in Magic Ring (6)
Round 2: *Inc* all around (12)
Round 3: *Inc, Sc* all around (18)
Round 4: *Inc, Sc 2* all around (24)
Round 5: *Inc, Sc 3* all around (30)
Round 6: *Inc, Sc 4* all around (36)
Round 7: Sc in the next 5 st, Hdc in the next 4 st, Dc in the next 3 st, Dc 5 times in the next st, Dc in the next 4 st, Hdc in the next 4 st, Sc in the next 15 st (40)
Finish off the purple color wings. Don’t finish off the pink color wings. Instead, continue on with Butterfly Wing Assembly.
Butterfly Wing Assembly:
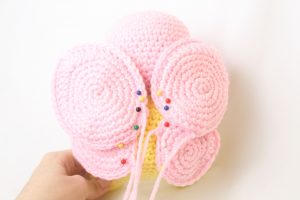
Line up the purple and pink wings, making sure the right sides are facing out and that the stitches line up (Pic 1-2). Single crochet them together for a total of 27 st for the small wing, or 40 st for the big wing (Pic 3-10). Pin the small wings to the butterfly and sew them on. Pin the big wings to the butterfly and sew on (Pic 11-12).
1. 2.
3. 4.
4.
5. 6.
6.
7. 8.
8.
9. 10.
10.
11. 12.
12.
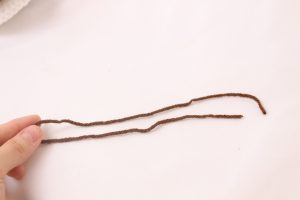
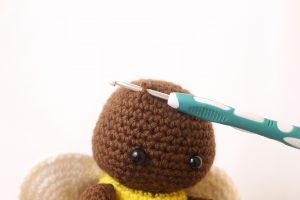
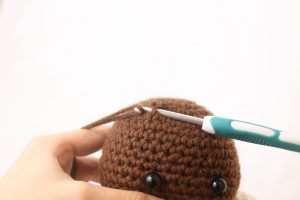
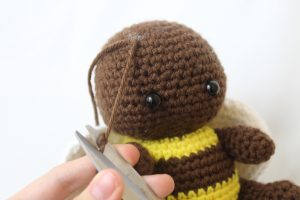
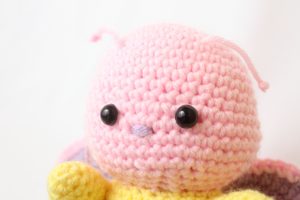
Antenna Assembly:
Refer to color guide to use suggested color
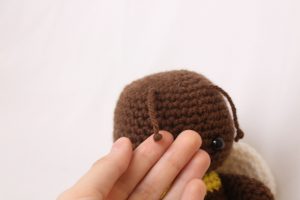
Take a ~8″ piece of yarn (Pic 1). Insert your hook into the top of the bug’s head as shown (Pic 2). Pull the yarn strand through, making sure to only bring one strand through (Pic 3-5)
1. 2.
2.
3. 4.
4.
5.
Tie a knot 3-4 times with one of the strands of yarn (Pic 6). Cut right below the knot (Pic 7). Pull the other strand of yarn if you want to make the antenna shorter (Pic 8). Tie a knot 5-7 times with that other strand of yarn (Pic 9) and pull that big knot into the bug’s head to hide (Pic 10). Done!
6. 7.
7.
8. 9.
9.
10. 11.
11.
12.
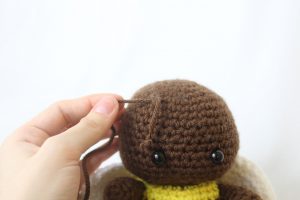
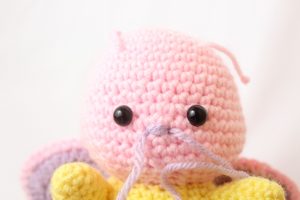
Nose:
Refer to color guide to use suggested color
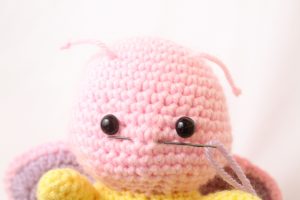
Take a ~8″ piece of yarn. Insert it into the middle-right if the face and pull out of the middle-left as shown (Pic 1). Reinsert needle into the middle-right and pull out of the middle-left as shown (Pic 2). Do this again one more time. Tie both ends of yarn and weave them back into the head to hide them (Pic 3-4). Done!
1. 2.
2.
3. 4.
4.
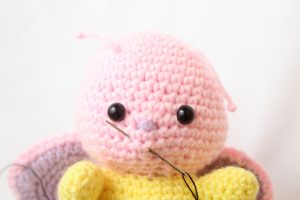
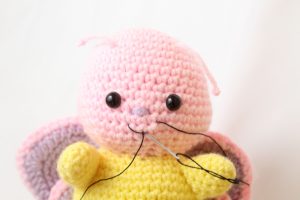
Smile:
In Black Embroidery Thread
Insert needle with yarn into the middle of the mouth and pull out diagonal and to the left as shown (Pic 1). Reinsert needle into the middle of the mouth and pull out diagonal and to the right as shown (Pic 2). Reinsert needle into the middle of the mouth (Pic 3). Tie knots with the ends of yarn and weave them into the head to hide. Done!
1. 2.
2.
3. 4.
4.
Done! I hope you enjoyed this pattern. I have always wanted to crochet a housefly and didn’t really know how I would do it. I made the butterfly first, then realized I should make a bee, then did a ladybug, and finally figured it would be a perfect time to make a housefly! If you have any ideas for my next crochet pattern, please let me know in a comment.
If you made a bug, I would love to see it! You can “try” it on Pinterest to show me 🙂


12 Comments
I tried to make a ladybug but it looks like a fat penguin!
Any tips for what I should do?
Aw I think he looks cute!! I think once you add on the wings and the antennas he will look much more like a ladybug. Trust me, I always have the weirdest looking amigurumis until I add on their defining features 😂 Maybe the only thing that makes him look like a little penguin is the nose? You can try painting the nose to be red or more of a lady bug color! I’d say try adding on the wings and antennas and see what you think! If you still think he’s penguin-y let me know and we can see how to make him into a lady bug! 😄
With the bee which rounds are yellow and which are brown?
Hi! You can find the color guide at the top of the pattern for each bug! Here’s when you’ll be changing colors for the ladybug:
Head/body: Round 1-20 Brown, Round 21-23 Yellow, Round 24-27 Brown, Round 28-31 Yellow, Round 32-40 Brown
Arms/Legs: Brown
Wings: White
Antennas: Brown
Nose: Yellow
I hope this helps! 🙂
Thank you so much
Hi I loved doing the ladybug. I’m having a problem attaching the wings. Can you tell me an easy way to attach them. Ty for your help
Hi Carole! I’m so happy that you’re having fun with the lady bug 🙂 For the winter, the easiest way to attach them is to sew them at the very top. If you’re having trouble getting your needle through the wings, try to mostly sew them at the top, around the outside! But how I did it was sew them at the top area 🙂 So I hope that can help, I say it can just take some practice! Please feel free to let me know if I can answer any questions ❤️
Hi! I was wondering if we could sell what we make using your patterns as long as we give you credit and if we leave a link to the pattern 🙂 I know some creators allow it but I couldn’t find a note so I thought I would ask 🙂 Thank you in advance!!
Hi Yasmine! Thank you so much for your question 🙂 You can sell the physical toy you make from my patterns! You don’t have to credit me since you did all of the hard work of making the toy 🥰 But it is always appreciated!
I hope your sales go great 🙂
Hey I made the bee and I’m going to be starting the butterfly
Hi Abbie! Oh wow your bee soooo cute! 😍 I really love how it came out, the brown you chose is perfect, by the way! I really appreciate that you shared a picture with me, you did such a great job 🙂 I hope your butterfly goes great! Please feel free to let me know if you have any questions ❤️
Hola chicas, las felicito por patrones tan hermosos, no podría referirme a uno solamente, todos son adorables. Y agradecerles por su gran generosidad al compartirlos gratuitamente… aunque he comprado algunos PDF. Chicas las felicito por la gran creatividad, tienen un don extraordinario. Saludos cordiales y afectuosos. 😘😘😘 💐