
Get the PDF version here
Or Get the entire Halloween PDF Bundle
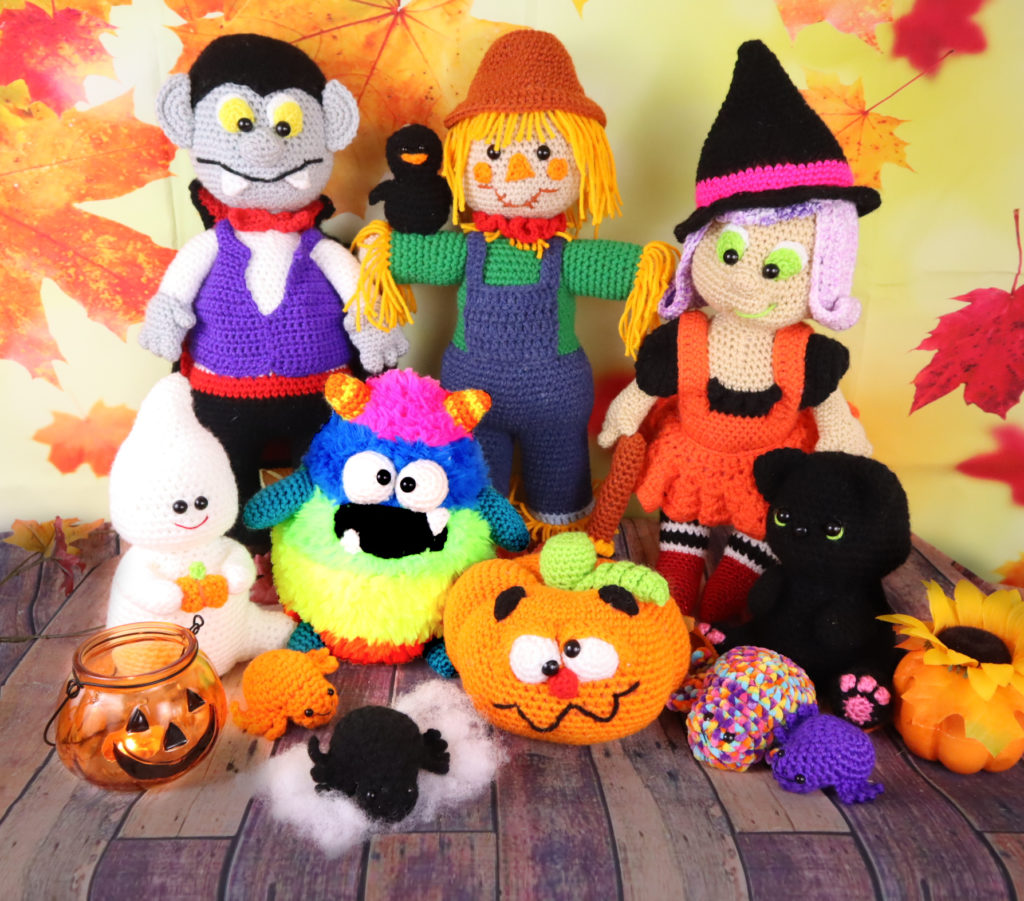
Show me the rest of the Halloween bundle, no PDFs.
Supplies:
• Yarn 4/Medium Weight Yarn in…
White, Orange, and Green
• 4mm Crochet Hook
•9mm safety eyes
•Red Embroidery Thread
•Tapestry needle
•Scissors
•Stuffing
Additional Information:
Difficulty: Easy
• Getting started
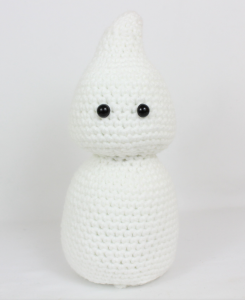
This ghost is so cute and fun to make! To start, we first make his whispy part of the head. We then work to the head, then the body. The whisp, head, and body are all one continuous piece.
After that, we make his arms, tail, and his pumpkin!
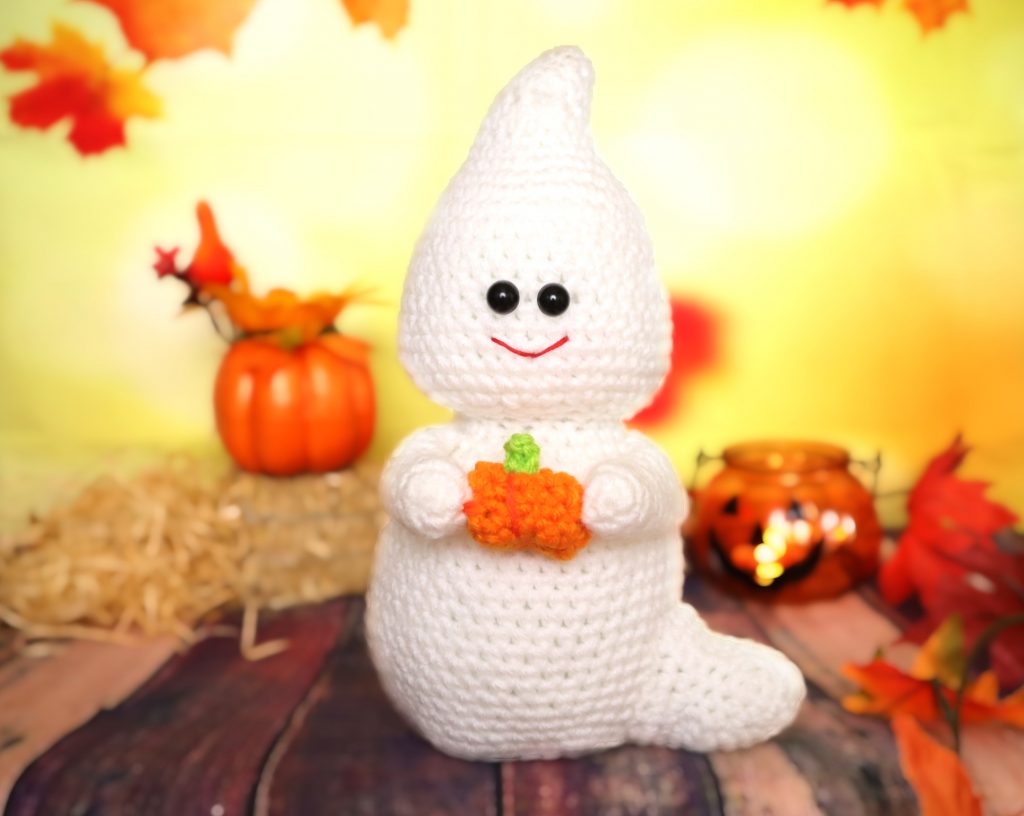
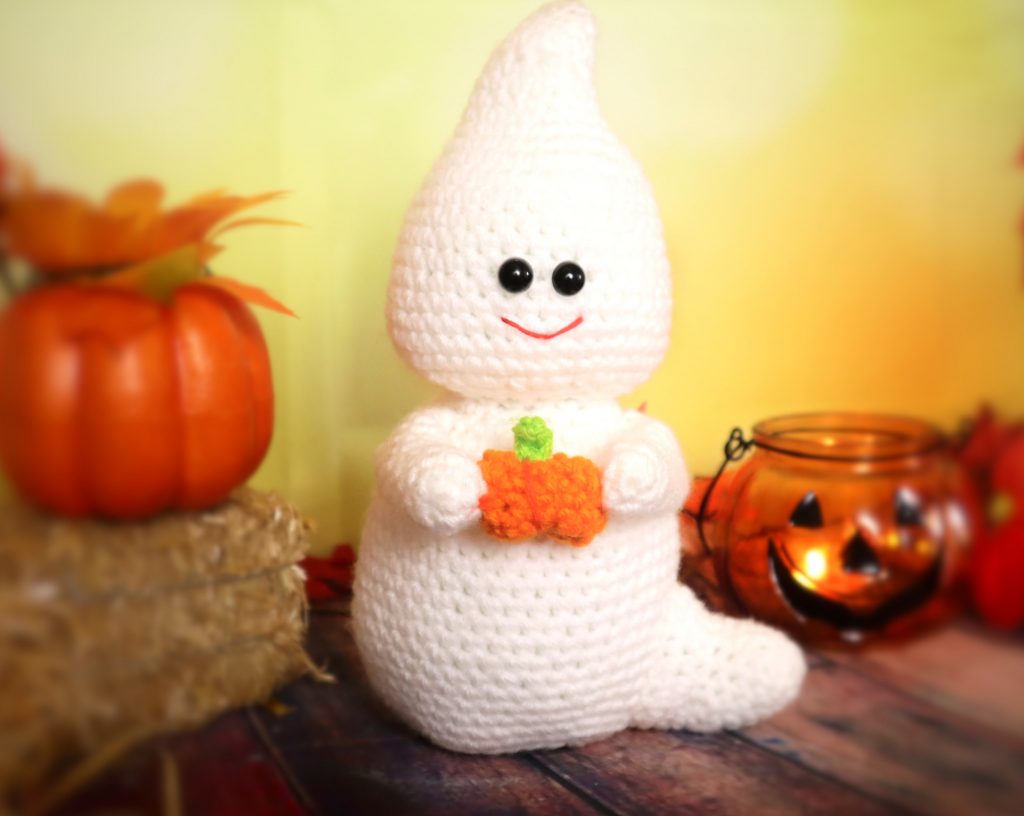
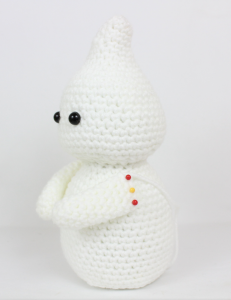
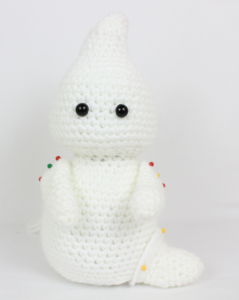
Ghost
We’re starting to work the tip of the ghost’s head.
After this we will work the ghost head, which will also work into the body. They are all one continuous piece.
Ghost Head
In White
Round 1: 6 Sc in Magic Ring (6)
Round 2: Repeat *Inc in the next st, Sc in the next st* all around (9)
Round 3: *Sc* all around (9)
Round 4: *Inc, Sc 2* all around (12)
Round 5: *Sc* all around (12)
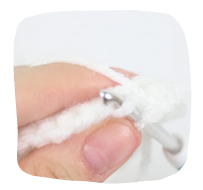
In the next round we will do a short row. A short row is where we crochet about half the round, turn our work, crochet over the stitches we just made. This will make a “indented” look for the ghost’s whisp at the head.
Round 6: Sc next 6 st (Pic 1). Turn (Pic 2), Sc next 6 (Pic 3 over the stitches we just made), Turn (Pic 4), now we’re working back into the round (Pic 5). Repeat *Inc, Sc 3* 3 times (Pic 6) (15)
1. 2.
2. 
3. 4.
4. 
5.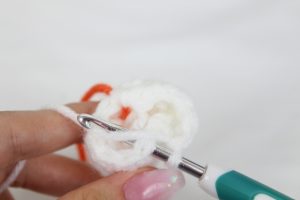 6.
6.
Round 7: *Inc, Sc 4* all around (18)
Round 8: *Sc* all around (18)
Round 9: *Inc, Sc 2* all around (24)
Round 10: *Inc, Sc 3* all around (30)
Round 11: *Inc, Sc 4* all around (36)
Round 12-16: *Sc* all around (36)
Round 17: *Inc, Sc 5* all around (42)
Insert safety eyes between Round 16 and 17 a total of 2 st apart or 4 st apart, whichever looks cuter to you! I ended up doing 2 st apart. Make sure they center up with the whisp
Round 18: *Sc* all around (42)
Round 19: *Inc, Sc 6* all around (48)
Round 20-21: *Sc* all around (48)
Round 22: *Dec, Sc 2* all around (36)
Round 23: *Dec, Sc 2* all around again (27)
Round 24: *Dec, Sc* all around (18)
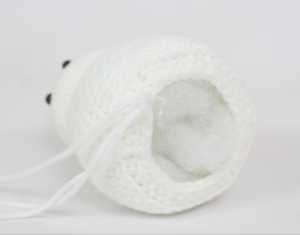
Round 25: In the FLO (Front Loop Only) *Sc* all around (18)
FLO Pictured Below
Stuff the head here
Round 26: In BOTH Loops, *Inc, Sc 2* all around (24)
Round 27: *Inc, Sc 3* all around (30)
Round 28: *Inc, Sc 4* all around (36)
Round 29: *Inc, Sc 5* all around (42)
Round 30-45: *Sc* all around (42)
Add stuffing again now.
In the next round we will start to make the bottom of the ghost. Before we do that, if you want your ghost to sit flat for decoration, cut out a circular piece of cardboard. Place it into the bottom of the ghost now. Then, continue on to the next round!
Round 46: In the BLO (Back Loop Only), *Dec, Sc 5* (36)
Round 47: In BOTH Loops, *Dec, Sc 4* all around (30)
Round 48: *Dec, Sc 3* all around (24)
Round 49: *Dec, Sc 2* all around (18)
Round 50: *Dec, Sc* all around (12)
Round 51: *Dec* all around (6)
Finish off, leaving a tail for sewing. Sew the bottom closed.
Arms: (Make 2)
In White

Round 1: 6 Sc in Magic Ring (6)
Round 2: Repeat *Inc in the next st, Sc in the next st* all around (9)
Round 3-13: *Sc* all around (9)
Finish off, leaving a long tail for sewing. Lightly stuff the arms. Pin each arm to the ghost as shown. Sew on.

Tail:
In White

Round 1: 6 Sc in Magic Ring (6)
Round 2: *Inc, Sc* all around (9)
Round 3: *Sc* all around (9)
Round 4: *Inc, Sc 2* all around (12)
Round 5: *Sc* all around (12)
Round 6: *Inc, Sc 3* all around (15)
In the next round we will do a short row. A short row is where we crochet about half the round, turn our work, crochet over the stitches we just made. This will make a “indented” look for the tail’s whispy look
Round 7: Sc in the next 7 st (Pic 1), Turn (Pic 2), Sc in the next 7 st (Pic 3), over the stitches we just made), Turn, Sc in the next 7 st. Now continuing on the round, Sc in the next 8 st (Pic 4) (15)
1. 2.
3. 4.
Round 8: *Inc, Sc 4* all around (18)
Round 9: *Inc, Sc 5* all around (24)
Finish off, leaving a long tail for sewing. Pin the tail to the ghost as shown. Sew on. Be sure to stuff the tail firmly before fully sewing closed.

Pumpkin:
In Orange
Round 1: 6 Sc in Magic Ring (6)
Round 2: *Inc* all around (12)
Round 3-7: *Sc* all around (12)
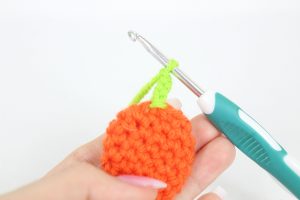
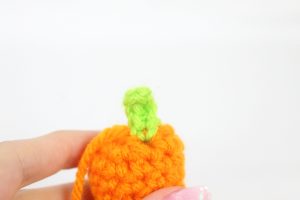
Round 8: *Dec* 5 times. *Dec* in the next st, changing to green as you yarn over to finish the decrease stitch (Pic 1-4). Don’t cut off orange yarn yet.
Round 9: Working in green, SlSt in the next st (Pic 5). Ch 4 (Pic 6).
1. 2.
2.
3. 4.
4.
5. 6.
6.
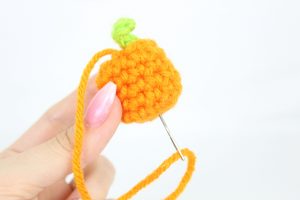
Sc in the 2nd Ch from the hook, Sc in the next 3 st (Pic 7). SlSt into the same st as before (Pic 8-9). Finish off the green yarn. Cut a very long tail on the orange yarn, about 15″ (Pic 10). Stuff firmly (Pic 11). Now take the orange tail and place it on a needle. Sew the top closed (Pic 12).
7. 8.
8.
9. 10.
10.
11. 12.
12.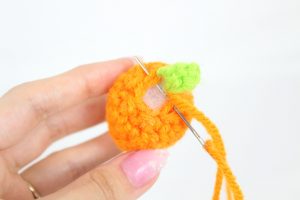
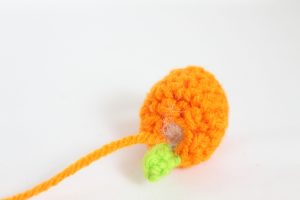
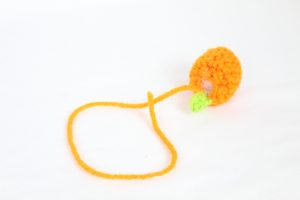
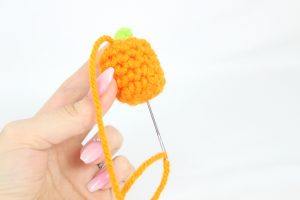
We will have the tail of yarn at the top of the pumpkin (Pic 1). Place the needle into the very center bottom of the pumpkin (Pic 2). Pull the needle out at the very center top of the pumpkin (Pic 3). Repeat this process about a total of 4 times (Pic 6). Doing this will make the pumpkin’s indents.
1. 2.
2.
3.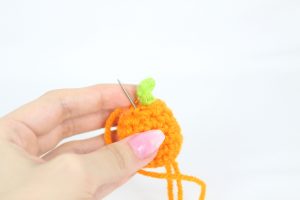 4.
4.
5.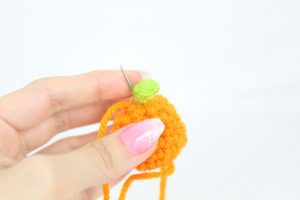 6.
6.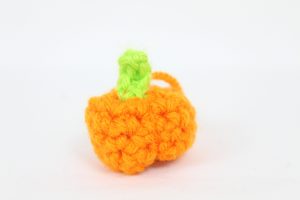
Now pin the pumpkin to the hand area of the ghost as shown and sew on with the remaining yarn (Pic 7).

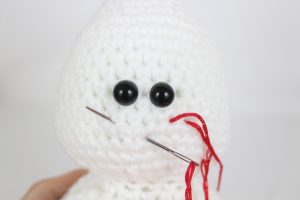
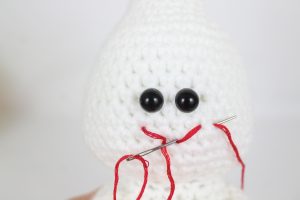
Ghost Smile:
In Red Embroidery Thread
Insert needle with thread into the right area of the face and pull needle out one stitch to the left (Pic 1). Reinsert needle into the middle of the mouth area and pull needle out at the left side of the face, matching up to the right side’s insertion spot (Pic 2). Reinsert needle into the middle of the mouth and pull needle out at the original insertion spot (Pic 3). Done! (Pic 4).
1. 2.
2.
3. 4.
4.
Done! If you made this cute ghost I would LOVE to see it! You can add a photo to the comments below this post, or you can “try” it on Pinterest.


37 Comments
hello, in making the head, I am confused by rounds 19-23. Round 18 leaves us at 42 stitches, and the next round says incr sc 6 which would leave us with 48 stitches, however the pattern says 36 and then I think all of the numbers after that until the head is done is off. Am I missing something? Thank you for your help.
Hi Christina, thank you so much for your comment! I looked at that section and the patterns stitch count was wrong from those rounds you mentioned, so I went ahead and fixed that area so now it should be back on track! I’m so sorry about that 🙁 I hope it makes much more sense now! Please feel free to let me know if you come across anything else you have questions with 🙂 I’m always happy to help in any way I can ❤️ I hope I can see your ghost when you’re done!
Here’s my ghost!
Hi Christina! Wow you have done such a cute job with your ghost! He looks so adorable, especially next to the other pumpkins 🙂 Very very cute, I bet he will bring a smile to anybody’s face! Thank you so much for sharing your adorable ghost, I love it!!!❤️
HI thank you so much for posting this pattern. I’m currently stuck in bed waiting for my COVID-19 results feeling rough. This pattern helped keep my mind off things as you can imagine I’m very worried. I’m planning on giving the beautiful witch lady a go next. Here’s a picture of my little ghost (without a face for the moment) 🙂
Hi Michelle,
Thank you so much for sharing your ghost! Wow he looks awesome!! Even without a face, I love it 🙂 I’m so sorry to hear about waiting for your results, I pray that you will be okay and feel better soon 🙁 The best thing for now is to try and keep your mind off of it like you said, take it easy and relax ❤️ I know when I get really worried about things I can make myself even more sick 🙁 Get some fun, relaxing crocheting in Michelle, I’m so excited to see when you make the witch! Please let me know if you have any questions when making her, I’m here to help!! ❤️ Love your ghost sooo much 🙂
Thank you so much for this pattern, it’s the most well written I’ve done in a long time, got this little guy done in a couple of days.
I didn’t have any eyes so embroidered them and I love him.
Such a cute ghost and a really lovely, well explained pattern to follow – thank you!
I didn’t have any toy eyes or beads so just sewed some eyes on 👻
Hi Abi, aw my goodness your ghost is super adorable! Those eyes are so well done, I really love how you made your own twist with the eyes 🙂 Next year I am definitely going to try doing the eyes that way! Thank you so very much for your kind words, it means so much that you really liked the pattern! Your ghost and the decorations around him are so awesome 😍
Thank you so much for the free patterns! I have vision problems and it’s not easy to find a great pattern all in one piece ☹️ so happy to see the ghost 😀 I’m going to crochet one this week. And I will make one for each of my great granddaughters too. I can’t wait to try the other Halloween things too. Thanks again and I love your site!
Hi Pixie! Thank you so extremely much for being so kind, I truly appreciate it so much! I’m sorry to hear about your vision problems. I hadn’t considered how finding patterns with little sewing would be easier since you don’t have to “see” as much. It makes total sense! Now that I know, I’m going to try and make more of an effort to try making more “no-sew” patterns 🙂
Let me know how this ghost goes for you! If by chance you need any help, please let me know. I’m so excited for your great granddaughters to get their own ghost – that’s so cute! Maybe you can add a bow around the neck of the ghost in their favorite colors? Just a thought 😉
Thanks so much again for your kindness, Pixie!
Olive
Thank you for the pattern! I’m on a Halloween/Fall kick and this ghost fit the bill. I named her boo! Even have her some blushing cheeks with makeup.
Awww I love Boo! That’s such a clever name, I wish I had thought of that LOL! I love that it looks like you used bigger eyes on yours 😍 It gives such a “kawaii” look, especially with the blush! Thank you so much for sharing a picture. I’m sure Boo goes great with all of your other Fall makes!
Here is my Ghost, he turned out so cute 😍
Awww this is so cute! 😍 He looks sooo perfect, I can’t get enough of your cute ghost! Thank you so much for sharing a picture, it totally brightened my day 🥰
Thank you so much for sharing your talent. I loved the way this Ghost turned out.
Oh my, that is so cute! I’m obsessed with your adorable ghost, for some reason I find his arms sooo adorable! Haha 🙂 I’m so glad you made the ghost and are happy with how it came out. You did such a great job making him 😍 Thank you so much for sharing a picture with me! I hope you have a fantastic Halloween!
Olive
Here’s my ghost. I love how everyone’s is different
I saw a huge version of this I was wondering if there are more patterns for different size ghosts
Thanks for your pattern! A friend requested a ghost and we fell in love with yours. It was fun to make and give away. Keep up the good work fellow needle workers!
Hi, VERY cute pattern! How tall is the ghost? Thank you!
Hi!
I am confused on how to do row 6. Can I get some further explanation or a video or what it is asking?
If this is “free” why do I have to pay in order to print it?
I just wanted to say, this project was a challenge and fun at the same tome for me. My family like it This was my first time making a ghost. Thank you for the pattern.
I loved your ghost so much – I made a baby version to keep him company.
My kids are begging me for their own ghosts – that’s how loveable they are. Thank you so much for this pattern & tutorial. ❤️
I changed the ghost head to make a snowman. Thank you for sharing your pattern.
Is the count off on the head mine turned out so big
Where is the revised pattern………?…?
¡Muchas gracias! Las instrucciones están muy completas y es muy fácil de hacer. 😀
You list this as a ‘FREE’ pattern, but then charge to download/print the PDF. Kind of false advertisement isn’t it?
only the PDF is not free. scroll down to find a FREE pattern. sorry i’m a bit late
Here is my cute ghost! I changed him up a bit with a smiley candy corn. Thanks for the fun pattern!!
I love the smiley candy corn. So cute
I made this little ghosty. This pattern is well written and easy to follow. Thank you for sharing. I love how my little guy turned out.
Thank you so much for the ghost pattern. I made him using glo-in-the-dark yarn.
Picture with glo-in-the-dark yarn
Really love how my ghost looks. It is so cute. The pattern was relatively easy to follow. Thanks for sharing!