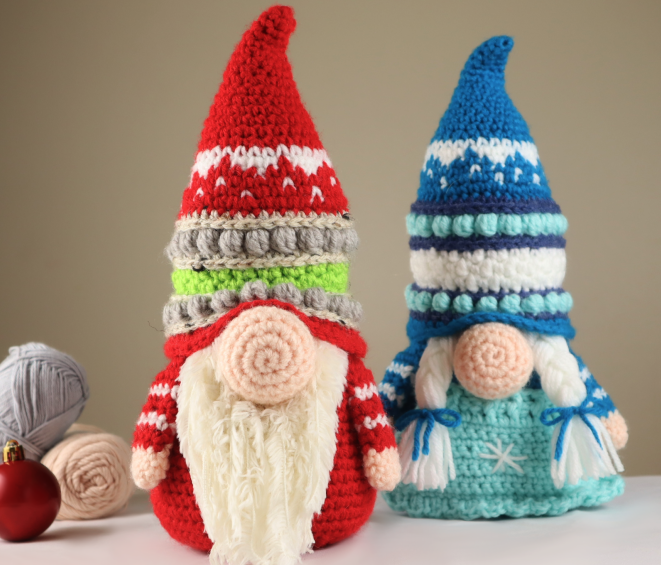
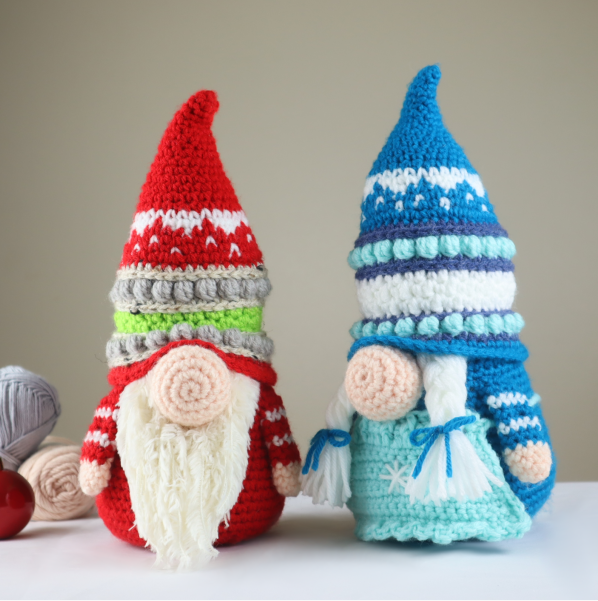
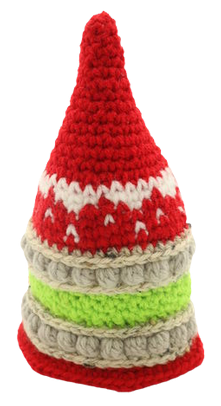
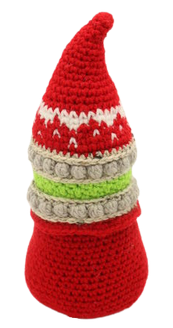
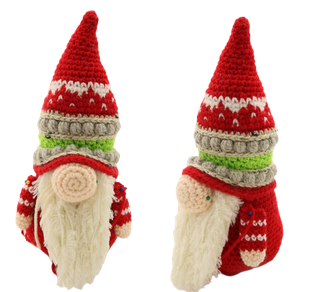
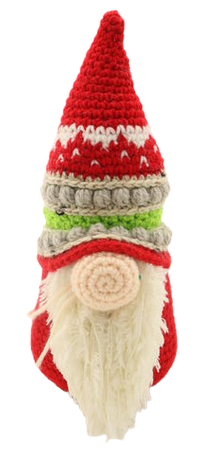
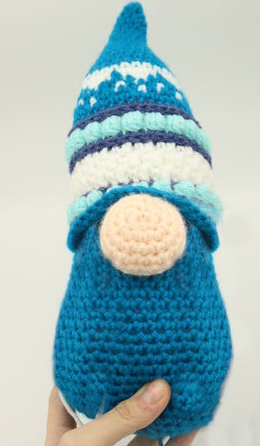
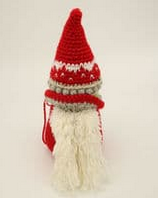
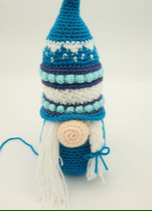
Gnome Amigurumi – Free Christmas Crochet Pattern
The PDF pattern is easier to follow – it includes 2 PDF files for both the boy and girl gnome, so you know exactly what colors to change to at what times!
The free online pattern only refers to “Main Color, Contrast color 1, Contrast Color 2”, because unfortunately it would be too complicated to write out both colors for the online version. If you want an easier time crocheting, get the PDF!
 Supplies:
• Yarn 4/Medium Weight in…
Main color blue, dark blue, light blue, white, and skin color
•4mm Crochet Hook
•Tapestry needle
•Scissors
•Stuffing
•Sewing Pins
Additional Information:
Difficulty: Intermediate
Size: 11″ tall, 4″ wide
• Before we get started…
These gnomes are really fun to make! There is a lot of color work in the hat. Because of this, I made the boy and girl pattern separately to easier follow the colors for each gnome. This pattern is for the girl, so I will explain how to make the gnome in her colors, along with how to make her braids and apron. Please follow the male pattern for how to make his colors and beard.
• Let’s Get Started!
We will start by making the hat from the tip down. We will then crochet the body. The body is worked into the hat by working in the back loop only of the hat. After this we will make the nose, braids, and apron.
Hat:
Start in main color
Round 1: 6 Sc into a Magic Ring (6)
Round 2-3: *Sc* all around (6)
Round 4: *Inc, Sc in the next st* all around (9)
Round 5-6: *Sc* all around (9)
Round 7: *Inc, Sc in the next 2 st* all around (12)
Round 8-9: *Sc* all around (12)
Round 10: *Inc, Sc in the next st* all around (18)
Round 11-12: *Sc* all around (18)
Round 13: *Inc, Sc in the next 2 st* all around (24)
Round 14-15: *Sc* all around (24)
Round 16: *Inc, Sc in the next 3 st* all around (30)
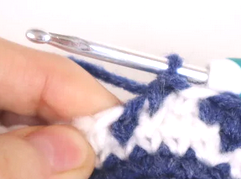
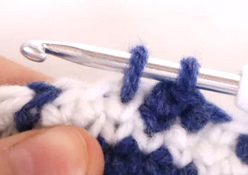
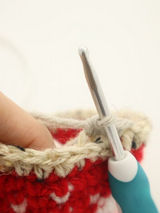
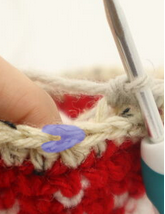
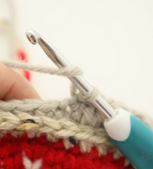
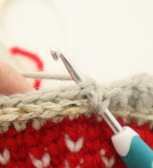
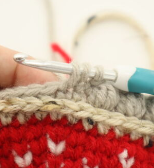
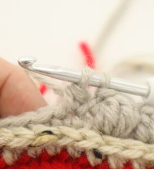
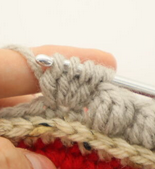
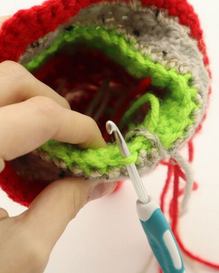
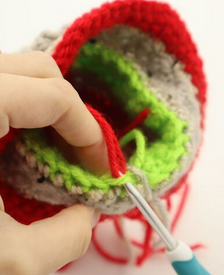
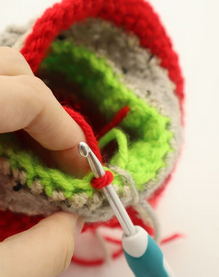
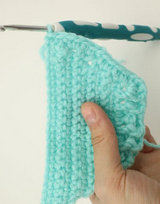
Now we will make the “knit” look of the hat. We do this by making a split stitch. To make the split stitch, insert the crochet hook directly in between the “v” of the stitch (Pic 1-2). Make sure to NOT crochet above the “v” like we usually do in crochet.
1.
 2.
2.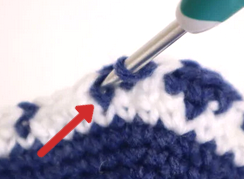
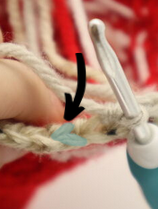
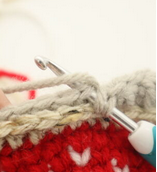
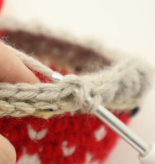
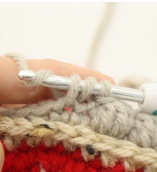
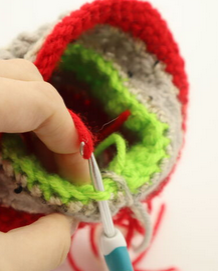
Crochet these rounds a bit looser than usual. When pulling second loop up, pull that loop looser to the height of the current stitch (Pic 3). This makes it easier to later crochet back into the stitch. We will be crocheting these rounds using a split stitch until we work the half double crochets.
3.
 4.
4.
Note:
The split stitch not only makes a “knit” look, but it also makes color changes line up perfectly!
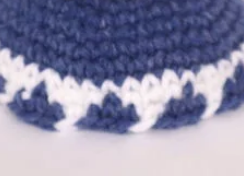
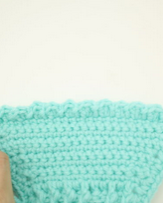
Round 17: Change to white. Using the split stitch, *Sc* all around (30)
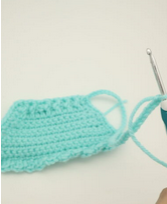
Round 18: Repeat *In white Sc in the next 3 st. Change to Main Color Sc in the next st* 7 times. Sc in the next 2 st (30)
Round 18 will look like the photo below:
The following 3 rounds includes a lot of color work. To shorten the pattern so it’s easier to follow, I simplified the pattern.
Round 19: Main Color Inc in the next st.
-White Sc in the next st.
-Main Color Sc in the next 3 st.
-White Inc in the next st.
-Main Color Sc in the next 3 st.
-White Sc in the next st.
-Main Color Inc in the next st, then Sc in the next 2 st.
-White Sc in the next st.
-Main Color Sc in the next st, Inc next st, Sc in next st.
-White Sc in next st.
-Main Color Sc in the next 3 st.
-White Sc in that same st, Sc in the next st.
-Main Color Sc in the next 3 st.
-White Inc in the next st.
-Main Color Sc in the next 3 st.
-White Sc in the next st (36)
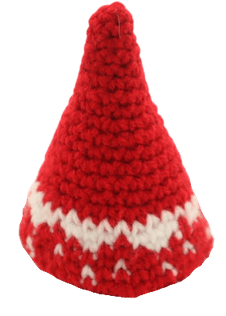
Round 19 will look like the photo below:
Round 20: White Sc in the next st
-Main Color Sc in the next 3 st
-Repeat *In white Sc next st, In Main Color Sc next 4 st* 2
times
-White Sc next st
-Main Color Sc in the next 3 st
-White Sc in the next st
-Repeat *In Main Color Sc in the next 4 st, In white Sc in the
next st* 3 times
-Main Color Sc in the next 2 st (36)
Round 21: In Main Color Sc in the next 2 st
-White Sc in the next st
-Main Color Sc in the next 3 st
-Repeat *In white Sc in the next st, In Main Color Sc in
the next 4 st* 2 times In white Sc in the next st
-In Main Color Sc in the next 3 st
-Repeat *In white Sc in the next st, In Main Color Sc in
the next 4 st* 2 times
-White Sc in the next st
-Main Color Sc in the next 5 st (36)
Round 20 and 21 will look like the photo below:
Round 22: In Main Color, *Inc, Sc in the next 5 st* all around (42)
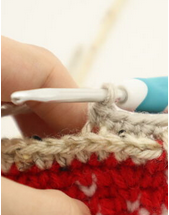
Round 23: Change to Contrast Color 1 yarn. Hdc in each st all around (42)
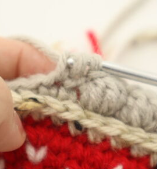
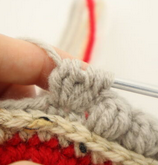
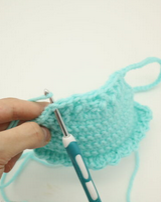
In the following round we will work in a certain part of the half double crochets we just made. Working in these parts will make Hdc round “pop”!
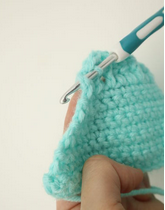
If you look at the Hdc as they are right in front of you, you will see the “v” facing you (Pic 2). This is how we see ours stitches regularly. However, if you look at the Hdc from the top facing you, you will see a new “v” (Pic 3). Insert your hook going between that top v, and make a Sc.
1. 2.
2. 3.
3. 4.
4.
Round 24: In Contrast Color 2, working in the back of the Hdc, *Sc* all around (42)
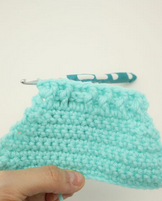
Round 25: Working in both loops, *Popcorn st* in the next st, 1 Sc in the next st* all around (42)
How to make a popcorn stitch:
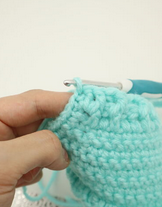
Repeat *Yarn over and insert your hook into the next stitch. Yarn over. Bring the yarn through. Yarn over and pull through two loops* 4 times. (Pic 1-8)
1. 2.
2. 3.
3. 4.
4. 5.
5. 6.
6. 7.
7. 8.
8. 9.
9.
You will have 5 loops on your hook (Pic 9). Yarn over and pull through all 5 loops at the same time (Pic 10-11). You made a popcorn stitch! (Pic 12)
9. 10.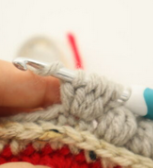 11.
11. 12.
12.
Round 26: In Contrast Color 1 yarn, *Hdc* all around (42)
Round 27: In White, working in the top stitch loop as shown on page 6, *Sc in the next st, Dc in the next st* all around (42)
Round 28: Working in BOTH loops, *Dc in the next st, Sc in the next st* all around (42)
Round 29: *Sc in the next st, Dc in the next st* all around (42)
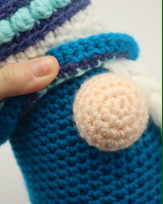
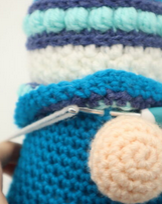
In the next round we will be working in the front loop only. This will leave a back loop, which we will later attach our hook into the back loop to from the gnome’s body.
Round 30: In Contrast Color 1 yarn, working in the Front Loop Only (FLO) make 1 Hdc into each stitch all around (42)
Round 31: In Light Blue, working in the top stitch loop as shown on page 6, *Sc* all around (42)
Round 32: In BOTH loops, Sc in the next st, Popcorn st in the next st* all around (42)
Round 33: In Contrast Color 1 yarn, Hdc all around (42)
Round 34: Change to Main Color, working in the top stitch loop as shown on page 6, repeat *Inc, Sc in the next 6 st* all around (48)
Round 35: In BOTH loops, repeat *Inc, Sc in the next 7 st* all around (54)
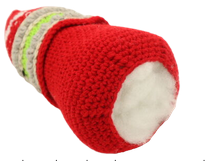
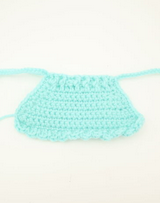
Finish off and weave in ends. Now we’re done with the hat!
Body:
In main color
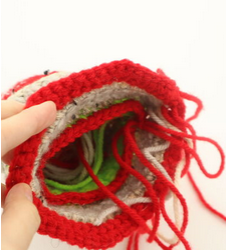
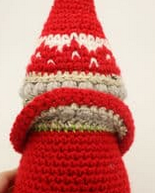
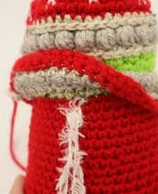
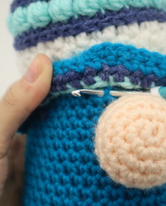
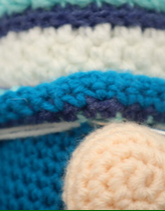
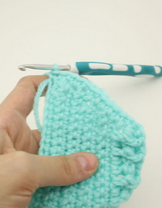
Round 1: Now we will work in the back loops we left in Round 30. Flip the hat’s brim outwards, and you will see a ridge of stitches (Pic 1). These are the back loop stitches. Insert your hook into any one of these loops (Pic 2), yarn over with red yarn (Pic 3), and pull the yarn through (Pic 4-5). Ch 1. Sc in the next 41 st (Pic 6) (42)
1. 2.
2. 3.
3. 4.
4. 5.
5. 6.
6.
Round 2-12: *Sc* all around (42)
Round 13: *Inc, Sc in the next 6 st* all around (48)
Round 14: *Sc* all around (48)
Round 15: *Inc, Sc in the next 7 st* all around (54)
Round 16-18: *Sc* all around (54)
Round 19: *Dec, Sc in the next 7 st* all around (48)
Round 20: *Dec, Sc in the next 6 st* all around (42)
Round 21: *Dec, Sc in the next 5 st* all around (36)
Stuff the hat now. I don’t stuff the very top tip of the hat because it allows you to move the tip around to look bent.
Round 22: *Dec, Sc in the next 4 st* all around (30)
Round 23: *Dec, Sc in the next 3 st* all around (24)
Stuff the body now. Continue stuffing after each round.
Round 24: *Dec, Sc in the next 2 st* all around (18)
Round 25: *Dec, Sc in the next st* all around (12)
Round 26: *Dec* all around (6)
Finish off, leaving a long tail for sewing. Sew the remaining stitches closed and weave in ends.
Arms: (Make 2)
In Skin Color
Round 1: 6 Sc into a Magic Ring (6)
Round 2: *Inc, Sc in the next st* all around (9)
Round 3-4: *Sc* all around (9)
Round 5-6: In Main Color, *Sc* all around (9)
Round 7: In white, *Sc* all around (9)
Round 8-9: In Main Color, *Sc* around (9)
Round 10: In white, *Sc* all around (9)
Round 11-12: In Main Color, *Sc* all around (9)
Finish off, leaving a long tail for sewing. Don’t stuff the arms. Pin the arms on as shown and sew on, weave in ends.
If you’re making the boy gnome, make the beard first THEN make the nose after.
If you’re making the girl gnome, make the nose first THEN make the hair after.
Nose:
In skin color
Round 1: 6 Sc into a Magic Ring (6)
Round 2: *Inc* all around (12)
Round 3: *Inc, Sc in the next st* all around (18)
Round 4-6: *Sc* all around (18)
Round 7: *Dec, Sc in the next st* all around (12)
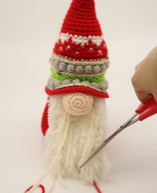
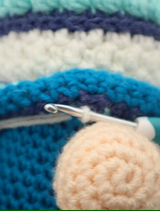
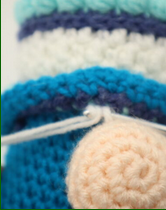
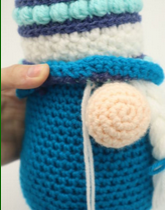
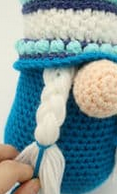
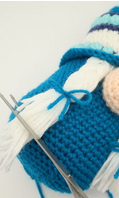
Finish off, leaving a long tail for sewing. Stuff the nose firmly now. Pin the nose on as shown and sew on.
Beard:
In Fuzzy Yarn
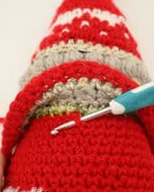
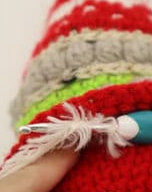
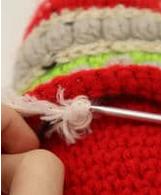
Cut 30 pieces of 9″ fuzzy yarn. You may cut less strands if you’re using thicker yarn than mine, see Pic 1 for size reference. Flip the brim of the hat up as shown (Pic 2). Insert your hook into Round 3 of the body (Pic 3). Fold the fuzzy yarn in half, and place the yarn onto your hook (Pic 4). Pull the yarn through (Pic 5-6).
1. 2.
2. 3.
3. 4.
4. 5.
5. 6.
6.
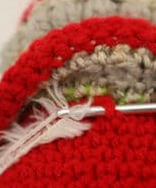
Yarn over with both strands of yarn (Pic 7). Pull the yarn through (Pic 8). After pulling both strands of yarn completely though, your strand will look like Pic 9. Repeat this process for about 13 stitches across. To make the beard thicker, add strands below the first row, and under neath the second row of strands until you run out of yarn strands. (Pic 10).
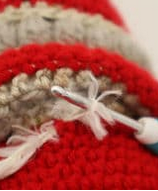
Once done, trim the edges of the beard at an angle as shown (Pic 11). Done!
7. 8.
8. 9.
9. 10.
10. 11.
11. 12.
12.
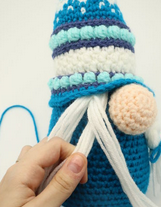
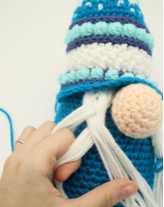
Braids:
In White Yarn
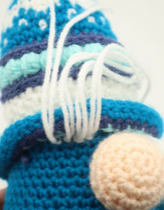
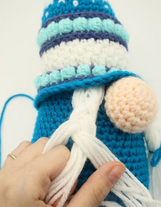
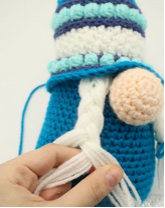
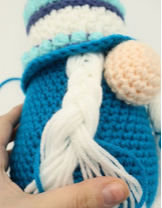
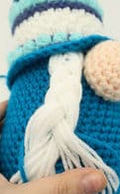
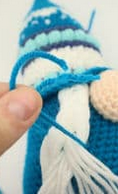
Cut 30 strands of 5″ white yarn. We will use 15 strands per braid. Lift the hat up as shown (Pic 1). Insert your hook into the first round of the body, 4 stitches to the left of the nose (Pic 2). Yarn over with the white yarn strand (Pic 3) and pull the yarn through (Pic 4-5). Yarn over with the yarn strands (Pic 6) and pull the yarn through (Pic 7-8). Repeat this for the next 3 stitches to the right (Pic 9). Now repeat this for the next 2 rows below until you run out of yarn strands (Pic 10).
1. 2.
2. 3.
3. 4.
4. 5.
5. 6.
6. 7.
7. 8.
8. 9.
9. 10.
10.
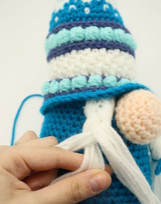
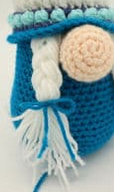
If you know how to braid hair, braid the hair but leave about 1.5″ unbraided. Go on to make the bow. If you don’t know how to braid, follow the next steps.
How to braid the hair:
Divide the hair into 3 pieces (Pic 1). Place the right strand under the middle strand (Pic 2). Place the middle strand over the left strand (Pic 3). Place the middle strand over the right strand (Pic 4). Take the left strand under the middle strand (Pic 5). Place the middle strand over the right strand (Pic 6). Place the middle strand over the left strand (Pic 7). Place the middle strand over the right strand (Pic 8). Leave the rest unworked (Pic 9-10).
1. 2.
2. 3.
3. 4.
4. 5.
5. 6.
6. 7.
7. 8.
8. 9.
9. 10.
10.
Bow:
In main blue
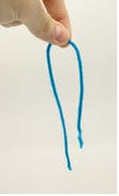
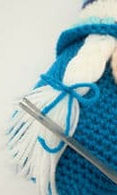
Take a 4″ piece of Main Blue yarn (Pic 1). Tie it over the end of the braid (Pic 2-4). Tie a bow (Pic 6). Trim the end of the bow to be even (Pic 6). Trim the end of the hair to be even (Pic 7).
1. 22.
22. 3.
3. 4.
4. 5.
5. 6.
6. 7.
7.
Apron:
In Light Blue
Row 1: Ch 24. Sc 3 times in the 2nd Ch from the hook, Sc 21, Sc 2 times in the last Ch (27)
Row 2: *Dec* 2 times, Sc next 19, *Dec* 2 times (23)
Row 3-4: Ch 1 and turn. Sc all in the next 23 st (23)
Row 5: *Dec* 2 times, Sc 15, *Dec* 2 times (17)
Row 6-7: Ch 1 and turn. Sc all in the next 19 st (19)
Row 8: Ch 1 and turn. *Dec* 2 times, Sc 11, *Dec* 2 times (15)
Row 9: Ch 1 and turn. Sc in the next 15 st (15)
Row 10: Ch 2 and turn. Dc in the next 15 st (15)
Row 11: Repeat *FpDc in the next st, BpDc in the next st* 7 times. Dc in the next st (15)
Row 12: Turn the apron to the side. Sc down the side of the apron (Pic 2). Now we meet the bottom of the apron. Repeat *3 Dc in the next st, Sc in the next st* until you reach the left side of the apron (Pic 4). Sc along the side of the apron (Pic 5). Now we are at the top of the apron. Ch 45 and finish off (Pic 7). Attach your hook to the other side of the apron and Ch 45 (Pic 8-10). Finish off and weave in ends.
1. 2.
2. 3.
3. 4.
4. 5.
5. 6.
6. 7.
7. 8.
8. 9.
9. 10.
10.
The apron is almost done! Now we need to add the snowflake on, which I show you how to do on this next. If you want, you can add fun 3d buttons to the apron instead of embroidering a snowflake. I also think an applique would be cute – do what you like best!
Snowflake:
In White
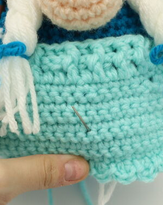
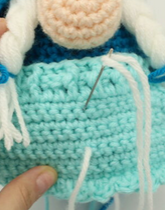
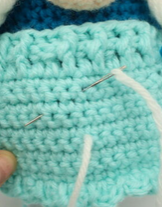
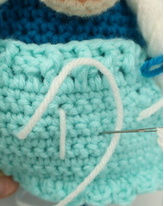
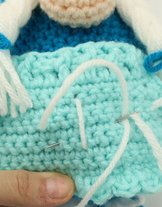
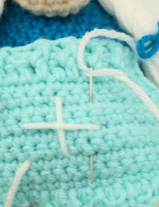
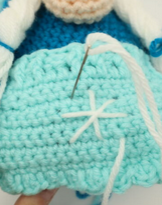
Insert needle with yarn under the apron and pull it out at the apron as shown (Pic 1). Insert needle a few stitches above where shown (Pic 2). Pull needle out at the left as shown (Pic 3). Insert needle in the same line, at the right as shown (Pic 4). Pull needle out between the two bottom left lines as shown (Pic 5). Reinsert needle between the two lines at the top right as shown (Pic 6). Pull needle out between the two bottom right lines as shown (Pic 7). Reinsert needle between the top left lines as shown (Pic 8). Tie the tail ends of yarn into a firm knot on the back of the apron, and cut any excess yarn.
1. 2.
2. 3.
3. 4.
4. 5.
5. 6.
6. 7.
7. 8.
8. 9.
9.


2 Comments
When making the hat, how do I change colors within the row? Also, do I flip the hat inside out at the end? My pattern shows up on the inside of the hat while crocheting.
Does it make a difference to not use the split stich. I am having a hard time sc the split stitch. I tried to loosen my tension but Its hard for me to.