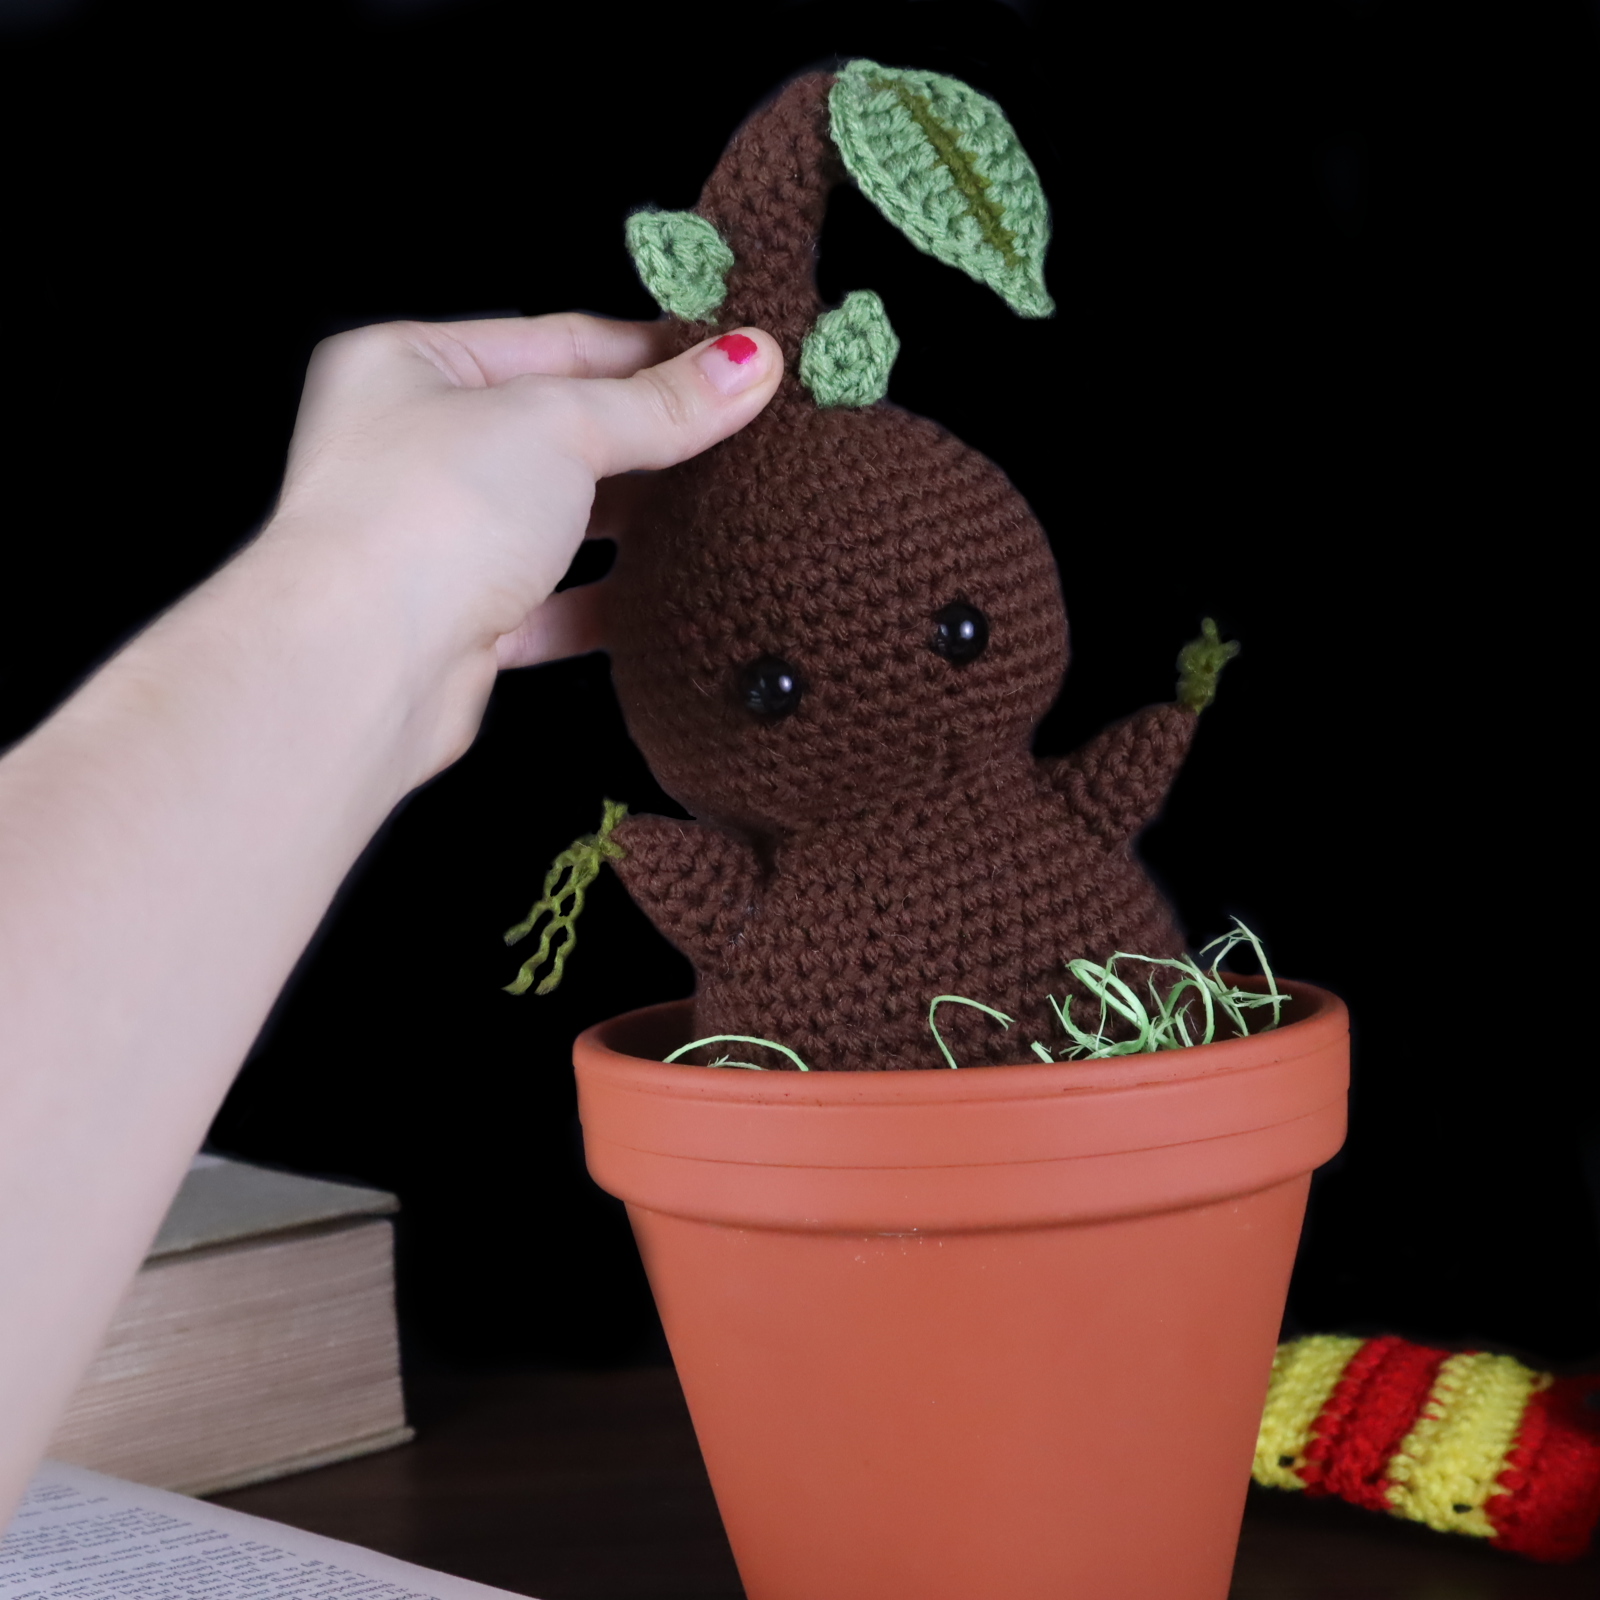

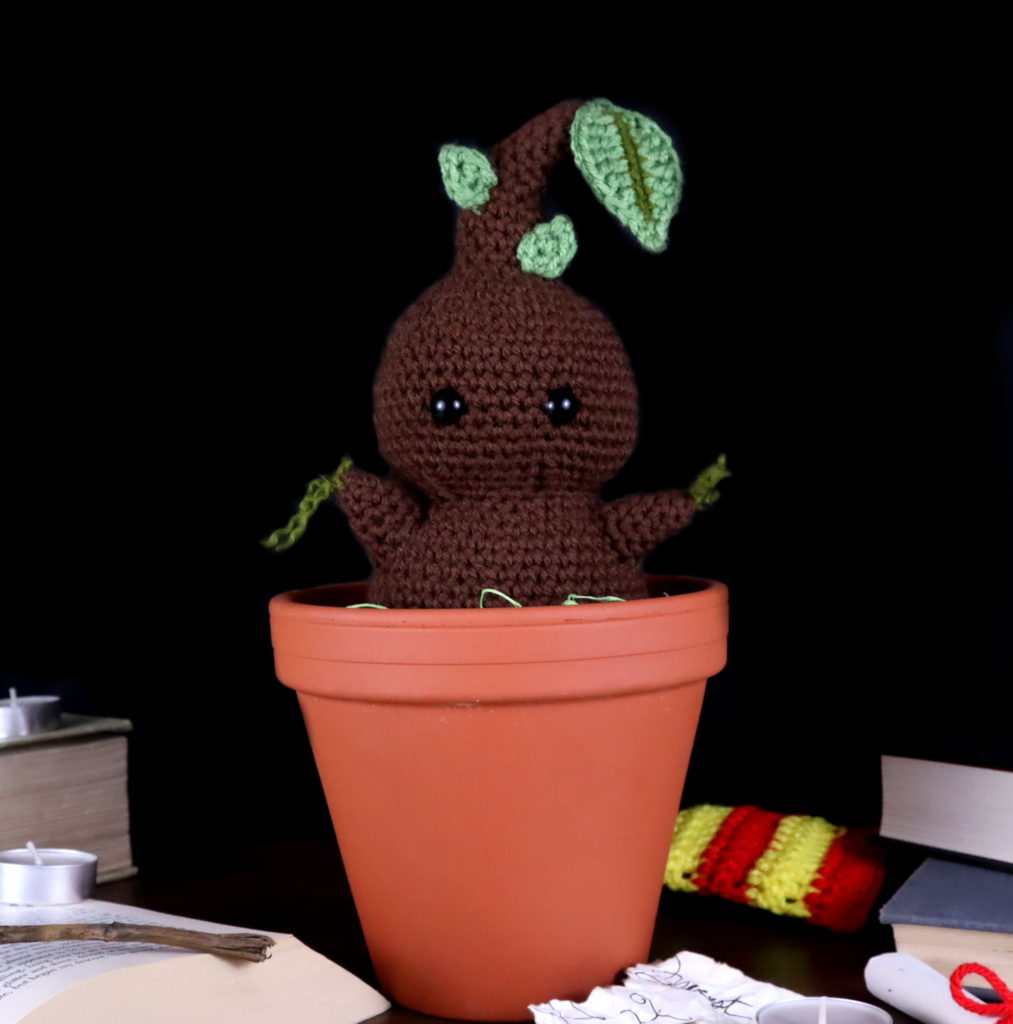
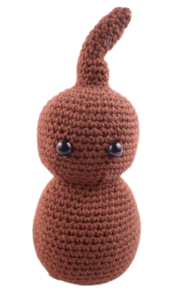
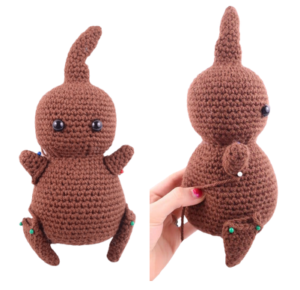
Free Mandrake Amigurumi Crochet Pattern
 This pattern is the second of the Wizard’s Amigurumi Bundle! Every week 1 new wizard/fantasy themed amigurumi will be released.

Want to see the other fantasy patterns and their release date? See them here!
Become a member to unlock each PDF pattern as they’re released!
This is the second addition to the Wizard Fantasy Bundle! I’ve been wanting to make a mandrake amigurumi for well over a year. I hope this pattern looks good, my favorite part has to be the roots coming off of his arms and legs.
Mandrakes, what are they? They actually don’t originate from Harry Potter!
They have a centuries long history. So far back that the mandrake plant is actually mentioned in well known works such as the Book of Genesis. The plant (mandragora officinarum) is referenced through many ancient books to cure ailments such as depression, infertility, joint pain, diseases, and was even used as an anesthetic. However, take even slightly too much of the plant and you’ll be met with hallucinations, or worse, death.
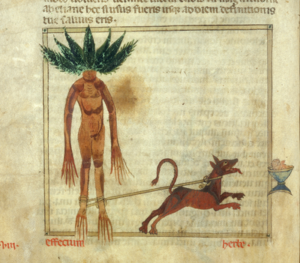
Dancing with death is common when dealing with the mandrake.
According to folklore, uprooting a mandrake was a dangerous job. Simply pulling a mandrake from the ground would result in an ear-piercing scream from the humanoid-looking plant and would kill the novice gardener.
It’s no surprise that this made the plant even more sought after.
 It’s no surprise that this made the plant even more sought after.
Those desperate enough to retrieve the plant for it’s health benefits would still have to risk a life. It’s said that the gardener would have to tie a rope around a dog’s neck like a leash, then tie the other end of the rope to a mandrake’s root. The gardener would then throw the dog a treat, and as the dog would run towards the treat, the gardener would plug his ears. The force of the dog’s running would uproot the mandrake, and the scream would kill the dog rather than the gardener who plugged his ears.
With a lot of folklore, people pass it off as “Well that was just an old story they would tell!”
I have to admit that I can believe this one, though. The “how to safely uproot a mandrake” guides span across many cultures and are presented in an educational sense rather than an entertainment sense.
A plant that holds such strong powers to cure the biggest ailments probably doesn’t want to be touched for a reason. Maybe that’s why the plant will give you hallucinations and death if you ingest too much – because you weren’t supposed to. Magicians and those who practiced witchcraft would seek out this plant. It seems to bear some dark energy, so I suggest staying away from this plant and never ingesting it.
With that dark history, let’s crochet a cute non-lethal mandrake!
Print it out! Purchase the PDF here!

LIMITED TIME: From March 21, 2021 – April 21, 2021:
Become a member and unlock this PDF pattern PLUS every upcoming pattern from the Wizard’s Crochet Pattern Bundle!
You’ll get 1 new PDF pattern per week, and get access to exclusive video tutorials, business video tutorials, crochet community chat, and more. Join now!

Supplies:
• Yarn colors in size 4/Medium Yarn…
Dark Brown, Light Green, and Dark Green
• 4mm Crochet Hook
•12mm safety eyes
•Tapestry needle
•Scissors
•Stuffing
• Optional: Clay 6″ flower pot
Additional Information:
- Difficulty: Easy
- Pattern is in US Terms
• Getting started…
The mandrake’s tip, head, and body are all made in one continuous piece. We will start by making the very tip of the root! After this, we will make the arms and legs. Then we will make the leaves and roots!
• Note
You can display your mandrake in an inexpensive flower pot! I bought my vase at JoAnn Fabrics for $4. Pair that with their 50% off coupon and you can get the vase for $2!
• Recommended Yarns:
JoAnn Fabric’s “Big Twist” Yarn
Red Heart Super Saver Yarn
Hobby Lobby’s “I Love This Yarn!”
Mandrake:
Start in Dark Brown
Round 1: 6 Sc into a Magic Ring (6)
Round 2-3: *Sc* all around (6)
Round 4: *Inc, Sc in the next st* all around (9)
Round 5-7: *Sc* all around (9)
Round 8-11: Sc in the next 5 st, SlSt loosely in the next 4 st (9)
Round 12: *Inc, Sc 2* all around (12)
Round 13-16: *Sc* all around (12)
Round 17: *Inc, Sc* all around (18)
Round 18: *Inc, Sc 2* all around (24)
Round 19: *Inc, Sc 3* all around (30)
Round 20: *Inc, Sc 4* all around (36)
Round 21: *Inc, Sc 5* all around (42)
Round 22-26: *Sc* all around (42)
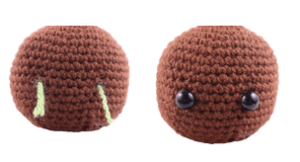
Now we will add 2 different colored stitch markers into Round 26. Add a different colored stitch marker into the 37th and 42nd stitch. Make sure these markers match each other, but not your round stitch marker. We don’t want to confuse the eye stitch markers with the Round stitch markers!
Round 27-30: *Sc* all around (42)
Round 31: *Dec, Sc 5* all around (36)
Round 32: *Dec, Sc 4* all around (30)
Round 33: *Dec, Sc 3* all around (24)
Round 34: In the FLO, *Sc* all around (24)
Round 35: *Inc, Sc 3* all around (30)
Add the eyes in the marked areas now. Stuff the head firmly here.
Round 36: *Inc, Sc 4* all around (36)
Round 37: *Inc, Sc 5* all around (42)
Round 38-42: *Sc* all around (42)
Round 43: *Inc, Sc 6* all around (48)
Round 44-50: *Sc* all around (48)
Round 51: *Dec, Sc 6* all around (42)
Round 52: *Dec, Sc 5* all around (36)
Round 53: *Dec, Sc 4* all around (30)
Round 54: *Dec, Sc 3* all around (24)
Round 55: *Dec, Sc 2* all around (18)
Stuff the body firmly now. Add stuffing after each round.
Round 56: *Dec, Sc* all around (12)
Round 57: *Dec* all around (6)
Finish off, leaving a tail for sewing. Sew the remaining stitches closed. Tie a firm knot with the remaining tail end of yarn and bring into the body to hide. Cut excess yarn.
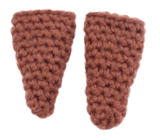
Arms: (Make 2)
In dark brown
Round 1: 6 Sc into a Magic Ring (6)
Round 2-3: *Sc* all around (6)
Round 4: *Inc, Sc 2* all around (8)
Round 5-6: *Sc* all around (8)
Round 7: *Inc, Sc 3* all around (10)
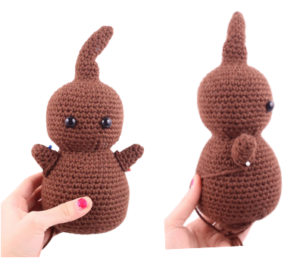
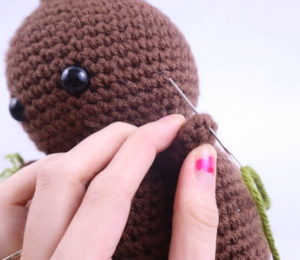
Finish off, leaving a long tail for sewing. Pin the arms on as shown (specifically the top of the arm on Round 36 and the bottom of the arm on Round 40). Sew on, making sure to stuff the arm before fully sewing closed. Once sewed on, tie the tail end of yarn into a firm knot. Bring the knot into the crochet body to hide. Cut any excess yarn.
Legs: (Make 2)
In Dark Brown
Round 1: 6 Sc into a Magic Ring (6)
Round 2-3: *Sc* all around (6)
Round 4: *Inc, Sc 2* all around (8)
Round 5-6: *Sc* all around (8)
Round 7: *Inc, Sc 3* all around (10)
Round 8-9: *Sc* all around (10)
Round 10: *Inc, Sc 4* all around (12)
Round 11-13: *Sc* all around (12)
Finish off, leaving a long tail for sewing. Pin the leg on as shown (specifically the top of the leg on Round 47 and the bottom of the leg on Round 51). Sew on, making sure to stuff the leg before fully sewing closed. Once sewed on, tie the tail end of yarn into a firm knot. Bring the knot into the crochet body to hide. Cut any excess yarn.
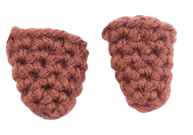
Tiny Leaves: (Make 2)
In Light Green
Round 1: In a magic ring: Sc 2 times, Dc 1 time, Ch 2 times, SlSt in the 2nd Ch from the hook. Dc 1 times into the magic ring, Sc 2 times.
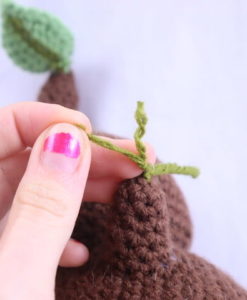
Tighten ring to form the leaf. Finish off, leaving a tail of yarn for sewing on. Pin the leafs on as shown.

Big Leaf:
Start in Dark Green
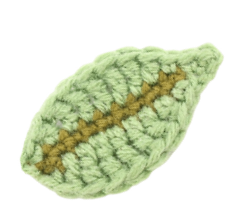
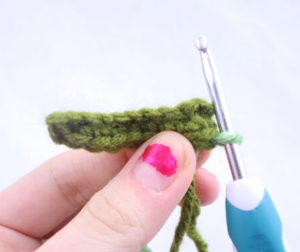
Row 1: In darker green, Ch 12. Sc 2nd ch from hook. Sc in the next 9 ch. Sc in the next ch, changing to light green when making this stitch (11)
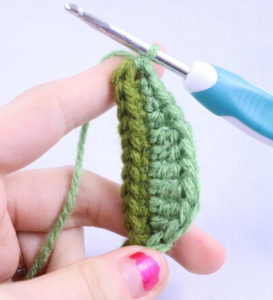
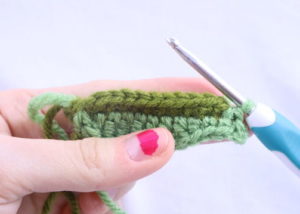
Row 2: Turn the work the the OTHER side of the stitches (Pic 2). In light green, Hdc in the next st (Pic 3). Dc in the next st. Trc in the next 5 st. Dc in the next st, Sc in the last 3 st (Pic 4). Ch 2, SlSt in the 2nd Ch from the hook (Pic 5-6).
1. 2.
2. 
3.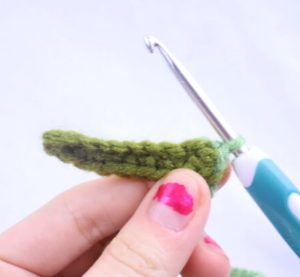 4.
4.
5. 6.
6.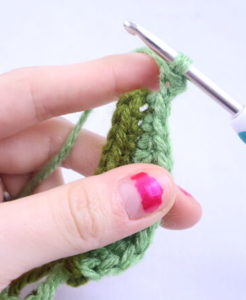
Continuing on other side of the stitches, Sc in the next 3 st (Pic 7-9). Dc in the next st, Trc in the next 5 st, Dc in the next st, Hdc in the last st. SlSt to first st made (Pic 10).7.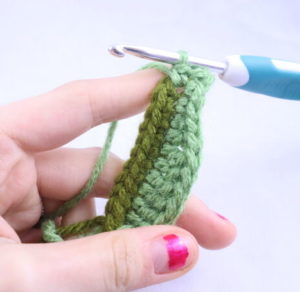 8.
8. 
9.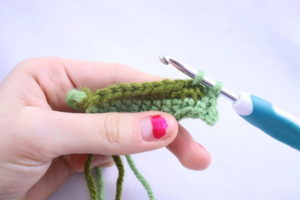 10.
10.
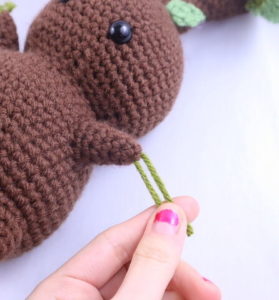
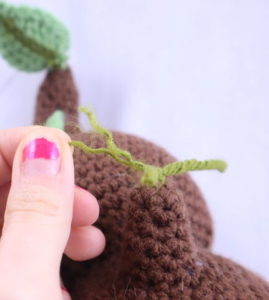
Roots:
In Light Green
Take a ~4″ piece of yarn and place it on a needle (Pic 1). Bring the needle through the tip of an arm/leg (Pic 2). Make sure half of the yarn is on each side of the limb (Pic 3). Tie both ends of yarn together twice (Pic 4)
1.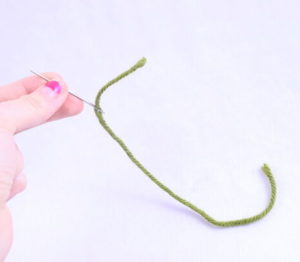 2.
2.
3. 4.
4.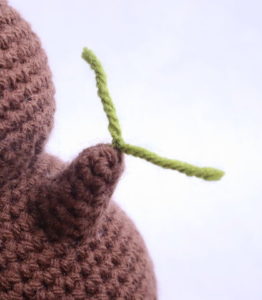
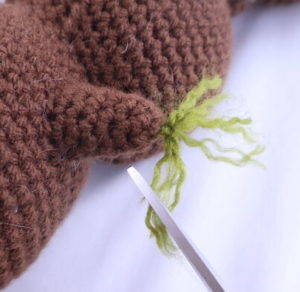
Take one strand and pull the ends apart to make even more tiny strands of yarn (Pic 5). Repeat this with the other strands (Pic 6-7).
5. 6.
6.
7.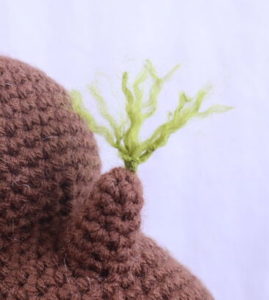
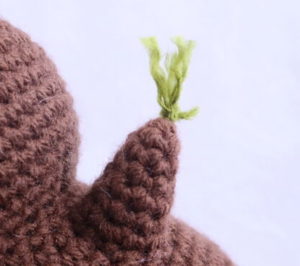
Cut the yarn to your liking, it looks better if the roots are slightly uneven from each other (Pic 8-9). Do this for the other limbs!
8. 9.
9.


10 Comments
💕💕💕💕💕💕💕
😍 I hope you like this pattern! ❤️
loved this pattern 🙂
Aww yay I’m so glad to hear that! 😍 ❤️ It’s a lot of fun to make something different from the usual food/animal amigurumi!
Pattern was so easy to follow. Great instruction and construction. My little mandrake turned out so adorable. Thank you Olive.
This was a wonderful pattern. Very well written and easy to follow. I love my Mandrake buddy!
So cute! I used yarn that was one size up for a slightly bigger stuffie. When my nephew was born, I crocheted a little mushroom man for him. When my brother-in-law told me they were expecting again, I had to find another fantastical forest friend that matched the theme, and this was it! The pattern was well-written, easy to follow, and worked up quickly. Thanks!
SlSt loosely means slip stitch loosely, right?
yes. that’s right. 🙂
maybe it’s because i’m new to this, but… do you sl st and chain one at end of each round?