

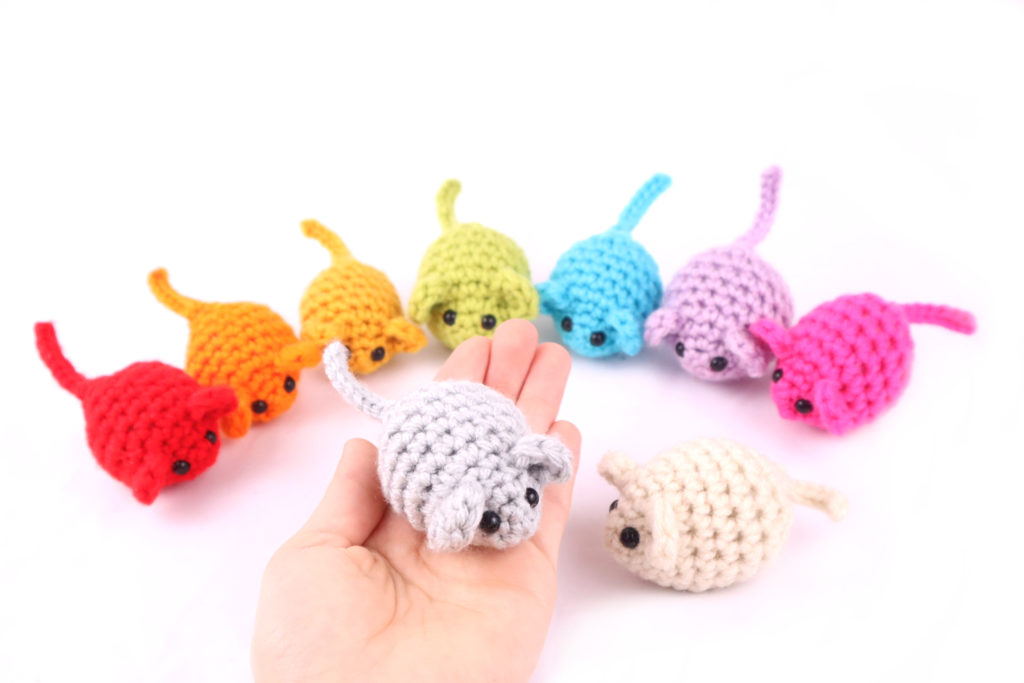
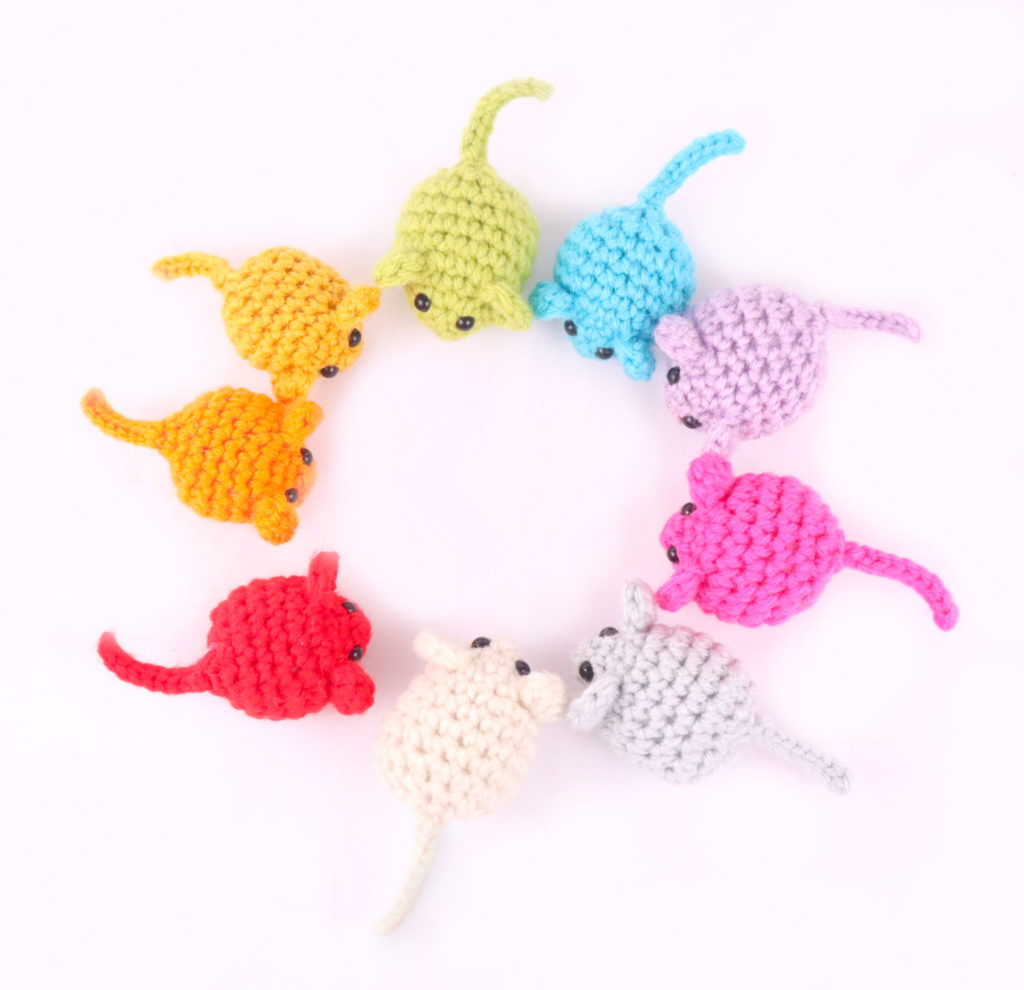

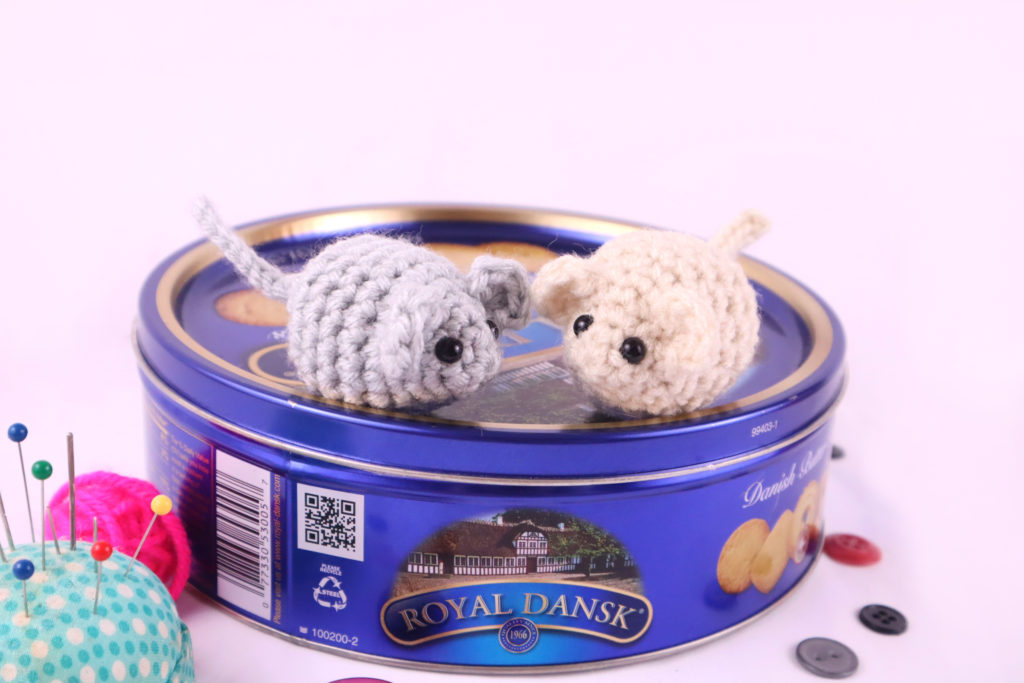
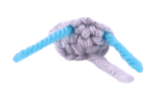
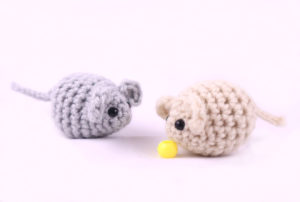
free mouse amigurumi crochet pattern
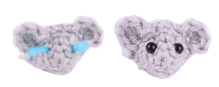
I know a lot of you love scraptacular patterns! (I made up that word. It’s supposed to sound like “spectacular” LOL). Since a lot of you love having scrap patterns, I knew I had to make a mouse eventually. So here’s a free mouse amigurumi crochet pattern! I hope it looks good! I’m really happy with how it came out. And if you didn’t notice, there’s no sewing needed! Everything is all made in one piece. I’ve been trying to make an effort to ditch sewing anytime possible. I know a lot of you dislike sewing!
This pattern has a lot of cute uses. For one, you can make a cat toy out of it. Just add in cat nip instead of stuffing! If you do this, definitely don’t add safety eyes in case your cat tries to eat the plastic eyes. With a lot of my scraptacular patterns, they make for awesome key chains! You could even set these mice around your town and let random people find it. 🙂 Or if you just need to get rid of some yarn that’s been sitting around for years (I’ve got some yarn guilty of this), just make some mice with this pattern!
If you guys have any ideas for future scraptacular patterns, please let me know. This year I’ve been making a big effort to make amigurumis you specifically requested! So trust me, all opinions are heard 🙂 . Maybe something for Spring would be a good idea… Scraptacular bees? Who knows, I’ll figure it out LOL! Enough of my babbling, I hope you enjoy this pattern. If you ever have any questions with this pattern, please just leave a comment or contact me! I’m always here to help 🥰 .
Print out this pattern – purchase the PDF version here!


LIMITED TIME: From Feb 28, 2021 – March 28, 2021:
Join the StringyDingDing Member’s Group and unlock this PDF pattern PLUS current and upcoming PDF patterns. Join now!

Supplies:
• Yarn colors in size 4/Medium Yarn…
Main Color for Entire Body
• 4mm Crochet Hook
• 6mm safety eyes
• Tapestry needle
• Scissors
• Stuffing
Additional Information:
• Difficulty: Intermediate
• Pattern is in US Terms
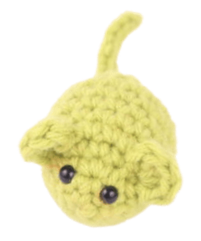
• Size: 5.5″ long from head to tail
Getting Started
This mouse is made all in one piece, no sewing required! After making 1 mouse you will easily understand how it’s made, making future mice super quick to make!
The only mildly difficult part of this pattern is understanding how to crochet behind the ears after we make them. If you are used to working in front and back loops, this should be no issue for you! If you are new to this, I provide many photos and explanations to help.
Recommended Yarns:
- Red Heart
- Big Twist
- I Love This Yarn!
Mouse:
Start in Main Color
Round 1: 6 Sc into a Magic Ring (6)
Round 2: *Sc* all around (6)
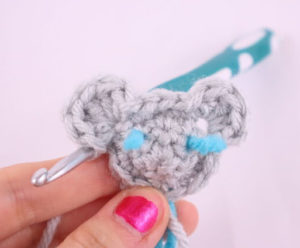
Now we will add eye stitch markers in Round 2. These will marks where to place the eyes later. Add a different colored stitch marker in the 3rd and 5th stitch in Round 2.
The eye markers will look like the photo below:
Round 3: *Inc* all around (12)
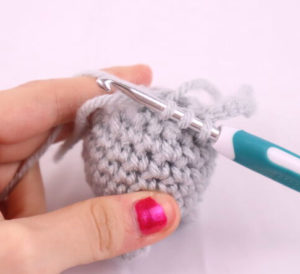
In the next round we will crochet the ears on. We do this by working in the front loop only when forming the ear
Round 4: Sc 5 (Pic 1). In the FLO SlSt in the next st (Pic 2), Make 4 Dc in that same st (Pic 3), SlSt in that same st. In BOTH loops, Sc in the next 3 st (Pic 4).
1.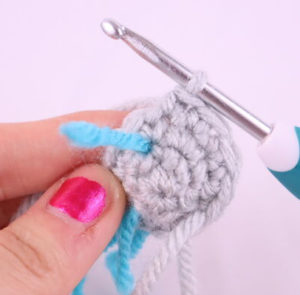 2.
2.
3. 4.
4.
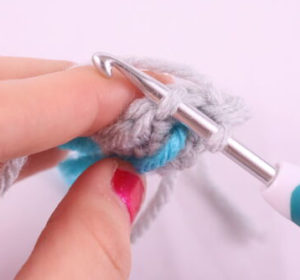
In the FLO SlSt in the next st, Make 4 Dc in that same st, SlSt in that same st (Pic 5). SlSt in the next 2 st
5.
(Stitch Count: 22 counting ALL stitches, or 12 stitches only counting the back loop left behind the ear, excluding the actual ear stitches.)
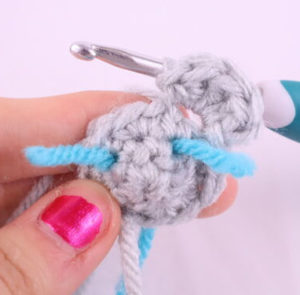
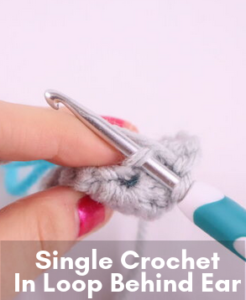
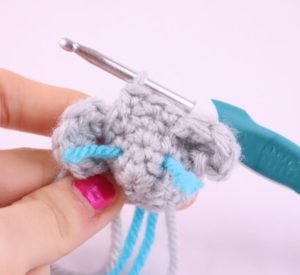
In the next round we will crochet behind the ear.
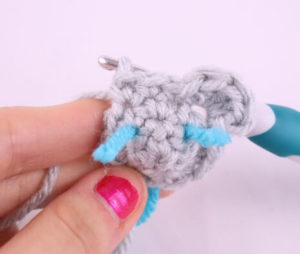
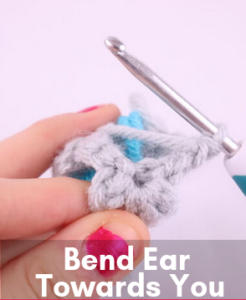
Round 5: *Inc, Sc* 2 times (Pic 1). Inc in the next st. Bend the ear towards you, this will expose the back loop stitch left from round 4 (Pic 2). Make 1 Sc into that back loop stitch (Pic 3-4).
1. 2.
2.
3. 4.
4.
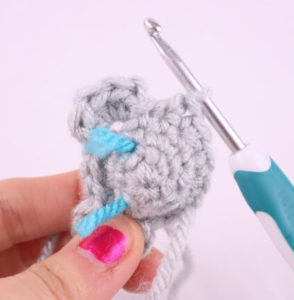
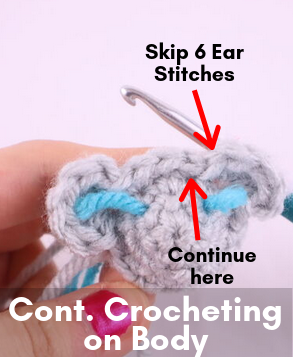
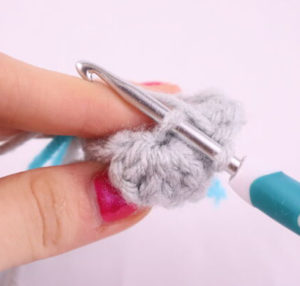
Now skip the 6 ear stitches (Pic 5). Inc in the next st (Pic 6-7). Sc in the next st, Inc in the next st. Bend the second ear towards you and Sc in the st behind the ear (Pic 9-10).
5. 6.
6. 
7. 8.
8.
9. 10.
10.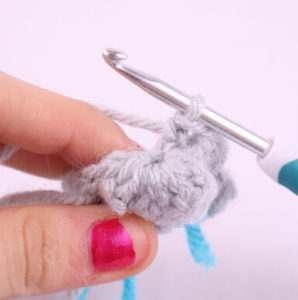
Skip the 6 ear stitches and Inc in the next st of the mouse. Sc in the last st (Pic 11-12). (18)
11. 12.
12.
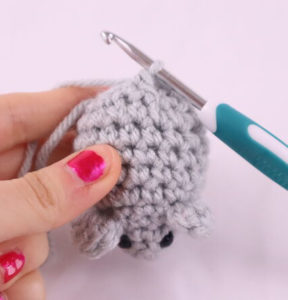
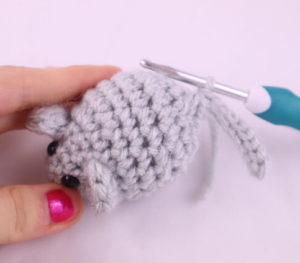
Add safety eyes in the marked areas now
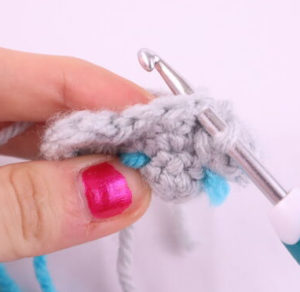
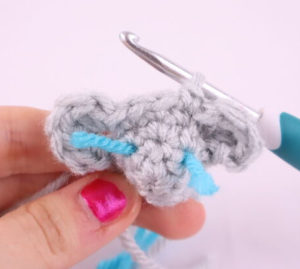
Now that we have made the ears, single crocheting around will be as usual!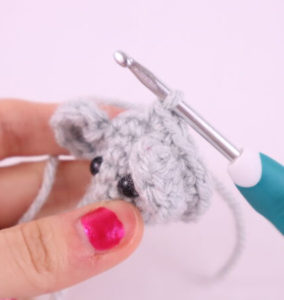
Round 6-9: *Sc* all around (18)
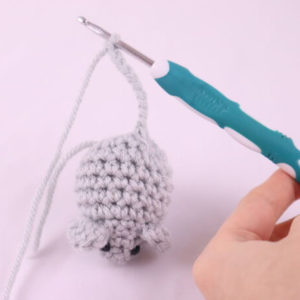
Round 10: *Dec, Sc* all around (12)
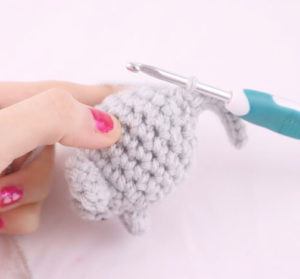
Stuff here. Continue adding stuffing after the next round.
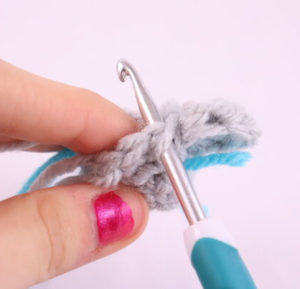
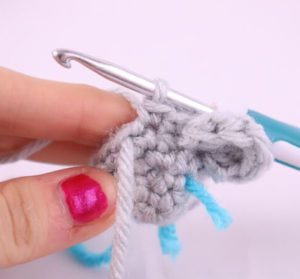
Round 11: *Dec* 5 times. Ch 10 (Pic 2), SlSt in the 2nd Ch from the hook. SlSt in the next 8 ch (Pic 3). Working back on the mouse, *Dec* 1 time (Pic 4-5). (15)
1. 2.
2.
3. 4.
4.
5. 6.
6.
Finish off, leaving a long tail of yarn for sewing. Sew the remaining stitches closed.
Done! If you made a mouse I would LOVE to see it! You can post a picture in the comments, or you can “try” it on Pinterest.


22 Comments
Hello, I like those tiny “scrap” patterns too..I usually turn them into pins that I put on my jean jacket, scarves, hats, or use them as ” backpack buddies” or “bag/purse buddies or pull zipper charms”!!! It just fun to put it anywhere where people can see them, and they ask me What is this? Where did you buy them? And I ytell them I did it myself!!!!😃
Its been a long time that I’m searching for cool small insects, to use them as I just said before. A good exemple us a fly (I think its from pokemon, I’m not sure…)
by Ami Amour. II did crochet it yet, but I will…If you can come with cool insects, like your Isopod ( Which I think is one of the Coolest and most underrated of your patterns!!!💚💚💚), or your scraptacular spiders, etc. It would be fun that you do one ” not everybody does” as a bumble bee or a a ladybug” we can find some everywhere, and except small detail, they all look the same to me!
Do maybe a mysterious scarabee , or a you could also invent a new insect!!!😃 Anyways, they were my suggestions, I just trust your creativity and your talent!!!
Hi Chantale, it’s so nice to hear from you!
You have such an awesome, creative mind. I never even thought of turning these tiny amigurumis into pins. Now I gotta try that! I’m sure you get so many people asking for you to make them their own pins/charms 😄 It’s so fun surprising people when you tell them you make your very own accessories!
Your ideas for tiny, detailed bugs is really cool. Especially now that it’s Spring time, it would be so perfect 🙂 Out of all of the ones you listed, the Scarabee has drawn my eye. Those things are scary, but would look so cool in crochet form! Thank you for always being so kind and encouraging. I love hearing your ideas, I gotta see if these crochet bugs can be made, wish me luck! ❤️❤️❤️
What an adorable pattern! My children with feline fur babies could use a couple of these stuffed with a touch of catnip. Thank you!
Hi Cher! Thank you so much, I am so happy you like this pattern 🙂 I know that any cat would appreciate some cat nip toys, I hope you make them some! Aren’t they the silliest when they’re chasing a toy for like an hour? 😄
Please feel free to let me know if you have any questions. I’m always happy to help!
As a fur mom, for the cat-nip toy idea, I have one serious suggestion. Only give them ones made of natural fibers. Natural fibers (wool, angora, cotton) are digestible. Acrylic, nylon, rayon, etc are not. We wound up spending three weeks and over $2900 to get one of my babies cured of an intestinal blockage. None of the toys I made were all that chewed up, but they still get stray fibers off of them into their mouths. Since they clean themselves they apparently can’t tell the fibers from their own fur. And they don’t always get everything when they do the ‘fur ball’ thing. I would also suggest using cotton balls to supplement the catnip stuffing instead of fiberfill, for the same reason.
It’s a wee bit crooked but not bad for my first attempt!!
Hi there, Tammy! Aww I think your mouse looks super cute, I can’t even tell if it’s crooked! The way you sewed on the eyes looks great, too 🙂 I hope you’ll make a few more of these mice! If you have a cat they’d probably appreciate a mouse toy 😆 Thank you so much for sharing your adorable work!
My 2nd attempt was much better than my first – thanks for a great pattern 😊
Hi Clare! This is so cute, I love the different colored tail 😍 I loved seeing this, thank you for sharing. You really did an awesome job!
My eldest daughter is a kindergarten teacher, She deals with the “First Day Separation” struggles every year. She used to draw a smiley on a scrap of fabric with a laundry marker and would give one to each child so they had a ‘friend’ in their pocket, and thereby would not be ‘alone while away from home. I had made the mouse and sent it to my daughter to see what she thought about it for next year. She loved it and put it on her desk at school.
This year, she had a new student join her class during the school year in progress. The little darling was absolutely heartbroken to be left at school while Daddy went away.
Well, it’s a good thing she had it on her desk because she was out of “Pocket Pals”. This little dear so desperately needed a pocket pal! So my daughter gave her the mouse. The tears dried up and the whining stopped after a few minutes, while she told her Pocket Pal all about her woes. I’m making bunches of these for her for next year to give to the kids. Thank you for such a cute and simple pattern!
P.S. My daughter suggested bright or neon colors so they can quickly find their Pocket Pal while in the rush to get ready for school in the morning!
So cute. I made a whole family in one afternoon. I love quick and easy projects to use up scraps and recover from a larger one. The fact that it’s all one piece is a bonus. I’m off to try more scraptacular no sew patterns. Thank you so much for sharing your talent with us. 💜🧶🐀
Thank you for this mouse pattern. It was really quick to make. I love the no sew things. I can make all the parts but putting them all together always turns into a complete disaster! ❤️❤️
Loved making these so quick to make
This is so cute! I’m going to make a scarf for my close friend who loves the nickname “Mouse” and sew it on as a little decor they can wear in the cold weather!
My first attempt turned out fine but my second was a little wonky. Love the pattern though so quick and easy.
Thanks for the free pattern!
I made this little friend and I love him!
I am hooked on these baby’s! I’ve made 12 out of 4mm yarn and then made 3 out of bernat blanket yarn! Love love love
I absolutely love making these. They are super easy. Still perfecting these but love them already. Thank you so much for the pattern.
This is the cutest, easiest no sew little darling. Thank you for sharing. Pictures just do not do thier cuteness justice
thanks for the pattern….however you lost me on round 5…I think because I’m left handed…I’m going to have modify it to work for me…
THESE GUYS ARE SO CUTE!! I made a whole ton of them and they make wonderful gifts for friends and family!! I also made a little cardboard cage for them 🙂 wonderful pattern!!