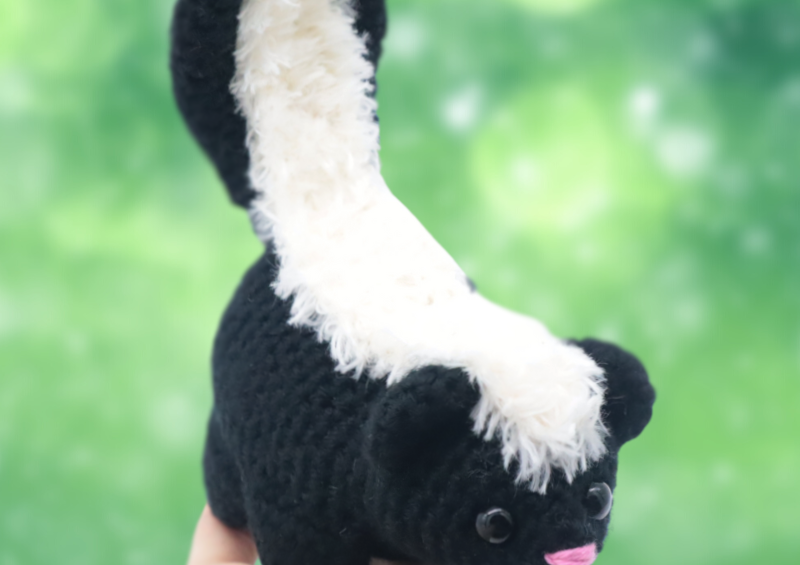
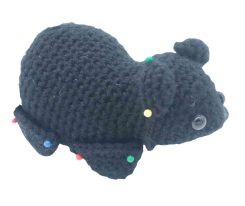
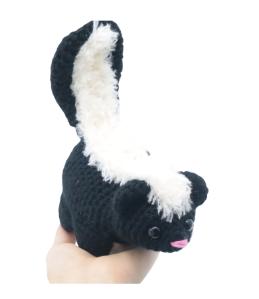
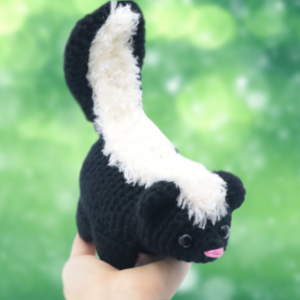
Skunk Amigurumi – Free Crochet Pattern

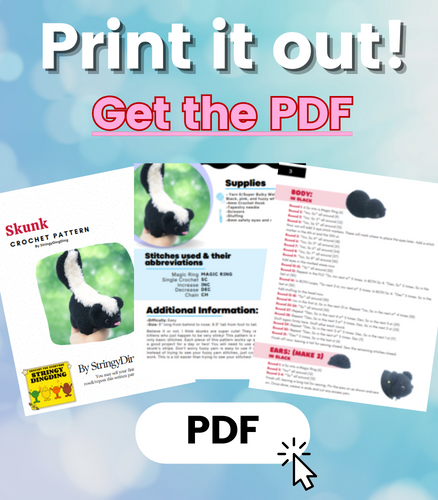
Print this pattern out – purchase the PDF version here!

 Supplies:
• Yarn 6/Super Bulky Weight Yarn in…
Black, pink, and fuzzy white yarn
•4mm Crochet Hook
•Tapestry needle
•Scissors
•Stuffing
•8mm safety eyes and a safety nose
Additional Information:
•Difficulty: Easy
•Size: 5″ long from behind to nose. 6.5″ tall from foot to tail.
Believe it or not, I think skunks are super cute! They remind me of little kittens who just happen to be very stinky! This pattern is very easy and uses only basic stitches. Each piece of this pattern works up quickly, making this a good project for a day or two! You will need to use a furry yarn for the skunk’s stripe. Don’t worry fuzzy yarn is easy to use if you know the trick! Instead of trying to see your fuzzy yarn stitches, just count and feel as you work. This is a lot easier than trying to see your stitches!
Body:
In Black
Round 1: 6 Sc into a Magic Ring (6)
Round 2: *Inc, Sc* all around (9)
Round 3: *Inc, Sc 2* all around (12)
Round 4: *Inc, Sc 3* all around (15)
Now we will add 2 eye stitch markers. These will mark where to place the eyes later. Add a stitch marker in the 6th st and the 12th st.
Round 5: *Inc, Sc 4* all around (18)
Round 6: *Inc, Sc 5* all around (21)
Round 7: *Inc, Sc 6* all around (24)
Round 8: *Inc, Sc 7* all around (27)
Round 9: *Inc, Sc 8* all around (30)
Add eyes in the marked areas now
Round 10-12: *Sc* all around (30)
Round 13: Repeat in the FLO *Sc, Inc next st* 5 times. In BOTH Sc 4. *Dec, Sc* 5 times. Sc in the last st (30)
Round 14: In BOTH Loops, *Sc next 2 st, Inc next st* 5 times. In BOTH Sc 4. *Dec* 5 times. Sc in the last st (30)
Add stuffing to the head now.
Round 15-18: *Sc* all around (30)
Round 19: Inc in the first st, Sc in the next 21 st. Repeat *Inc, Sc in the next st* 4 times (35)
Round 20-26: *Sc* all around (35)
Round 27: Repeat *Dec, Sc in the next 4 st* 5 times. Dec, Sc in the next 3 st (29)
Round 28: Repeat *Dec, Sc in the next 3 st* 5 times. Dec, Sc in the next 2 st (23)
Stuff again firmly here. Stuff after each round.
Round 29: Repeat *Dec, Sc in the next 2 st* 5 times. Dec, Sc in the next 1 st (17)
Round 30: Repeat *Dec, Sc in the next st* 5 times. Dec (11)
Round 31: *Dec* 5 times, Sc in the last st (6)
Finish off now, leaving a tail for sewing closed. Sew the remaining stitches closed.
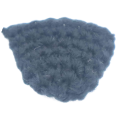
Ears: (Make 2)
In Black
Round 1: 6 Sc into a Magic Ring (6)
Round 2: *Inc* all around (12)
Round 3-4: *Sc* all around (12)
Finish off, leaving a long tail for sewing. Pin the ears on as shown and sew on. Once done, weave in ends and cut any excess yarn.
Arms: (Make 4)
In Black
Round 1: 6 Sc into a Magic Ring (6)
Round 2: *Inc, Sc in the next st* all around (9)
Round 3: *Inc, Sc in the next 2 st* all around (12)
Round 4: *Sc* all around (12)
Round 5: *Inc, Sc in the next 3 st* all around (15)
Round 6: *Sc* all around (15)
Finish off, leaving a long tail for sewing. Pin the arms on as shown and sew on, being sure to lightly stuff before fully sewing on. Once done, weave in ends and cut any excess yarn.
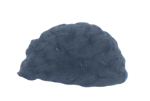
Tail:
In Black
Round 1: 6 Sc into a Magic Ring (6)
Round 2: *Inc* all around (12)
Round 3: *Inc, Sc in the next st* all around (18)
Round 4: *Inc, Sc in the next 2 st* all around (24)
Round 5-12: *Sc* all around (24)
Round 13: *Dec, Sc in the next 2 st* all around (18)
Round 14-17: *Sc* all around (18)
Round 18: *Dec, Sc in the next st* all around (12)
Round 19-21: *Sc* all around (12)
Finish off, leaving a long tail for sewing. Pin the tail on as shown and sew on. Once done, weave in ends and cut any excess yarn.
Fuzzy Stripe:
In White Yarn
Row 1: Ch 2. Sc 2 times in the 2nd Ch from the hook (2)
Row 2: Ch 1 and turn. Inc in the next 2 st (4)
Row 3-13: Ch 1 and turn. Sc in the next 4 st (4)
Row 14: Ch 1 and turn. Inc in the next st, Sc in the next 2 st, Inc in the next st (6)
Row 15-20: Ch 1 and turn. Sc in the next 6 st (6)
Row 21: Ch 1 and turn. Dec 1 time, Sc in the next 2 st, Dec 1 time (4)
Row 22-40: Ch 1 and turn. Sc in the next 4 st (4)
Row 41: Ch 1 and turn. Dec 2 times (2)
Row 42-43: Ch 1 and turn. Sc in the next 2 st (2)
Finish off, leaving a long tail for sewing. Pin the first row at the toy’s head, pin the piece along the back. The last row we made will be at the top of the tail. Once pinned on, sew or hot glue on. Weave in ends and cut any excess yarn.
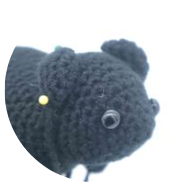
Nose:
In Pink
Insert needle with thread into the tip of the toy‘s nose area and pull needle out a few stitches to the left as shown. Repeat reinserting into the original spot and pulling out at the left 3-4 times. Once done, tie the tail end of yarn into a firm knot and bring the knot inside the toy to hide. This will secure the nose. Cut any excess yarn.
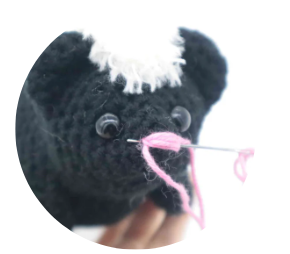
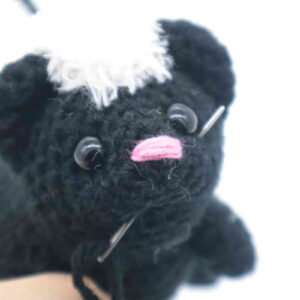
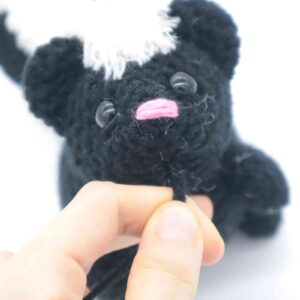
Face Shaping: (Optional)
In Black
Insert needle with black yarn into the middle bottom area of the toy’s mouth (Pic 1). Pull needle out to the right of the toy’s right eye (Pic 1).
1.
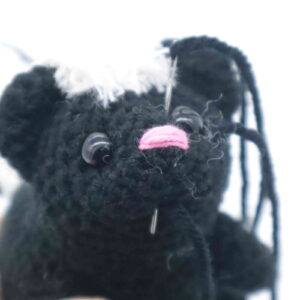
Reinsert needle to the left of the toy’s eye (Pic 2), and pull needle out one stitch to the left of the tail end of yarn (Pic 2).
2.
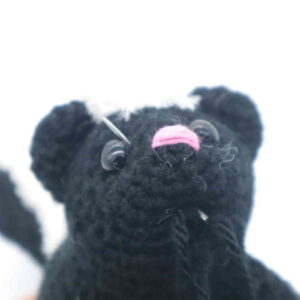
Reinsert needle one stitch to the right (Pic 3) and pull needle out to the right of the toy’s left eye (Pic 3).
3.
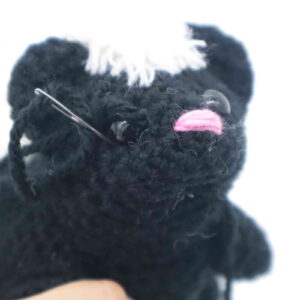
Reinsert needle to the left of the toy’s eye (Pic 4) and pull needle out where the tail end of yarn is at the bottom of the toy’s mouth (Pic 4).
4.
You will have two tail ends of yarn. Pull them at the same time to tighten the face shaping (Pic 5). Tie these ends of yarn together in a firm knot. Bring the knot inside he toy to hide. Cut any excess yarn.
5.
 Done! If you made a skunk, I would LOVE to see! You can show me by posting a picture in the comments section underneath this post 🙂


5 Comments
Could you please make a Vaporeon Pokémon pattern?
Love this pattern
How do you do a slip stich?
insert hook into next st yo and pull through both loops. hope that makes sense tell me if it doesn’t and i’ll try again. AB
A real fun and cute project, thank you!