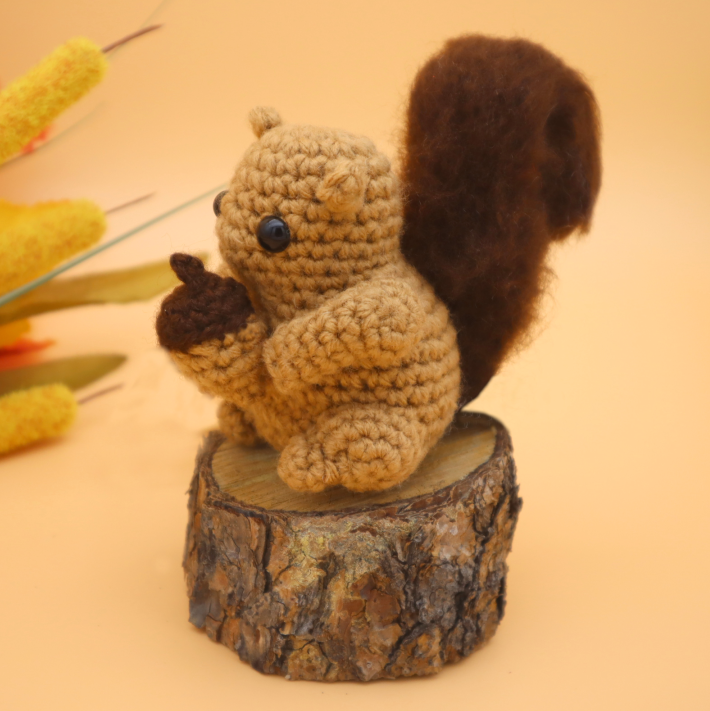
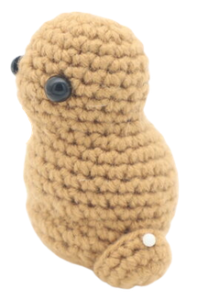
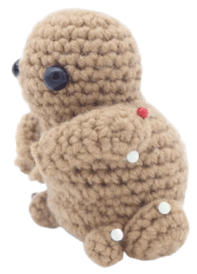
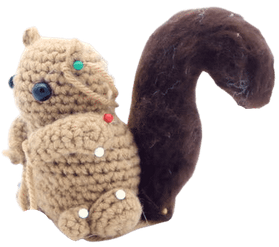
Squirrel Amigurumi – Free Crochet Pattern
Hello there! I’m really hoping you’ll like this free squirrel amigurumi crochet pattern. It officially feels like autumn, and when I think of the beautiful scenery that comes with this crisp weather, I always end up day dreaming about squirrels rummaging for acorns. They are SO cute and are high up on my list of “cutest animals to ever exist”. Don’t let their cute looks deceive you, though. Squirrels are known to be feisty 🙁
I hope you enjoy this pattern! Even though I’m releasing it during the fall season, this cute fella is a perfect project for any time of the year. I implemented some shaping of the body by placing increases and decreases in certain areas, so this pattern definitely requires some focus as you’re making it. Let’s get started with this squirrel crochet pattern!
Print this pattern out – purchase the PDF pattern here!
Supplies:
• Yarn 4/Medium Weight in…
Light brown and dark brown
•3mm Crochet Hook
•Tapestry needle
•Scissors
•Stuffing
•8mm safety eyes
•(Optional) Pet brush for brushing out tail
Additional Information:
To start this squirrel, we will first start by making the top of our head, then working our way down to the body. The head and body are made in one continuous piece. After this, we will make his legs, arms, and ears. Finally, we’ll make his bushy tail!
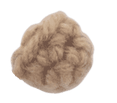
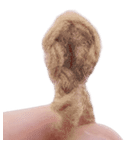
• Getting the bushy tail
The tail looks cute being bushy, but you can definitely keep it regular! If you want it to look furry, I recommend getting a pet brush to brush out the tail. I bought a pet brush at the Dollar Tree. To brush out the tail, just run the brush over the same area a number of times, and the fur will form. Repeat this all over the tail.
Head/Body:
Start in light brown
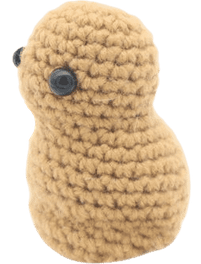
Round 1: 6 Sc into a Magic Ring (6)
Round 2: *Inc* all around (12)
Round 3: *Inc, Sc in the next st* all around (18)
Round 4-6: *Sc* all around (18)
Round 7: Sc in the next 6 st, Inc in the next st, Sc in the next 11 st (19)
Add an eye stitch marker into the 5th st and in the 10th st.
Round 8: Sc in the next 6 st. Inc in the next 2 st, Sc in the next 11 st (21)
Round 9: Sc in the next 6 st, Dec in the next 2 st, Sc in the next 11 st (19)
Round 10: Sc in the next 6 st, Dec 1 time, Sc in the next 6 st. Repeat *Inc in the next st, Sc in the next st* 2 times. Inc in the next st (21)
Round 11: Sc in the next st, Inc in the next st, Sc in the next 2 st. Repeat *Dec, Sc in the next 2 st* 2 times. Sc in the next st. Repeat *Inc, Sc in the next 2 st* 2 times. Inc in the next st, Sc in the next st (23)
Round 12: Sc in the next st, Inc in the next st, Sc in the next 14 st. Inc in the next st, Sc in the next 3 st, Inc in the next st, Sc in the next 2 st (26)
Round 13: Inc in the next st, Sc in the next 25 st (27)
Add the eyes into the marked areas now. Stuff the head firmly now.
Round 14-17: *Sc* all around (27)
Round 18: Sc in the next 8 st. SlSt in the next 9 st. Sc in the next 10 st (27)
Round 19: *Sc* all around (27)
Round 20: Repeat *Dec, Sc in the next st* 3 times. Sc in the next 7 st. Repeat *Dec, Sc in the next st* 3 times. Sc in the last 2 st (21)
Round 21: *Dec* in the next 3 st, Sc in the next 7 st, *Dec* in the next 3 st* Sc in the last 2 st (15)
Stuff the body firmly now. Continue stuffing after each round.
Round 22: *Dec, Sc in the next st* all around (10)
Round 23: *Dec* all around (5)
Finish off, leaving a tail for sewing. Sew the remaining stitches closed now. Weave in ends.
Sitting Legs: (Make 2)
Start in light brown
Round 1: 6 Sc into a Magic Ring (6)
Round 2: *Inc* all around (12)
Round 3-4: *Sc* all around (12)
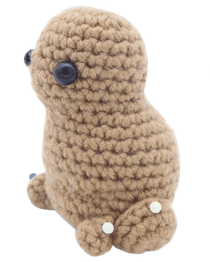
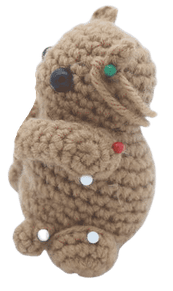
Finish off, leaving a long tail for sewing. Pin the leg onto the body as shown and sew on – be sure to firmly add stuffing before fully sewing closed. Weave in ends
Feet: (Make 2)
Start in light brown
Round 1: 6 Sc into a Magic Ring (6)
Round 2: *Sc* all around (6)
Pin the leg onto the body as shown and sew on – be sure to firmly add stuffing before fully sewing closed. Weave in ends.
Arms: (Make 2)
Start in light brown
Round 1: 6 Sc into a Magic Ring (6)
Round 2: *Inc* all around (12)
Round 3: *Sc* all around (12)
Round 4: In this round we will for the arm itself. Skip the next 6 st and Sc in the 7th st. Place your stitch marker in that first stitch made. We’ve created a new circle, and we will work within this circle to form the arm. Sc in the next 6 st. (7)
Round 5-7: *Sc* all around (7)
Finish off, leaving a long tail for sewing. Pin on as shown and sew on. Weave in ends.
Ears: (Make 2)
Start in light brown
Round 1: 6 Sc into a Magic Ring (6)
Finish off, leaving a long tail for sewing. Fold the ear in half and pin on as shown. Sew on and weave in ends.
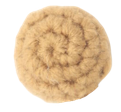
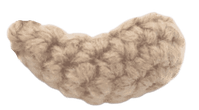
Tail:
Start in dark brown
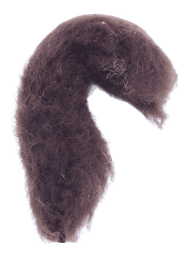
Round 1: 6 Sc into a Magic Ring (6)
Round 2: *Inc* all around (12)
Round 3: *Inc, Sc in the next st* all around (18)
Round 4-22: *Sc* all around (12)
Finish off, leaving a long tail for sewing
This step is optional: take a metal brush, such as a pet brush, and run the brush over the same area of the tail a number of times, and the fur will form. Repeat this all over the tail.
After this, pin the tail onto the butt of the squirrel. Sew on. Fold the tail over itself to make a curled tail. Weave the tail end of yarn to this area, and sew the curled tail area down. Once done, let’s secure the ends. tie the end end of yarn into a firm knot 2-4 times. Bring this knot into the toy’s tail to hide. Cut any excess yarn.
Acorn:
Start in dark brown
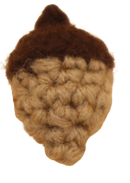
Round 1: 6 Sc into a Magic Ring (6)
Round 2: *Inc* all around (12)
Round 3: *Sc* all around (12)
Round 4: Change to light brown. In the BLO, *Dec, Sc in the next 2 st* all around (9)
Round 5-6: *Sc* all around (9)
Stuff the acorn now.
Round 7: *Dec* 4 times, Sc in the last st (5)
Finish off, leaving a long tail for sewing. Sew the remaining stitches closed. Place the tail end of yarn onto your sewing needle, then bring the yarn into the middle of the acorn. Using this yarn, we will later sew the acorn to the squirrel’s hands.
Acorn Stem:
Start in dark brown:
Round 1: Ch 3. Sc in the 2nd Ch from the hook, Sc in the next 2 st (3)
Finish off, leaving a long tail end of yarn. Place the stem onto the top middle area of the acorn and sew on. Weave in ends. Now place the acorn between the amigurumi squirrel’s hands and sew on. Weave in ends.

Done!


9 Comments
Question on the tail, row 4-22 shows a total stitch count of 18 however, the previous row 3 shows a total of 12. Are there some instructions missing or should rows 4-22 be 18 stitches each?
Scratch that row 3 is 18. 4-22 is 12 in the instructions.
I didn’t have the right kind of brush so I improvised and used a doll brush for the tail. Tomorrow I plan to go out and get the right kind of brush because it really brings up the wow factor on the squirrel. Thanks for the pattern, You write some of my favorites! I will have a video of me making this squirrel on my YouTube channel the first week in November, if you want to check it out! 😁❤️
Love all your critters, they are so cute! I had leftover fur yarn, so I used that on the chubby squirrel!
hey. is that toy next to the squirrel a curlie from tiny curl?. tiny curl is my second fav’ Amigurumi site…after stringydingding (good job on both toys buy the way)
Row 3 says 18 stitches. Rows 4-22 says 12 each but there’s no decrease from row 3 to 4. How did it go down from 18 to 12?
Yeah, I see that…makes no sense and I have no idea how others were able to finish it lol but I need instructions…I am a bit anal and have a hard time going off what I am to do! ~
Shouldn’t it actually be 24 in 3 – 22? Ugh I am a beginner again- been so long!
LOL NO it should NOT be 24~ Dang I need sleep! No decrease means it should be the same with no added which is 18 in 3-22 …hope she can help us!
You guys are over reacting