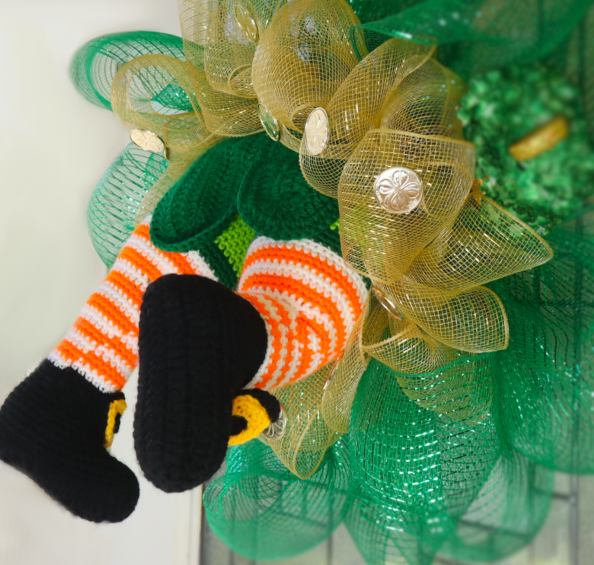
St. Patrick’s Day Leprechaun Stuck in Wreath – Free Crochet Pattern

Hello everyone! This week we’re releasing a super funny free crochet pattern – A leprechaun stuck in a wreath! This pattern makes for a fantastic door decoration during March. Don’t forget that there are two other variations of the “stuck in a wreath” collection – a witch and elf stuck in a wreath! If that sounds like something you’d like to make, check them out here.
Print this pattern out – purchase the PDF here!


 Supplies:
• Yarn 4/Medium Weight in…
Black, yellow, white, orange, green, and dark green
•4mm Crochet Hook
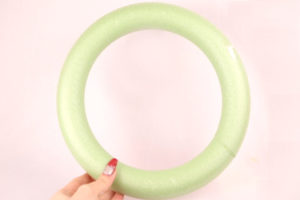
•10 inch foam wreath
•Tapestry needle
•Scissors
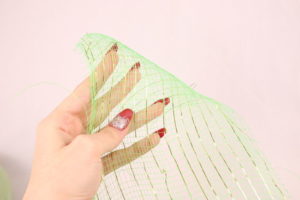
•Gold and Green Mesh
•Stuffing
•Gold coins for wreath (optional)
Additional Information:
Difficulty: Intermediate
• Before we get started…
You will need a wreath. I bought a foam wreath (10 inches) from Dollar Tree. However, a wire wreath is better suited for the frilly wreath we’ll be doing. There are video tutorials online showing how to put mesh around a wire wreath, but I will show you how I did mine with a foam wreath.
You’ll also need colorful mesh to go around the wreath. You can find mesh at Dollar Tree in the floral/craft/seasonal sections or Hobby Lobby in the floral section.
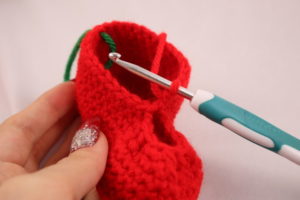
Shoe: (Make 2)
In Black
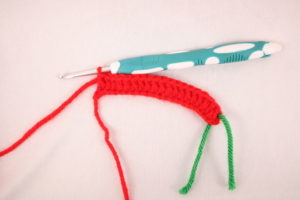
In round 1 we will make a foundation chain. This means we will make a chain, work down one side of the chain, then we turn to the other side of the chain and continue down that side. This will make a round. We are NOT turning the work and crocheting over the stitches we just made! That would be working a row.
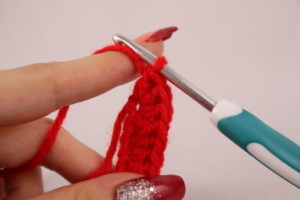
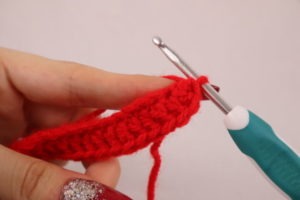
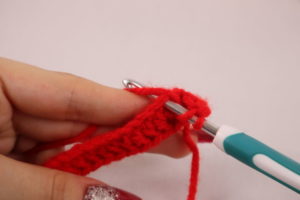
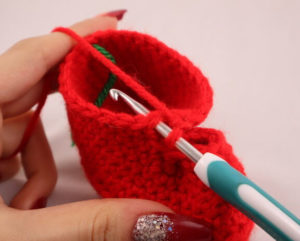
Round 1: Ch 22 (Pic 1). Dc in the 3rd Ch from the hook. Dc in the next 18 Ch (Pic 2). Dc 3 times in the last Ch (Pic 3). Now turn the chain to the opposite side, where we haven’t worked any double crochets yet (Pic 4). Dc in the next 18 st (Pic 5-6) (40)
1. 2.
2. 3.
3. 4.
4. 5.
5. 6.
6.
Round 2: *Inc, Dc in the next 4 st* 8 times (48)
 Round 2 will look like photo above
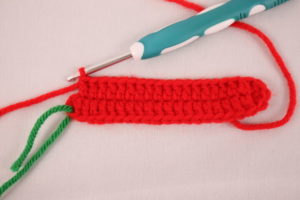
Round 3: In the BLO (Back Loop Only) Sc in the next 48 st (48)
Round 4-6: In BOTH Loops, *Sc* all around (48)
Round 7: Sc in the next 17 st, Repeat *Dec, Sc in the next st* 6 times. Sc in the next 13 st (42)
Round 8: Sc in the next 17 st, *Dec* 6 times, Sc in the next 13 st (36)
 Round 8 will look like photo above
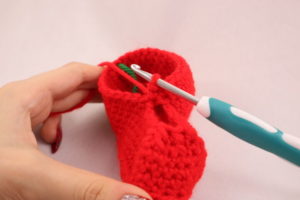
Round 9: Sc in the next 16 st (Pic 1). Count the next 9 st and Sc into that 9th st Pic 2-3. Sc in the next 11 st (Pic 4-5) (28)
1.
 2.
2. 3.
3.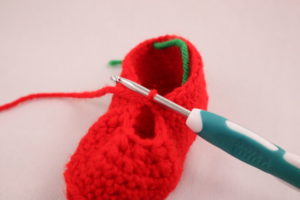 4.
4. 5.
5.
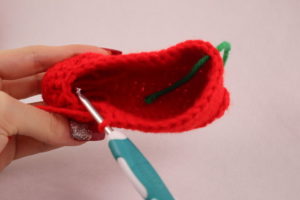
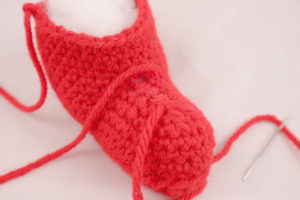
This will create a leg on the shoe. We will also have a hole near the front. Don’t worry, we will just sew it closed later!
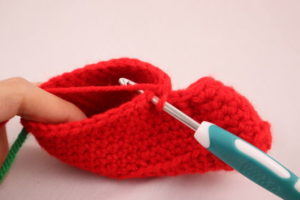
Round 10: Sc in the next 16 st (Pic 1). Sc in the next st that connects the shoe (Pic 2-3). Sc in the next 11 st (Pic 4) (28)
1. 2.
2. 3.
3. 4.
4.
Round 11-13: *Sc* all around (28)
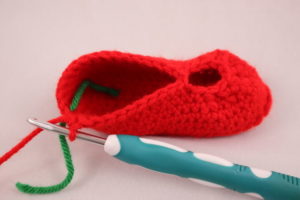
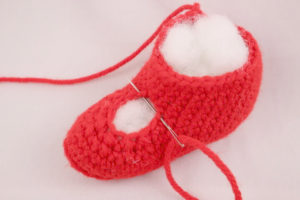
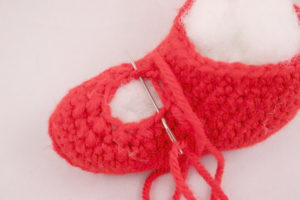
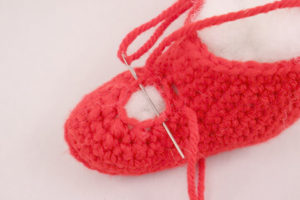
Stuff the shoe here (Pic 1). Now we will sew the front hole of the shoe closed. Take a needle with black yarn and sew through the stitches that align (Pic 2-5). Grab both tail ends of yarn and pull firmly at the same time to tighten the yarn. Now tie each tail end of yarn into firm knots and bring into the shoe to hide.
1. 2.
2. 3.
3. 4.
4. 5.
5.
Now we make the leg. It’s easy, but we make frequent color changes
Round 14: Change to White. In the BLO *Sc* all around (28)
Round 15: In BOTH Loops, *Sc* all around (28)
Round 16-17: Change to Orange. *Sc* all around (28)
Round 18-19: Change to White. *Sc* all around (28)
Round 20-21: Change to Orange. *Sc* all around (28)
Round 22: Change to White. *Sc* all around (28)
Round 23: Repeat *Inc, Sc 3* 7 times (35)
Round 24-25: Change to Orange. *Sc* all around (35)
Round 26-27: Change to White. *Sc* all around (35)
Round 28-29: Change to Orange. *Sc* all around (35)
Round 30-31: Change to White. *Sc* all around (35)
Round 32: Change to Orange. Repeat *Inc, Sc 4* 7 times (42)
Round 33: *Sc* all around (42)
Round 34: Change to White. *Inc, Sc 5* 7 times (49)
Round 35: *Sc* all around (49)
Round 36-37: Change to Orange. *Sc* all around (49)
Round 38-39: Change to White. *Sc* all around (49)
Round 40: Change to DARK Green. In the BLO. *Sc* all around (49)
Round 41-42: In BOTH Loops, *Sc* all around (49)
Round 43-47: Change to Light Green. *Sc* all around (49)
Round 48: In BOTH Loops, *Inc, Sc in the next 6 st* 7 times (56)
Here is where we will do a different pattern depending on which leg you’re making:
First leg, Round 49: In BOTH Loops, *Sc* all around (56)
Finish off the first leg here, keep the stitch marker in this leg, we will need it later. Stuff now.
Second leg, Round 49: Sc in the next 3 st (Pic 1). Take the first leg made and count 12 stitches to the right of the stitch marker (Pic 2).
1. 2.
2.
Next we will Sc going through BOTH the first and second leg.
While your hook is still in the working loop of the second leg, also insert your hook into that 12th stitch on the first leg (Pic 4). Now insert hook into the next stitch of the first leg (Pic 4). Yarn over and pull up a loop (Pic 5-7). You will have 2 loops on your hook (Pic 7).
3. 4.
4. 5.
5. 6.
6. 7.
7.
Yarn over and pull through both loops at the same time (Pic 8-10). This makes 1 single crochet.
8. 9.
9. 10.
10.
Continue working through BOTH the first and second leg. Sc in the next 10 st (Pic 11). Continuing on the second leg (the left leg), Sc in the next 42 st (Pic 12-15).
11. 12.
12. 13.
13. 14.
14. 15.
15.
Round 50: Sc in the next 3 st (Pic 1). Now we will work on the other leg. Sc in the next 45 st (Pic 2-3). Now we meet the other leg. Sc in the next 42 st (Pic 4-5) (90)
1. 2.
2. 3.
3. 4.
4. 5.
5.
Round 51-56: *Sc* all around (90)
Round 57-60: Change to Black. *Sc* all around (90)
Stuff here. Continue stuffing after each round.
Round 61: Change to Light Green. In the BLO, *Dec, Sc 7* 10 times (80)
Round 62: In BOTH Loops, *Dec, Sc 6* 10 times (70)
Round 63: *Dec, Sc 5* 10 times (60)
Round 64: *Dec, Sc 4* 10 times (50)
Round 65: *Dec, Sc 3* 10 times (40)
Round 66: *Dec, Sc 2* 10 times (30)
Round 67: *Dec, Sc 1* 10 times (20)
Round 68: *Dec* all around (10)
Round 69: *Dec* all around (5)
Finish off and sew closed.

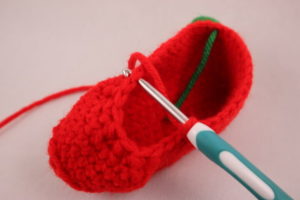
Shoe Tongue:
In black
Row 1: Ch 10. Skip the next 2 Ch, Dc in the 3rd Ch. Dc in the next 7 st (8)
Row 2: Ch 2 and turn. Dc 2 times in the first st, Dc 1 time in the next 6 st, Dc 2 times in the last st (10)
Row 3: Ch 2 and turn, Dc in the next 10 st (10)
Finish off, leaving a long tail for sewing. Pin the tongue on as shown and sew on. Once sewn, weave in ends.

Buckle:
In yellow
Row 1: Ch 21. Connect to first chain with a Single Crochet. Sc 2 times in that same st. Sc in the next 3 st. Sc 3 times in the next st. Sc in the next 5 st. Sc 3 times in the next st. Sc in the next 3 st. Sc 3 times in the next st. Sc in the next 6 st. Connect to first Sc with a SlSt. Finish off, leaving a long tail for sewing. Place the buckle on top of the shoe’s tongue and sew on. Once done, weave in ends.

Coat tails: (Make 2)
In dark green

Round 1: Ch 20. Skip the next 2 chains, Dc 3 times in the 3rd chain from the hook. Dc in the next 16 st. Dc 3 times last ch. Now working on the OTHER side of the chain, where we haven’t made any stitches yet, Dc in the next 16 st (38)
Round 2: Connect to the first dc with a SlSt. Ch 2 and turn. Dc in the next 17 st. Dc 2 times in each of the next 3 st. Dc in the next 17 st.
Round 3: Connect to the first dc with a SlSt. Ch 2 and turn. Dc in the next 17 st. Repeat *Dc 2 times in the next st, Dc 1 time in the next st* 3 times. Dc in the next 17 st
Coat Tail Assembly:
Line up both pieces together (Pic 1). Going through both stitches, sew them together for the next 10 stitches (Pic 2-3). After this, pin the coat tails to the back of the leprechaun as shown (Pic 4). Sew on and weave in ends.
1. 2.
2. 3.
3. 4.
4.
Leg Assembly:
To make the leprechaun look like he’s fallen in the wreath, we need to bend his leg slightly. Here is how we do that!
Insert needle with green yarn into the 5th white stripe on the right leg, and pull needle out a stitch to the left (Pic 1). Reinsert needle on the 3rd right stripe, lining up to where you’d previously pulled in and out the needle (Pic 2).
1. 2.
2.
Reinsert needle on the 5th white stripe, next to where you previously had sewed. Pull the needle out about 2 stitches to the left (Pic 3). Reinsert needle into the 3rd stripe, next to where you previously had sewed. Pull the needle out about 2 stitches to the left (Pic 4).
3. 4.
4.
Repeat this process until you’ve sewed the back of the leg. Pull both tail ends of yarn firmly at the same time to tighten the leg (Pic 5-6). Tie the ends of yarn into firm knots and weave in to hide.
5. 6.
6.
Wreath Assembly:
If you know how to make your own wreath, feel free to do so! However, this is how I did mine.
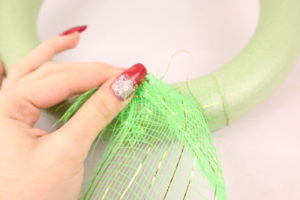
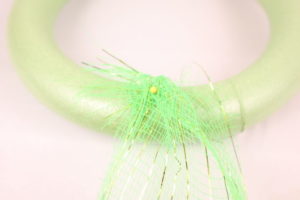
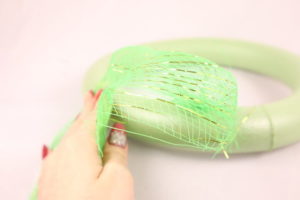
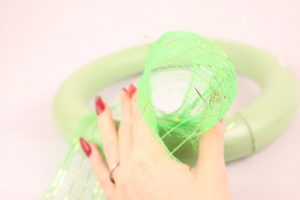
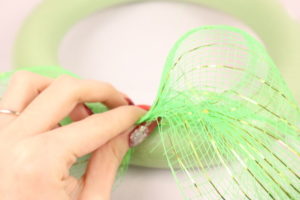
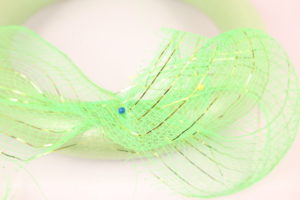
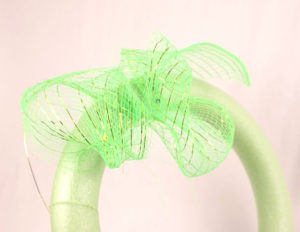
Take a wreath (I am using a foam wreath from Dollar Tree, they also have wire wreaths that are better suited for making frilly wreaths like this. I just didn’t know at the time that a foam wreath is more for flowers). Now take mesh and bunch it up at the very tip and place it on the wreath (Pic 3). Place a pin, greening pin, or zip tie to secure this mesh, try to make sure the pin goes through all layers of the mesh (Pic 4). Grab a section of the mesh and bring it to close to the previous mesh you pinned, it should make what looks like a loop (Pic 5-6). Bunch this area up close to the wreath (Pic 7), and place a pin or zip tie going through all layers of the mesh (Pic 8-9). Repeat this process all around. I did gold mesh first and closer to the center, then repeated the same process with green mesh at the outside of the wreath. When doing the green mesh, make your loops larger by using more mesh each time you grab a new section.
1. 2.
2. 3.
3. 4.
4. 5.
5. 6.
6. 7.
7. 8.
8. 9.
9. 10.
10.
Attaching leprechaun to wreath:
We will attach the elf to the wreath by tying him to it. This secures it really well and you won’t see the yarn as long as you use a color that matches your wreath’s mesh.
Do these steps only on the left and right side of the elf. You can also do these steps for the top of the elf if you need to secure it more.
Take a 8″ piece of yarn and place it on a needle (Pic 1). Bring this yarn through the wreath as shown (Pic 2-3). Insert the needle through the leprechaun and pull the needle out about 4 stitches to the left (Pic 4). This yarn through now be at the top of the wreath. Grab both tail ends of yarn and pull them very firmly so the leprechaun is close to the wreath (Pic 5). Tie these tail ends of yarn firmly together a few times and cut the excess yarn (Pic 5-6).
1. 2.
2. 3.
3. 4.
4. 5.
5. 6.
6. 7.
7.
If you want the leprechaun to be more secure, repeat this process on the sides of the leprechaun.
Done! If you made this wreath, I would LOVE to see yours! You can show me by posting a picture in the comments below this post.


