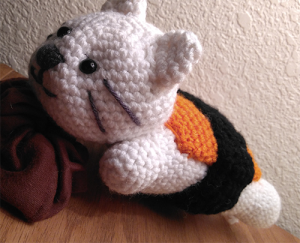
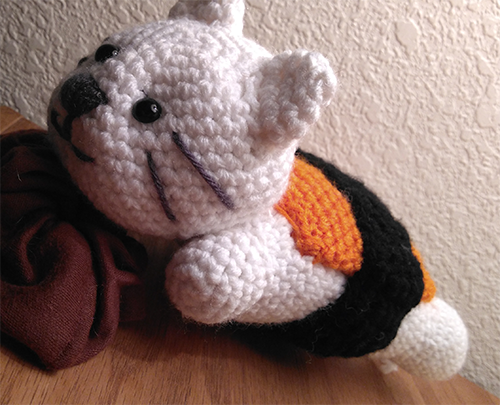
Sushi Cat
Long ago in the year of 2012 I was obsessed with making small clay figurines. The sushi cat was a popular figurine to make among the clay community. So now I decided to make it in crochet form! Now don’t go actually using cats in sushi. Please enjoy this free cat amigurumi crochet pattern!
Information before starting
Hook Size: 4.5mm
Materials: Tapestry Needle, Scissors, Safety Eyes, and Stuffing
I used Red Heart Super Saver for this project.
Head in white
Round 1: 6 sc in magic ring. (6 sc)
Round 2: *Inc* all around. (12 sc)
Round 3: *1 Sc, inc* all around (18 sc)
Round 4: *2 Sc, inc* all around (24 sc)
Round 5: *3 Sc, inc* all around (30 sc)
Round 6: *4 Sc, inc* all around (36 sc)
Round 7: *5 Sc, inc* all around (42 sc)
Round 8-14: Sc around. (42 sc)
Round 15: *5 Sc, dec* all around (36 sc)
Round 16: *4 Sc, dec* all around (30 sc)
Round 17: *3 Sc, dec* all around (24 sc)
Stuff at this point and add safety eyes.
Round 18: *2 Sc, dec* all around (18 sc)
Round 19: *1 Sc, dec* all around (12 sc)
Round 20: *Dec* all around. (6 sc)
Add any additional stuffing and sew closed. Sew on nose and whiskers.
Set aside for now.
Body:
In white, Ch 16
Round 1: Sc in 2nd Ch from hook. Add st marker to Sc just made. Sc in same St. Sc in next 13st, Sc 3 in next St. turn to other side of ch. Sc in next 14 st (32 sc)
Round 2: *Sc 3, inc* Repeat 8 times. (40 sc)
Round 3: Sc around in back loops only. (40 sc)
Round 4: Sc around in both loops. (40 sc)
Round 5-24 : Sc around. (40 sc)
Round 25: Sc around in back loops only. (40 Sc)
Stuff at this point
Round 26: *Sc 3, dec* around in both loops. (32 sc)
Finish off but leave a long tail for sewing. Add any additional stuffing before sewing closed. Now pin head to body.
Sushi Part:
Row 1: In orange, Ch 16 turn.Sc in 2nd Ch from hook. Sc in same St. Sc in next 13 St. Sc 3 in next St, turn to other side of ch. Sc in next 14 St. (32 sc)
Row 2: Sc around in back loops only. (32 sc)
Row 3: Sc around in both loops. (32 sc)
Row 4-20: Sc around. (32 sc)
Row 21: Sc to the corner of your work, then slst both stitches together to complete. I did not fill this part with stuffing but you can if you want. Leave long tail for sewing to body.
Seaweed:
Row 1: In black Ch 5. Sc in 2nd Ch from hook. Sc in next 4 st. (4)
Row 2: Repeat *Ch 1, turn, sc 4 across* until your seaweed reaches around the body of the cat.
Don’t finish off. Sc around entire seaweed to make sides look cleaner. Finish off.
Ears:
Round 1: In White, 6 Sc in magic ring (6 sc)
Round 2: Sc around. (6 sc)
Round 3: *Inc* all around (12 sc)
Round 4-5: Sc around (12 sc)
Finish off and pin onto head.
Legs (make 2):
Round 1: In white, 6 Sc in magic ring (6 sc)
Round 2: *Inc* all around (12 sc)
Round 3: *1 sc, inc* all around (18 sc)
Round 4-8: Sc around (18 sc)
Finish off and stuff. Pin to body.
Arms (make 2):
Round 1: In White, 6 Sc in magic ring. (6 sc)
Round 2: *inc* all around (12 sc)
Round 3-7: Sc around (12 sc)
Finish off and stuff. Pin to other side of body.
Tail:
Round 1: 6 sc in magic ring. (6 sc)
Round 2-11: sc around (6 sc)
Finish off and pin between legs.
Now you’re finished. Sew orange sushi to white body, sew on head, then ears, then arms and legs





7 Comments
Hi! I’m currently following this pattern but I’m not sure where the safety eyes should be put in since it’s not mentioned in the pattern. May I ask between which stitches I should be putting the safety eyes? Thanks! Can’t wait to finish this cute pattern!
Hi there! Thank you so much for your question 🙂 The best place to put the safety eyes in between rounds 6 and 7, 6 stitches apart from each other ❤️ Please feel free to let me know if I can help answer any other questions!
how large is the finished product?
I made the sushi part for now, it came out 10×8 cm.
I would guess the finished cat is around 20x10cm size, +/- 3-4cm
With 4.5mm hook and 50g/150m polyester yarn
I hope this helps a bit
Hi! Is the body in rows or rounds. Having a bit of trouble with this part 🙂 appreciate your help and this pattern 10/10
The pattern says it’s done in rounds! 😀
How many yarn did you use?