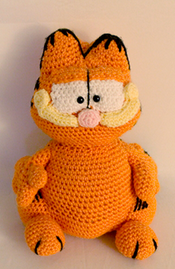

Garfield
This pattern is for intermediate crocheters.
Supplies: 5mm Crochet Hook, Stuffing, Scissors, Tapestry Needle, Safety Eyes
Yarn: 4/Medium Weight in Colors: Orange, Black, Light Yellow, Light Pink, and White
This pattern requires a bit of skill when it comes to sewing on/detail stitching.
You will need to cleanly attach his eyes and eyelids, sew his ears together once already sewn on the head, and sew his black hairs on his body.
The key is to sew slowly and undo anything that you find “messy” looking. It just takes practice!
Stuff gradually throughout making every piece.
Head (In Orange):
The head will work into the body, so it is all one piece.
Ch 11
Row 1: Sc in 2nd ch from loop, sc in next 9
Row 2: Turn to the other side of chain and sc in next 9 st
Row 3: Inc in next st and add st marker. Sc in next 10 st, inc in next st, sc in last 8 st (22)
Row 4: Sc, inc in next st, sc in next 11 st, inc in next st, sc in last 8 st (24)
Row 5: Sc 2, inc in next 2 st, sc in next 10 st, inc in next 2 st, sc in last 8 st (28)
Row 6: Sc 3, inc in next 3 st, sc in next 10 st, inc in next 3 st, sc in last 9 st (34)
Row 7: Sc 3, inc in next 4 st, sc in next 13 st, inc in next 4 st, sc in last 10 st (42)
Row 8: Sc around (42)
Row 9: Sc 4, inc in next 6 st, sc in next 15 st, inc in next 6 st, sc in last 11 st (54)
Row 10-15: Sc around (54)
Row 16: Sc 9, Inc in next 6 st, sc in next 22 st, inc in next 6 st, sc in last 11 st (66)
Row 17-20: Sc around (66)
Row 21: Sc 11, dec 6 times, sc in next 21 st, dec 6 times, sc in last 10 st (54)
Row 22: Sc 10, dec 4 times, sc in next 19 st, dec 4 times, sc in last 9 st (46)
Row 23: Sc around (46)
Row 24: Sc 10, dec 3 times, sc in next 17 st, dec 3 times, sc in last 7 st (40)
Row 25: Sc 10, dec 2 times, sc in next 16 st, dec 2 times, sc in last 6 st (36)
Row 26: Sc 4, dec in next st, sc in next 3 st, dec in next st, sc in next st, dec in next st, sc in next 2 st, dec in next st, sc in next 3 st, dec in next st, sc in next 3 st, dec in next st, sc in next 4 st, dec in next st, sc in last 2 st (29)
Row 27: *3 sc, dec twice* four times. Sc in last sc (21)
Row 28: *sc, inc* all around (31)
Row 29: *Sc 2, inc* all around (41)
Row 30: Sc 11, inc in next 8 st, sc 12, inc in next 8 st, sc 2 (57)
Row 31-32: Sc around (57)
Row 33: Sc 27, inc, sc 3, inc, sc 3, inc, sc 3, inc, sc 17 (62)
Row 34-42: Sc around (62)
Row 43: Sc 32, inc in next 12 st, sc 17 (73)
Row 44-47: Sc around (73)
Row 48: *Sc 6, dec twice* around, sc in last 3 (59)
Row 49: *Sc 5, dec twice* sc in last 5 (47)
Row 50: *4 sc, dec twice* around, Sc in last 7 (37)
Row 51: *4 sc, dec twice* around, Sc in last 5 (29)
Row 52: *3 sc, dec twice* around, Sc in last sc (21)
Row 53: *2 sc, dec twice* around, sc in last 3 sc (15)
Row 54: * 1 sc, dec twice* all around (9)
Row 55: Dec all around and sew shut
Ears (In Orange Make 2):
Row 1: 6 sc in magic ring (6)
Row 2: inc all around (12)
Row 3-4: Sc around (12)
Row 5: *inc, sc* around (18)
Row 6-7: Sc around (18)
Row 8: *inc, sc 2* around (24)
Row 9: *Inc, sc 3* around (30)
Row 10-11: Sc around (30)
Finish off
Stuff and sew onto head. After attaching to the head, closely sew the back part of the ears together, as it looks more like Garfield’s chubby ears rather than traditional separate cat ears.
Now in black, sew black fur lines on the ears
Eyes: (Make 1)
Row 1: In white, Ch 15
Row 2: Sc in 2nd chain from hook and sc across
Row 3-9: Turn, ch 1, sc across
Finish off
Eyelids in Orange: (Make 1)
Row 1: Ch 15
Row 2: Sc in 2nd chain from hook and sc across
Row 3-6: Sc across
The eyes require no stuffing. Pin down and sew on the white eyes first, then pin down and sew on the orange eyelids on top of the white eyes.
Then sew black yarn in the middle to separate the eyes. Pull the yarn a bit tight to make the eyes appear not flat.
Mouth:
(Make 2 in Light Yellow)
Row 1: Ch 13
Row 2: Sc all around on chain, both sides (23)
Row 3: Sc around (23)
Row 4: Sc around in back loops only (23)
Pin beneath eyes. Make sure there is room for the nose between the mouths.
Circle Cheek in Light Yellow:
(Make 2)
Row 1: 6 sc in magic ring (6)
Row 2: Inc all around (12)
Row 3: Sc around in back loop only (12)
Finish off and pin above the each mouth
Nose:
Row 1: In light pink, 6 sc in magic ring (6)
Row 2: Inc all around (12)
Row 3: Sc around in back loop only (12)
Finish off and pin between the two mouths.
Now make any placement adjustments and sew on once you’re happy with where everything is placed. Refer to my pictures to get best placement.
Sitting leg:
Row 1: In orange, Sc in magic ring (6)
Row 2: Inc all around (12)
Row 3: *Sc, inc* all around (18)
Row 4: *2 sc, inc* around (24)
Row 5: *3 sc, inc* around (30)
Row 6: *4 sc, inc* around (36)
Row 7-12: Sc around (36)
Finish off. Sew onto the body, more towards the front of the body so when you sit him down he will be stable. Stuff leg when it is close to being sewn shut.
It looks like this when pinned to the body.
Now we make the foot.
Foot:
(Make 2)
Row 1: In orange, 6 sc in magic ring (6)
Row 2: Inc all around (12)
Row 3: *sc, inc* around (18)
Row 4: *2 sc, inc* around (24)
Row 5-9: Sc around (24)
Row 10: *2 sc, dec* around (18)
Row 11: *Sc* around (18)
Row 12: *1 sc, dec* around (12)
Finish off. Sew closer to the body rather than too far out on the leg. This will help him be stable. Stuff when close to sewing shut.
Sew toe indentations in black.
Fingers:
(Make 8, 4 fingers for each hand. DO NOT finish off 4th finger)
Row 1: In orange, 6 sc in magic ring (6)
Row 2: Inc in next 3 st, sc in next 3 st (9)
Row 3-4: *Sc* around (9)
After making the 4th finger, DO NOT finish off. We will connect it to the other fingers to work into the hand.
Hand:
Row 1: Take 4th finger and sc into any stitch of the 2nd finger.
Row 2: Loosely slst into next 5 sc of the 2nd finger. Sc into any stitch of the 3rd finger.
Row 3: Sc in next stitch. Add a stitch marker to the sc you just made. Sc around. (27)
(Row 3 Note) We are working around all 3 fingers now. Check your stitch count after this row
Row 4: Dec, Sc next 11 st, Dec, Sc next 12 st (25)
Row 5: *Sc* around (25)
Row 6: Sc in next st, dec in next st, sc in next st, line up the thumb to the and and sc in both the hand and thumb at the same time. Sc in next st in thumb, dec 3 times on the thumb, Sc in the next st, working back on the hand sc in next st, *dec, sc* 6 times. (22)
Row 7: *Sc, dec* 7 times, sc in last sc. (15)
Row 8: *Sc, dec* 5 times (10)
Row 9: Repeat *Dec, Sc 3* 2 times (8)
Row 10-13: *Sc* around (8)

Tail:
Row 1: In black, 6 sc in magic ring (6)
Row 2: *Inc* all around (12)
Row 3: *Sc, inc* all around (18)
Row 4: *2 sc, inc* around (24)
Row 5: *3 sc, inc* around (30)
Row 6: *Sc* around (30)
Switch to orange
Row 7: *Sc* around (30)
Row 8: *Sc 5, dec* around. Sc in last 2 (26)
Row 9-11: *Sc* around (26)
Row 12: *4 sc, dec* around, sc in last 2 (22)
Row 13-15: *Sc* around (22)
Row 16: *3 sc, dec* around, sc in last 2 (18)
Row 17-21: *Sc* around (18)
Row 22: *2 sc, dec* around, sc in last 2 st (14)
Row 23-24: *Sc* around (14)
Finish off and stuff.
After sewing on all body pieces, sew on black fur. I looked at photos of Garfield on Google and my books for reference. He has these patches on his legs, sides of his head, his back, and end of his tail.
For reference


38 Comments
You are a New HERO. Thank you so much for doing Garfield, he has been my favorite character. My daughter loves him too. My goal is to work up to make Garfield as a newer Crotcher.
Your instructions are awesome. Thank you so much.
Wow that’s so nice, thank you!! He is so cute it’s hard not to love him 🙂 I would love if you made him, a great goal for a new crocheter! This is one of my older patterns so I will try to update it with pictures to make is easier to understand. Please let me know if you have any questions! <3
This is a great pattern but I have a question on the beginning row 3 you have, Inc in next st and add st marker. I’m a little confused about that, do you do the increase then add st. marker and finish the rest of row or place st marker after row 2 then start row 3
Hi Tonya, so for Row 3 you will ad a stitch marker to the first stitch of the increase you make. This will then mark the beginning of row 3, so you will continue with row 3 after adding the stitch marker. Please feel free to let me know if you have any questions!
Thankyou for free pattern of Garfield he looks great .I will have to try this.
Thank you! I’m glad you like it. If you try it, feel free to let me know if you have any questions!
where is he body patern?
Hi! The head pattern works into the body as one piece. Where the pattern states “head” you will eventually start working into the body.
Thank you. I should have read the pattern more carefully. Thank you, he is so cute.
No problem, I should have clarified it before the pattern starts 🙂 I’m glad you like him!
Thanks for creating this pattern! I’m just about to finish making Garfield’s head and body. Just wanted to ask, is the ‘bump’ towards the bottom of the body meant to be his belly or his bum?
Hi there, I’m glad you’re making garfield! The bump towards the end of the body makes the belly 🙂 If you have any other questions please feel free to let me know!
hola, me gusta mucho garfield, de que tamaño queda al final?
¡Hola! Garfield mide 12 “/ 32 cm de alto 🥰
Getting to the end of head and body do you put the face and safety eyes before you start stuffing
Hi Brenda! 🙂 I put the face on after stuffing. You won’t need to secure the safety eyes through the head, because we secure them to the crochet “eye whites” and sew the whites on to the face, so the safety eye washers will be hidden just from securing them to the eye white part. I hope that makes sense! Please let me know if you have any questions ❤️❤️
Oops I attached eyes not only to the white eyes but the head , they are now very secure. Oh well will learn for next time😁
Hi, thank you for the pattern! I was reading through it and counting the stitches(for my benefit), and on row 33 of the head/body the stitch count adds up to (61) not (62) I am going to sc 28 instead of 27. Will this work?
Hi Kathi, thank you for your kind comment! I’m sorry about that stitch count mishap 🙁 Go ahead and add that extra single crochet like you mentioned, it should then work out! I will fix that, thank you so much for letting me know 🙂
I’ve just finished this project requested by a friend. He’s totally cute. I made a few adjustments: I used a 4mm hook for tighter stitches (he’s still quite a large piece) and I stuffed the eyeballs and the mouth parts. Thanks for taking the time to share your pattern.
Hi Janie! Oh wow I LOVE seeing how cute your Garfield came out! He looks fantastic – there’s no mistaking that he’s Garfield! 😍 I hope your friend loves it. You are so kind to make that for them, this is definitely a bigger project so I’m sure you made it with lots of love ❤️❤️
Thank you for sharing a picture with me! He came out so cute 🙂
I made this for a friend’s birthday and the pattern worked incredibly well! I ran out of patience a little bit when attaching the facial features, but I think it gives him character lol! Thank you for this great pattern
Hi Jackie! Wow he turned out super cute! Just 1 look at him and you immediately recognize that it’s Garfield! 😁 I think his face looks amazing. To be honest, I wouldn’t have even guessed that you were running out of patience LOL! Thank you so much for sharing a picture, it brought a big smile to my face. I know your friend will have an amazing birthday thanks to you! ❤️
I would like to crochet a big Garf, but I dont understand the first steps. How goes it with the 11 chain till the third row? Whithout magic ring? I cant imagine and I cant start the head. 🥺
Thank you for the answer.
Maybe I’m missing it in the directions but could someone tell me the dimensions of this? How tall is he? How wide is he? Thanks in advance
Just finished Garfield. He was easy to make. I have 7 totes of yarn and no orange, so I used carrot.
I finished my Garfield! I used thicker yarn than the one you recommended, so it came out super larger lol! But I loved it! Thanks for the great pattern!
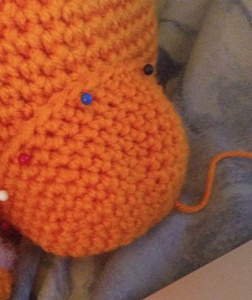
Is this how his head is supposed to look?
I’m wondering the same thing?
Yes! Trust the process. I thought I did something wrong, but it ended up working out beautifully!
Hello, how many grams of orange yarn did you use?
Hi! on row 3 it says to sc in last 8 st, but where are the other st? after going for 10 on the row, are the last 8 on the side of the row?
Thank you for this pattern! I think my Garfield turned out great.
THIS PATTERN IS NOT FREE. THERE ARE CONDITIONS. NOTHING IS FREE IF THERE ARE CONDITIONS TO IT.
I’m using it for free
I enjoyed this project tremendously!!! And it leads to a “spot on” version of Garfield! Thank you for sharing your pattern.
Is this crocheted in the round? I’m confused about the starting rows and how to transition
Never mind!! I figured it out was just confused with the first few rows but makes sense now 🙂