
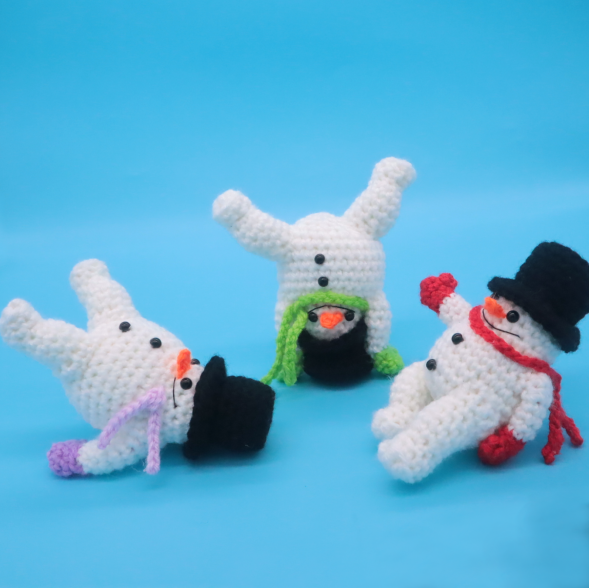
Tumbling Snowmen Amigurumi – Free Crochet Pattern
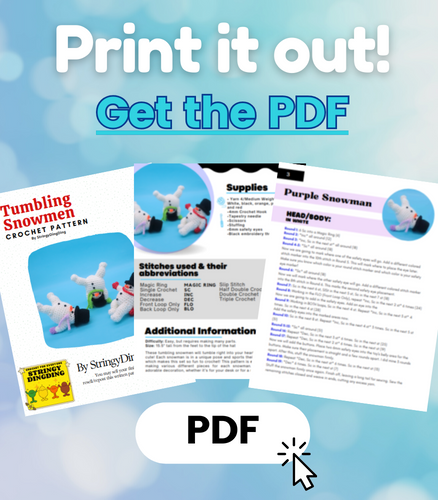
Print this pattern out – purchase the PDF here!

 Supplies:
• Yarn 4/Medium Weight Yarn in…
White, black, orange, purple, green, and red
•4mm Crochet Hook
•Tapestry needle
•Scissors
•Stuffing
•6mm safety eyes
•Black embroidery thread
Additional Information:
Difficulty: Easy, but requires making many parts.
Size: 15.5″ tall from the feet to the tip of the hat
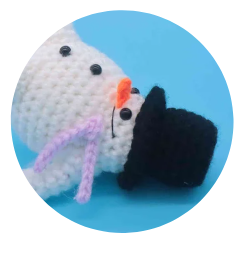
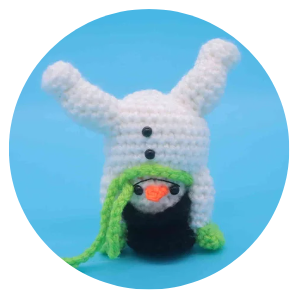
These tumbling snowmen will tumble right into your heart because they’re so cute! Each snowman is in a unique pose and sports their own unique colors, which makes this set so fun to crochet! This pattern is easy but does require making various different pieces for each snowman. They make for an adorable decoration, whether it’s for your desk or for a decorative counter!
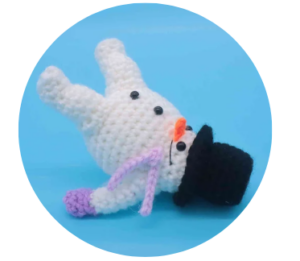
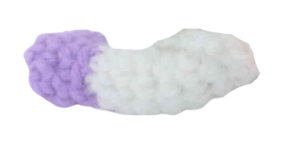
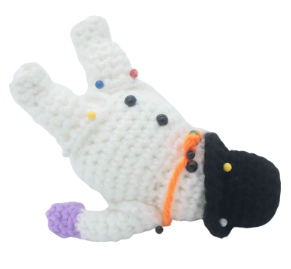
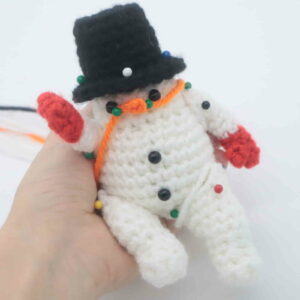
Purple Snowman:
Purple Snowman Head/Body:
In White
Round 1: 6 Sc into a Magic Ring (6)
Round 2: *Inc* all around (12)
Round 3: *Inc, Sc in the next st* all around (18)
Round 4-5: *Sc* all around (18)
Now we are going to mark where one of the safety eyes will go. Add a different colored stitch marker into the 10th stitch in Round 5. This will mark where to place the eye later. Make sure you know which color is your round stitch marker and which color is your safety eye marker!
Round 6: *Sc* all around (18)
Now we will mark where the other safety eye will go. Add a different colored stitch marker into the 8th stitch in Round 6. This marks the second safety eye placement.
Round 7: Sc in the next 6 st, SlSt in the next 5 st, Sc in the next 7 st (18)
Round 8: Working in the FLO (Front Loop Only), repeat *Inc, Sc in the next 2 st* 6 times (24)
Now we are going to add in the safety eyes. Add an eye into the
Round 9: Working in BOTH loops, Sc in the next 4 st. Repeat *Inc, Sc in the next 3 st* 4 times. Sc in the next 4 st (28)
Add the safety eyes into the marked areas now.
Round 10: Sc in the next 8 st. Repeat *Inc, Sc in the next 4 st* 3 times. Sc in the next 5 st (31)
Round 11-15: *Sc* all around (31)
Round 16: Repeat *Dec, Sc in the next 3 st* 6 times. Sc in the next st (25)
Round 17: Repeat *Dec, Sc in the next 2 st* 6 times. Sc in the next st (19)
Now we will add the buttons. Place two 6mm safety eyes into the toy’s belly area for the buttons. Make sure their placement is straight and a few rounds apart. I did mine 3 rounds apart. After this, stuff the snowman firmly.
Round 18: Repeat *Dec, Sc in the next st* 6 times. Sc in the next st (13)
Round 19: *Dec* 6 times. Sc in the next st (7)
Stuff the snowman firmly once again. Finish off, leaving a long tail for sewing. Sew the remaining stitches closed and weave in ends, cutting any excess yarn.
Purple Snowman Arms: (Make 2)
In Purple
Round 1: 6 Sc into a Magic Ring (6)
Round 2: *Sc* all around (6)
In the next round we will make the thumb.
Round 3: Sc in the next 2 st. Working in the Front Loop Only (FLO), make 3 Hdc into the next st. Remove your hook from the current stitch and insert the hook into the first Hdc. Now also insert hook into the third Hdc’s loop. Yarn over and pull through both loops. This will make the thumb. Working in BOTH loops, Sc in the next 3 st (6)
Round 4: Sc in the next 2 st, Sc in the next stitch, which will be in the back loop only behind the thumb. Working in BOTH loops, Sc in the next 3 st (6)
Round 5: Change to white. Working in the Back Loop Only, *Sc* all around (6)
Round 6-9: Working in BOTH loops, *Sc* all around (6)
In the next 2 rounds we will make slip stitches. Make these slip stitches loose! This is important so we can easily crochet back into that slip stitch.
Round 10: Inc in the next 3 st, loosely SlSt in the next 3 st (9)
Round 11: Repeat *Inc, Sc in the next st* 3 times. SlSt in the next 3 st (12)
Finish off, leaving a long tail for sewing. Pin the arms on. The snowman’s left arm will be attached to the body and positioned to support the snowman’s angled body. The right arm will not be attached to the body, and it will support his stabilization as pictures. You can sew on now, or sew on later after making the legs. Once done, weave in ends and cut any excess yarn.
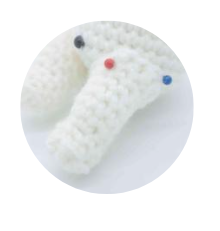
Purple Snowman Legs: (Make 2)
In White
Round 1: 6 Sc into a Magic Ring (6)
Round 2: Sc in the next 2 st. Hdc into the next st, Trc into that same st. Trc into the next st, Hdc into that same st. Sc in the next 2 st (8)
Round 3: Working in the Back Loop Only (BLO), *Sc* all around (8)
Round 4: Working in BOTH loops, Sc in the next 4 st, Dec 1 time, Sc in the next 2 st (7)
Round 5: Sc in the next 4 st, Inc in the next st, Sc in the next 2 st (8)
Round 6: Sc in the next 4 st, Inc in the next st, Sc in the next st, Inc in the next st, Sc in the next st (10)
In the next 2 rounds we will make slip stitches. Make these slip stitches loose! This is important so we can easily crochet back into that slip stitch.
Round 7-8: Loosely SlSt in the next 3 st. Sc in the next 7 st (10)
Round 9: *Sc* all around (10)
Round 10: *Sc* all around (10)
Round 11: Repeat *Inc, Sc in the next 2 st* 3 times. Sc in the next st (13)
Round 12: *Sc* all around (13)
Stuff the leg firmly now. Finish off, leaving a long tail for sewing. Pin the legs on as shown, making sure the legs make the snowman look as if he’s tumbled up!
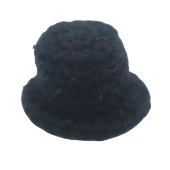
Purple Snowman Hat:
In Black
Round 1: 6 Sc into a Magic Ring (6)
Round 2: *Inc* all around (12)
Round 3: *Inc, Sc in the next st* all around (18)
Round 4: Working in the BLO, *Sc* all around (18)
Round 5-8: Working in BOTH loops, *Sc* all around (18)
Round 9: Working in the FLO, repeat *2 Dc into the next st, Dc in to the next st* all around (24)
Finish off, leaving a long tail for sewing Pin the hat onto the top of the snowman, making sure the hat is a little askew as shown. Sew on, making sure to add a small amount of stuffing before fully sewing on.
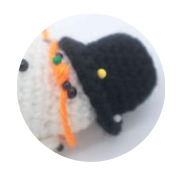
Purple Snowman Nose:
In Orange
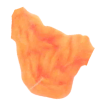
Row 1: Ch 3. SlSt in the 2nd Ch from the hook, Sc in the next st (2)
Finish off, leaving a long tail for sewing. Pin the nose on as shown and sew on. Once sewn on, weave in ends and cut any excess yarn.
Purple Snowman Scarf:
In Purple
Row 1: Ch 21. Finish off, leaving a long tail for sewing. Tie a knot in the middle using the scarf. This knot piece will be pinned onto the snowman as shown. Sew or hot glue in place.
Smile:
In Black Embroidery Thread
Using black embroidery thread, embroider on a smile. Make a half smile smirk for the purple snowman, since his smile is obscured by part of his belly.
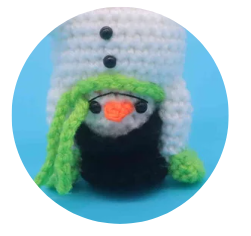
Green Snowman
Green Snowman Head/Body
In White
Round 1: 6 Sc into a Magic Ring (6)
Round 2: *Inc* all around (12)
Round 3: *Inc, Sc in the next st* all around (18)
Round 4-5: *Sc* all around (18)
Now we will mark where to place the safety eyes. Add a different colored stitch marker into the 8th and 11th stitch in Round 5. Later we will replace these eye stitch markers with safety eyes.
Round 6-7: *Sc* all around (18)
Round 8: Working in the Front Loop Only (FLO), repeat *Inc, Sc in the next 2 st* all around (24)
Round 9: Working in BOTH loops, Sc in the next 4 st. Repeat *Inc, Sc in the next 3 st* 4 times. Sc in the next 4 st (28)
Round 10-14: *Sc* all around (28)
Round 15: Sc in the next 5 st, *Dec* 6 times, Sc in the next 11 st (22)
Round 16: Sc in the next 3 st, *Dec, Sc in the next st* 5 times, Sc in the next 4 st (17)
Now we will add the buttons. Place two 6mm safety eyes into the toy’s belly area for the buttons. Make sure their placement is straight and a few rounds apart. I did mine 2-3 rounds apart. After this, stuff the snowman firmly.
Round 17: Repeat *Dec, Sc in the next st* 5 times. Dec 1 time (11)
Stuff the snowman firmly again. Stuff after the next round once again.
Round 18: *Dec* 5 times, Sc in the next st (6)
Finish off, leaving a long tail for sewing. Sew the remaining stitches closed and weave in ends. Cut any excess yarn.
Green Snowman’s Arms: (Make 2)
In Green

Round 1: 6 Sc into a Magic Ring (6)
Round 2: *Sc* all around (6)
In the next round we will make the thumb.
Round 3: Sc in the next 2 st. Working in the Front Loop Only (FLO), make 3 Hdc into the next st. Remove your hook from the current stitch and insert the hook into the first Hdc. Now also insert hook into the third Hdc’s loop. Yarn over and pull through both loops. This will make the thumb. Working in BOTH loops, Sc in the next 3 st (6)
Round 4: Sc in the next 2 st, Sc in the next stitch, which will be in the back loop only behind the thumb. Working in BOTH loops, Sc in the next 3 st (6)
Round 5: Change to white. Working in the Back Loop Only, *Sc* all around (6)
Round 6-10: Working in BOTH loops, *Sc* all around (6)
Finish off, leaving a long tail for sewing. Stuff the arms. Pin the arms onto the snowman. Make sure the hands of the snowman can meet the ground. Sew on. Once sewn on, weave in ends and cut any excess yarn.
Green Snowman’s Legs: (Make 2)
In White
Round 1: 6 Sc into a Magic Ring (6)
Round 2: Sc in the next 2 st. Hdc in the next st, Trc into that same st. Trc into the next st, Hdc into the next st. Sc in the next 2 st (8)
Round 3: Working in the BLO (Back Loop Only), *Sc* all around (8)
Round 4: Working in BOTH loops, Sc in the next 4 st, Dec 1 time, Sc in the next 2 st (7)
Round 5: Sc in the next 4 st, Inc in the next st, Sc in the next 2 st (8)
Round 6: Sc in the next 4 st. Repeat *Inc, Sc in the next st* 2 times (10)
In the next 2 rounds we will make slip stitches. Make these slip stitches loose! This is important so we can easily crochet back into that slip stitch.
Round 7-8: Loosely SlSt in the next 3 st. Sc in the next 7 st (10)
Round 9: *Sc* all around (10)
Round 10: Sc in the next st, Inc in the next 2 st, Sc in the next 3 st, Dec 2 times (10)
Finish off the first leg now. When making the second leg, do Round 11 for that second leg.
Round 11: *Sc* all around (10)
Stuff the leg firmly now. Finish off, leaving a long tail for sewing. Pin the first leg onto the right side of the snowman as shown and sew on. Pin the second leg onto the left side of the snowman as shown and sew on. Once done, weave in ends and cut any excess yarn.
Green Snowman’s Hat:
In Black
Round 1: 6 Sc into a Magic Ring (6)
Round 2: *Inc* all around (12)
Round 3: *Inc, Sc in the next st* all around (18)
Round 4: Working in the BLO, *Sc* all around (18)
Round 5-8: Working in BOTH loops, *Sc* all around (18)
Round 9: Working in the FLO, repeat *2 Dc into the next st, Dc in to the next st* all around (24)
Finish off, leaving a long tail for sewing Pin the hat onto the top of the snowman. Sew on, making sure to add a small amount of stuffing before fully sewing on.
Green Snowman’s Nose:
In Orange
Row 1: Ch 3. SlSt in the 2nd Ch from the hook, Sc in the next st (2)
Finish off, leaving a long tail for sewing. Pin the nose on as shown and sew on. Once sewn on, weave in ends and cut any excess yarn.
Green Snowman’s Scarf:
In Green
Row 1: Ch 53. Finish off, leaving a long tail for sewing. Place the scarf on the snowman and tie it around the snowman. Sew or hot glue in place. The scarf should drape down.
Green Snowman’s Smile:
In Black Embroidery Thread
Using black embroidery thread, embroider on a smile.
Red Snowman
Red Snowman Head/Body:
In White
Round 1: 6 Sc into a Magic Ring (6)
Round 2: *Inc* all around (12)
Round 3: *Inc, Sc in the next st* all around (18)
Round 4-5: *Sc* all around (18)
Now we will mark where to place the safety eyes. Add a different colored stitch marker into the 8th and 11th stitch in Round 5. Later we will replace these eye stitch markers with safety eyes.
Round 6-7: *Sc* all around (18)
Round 8: Working in the Front Loop Only (FLO), repeat *Inc, Sc in the next 2 st* all around (24)
Round 9: Working in BOTH loops, Sc in the next 4 st. Repeat *Inc, Sc in the next 3 st* 4 times. Sc in the next 4 st (28)
Round 10-14: *Sc* all around (28)
Round 15: Sc in the next 5 st, *Dec* 6 times, Sc in the next 11 st (22)
Round 16: Sc in the next 3 st, *Dec, Sc in the next st* 5 times, Sc in the next 4 st (17)
Now we will add the buttons. Place two 6mm safety eyes into the toy’s belly area for the buttons. Make sure their placement is straight and a few rounds apart. I did mine 2-3 rounds apart. After this, stuff the snowman firmly.
Round 17: Repeat *Dec, Sc in the next st* 5 times. Dec 1 time (11)
Stuff the snowman firmly again. Stuff after the next round once again.
Round 18: *Dec* 5 times, Sc in the next st (6)
Finish off, leaving a long tail for sewing. Sew the remaining stitches closed and weave in ends. Cut any excess yarn.
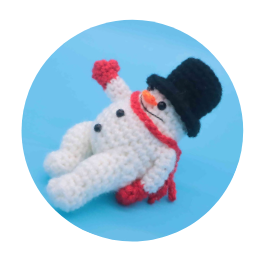
Red Snowman’s Left Arm: (Make 1)
In Red
Round 1: 6 Sc into a Magic Ring (6)
Round 2: *Sc* all around (6)
In the next round we will make the thumb.
Round 3: Sc in the next 2 st. Working in the Front Loop Only (FLO), make 3 Hdc into the next st. Remove your hook from the current stitch and insert the hook into the first Hdc. Now also insert hook into the third Hdc’s loop. Yarn over and pull through both loops. This will make the thumb. Working in BOTH loops, Sc in the next 3 st (6)
Round 4: Sc in the next 2 st, Sc in the next stitch, which will be in the back loop only behind the thumb. Working in BOTH loops, Sc in the next 3 st (6)
Round 5: Change to white. Working in the Back Loop Only, *Sc* all around (6)
Round 6-9: Working in BOTH loops, *Sc* all around (6)
Finish off, leaving a long tail for sewing. Pin the arm onto the left side of the snowman. The left arm will be aiming upwards as shown. Sew on. Once done, weave in ends and cut any excess yarn.
Red Snowman’s Right Arm: (Make 1)
In Red
Round 1: 6 Sc into a Magic Ring (6)
Round 2: *Sc* all around (6)
In the next round we will make the thumb.
Round 3: Sc in the next 2 st. Working in the Front Loop Only (FLO), make 3 Hdc into the next st. Remove your hook from the current stitch and insert the hook into the first Hdc. Now also insert hook into the third Hdc’s loop. Yarn over and pull through both loops. This will make the thumb. Working in BOTH loops, Sc in the next 3 st (6)
Round 4: Sc in the next 2 st, Sc in the next stitch, which will be in the back loop only behind the thumb. Working in BOTH loops, Sc in the next 3 st (6)
Round 5: Change to white. Working in the Back Loop Only, *Sc* all around (6)
Round 6-8: Working in BOTH loops, *Sc* all around (6)
Round 9: SlSt in the next st. Make 2 Hdc in each of the next 3 st, Sc in the next st, SlSt in the next st (9)
Round 10: SlSt in the next st, Hdc in each of the next 6 st, Sc in the next st, SlSt in the next st (9)
Finish off, leaving a long tail for sewing. Pin the arm onto the right side of the snowman. The right arm will be attached to the snowman’s body and as shown and slightly under the body. Sew on. Once done, weave in ends and cut any excess yarn.
Red Snowman’s Left Leg: (Make 1)
In White
Round 1: 6 Sc into a Magic Ring (6)
Round 2: Sc in the next 2 st. Hdc in the next st, Trc into that same st. Trc into the next st, Hdc into the next st. Sc in the next 2 st (8)
Round 3: Working in the BLO (Back Loop Only), *Sc* all around (8)
Round 4: Working in BOTH loops, Sc in the next 4 st, Dec 1 time, Sc in the next 2 st (7)
Round 5: Sc in the next 4 st, Inc in the next st, Sc in the next 2 st (8)
Round 6: Sc in the next 4 st. Repeat *Inc, Sc in the next st* 2 times (10)
In the next 2 rounds we will make slip stitches. Make these slip stitches loose! This is important so we can easily crochet back into that slip stitch.
Round 7-8: Loosely SlSt in the next 3 st. Sc in the next 7 st (10)
Round 9: *Sc* all around (10)
Round 10: Sc in the next st, Inc in the next 2 st, Sc in the next 3 st, Dec 2 times (10)
Round 11: *Sc* all around (10)
Stuff the leg firmly now. Finish off, leaving a long tail for sewing. Pin the leg onto the left side of the snowman as shown and sew on. Once done, weave in ends and cut any excess yarn.
Red Snowman’s Right Leg: (Make 1)
In White
Round 1: 6 Sc into a Magic Ring (6)
Round 2: Sc in the next 2 st. Hdc in the next st, Trc into that same st. Trc into the next st, Hdc into the next st. Sc in the next 2 st (8)
Round 3: Working in the BLO (Back Loop Only), *Sc* all around (8)
Round 4: Working in BOTH loops, Sc in the next 4 st, Dec 1 time, Sc in the next 2 st (7)
Round 5: Sc in the next 4 st, Inc in the next st, Sc in the next 2 st (8)
Round 6: Sc in the next 4 st. Repeat *Inc, Sc in the next st* 2 times (10)
In the next 2 rounds we will make slip stitches. Make these slip stitches loose! This is important so we can easily crochet back into that slip stitch.
Round 7-8: Loosely SlSt in the next 3 st. Sc in the next 7 st (10)
Round 9: *Sc* all around (10)
Round 10: Repeat *Inc, Sc in the next 2 st* 3 times. Sc in the next st (13)
Round 11: Sc in the next 7 st, Dc in the next 6 st (13)
Round 12: Sc in the next st, SlSt in the next 6 st.
Stuff the leg firmly now. Finish off, leaving a long tail for sewing. Pin the leg onto the right side of the snowman as shown and sew on. Once done, weave in ends and cut any excess yarn.
Red Snowman’s Hat:
In Black
Round 1: 6 Sc into a Magic Ring (6)
Round 2: *Inc* all around (12)
Round 3: *Inc, Sc in the next st* all around (18)
Round 4: Working in the BLO, *Sc* all around (18)
Round 5-8: Working in BOTH loops, *Sc* all around (18)
Round 9: Working in the FLO, repeat *2 Dc into the next st, Dc in to the next st* all around (24)
Finish off, leaving a long tail for sewing Pin the hat onto the top of the snowman. Sew on, making sure to add a small amount of stuffing before fully sewing on.
Red Snowman’s Nose:
In Orange
Row 1: Ch 3. SlSt in the 2nd Ch from the hook, Sc in the next st (2)
Finish off, leaving a long tail for sewing. Pin the nose on as shown and sew on. Once sewn on, weave in ends and cut any excess yarn.
Red Snowman’s Scarf:
In Red
Row 1: Ch 48. Finish off, leaving a long tail for sewing. Place the scarf around the snowman. Tie the scarf around the snowman’s neck, the knot part being at the back of the snowman. Sew or hot glue on.
Red Snowman’s Smile:
In Black Embroidery Thread
Using black embroidery thread, embroider on a smile.
 Done! If you made these tumbling snowmen, I would LOVE to see! You can show me by posting a picture in the comments section below 🙂


3 Comments
Hello, I’m working on purple snowman and I’m not sure where to attach is right arm. The directions say not to attach to the body and to use it as stabilization as in the pictures but his right arm can’t be seen in the pictures! Is there anyway we can get a picture of his right side so I know how to correctly position it?
I reversed the order of Slip Stitches and Half Double Crochet and attached the arm last.
Oops. reversed the order of slip stitches and single crochet in Rounds 10 and 11 of the 2nd arm, not Half Double Crochet.