
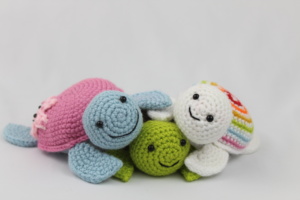
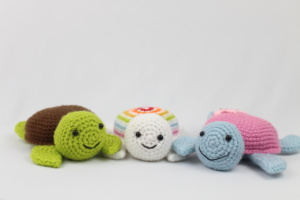
Free Crochet Pattern!
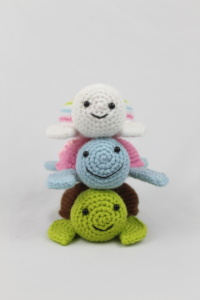
Amigurumi Turtle
Purchase the PDF version here.
Supplies:
4mm Hook, 6mm Safety Eyes, Black Embroidery Thread, Tapestry Needle, Stuffing, Scissors
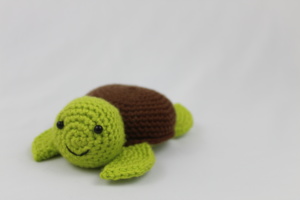
Yarn Used for Basic Turtle: Green, Brown, and Orange
Additional Information:
There is a baby turtle version and a mommy turtle version. The baby is smaller and the mommy is bigger. For colors, use any desired colors.
“Shell Color” refers to the color you want to use for the shell.
“Skin Color: refers to the color you want the turtles skin to be.
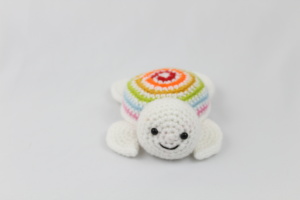
For the rainbow Baby Turtle shell, start with White and alternate between white and rainbow colors. Use just white for bottom shell.
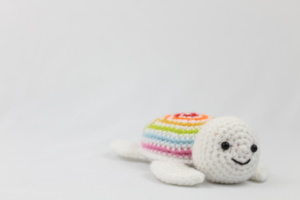
Baby Turtle
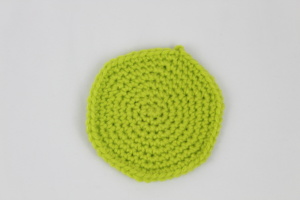
Top Shell

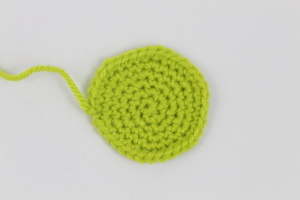
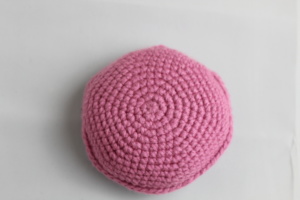
Round 1: In Shell Color, 6 Sc in Magic Ring (6)
Round 2: *Inc* all around (12)
Round 3: *Inc, Sc* all around (18)
Round 4: *Inc, 2 Sc* all around (24)
Round 5: *Inc, 3 Sc* all around (30)
Round 6: *Inc, 4 Sc* all around (36)
Round 7: *Inc, 5 Sc* all around (42)
Round 8: *Inc, 6 Sc* all around (48)
Round 9: *Inc, 7 Sc* all around (54)
Round 10-13: *Sc* all around (54)
Finish off.
Bottom Shell
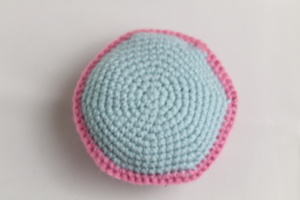
Round 1: In Skin Color, 6 Sc in Magic Ring (6)
Round 2: *Inc* all around (12)
Round 3: *Inc, Sc* all around (18)
Round 4: *Inc, 2 Sc* all around (24)
Round 5: *Inc, 3 Sc* all around (30)
Round 6: *Inc, 4 Sc* all around (36)
Round 7: *Inc, 5 Sc* all around (42)
Round 8: *Inc, 6 Sc* all around (48)
Round 9: *Inc, 7 Sc* all around (54)
Finish off. Now refer to Note/Assembly.
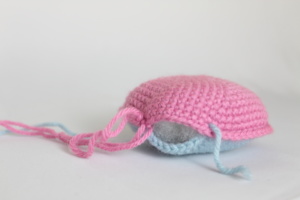
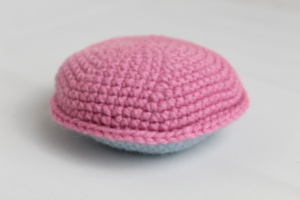
Note: The bottom shell will appear smaller than the top shell. That’s fine, this happens because we single crocheted a few extra rounds on the top shell and not the bottom shell. Since the number of stitches is the same, the shells will line up perfectly when you Sc them together.
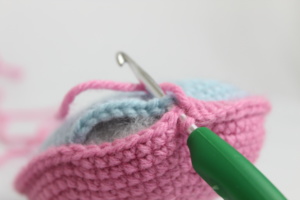
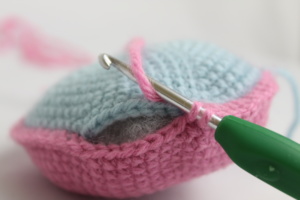
Assembly:
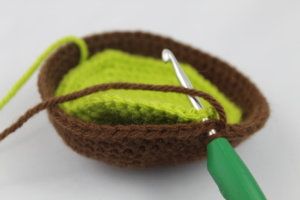
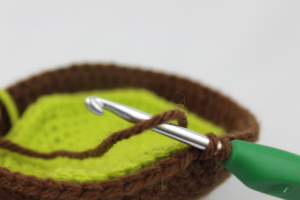
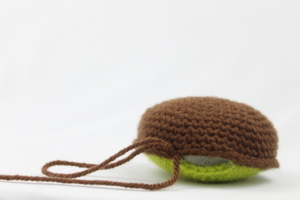
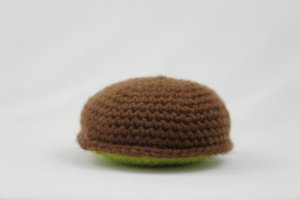
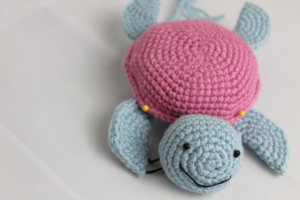
Line top shell up to the bottom shell. Sc both together, making sure the stitches line up.
Stuff before closing. Finish off.
Flippers: (Make 4)


Round 1: In Skin Color, 6 Sc in Magic Ring (6)
Round 2: *Inc* all around (12)
Round 3: *Inc, Sc* all around (18)
Round 4: *Inc, 2 Sc* all around (24)
Round 5: *Inc, 3 Sc* all around (30)
Round 6: *Inc, 4 Sc* all around (36)
Finish off. Fold in half and sew closed.
Flipper Assembly:
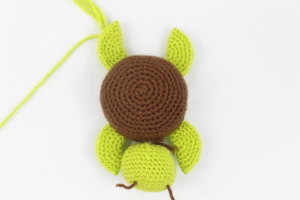
Once all four flippers are sewed shut, pin the flippers as shown.
Head:
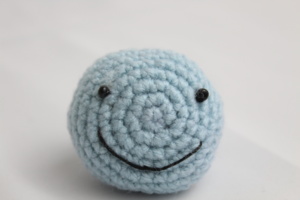
Round 1: In Skin Color, 6 Sc in Magic Ring (6)
Round 2: *Inc* all around (12)
Round 3: *Inc, Sc* all around (18)
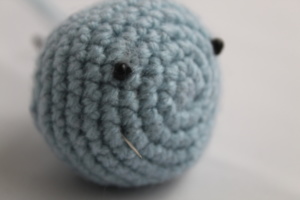
In next round we will place different colored stitch markers to indicate where to place your safety eyes.
Round 4: *Inc, 2 Sc* 1 time. Inc in next st, Sc in next 2 st. Add different colored St marker to Sc just made. *Inc, 2 Sc* 1 time. Inc in next st, Sc in next 2 st. Add different colored st marker to Sc just made. *Inc, Sc in next 2 st* 2 times (24)
Round 5: *Inc, 3 Sc* all around (30)
Round 6: *Inc, 4 Sc* all around (36)
Round 7-9: *Sc* all around (36)
Round 10: *Dec, 4 Sc* all around (30)
Round 11: *Sc* all around (30)
Round 12: *Dec, 3 Sc* all around (24)
Round 13: *Dec, 2 Sc* all around (18)
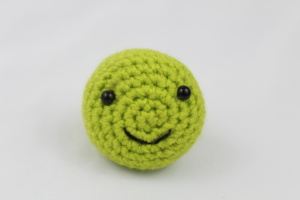
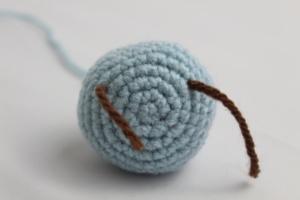
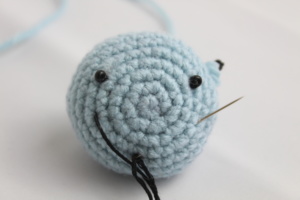
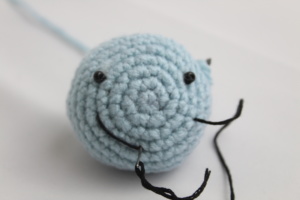
Apply safety eyes and remove the safety eye markers. Sew on smile. Stuff here.
Round 14: *Dec, 1 Sc* all around (12)
Round 15: *Dec* all around (6)
Stuff any additional stuffing and finish off. Sew closed.
Head Assembly:
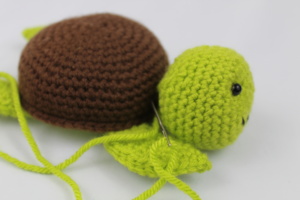
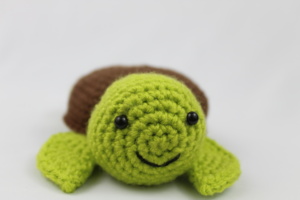
Place head between to fins. Pin in place and sew on.
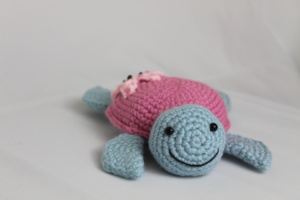
Mommy Turtle
Top Shell
Round 1: In Shell Color, 6 Sc in Magic Ring (6)
Round 2: *Inc* all around (12)
Round 3: *Inc, Sc* all around (18)
Round 4: *Inc, 2 Sc* all around (24)
Round 5: *Inc, 3 Sc* all around (30)
Round 6: *Inc, 4 Sc* all around (36)
Round 7: *Inc, 5 Sc* all around (42)
Round 8: *Inc, 6 Sc* all around (48)
Round 9: *Inc, 7 Sc* all around (54)
Round 10: *Inc, 8 Sc* all around (60)
Round 11: *Inc, 9 Sc* all around (66)
Round 12-13: *Sc* all around (66)
Finish off.
Bottom Shell:
Round 1: In Skin Color, 6 Sc in Magic Ring (6)
Round 2: *Inc* all around (12)
Round 3: *Inc, Sc* all around (18)
Round 4: *Inc, 2 Sc* all around (24)
Round 5: *Inc, 3 Sc* all around (30)
Round 6: *Inc, 4 Sc* all around (36)
Round 7: *Inc, 5 Sc* all around (42)
Round 8: *Inc, 6 Sc* all around (48)
Round 9: *Inc, 7 Sc* all around (54)
Round 10: *Inc, 8 Sc* all around (60)
Round 11: *Inc, 9 Sc* all around (66)
Finish off. Now refer to Note/Assembly.
Note: The bottom shell will appear smaller than the top shell. That’s fine, this happens because we single crocheted a few extra rounds on the top shell and not the bottom shell. Since the number of stitches is the same, the shells will line up perfectly when you Sc them together.
Assembly
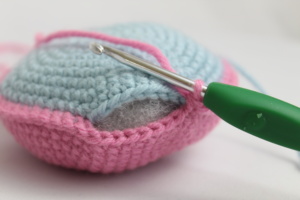
Line top shell up to the bottom shell. Sc both together, making sure the stitches line up. Stuff before closing. Finish off.
Flippers: (Make 4)
Round 1: In Skin Color, 6 Sc in Magic Ring (6)
Round 2: *Inc* all around (12)
Round 3: *Inc, Sc* all around (18)
Round 4: *Inc, 2 Sc* all around (24)
Round 5: *Inc, 3 Sc* all around (30)
Round 6: *Inc, 4 Sc* all around (36)
Finish off. Fold in half and sew closed.
Flipper Assembly:

Once all four flippers are sewed shut, pin the flippers as shown.
Head:
Round 1: In Skin Color, 6 Sc in Magic Ring (6)
Round 2: *Inc* all around (12)
Round 3: *Inc, Sc* all around (18)
Round 4: *Inc, 2 Sc* all around (24)
In next round we will place different colored stitch markers to indicate where to place your safety eyes.
Round 5: Inc in next st, Sc in next 3 st. Inc in next st, Sc in next st. Add different colored St marker to St just made, Sc in next 2 st. Inc in next st, Sc in next 3 st. Inc in next st, Sc in next St. Add different colored st marker to St just made, Sc in next 2 st. *Inc, 3 Sc* 2 times (30)
Round 6: *Inc, 4 Sc* all around (36)
Round 7-9: *Sc* all around (36)
Round 10: *Dec, 4 Sc* all around (30)
Round 11: *Sc* all around (30)
Round 12: *Dec, 3 Sc* all around (24)
Round 13: *Dec, 2 Sc* all around (18)
Add in safety eyes and remove eyes stitch markers. Sew on smile. Stuff here.
Round 14: *Dec, 1 Sc* all around (12)
Round 15: *Dec* all around (6)
Stuff any additional stuffing and finish off. Sew closed.Sew head onto body between two flippers.
Head Assembly:
Place head between to fins. Pin in place and sew on.
Starfish: (Optional)
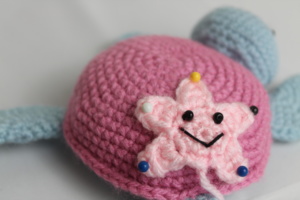
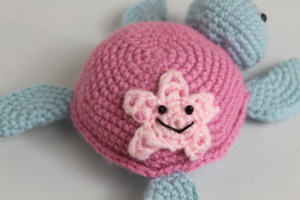
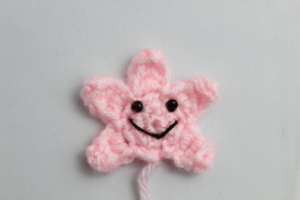
Round 1: In Pink, 6 Sc in Magic Ring (6)
Round 2: *Inc in next 2 st, Sc in next st* 2 times (10)
Round 3: *Slst in next St, Ch 4. Dc in 2nd ch from hook. Dc in next ch, Trc in last Ch. Skip next st* 5 times
Finish off. Sew onto the back on the turtle.
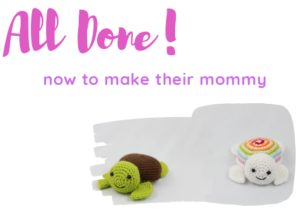
All done!
If you finished a turtle, I would be SO HAPPY if you upload a picture to the Ravelry project page here.
Let me know if you enjoyed this pattern and sign up to my newsletter to be notified of all future FREE patterns.


32 Comments
This would be better if we could print the pattern.
Hi Dottie, thanks for your comment!
You can purchase the PDF made for printing here. Many hours go into getting ideas, designing, testing, editing, photographing, creating social media graphics, and creating the PDF/this page. I hope you understand why I charge 1.99 for the PDF. 🙂
If you need any help, feel free to let me know!
Thanks Dottie, have a great day!
thank you for this nice and easy pattern. my 3 year old one saw it and i had to make it for him immediatly :)). so cute!!
Awe that’s so sweet! I hope he’ll love his turtle friend 🙂 Thanks for such a nice comment <3
This is so cute! What weight of yarn do you use?
Hi Haley, thank you so much! I used 4/medium weight yarn for the turtles 🙂
do you have a pattern book i could by from you for the patterns of the turtles?
Hi Mary, unfortunately I don’t have a book right now for the turtles. However, you can print the PDF version if you’d like this pattern physically: https://stringydingding.com/product/turtle-amigurumi-pdf/ . I hope that helps 🙂
Hello!
I really like your pattern, looking forward to try it.
Could you add a pic of the turtle upside down though, to see how the flippers attach?
Thank you!
Hi Aly! Unfortunately I don’t have a picture of the flippers with the turtle flipped upside down. I will try to add that soon though 🙂 I hope you give the turtle a try!
Is there a video tutorial for this pattern? I don’t understand how to put the two she’ll pieces together?
Hi there Amber, unfortunately there isn’t a video tutorial for this pattern. However, I would love to help you with crocheting the shells together. I will try to help as much as I can 🙂
Take the bottom shell and top shell and place them together. Make sure the stitches from each shell line up together.
Now, insert your crochet hook under BOTH stitches from the bottom and the top shell. Yarn over and pull up a loop. Yarn over once more and pull through both loops on your hook. Now you’ve successfully crocheted both shells together for one stitch.
Continue crocheting through both shells for the remaining amount until the shells are almost completely crocheted together. Now add stuffing to the shells. Continue crocheting closed. One done, finish off and weave in the ends of yarn.
If you have any questions or need clarifications, please just let me know 🙂
Fourth thing ever 🙂
I think I am going to make a ridge line for the future :).
Thank you for making it simple and fun!
How super adorable is that! Aw I love your turtle. I’m so impressed that your turtle is the 4th thing you’ve ever made! That’s so insane, you have great crochet skills 🙂 ❤️
I had a lot of fun making this. Thank you for the free pattern!
Oh my gosh that is so adorable!! Wow your amazing turtle brought a big smile to my face 🙂 I love the little accessory too! Thank you so much for sharing your adorable work 😍 I really appreciate it ❤️
How do I do the flippers? Help I need to do it before christmas. REPLY SOON
Hi there Katlyn,
What part of the flippers are you having trouble with? Please let me know, I’m happy to help! 🙂
Attaching them. Where do I attach them?
Wow! This is my third thing ever to make! It took a lot of work, but it was worth it. It took me a course of three days. NOW INTRODOUCING TO YOU: SAMMY THE SEA TURTLE! Thanks for this amazing pattern!
Thank you so much for the free pattern! I made three of these for three little boys.
Woah this is so creative and awesome!!! I know that those boys will be so excited to choose theirs, what lucky little guys! You are so kind to make the turtles for them 😄 I love how you did the shells, I would never have thought to do something like that! Thank you so much for sharing a picture, this made my day ❤️❤️❤️
So cute
I loved this turtle!! I actually own a real water turtle, do this was an easy pattern choice for me. I went one step further and made it a rattle by adding rattle noise makers!!!!
Awww that’s amazing to hear, I’m so beyond happy that you like this turtle pattern! 🙂 I love that you added a rattle into it, too! Lol I know I would non-stop be shaking that turtle around 😁 Did you make this turtle after your pet turtle? Ahhh I would LOVE to see a picture of your turtle – I bet it’s sooo cute!
This turtle was my fastest project. And cutest too!! Thank you for the detailed patterns and work in progress pictures. They are a boon for beginners like me.
Love the turtles. I have changed up the sizing for keychains, ornaments, small turtle and a large turtle. I used a variegated cotton yarn
This is the larger version. I added extra stuffing to make fatter
I love turtles so I will definitely try this pattern! 😉
My turtle came out ugly! 🙁 It’s body is lumpy and the flippers are to big.(They really are!!!) I was hoping you could help me! Thank you!
~Cara
I was very confused when making this turtle. I don’t know if I was doing it wrong or not because my shell was flat and wasn’t curving into the bowl shape it should. This also happened when I tried making the baby seal. If you could give me some advice that would be great.
This is such an adorable pattern. I just made my first baby turtle after purchasing the pattern. It was bigger than I was expecting. I would like to make a smaller version like your other 3inch pattern. I want to be able to sew the pieces together. I can figure out the size of the shells and flippers but I am struggling with a pattern for a smaller head. Can you give me any hints on how to do this?