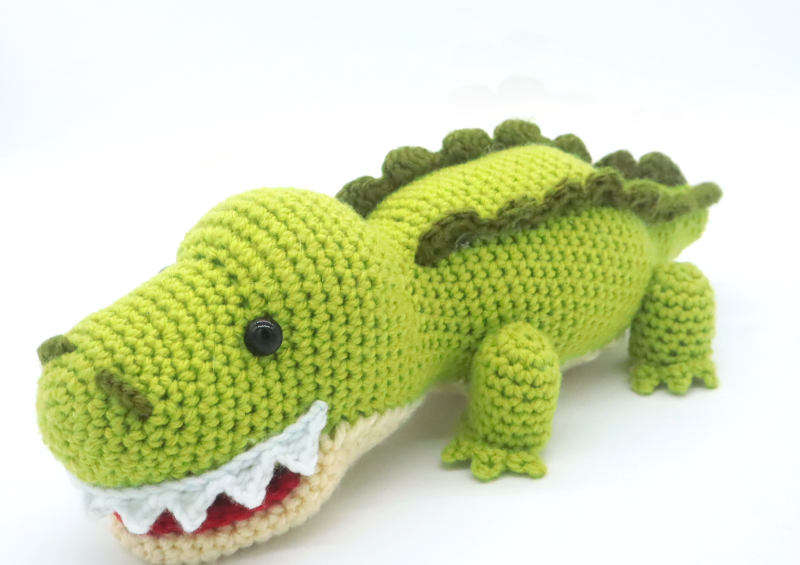
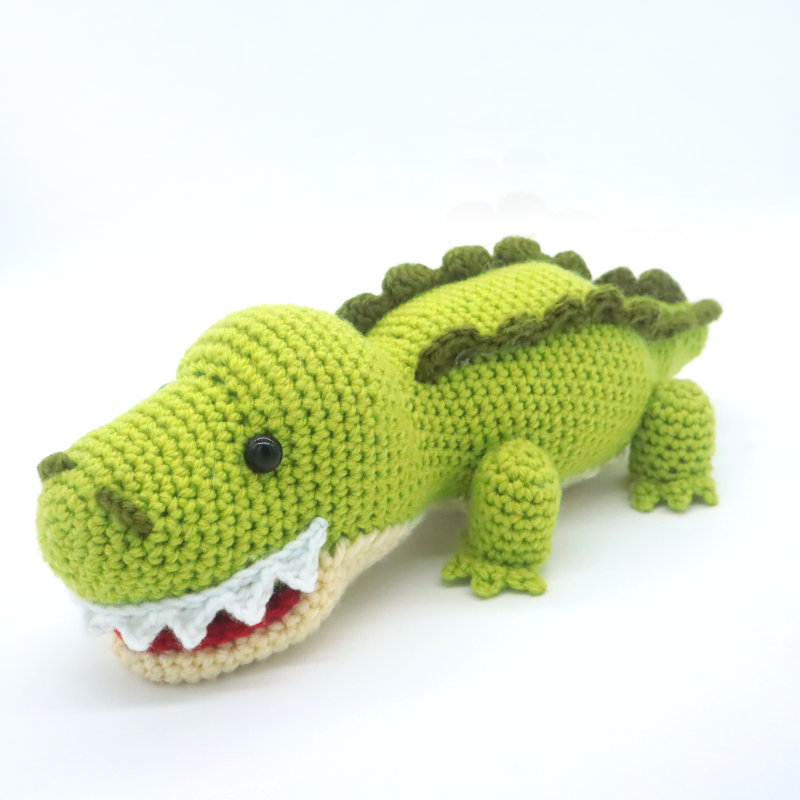
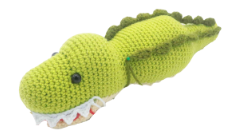
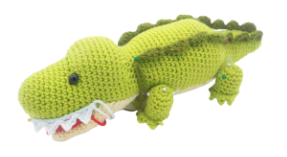
Alligator Amigurumi – Free Crochet Pattern
Print this pattern out – purchase the PDF version here!

 Supplies:
• Yarn 4/Medium Weight Yarn in…
Green, dark green, yellow, red, and white
•4mm Crochet Hook
•Tapestry needle
•Scissors
•Stuffing
•Hot glue gun (optional)
•12mm safety eyes
Additional Information:
•Difficulty: Intermediate
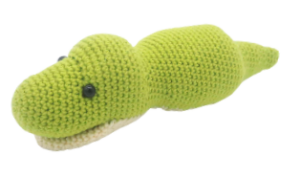
•Size: 13″ long from nose to tail. 4.5″ tall
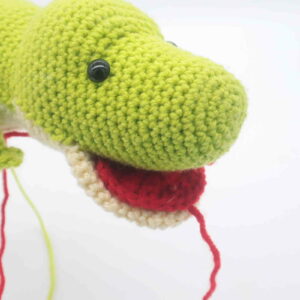
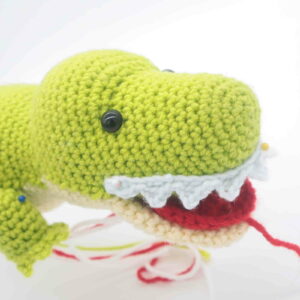
Just look at the smile on this cute alligator! You’ll be smiling too once you get started on this fun and easy crochet project. This pattern makes use of a few unique techniques, which is why I’ve labeled the difficulty as intermediate – but don’t let that intimidate you! You’ll have a great time learning these techniques if you’ve never done them before, and enjoy a final product that ends up with a very professional, gift-ready look!
Let’s get started!
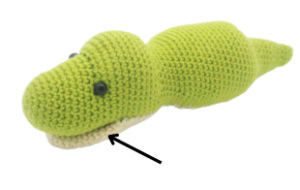
Bottom mouth: (make first)
In Yellow
Round 1: 6 Sc into a Magic Ring (6)
Round 2: *Inc* all around (12)
Round 3: *Inc, Sc in the next st* all around (18)
Round 4-6: *Sc* all around (18)
Round 7: *Inc, Sc in the next 2 st* all around (24)
Round 8-9: *Sc* all around (24)
Round 10: *Inc, Sc in the next st* all around (30)
Round 11-13: *Sc* all around (30)
Finish off, leaving a long tail for sewing. Set the mouth aside for now. Later we will crochet the mouth to the body.
Body:
Start in Green
Round 1: 6 Sc into a Magic Ring (6)
Round 2: *Inc* all around (12)
Round 3: *Inc, Sc in the next st* all around (18)
Round 4: *Inc, Sc in the next 2 st* all around (24)
Round 5-8: *Sc* all around (24)
Round 9: *Inc, Sc in the next 3 st* all around (30)
Round 10-13: *Sc* all around (30)
Round 14: Sc in the next 12 st. Inc in each of the next 6 st. Sc in the next 12 st (36)
Now we will mark where to place the safety eyes. Add an eye stitch marker into the 12th and 25th stitch in Round 14. Later we will add safety eyes into these marked areas.
Round 15: Sc in the next 12 st. Repeat *Inc, Sc in the next st* 6 times. Sc in the next 12 st (42)
Round 16: Sc in the next 36 st. Stop here.
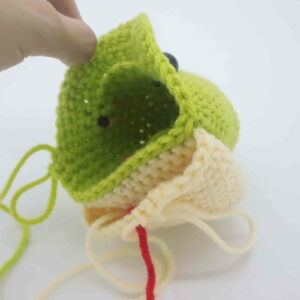
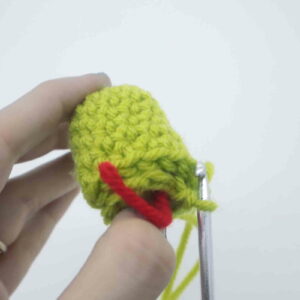
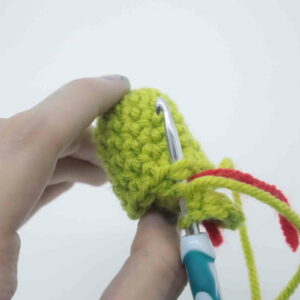
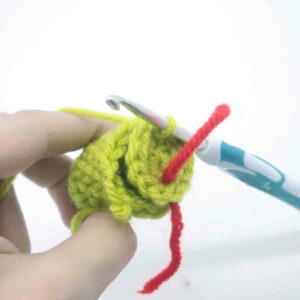
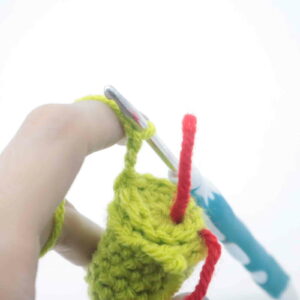
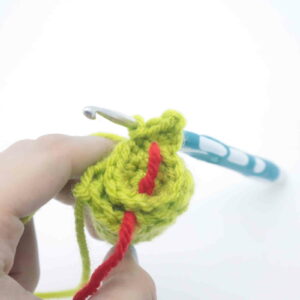
Align the yellow mouth to the head. Make sure the stitches align as shown (Pic 1). Going through BOTH the mouth stitches and the head stitches (Pic 2), Sc in the next 13 st (Pic 3). Going through just the green head stitches, Sc in the next 4 st. This will be the last stitch in the round, so add a stitch marker into the first stitch of the next round to mark our new rounds!
1.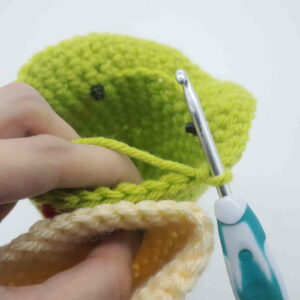 2.
2.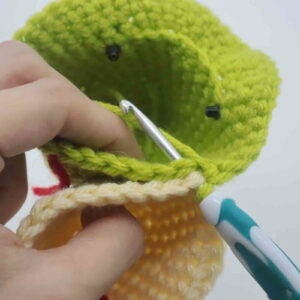 3.
3.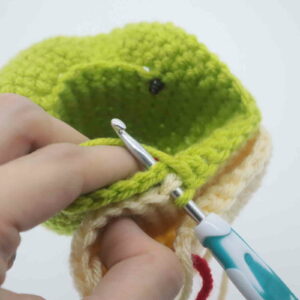 4.
4.
Round 17: In Green Sc in the next 25 st. Now we will work on the yellow mouth stitches, in Yellow Sc in the next 17 st. Working back on the head, in Green Sc in the next 4 st (46)
Round 18-23: In Green Sc in the next 25 st. In Yellow Sc in the next 17 st. In Green Sc in the next 4 st (46)
Add safety eyes into the marked areas now.
Round 24: In Green repeat *Dec, Sc in the next 2 st* 6 times. Sc in the next st. In Yellow Sc in the next 17 st. In Green Sc in the next 4 st (40)
Round 25: In Green repeat *Dec, Sc in the next st * 6 times. Sc in the next st. In Yellow Sc in the next 3 st. Repeat *Dec, Sc in the next 3 st* 2 times. Dec, Sc in the next 2 st. In Green Sc in the next 4 st (31)
Round 26: In the Front Loop Only (FLO), Sc in the next 16 st. In Yellow and working in BOTH loops, Sc in the next 11 st. In Green and working in the FLO, Sc in the next 4 st (31)
Round 27-30: In Green and in BOTH loops, Sc in the next 16 st. In Yellow Sc in the next 11 st, Sc in the next 4 (31)
Round 31: In green Sc in the next 17 st. In yellow Sc in the next 11 st. In Green Sc in the next 3 st (31)
Round 32: In green Inc in the next st, Sc in the next 7 st, Inc in the next st, Sc in the next 5 st, Inc in the next st, Sc in the next 2 st. In Yellow Sc in the next 3 st, Inc in the next st, Sc in the next 4 st, Inc in the next st, Sc in the next 2 st. In Green Sc in the next 3 st (36)
Round 33: In Green Inc in the next st, Sc in the next 8 st, Inc in the next st, Sc in the next 6 st, Inc in the next st, Sc in the next 3 st. In Yellow Sc in the next st, Inc in the next st, Sc in the next 5 st, Inc in the next st, Sc in the next 4 st, Inc in the next st. In Green Sc in the next 3 st (42)
Round 34-36: In Green Sc in the next 23 st. In Yellow Sc in the next 17 st. In Green Sc in the next 2 st (42)
Round 37: In Green Sc in the next 24 st. In Yellow Sc in the next 17 st. In Green Sc in the next st (42)
Round 38: Sc in the next 3 st, Inc in the next st, Sc in the next 8 st, Inc in the next st, Sc in the next 7 st, Inc in the next st, Sc in the next 3 st. In Yellow Sc in the next 17 st. In Green Sc in the next st (45)
Round 39: In Green Sc in the next 27 st. In Yellow Sc in the next 17 st. In Green Sc in the next st (45)
Round 40: In Green Sc in the next 28 st. In Yellow Sc in the next 17 st (45)
Round 41: In Green Sc in the next 29 st. In Yellow Sc in the next 16 st (45)
Round 42-44: In Yellow Sc in the next st. In Green Sc in the next 28 st. In Yellow Sc in the next 16 st (45)
Round 45-47: In Yellow Sc in the next 2 st. In Green Sc in the next 28 st. In Yellow Sc in the next 15 st (45)
Round 48: In Yellow Sc in the next 3 st. In Green Sc in the next 28 st. In Yellow Sc in the next 14 st (45)
Stuff the head here.
Round 49: In Yellow, Dec, Sc in the next st. In Green repeat *Sc in the next 4 st, Dec* 4 times. Sc in the next 4 st. In Yellow Dec, Sc in the next 12 st (39)
Round 50: In Yellow Dec, Sc in the next st. In Green Sc in the next 3 st. Repeat *Dec, Sc in the next 3 st* 3 times. Dec, Sc in the next 2 st, Dec 1 time. In Yellow Sc in the next 12 st (33)
Now we will work only in green.
Round 51: In Green Dec 1 time, Sc in the next 3 st. Repeat *Dec, Sc in the next 2 st* 3 times. Dec, Sc in the next st, Dec 1 time, Sc in the next 11 st (27)
Round 52-54: *Sc* all around (27)
Round 55: Repeat *Dec, Sc in the next 4 st* 4 times. Dec 1 time, Sc in the next st (22)
Round 56-58: *Sc* all around (22)
Stuff the body firmly here. Continue stuffing after each round.
Round 59: Repeat *Dec, Sc in the next 2 st* 4 times. Sc in the next 6 st (18)
Round 60-61: *Sc* all around (18)
Round 62: Repeat *Dec, Sc in the next st* 6 times (12)
Round 63-65: *Sc* all around (12)
Round 66: *Dec* all around (6)
Finish off, leaving a long tail for sewing. Sew the remaining stitches together and weave in ends. Cut any excess yarn.
Inside Mouth:
In Red
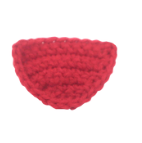
Row 1: Ch 4. Sc in the 2nd ch from the hook, then Sc in the next 2 st (3)
Row 2: Inc in the next st, Sc in the next st, Inc in the next st (5)
Row 3: Inc in the next st, Sc in the next 3 st, Inc in the next st (7)
Row 4: Inc in the next st, Sc in the next 5 st, Inc in the next st (9)
Row 5-9: Ch 1 and turn. Sc in the next 9 st (9)
Finish off, leaving a long tail for sewing. Pin the mouth on as shown and sew or hot glue on. Once done, weave in ends and cut any excess yarn.
Teeth:
In White
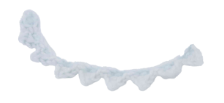
Row 1: Ch 29. SlSt in the 2nd Ch from the hook, Dc in the next Ch, SlSt in the next 2 st. Repeat *Ch 3, SlSt in the 2nd Ch from the hook, Dc in the next Ch, Skip the next chain, SlSt in the next 2 Ch* 8 times
Finish off, leaving a long tail for sewing. Pin the teeth on as shown and sew or hot glue on. Once done, weave in ends and cut any excess yarn.
Back Ridges:
In Dark Green
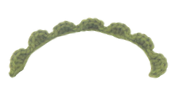
Row 1: Ch 37. Sc in the 2nd Ch from the hook, repeat *2 Dc into each of the next 2 Ch, SlSt in the next 3 ch* 7 times (50)
Finish off, leaving a long tail for sewing. Pin on as shown and sew or hot glue on. Once done, finish off and weave in ends.
Top Arm: (Make 4)
In Green
Round 1: 6 Sc into a Magic Ring (6)
Round 2: *Inc* all around (12)
Round 3-8: *Sc* all around (12)
Finish off, leaving a long tail for sewing. Set aside for now.
Left Foot: (Make 2)
In Green
Round 1: 6 Sc into a Magic Ring (6)
Round 2: *Inc* all around (12)
Round 3: Now align both the bottom of the foot to the leg as shown. Make sure the stitches align (Pic 1). Inserting your hook through BOTH stitches (Pic 2), SlSt in the next 6 st (Pic 3).
1. 2.
2. 3.
3.
Repeat *Ch 3, SlSt in the 2nd Ch from the hook, Dc in the next ch, going through the leg and foot, SlSt in the next st.* 3 times (Pic 5-6).
5. 6.
6.
SlSt in the next. Ch 3, SlSt in the 2nd Ch from the hook, Dc in the next ch.
Stuff the leg firmly now. Going through BOTH the leg and foot, SlSt in the next 2 st (Pic 7).
7.
Finish off, leaving a long tail for sewing. Weave this tail to the top of the leg. Pin the leg onto the left side of the alligator, making sure the thumb faces inside (Pic 8). Sew on. Once sewn on, weave in ends and cut any excess yarn.
Right Foot: (Make 2)
In Green
Round 1: 6 Sc into a Magic Ring (6)
Round 2: *Inc* all around (12)
Round 3: Now align both the bottom of the foot to the leg as shown in the pictures on page 8, Pic 1. Make sure the stitches align. Inserting your hook through BOTH stitches, SlSt in the next 2 st.
Ch 3, SlSt in the 2nd Ch from the hook, Dc in the next st. Going through BOTH the leg and foot, SlSt in the next st.
Repeat *Ch 3, SlSt in the 2nd Ch from the hook, Dc in the next ch, going through the leg and foot, SlSt in the next st.* 3 times.
Stuff the leg firmly now. Going through BOTH the leg and foot, SlSt in the next 6 st.
Finish off, leaving a long tail for sewing. Weave this tail to the top of the leg. Pin the leg onto the right side of the alligator, making sure the thumb faces inside. Sew on. Once sewn on, weave in ends and cut any excess yarn.
Done! If you made an alligator, I would LOVE to see! You can show me by posting a picture in the comments section underneath this post 🙂


2 Comments
I’m not understanding when to close the bottom mouth up. I see it still open in the pictures when you attach it to the head. Are you supposed to close it on the next round? Do you stuff it or leave flat?
i have not closed it at all as the rest of the pattern is made with the green top and the yellow bottom all together.
and yes stuff it also