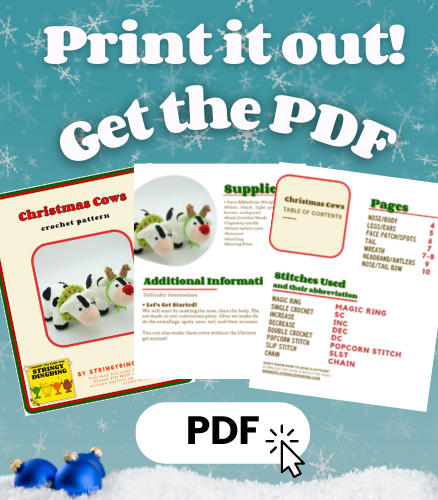
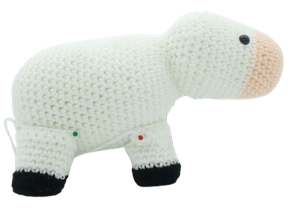
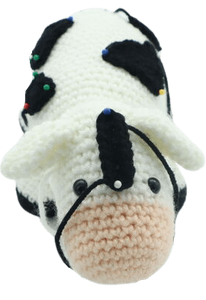
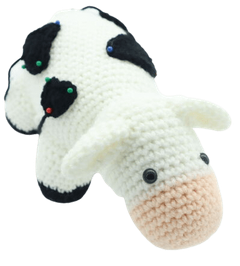
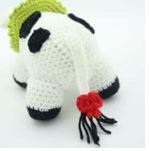
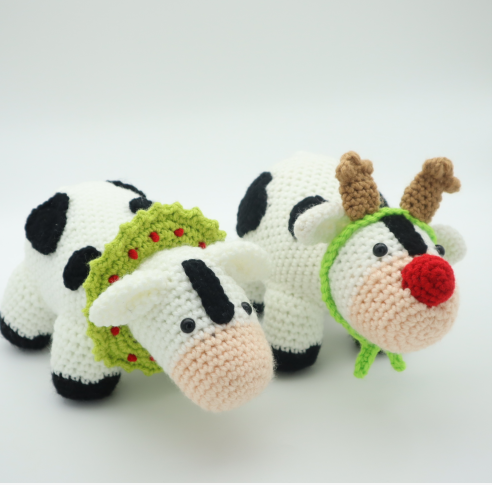
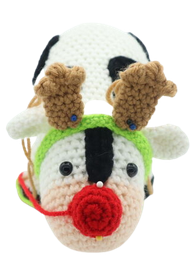
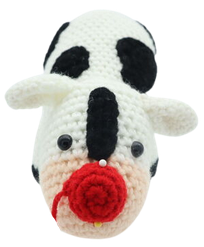
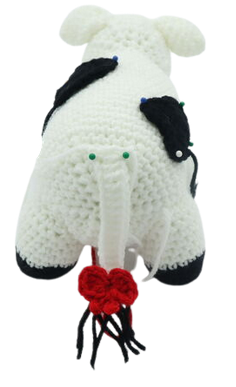
Christmas Cow Amigurumi – Free Crochet Pattern
Hello everyone! This week’s free crochet pattern is this cute Christmas cow couple! I had gotten this idea from a salt and pepper shaker where they had on antlers and a nose. I thought it was such a cute idea, I had to make a crochet version. I hope you like it!
Print this pattern out – purchase the PDF version here!

 Supplies:
• Yarn 4/Medium Weight in…
White, black, light pink, red, brown, and green
•4mm Crochet Hook
•Tapestry needle
•10mm safety eyes
•Scissors
•Stuffing
•Sewing Pins
Additional Information:
Difficulty: Intermediate
• Let’s Get Started!
We will start by making the nose, then the body. The nose and body are made in one continuous piece. After we make the body, we will do the arms/legs, spots, ears, tail, and their accessories!
You can also make these cows without the Christmas gear. Let’s get started!
Head/body:
In light pink
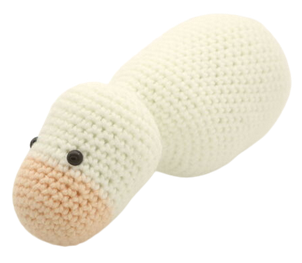
Round 1: 6 Sc into a Magic Ring (6)
Round 2: *Inc* all around (12)
Round 3: *Inc, Sc in the next st* all around (18)
Round 4: *Inc, Sc in the next 2 st* all around (24)
Round 5-8: *Sc* all around (24)
Round 9: *Inc, Sc in the next 7 st* 3 times (27)
Round 10: Change to white, *Sc* all around (27)
Now we will add eye markers into Round 10. Add an eye marker into the 13th and 19th stitch.
Round 11: *Sc* all around (27)
Round 12: *Inc, Sc in the next 8 st* all around (30)
Round 13-14: *Sc* all around (30)
Round 15: *Inc, Sc in the next 9 st* all around (33)
Round 16-17: *Sc* all around (33)
Round 18: *Inc, Sc in the next 10 st* all around (36)
Round 19: Sc in the next 3 st, LOOSELY SlSt in the next 11 st, Sc in the next 3 st. Repeat *Dec, Sc in the next 2 st* 4 times. *Dec* 1 time, Sc in the next st (31)
Round 20: Sc in the next 3 st, LOOSELY SlSt in the next 11 st, Sc in the next 3 st. Repeat *Dec, Sc in the next st* 4 times, Sc in the next 2 st (27)
Round 21: Sc in the next 3 st, LOOSELY SlSt in the next 11 st, Sc in the next 3 st. Repeat *Dec* 4 times, Sc in the next 2 st (23)
Round 22: Sc in the next 3 st, Repeat *Inc, Sc in the next 2 st* 4 times, Sc in the next 2 st, *Dec* 2 times, Sc in the last 2 st (25)
Add the eyes in the marked areas now. Stuff the head firmly.
Round 23: Sc in the next 3 st, *Inc, Sc in the next 3 st* 4 times, Sc in the next 6 st (29)
Round 24: Sc in the next 7 st. *Inc, Sc in the next st* 6 times. Sc in the next 10 st (35)
Round 25: Sc in the next 10 st. *Inc, Sc in the next st* 6 times. *Inc* in the next st, Sc in the next 12 st (42)
Round 26-44: *Sc* all around (42)
Round 45: *Dec, Sc in the next 5 st* all around (36)
Round 46: *Sc* all around (36)
Round 47: *Dec, Sc in the next 4 st* all around (30)
Round48: *Dec, Sc in the next 3 st* all around (24)
Stuff the body firmly now. Continue stuffing after each round.
Round 49: *Dec, Sc in the next 2 st* all around (18)
Round 50: *Dec, Sc in the next st* all around (12)
Round 51: *Dec* all around (6) Finish off now. Weave in ends.
Legs: (Make 4)
Start in black
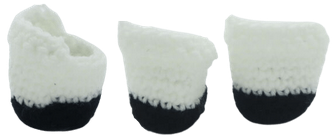
Round 1: 6 Sc into a Magic Ring (6)
Round 2: *Inc* all around (12)
Round 3: *Inc, Sc in the next st* all around (18)
Round 4: In the BLO, *Sc* all around (18)
Round 5: In BOTH loops, *Sc* all around (18)
Round 6: Change to white. *Sc* all around (18)
Round 7-9: *Sc* all around (18)
Round 10: Sc in the next 11 st.
Row 11: Ch 1 and turn. *Dec* 1 time, Sc in the next 7 st, *Dec* 1 time
Round 12: Ch 1 and turn. Sc in the next 9 st.
Finish off, leaving a long tail for sewing. There will be a short and long side of the leg. Stuff the leg, then pin the short side of the leg on the inside of the cow, the long side of the leg will be facing on the outside. Sew on, then weave in ends.
Ears: (Make 2)
In white

Round 1: 6 Sc into Magic Ring (6)
Round 2: *Sc* all around (6)
Round 3: *Inc, Sc in the next st* 3 times (9)
Round 4: *Inc, Sc in the next 2 st* 3 times (12)
Round 5-7: *Sc* all around (12)
Round 8: *Dec, Sc in the next 2 st* 3 times (9)
Round 9: *Sc* all around (9)
Finish off now. Leave a long tail for sewing. Fold the ear in half and pin onto the cow as shown. Sew on now.
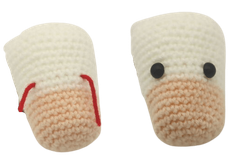
Face patch:
In black
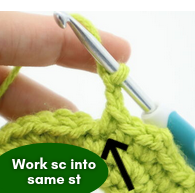
Round 1: Ch 8. Sc in the 2nd Ch from the hook. Sc into that same st. Sc in the next 5 st. Sc 2 times into the last Ch. Now we meet the end of the chain. Turn the piece to the OTHER side of the chain, where we haven’t made any stitches yet. Sc in the next 5 st (14)
Finish off, leaving a long tail for sewing. Pin the face patch on as shown and sew on. Weave in ends.
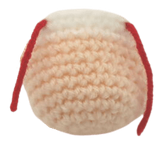
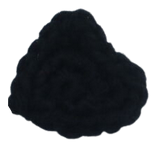
Big spots: (Make 2)
In black
Round 1: 6 Sc into a Magic Ring (6)
Round 2: *Inc* all around (12)
Round 3: *Inc, Sc in the next st* all around (18)
Round 4: SlSt in the next 3 st, Dc in the next 2 st, *Inc* in the next st, SlSt in the next 3 st, Hdc in the next st, Dc in the same st, Dc 2 times in the next st, SlSt in the next 3 st, Dc 2 times in the next st, Dc in the next st, SlSt in the next 2 st (22)
Finish off, leaving a long tail for sewing. Pin the spots on as shown and sew on. Weave in ends.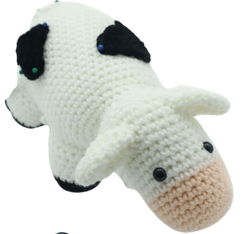
Small spots: (Make 2)
In black
Round 1: 6 Sc into a Magic Ring (6)
Round 2: *Inc* all around (12)
Round 3: SlSt in the next 3 st, Sc 4 times in the next st, SlSt in the next 2 st, Sc 3 times in the next st, SlSt in the next 2 st (14)
Finish off, leaving a long tail for sewing. Pin the spots on as shown and sew on. Weave in ends.
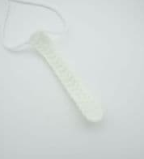
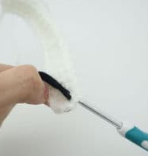
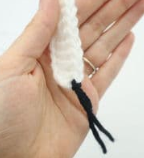
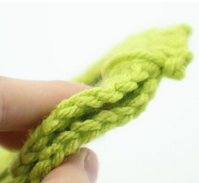
Tail:
In white
Row 1: Ch 21. Skip the next 3 stitches, then make 1 Dc in the 4th Ch from the hook. Dc in the next 17 st (19)
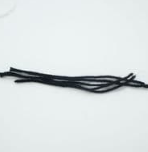
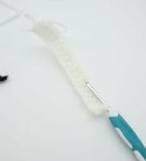
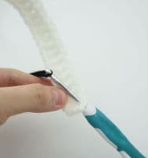
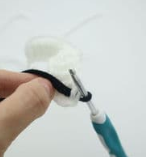
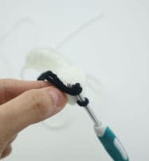
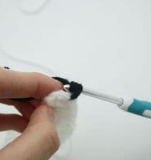
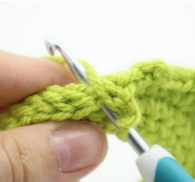
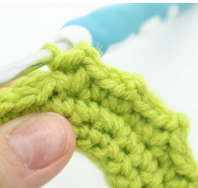
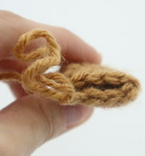
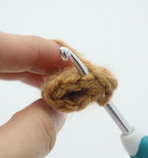
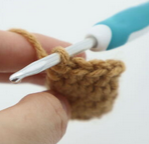
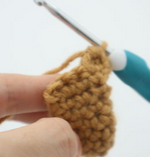
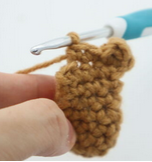
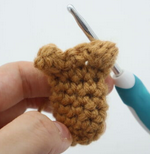
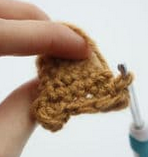
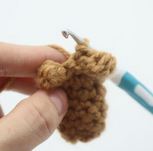
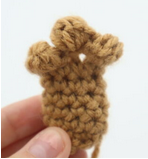
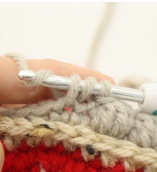
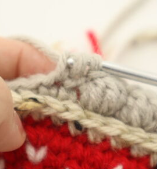
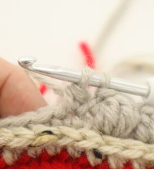
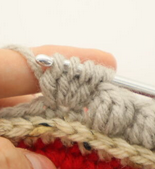
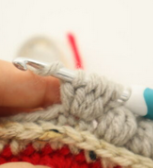
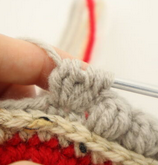
Finish off, leaving a long tail for sewing. Cut 5 pieces of 6″ black yarn (Pic 2). Insert your crochet hook into the end of the tail (Pic 3). Yarn over with the black strand (Pic 4) and pull the yarn through (Pic 5-6). Yarn over with both ends of the strands (Pic 7), and pull the yarn through (Pic 8-9). Now you have made 1 strand of the tail! Repeat this for the other strands. Then, pin the tail onto the butt of the cow as shown and sew on (Pic 10).
1.
 2.
2. 3.
3. 4.
4. 5.
5. 6.
6. 7.
7. 8.
8. 9.
9. 10.
10.
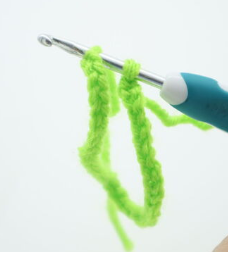
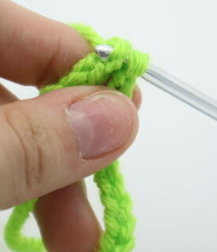
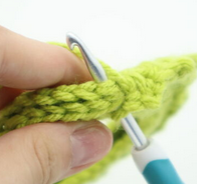
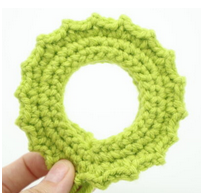
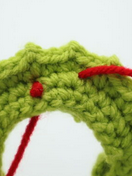
Wreath: Make 2 Pieces
In green
To make the wreath, we will make two pieces then crochet them together to form the one wreath. As we crochet them together, we will form the “peaks” of the wreath.
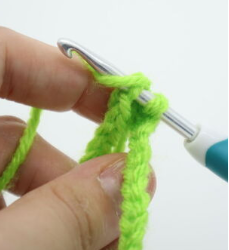
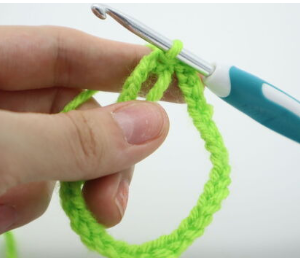
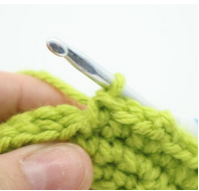
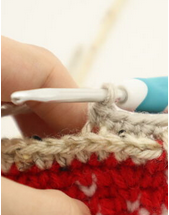
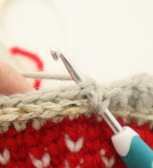
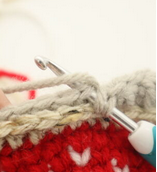
Round 1: Ch 36. Sc to the very first Ch made, this will connect the circle. Make sure to NOT twist the chain when doing this (Pic 2-5)! Add a stitch marker to the Sc you just made, this will mark the rounds. Sc in the next 35 st (Pic 6, 36)
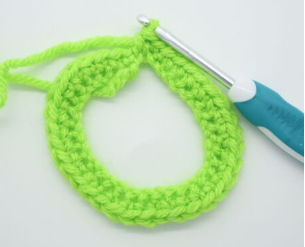
Round 2: Repeat *Inc, Sc in the next 4 st* all around (Pic 7, 42)
1.
 2.
2. 3.
3. 4.
4. 5.
5. 6.
6. 7.
7.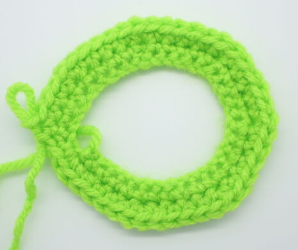
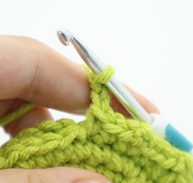
Finish off the first wreath now. DON’T finish off the second wreath. Instead, continue on with the next round:
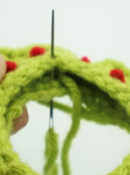
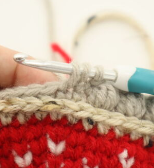
Round 3: Line up both pieces together, making sure the stitches line up (Pic 1). Going through both stitches (Pic 2), repeat *Sc in the next 2 st, Ch 2, Sc into that same st (Pic 5-6)* all around.
Finish off, leaving a long tail end of yarn.
1.
 2.
2. 3.
3. 4.
4. 5.
5. 6.
6. 7.
7. 8.
8.
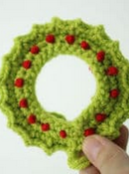
Wreath berries:
In red
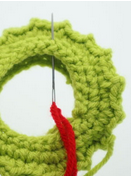
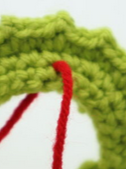
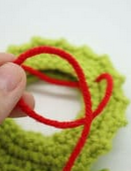
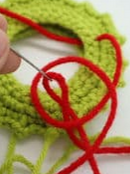
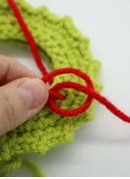
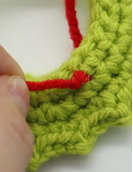
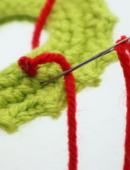
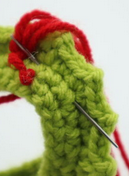
Place red yarn onto your needle. Insert the needle in between the two layers of the wreath and pull the needle out at the outside of the wreath (Pic 1-2). Tie a knot close to the surface of the wreath (Pic 3-6). Tie the knot into the same area 1-2 more times to make a larger knot. Now, insert your needle into a close nearby stitch (Pic 7), and pull needle out a few stitches away (Pic 8-9). Repeat the above process until the wreath has a complete circle of berries (Pic 10). Once done, weave in ends. Take the green tail end of yarn and sew the two layers of the wreath closed (Pic 11). Place the wreath onto the cow as shown (Pic 12).
1.
 2.
2. 3.
3. 4.
4. 5.
5. 6.
6. 7.
7. 8.
8. 9.
9. 10.
10. 11.
11. 12.
12.
Headband:
In green
Round 1: Ch 45. Sc in the 45th Ch from the hook. This will form a circle. Sc in the next 44 st (45)
Round 2: Repeat *SlSt in the next st, Ch 6, Sc in the 2nd Ch from the hook, Sc in the next 4 st, SlSt in the next st.* 2 times.
Finish off, leaving a long tail for sewing. Place the headband onto the cow as shown. Sew on and weave in ends.
Antlers: (Make 2)
In brown
Round 1: Ch 8. Sc into the 8th Ch from the hook. This will form a circle. Add a stitch marker into the Sc you just made. Sc next 7 st (8)
Round 2-6: *Sc* all around (8)
Round 7: Line up the stitches together (Pic 1). Going through BOTH stitches (Pic 2), Sc the next 8 st together. This will form 4 stitches total (Pic 3, Stitch Count: 4)
1.
 2.
2. 3.
3.
Round 8: Turn, SlSt in the next st, Popcorn in that same st, SlSt in that same st (Pic 4). Sc in the next 2 st (Pic 5). SlSt in the next st, Popcorn st in the same st, SlSt in the same st (Pic 6).
4.
 5.
5. 6.
6.
Round 9: Turn (Pic 7). Skip the next 3 st, SlSt in the next st, Popcorn st in the same st, SlSt in the same st (Pic 9-10).
7.
 8.
8. 9.
9. 10.
10.
Finish off, leaving a long tail for sewing. Weave the yarn to the bottom of the antler. Pin the antler on as shown in the headband section above, then sew on. Weave in ends.
How to make a popcorn stitch:
Repeat *Yarn over and insert your hook into the next stitch. Yarn over. Bring the yarn through. Yarn over and pull through two loops* 4 times. (Pic 1-9)
1.
 2.
2. 3.
3. 4.
4. 5.
5. 6.
6. 7.
7. 8.
8. 9.
9.
You will have 5 loops on your hook (Pic 9). Yarn over and pull through all 5 loops at the same time (Pic 10-11). You made a popcorn stitch! (Pic 12)
10. 11.
11. 12.
12.
Nose: (Optional)
In red
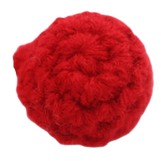
Round 1: 6 Sc into a Magic Ring (6)
Round 2: *Inc* all around (12)
Round 3-4: *Sc* all around (12)
Round 5: *Dec* all around (6)
Finish off, leaving a long tail for sewing. Stuff the nose, then pin on as shown. Weave in ends.
Tail bow: (Optional)
In red
Round 1: Make a magic ring. We will do all these stitches into the magic ring, then tighten the ring to form the bow.
Ch 2, Dc 3 times into the magic ring, SlSt in ring.
Ch 4, SlSt in the 2nd Ch from the hook, SlSt in the next 3 ch.
SlSt into the magic ring. Ch 4, SlSt in the 2nd Ch from the hook, SlSt in the next 3 Ch, SlSt into the magic ring.
Ch 3, Dc 3 times in the magic ring, Sc in the magic ring.
Pull the tail end of yarn firmly to tighten the magic ring. The bow will form. Finish off, leaving a long tail for sewing. Sew the bow onto the tail as shown. Weave in ends.


21 Comments
Omg this are soooo cuteee i love them 😍😍😍😍😍
Cant wait to make them for my home decoration
Awww thank you so much! They are so fun to have around the house. It would be cute to make the cows have a new outfit for each holiday!
Thanks for the great pattern! My daughter will love these. Can’t wait to make them!
Thank you so much, I’m so happy you like this pattern! 🙂
These are so lovely and I would love to print them out so I could make them, but can’t so will have to put these “on hold” as I need patterns I can use while I care for my husband away from the computer.
Thanks for creating though – they do look lovely.
Sorry – should have explained money too tight for the pdf or membership at the moment. 🥲
Thank you so much for the kind words, Rebecca! I always enjoy using free patterns on my mobile phone or tablet, so you can take the pattern with you anywhere! I hope you have fun with this pattern, I appreciate your support 😍
Row 19 has any instructions for the amount of stitches. Rows 20 and 21 are missing. I tried just continuing to follow row 19 but it did not work out. Any help you could offer would be greatly appreciated.
Hi Connie! I checked and I just accidentally typed Round “22” instead of Round “20” 🙂 The pattern remains exactly the same besides that!
I double checked the rounds and they should work out without any error. Can you undo Round 19, and then count how many stitches you have? If you end up with the wrong number of stitches after you complete Round 18, then Round 19 won’t work out. Let me know how it goes!
The number of stitches I have in round 18 is 36. Round 19 has 3sc, slst 11, 3 sc. repeat. That leaves me with 2 stitches left and the dec.,sc in 2st 4 times and dec 1 is way more than 2 two stitches i have left. I have frogged this part so many times I should have a herd of cows. lol
Hi Connie,
I think I see where you may be going wrong! It looks like a slight misunderstanding 😅
You don’t repeat “Sc in the next 3 st, SlSt in the next 11 st, Sc in the next 3 st”.
You will repeat what’s inside the *stars* for the stated amount of times. In this case it says, “Repeat *Dec, Sc in the next 2 st* 4 times”
So to clarify, do Round 19 as follows: Sc in the next 3 st. SlSt in the next 11 st. Sc in the next 3 st.
Repeat *Dec, Sc in the next 2 st* a total of 4 times.
*Dec* 1 time, Sc in the next st (31)
I hope this was able to help, please let me know how it goes! Haha I love your joke of having a herd of cows, ugh!
Thank you so much. I will work on it after dinner and let you know how I made out.
I frogged back to the color change and began again. It went well and I got past the dreaded round 19. However I am now on 21 and it will not work. The 3sc, 11slst, 3sc add up to 17 and it wants me to decrease 4 times and sc 2 for a total of 23. 17-4+2= 15. It seems like the count is off ever after. If my granddaughter did not have her heart set on this cow I would give up.
I checked Round 21 and the pattern works.
It looks like you’re subtracting 4 in your math, but we don’t lose 4 stitches. We actually end up with 4 stitches, as 1 decrease will make 1 stitch each.
The decreases take 2 stitches and make it into 1 total stitch, so remember that even though we make 4 decreases, we will end up with 1 stitch for each decrease (4 decreases = 4 stitches made).
So let me break it down: Round 21: Sc in the next 3 st, LOOSELY SlSt in the next 11 st, Sc in the next 3 st. Repeat *Dec* 4 times, Sc in the next 2 st (23)
3 st + 11 slst + 3 st + 4 st made from the dec + 2 sc = 23
I hope this could help, please let me know how it goes!
Thank you so much for all your help. I have head and body as well as the wreath and cow spots. I know my granddaughter will love it. It is going to be adorable and I know my daughter will want one as well. Thanks again. Merry Christmas.
So sorry to bother you again. I am trying to create the legs and it goes from 18 st. in round 5, change to white and crochet 12 st. What do I do with the other 6 stitches? I tried a 6 dec. in round 6 with white but it does not look right. Please help.
I found a similar pattern and used the legs from that.
Hi Connie,
Sorry I couldn’t get back to you sooner, I had a busy day yesterday 😭 I’m glad to hear everything worked out! For the legs, you continue making the 18 stitches, 12 was a typo for that round, sorry about that!
Hello, I’m on round 19 and I don’t understand what LOOSELY SISt means, please help me
Hi Daria! I’m no expert with crochet or anything, but I’ve been crocheting for a little while now, and I think a loose slip stitch is just crocheting it without much tension. I dunno if that makes much sense, but if you think about when you slst to fasten off, it’s tight, right? but with this just don’t pull as hard on the yarn as you go.
I loved to make this cute cow. It gives a different nice touch to Christmas. Thank you so much for your time and for sharing this wonderful project.