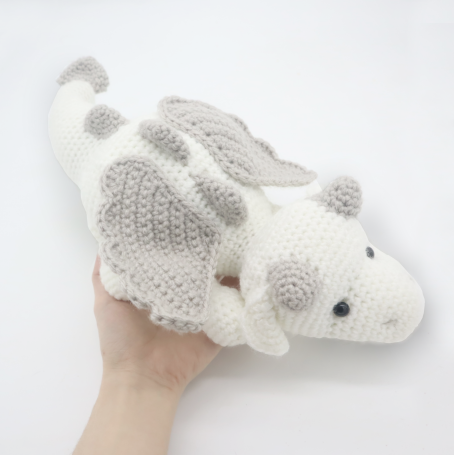
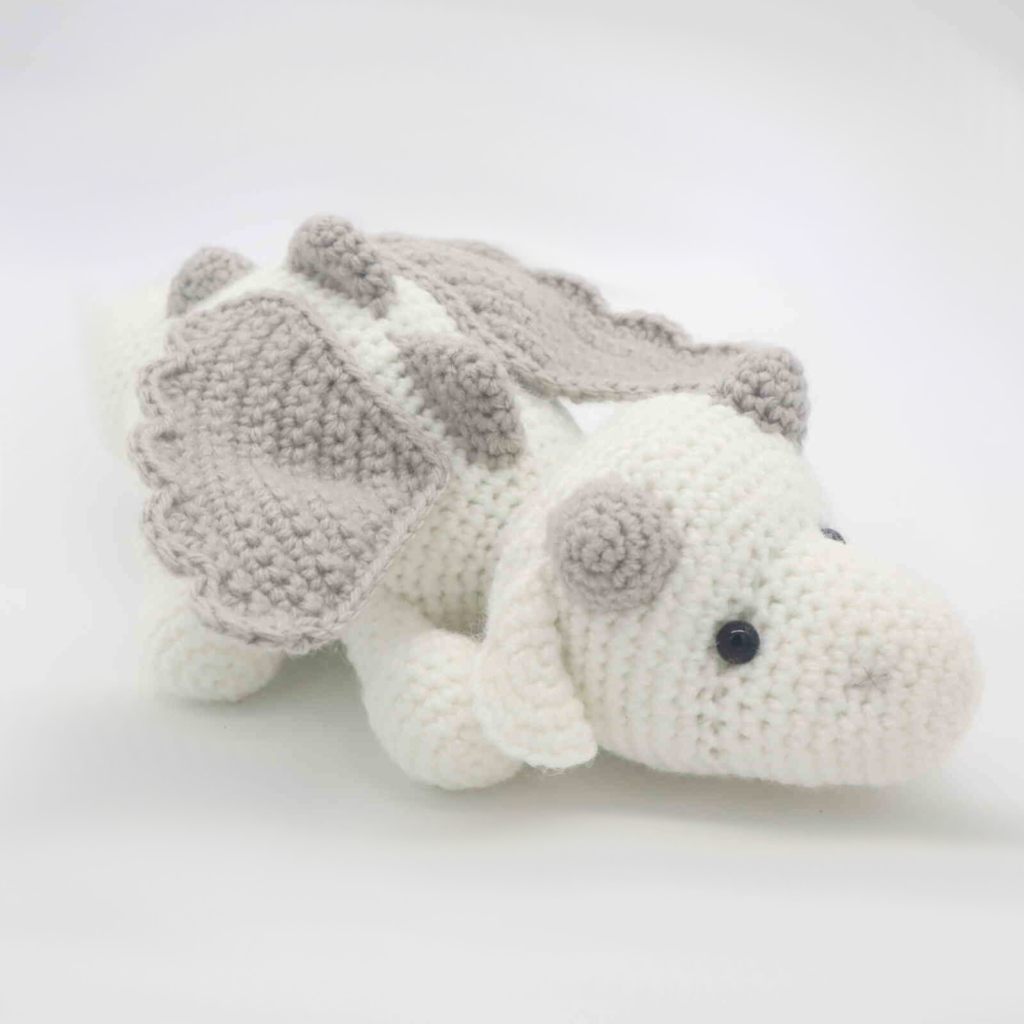
Fantasy Dragon Amigurumi – Free Crochet Pattern
Print this pattern out – purchase the PDF here!


 Supplies:
• Yarn 4/Medium Weight Yarn in…
White and grey
•4mm Crochet Hook
•12mm Safety Eyes
•Tapestry needle
•Scissors
•Stuffing
Additional Information:
•Difficulty: Easy
•Size: 15″ long from head to tip of tail
This dragon is simple, yet so cute! This dragon would be perfect to make in multiple colors, and you could definitely use variegated yarn with this pattern! I was so tempted to make his cute fella with big chunky yarn, but I ended up using regular yarn. I know he’d be extra cute and plush-like if you made him with chunky yarn!
Let’s get started!
Body:
Start in white

Round 1: 6 Sc into a Magic Ring (6)
Round 2: *Inc* all around (12)
Round 3: *Inc, Sc in the next st* all around (18)
Round 4: *Inc, Sc in the next 2 st* all around (24)
Round 5-7: *Sc* all around (24)
Round 8: *Inc, Sc in the next 3 st* all around (30)
Round 9-12: *Sc* all around (30)
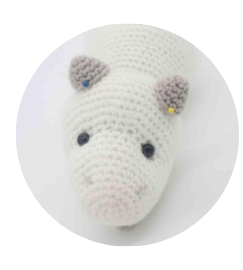
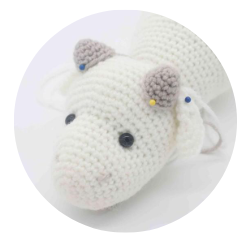
Now we will mark where to place the safety eyes. Add an different colored eye stitch marker into the 8th and 15th stitch in Round 12.
Round 13: Sc in the next 9 st. In the FLO (Front Loop Only), repeat *Inc, Sc in the next 2 st* 6 times. Working in both loops, Sc in the next 3 st (36)
Round 14: Sc in the next 4 st. Repeat *Inc, Sc in the next 2 st* 7 times. Sc in the next 11 st (43)
Round 15: Sc in the next 4 st. Repeat *Inc, Sc in the next 3 st* 6 times. Sc in the next 15 st (49)
Add the safety eyes into the marked areas from Round 12 now.
Round 16-22: *Sc* all around (49)
Round 23: Sc in the next 9 st. Repeat *Dec, Sc in the next 3 st* 6 times. Sc in the next 10 st (43)
Round 24: Sc in the next 8 st. Repeat *Dec, Sc in the next 2 st* 6 times. Sc in the next 11 st (37)
Round 25: Sc in the next 8 st. Repeat *Dec, Sc in the next st* 6 times. Sc in the next 11 st (31)
Round 26: Sc in the next 8 st. Dec 6 times. Sc in the next 11 st (25)
Round 27-29: *Sc* all around (25)
Round 30: Sc in the next 7 st. Repeat *Inc, Sc in the next 2 st* 4 times. Sc in the next 6 st (29)
Round 31: Sc in the next 7 st. Repeat *Inc, Sc in the next 3 st* 4 times. Sc in the next 6 st (33)
Round 32: Sc in the next 3 st. Repeat *Inc, Sc in the next 4 st* 6 times. (39)
Round 33-36: *Sc* all around (39)
Stuff the head firmly now.
Round 37: Sc in the next 6 st. Repeat *Inc, Sc in the next 5 st* 5 times. Sc in the next 3 st (44)
Round 38: *Sc* all around (44)
Round 39: Sc in the next 11 st. Repeat *Inc, Sc in the next 3 st* 7 times. Sc in the next 5 st (51)
Round 40-50: *Sc* all around (51)
Round 51: Sc in the next 17 st. Repeat *Dec, Sc in the next 4 st* 5 times. Sc in the next 4 st (46)
Round 52: Sc in the next 17 st. Repeat *Dec, Sc in the next 3 st* 5 times. Sc in the next 4 st (41)
Round 53: Sc in the next 17 st. Repeat *Dec, Sc in the next 2 st* 5 times. Sc in the next 4 st (36)
Round 54: Sc in the next 17 st. Repeat *Dec, Sc in the next st* 5 times. Sc in the next 4 st (31)
Round 55-64: *Sc* all around (31)
Stuff the body firmly now. Continue stuffing after each round.
Round 65: Skip the next stitch, then repeat *Dec, Sc in the next 3 st* all around (24)
Round 66-69: *Sc* all around (24)
Round 70: *Dec, Sc in the next 2 st* all around (18)
Round 71-77: *Sc* all around (18)
Round 78: *Dec, Sc in the next st* all around (12)
Round 79-80: *Sc* all around (12)
Finish off, leaving long tail of yarn for sewing. Sew the remaining stitches closed and weave in ends.
Horns: (Make 2)
In Grey

Round 1: 6 Sc into a Magic Ring (6)
Round 2: *Sc* all around (6)
Round 3: *Inc* all around (12)
Round 4-5: *Sc* all around (12)
Finish off, leaving a long tail for sewing. Pin the horns on as shown, making sure to add stuffing before fully sewing closed. Once done, weave in ends and cut any excess yarn.
Ears: (Make 2)
In White

Round 1: 6 Sc into a Magic Ring (6)
Round 2: *Inc* all around (12)
Round 3: *Inc, Sc in the next st* all around (18)
Round 4: *Inc, Sc in the next 2 st* all around (24)
Finish off, leaving a long tail for sewing. Fold the hear in half, then pin on as shown. Sew on. Once sewn on, weave in ends and cut any excess yarn.
Arms/Legs: (Make 4)
In White

Round 1: 6 Sc into a Magic Ring (6)
Round 2: *Inc* all around (12)
Round 3: *Inc, Sc in the next st* all around (18)
Round 4-7: *Sc* all around (18)
Round 8: Sc in the next 5 st. Repeat *Dec, Sc in the next st* 4 times. Sc in the next st (14)
Round 9: Sc in the next 5 st. Dec 4 times. Sc in the next st (10)
Round 10-16: *Sc* all around (10)
Finish off, leaving a long tail for sewing. Stuff the arms and legs. Now pin the arms/legs on as shown and sew on. Once sewn on, weave in ends and cut any excess yarn.

Back Spikes: (Make 3)
In White

Round 1: 6 Sc into a Magic Ring (6)
Round 2: *Sc* all around (6)
Round 3: *Inc* all around (12)
Round 4: *Sc* all around (12)
Round 5: *Inc, Sc in the next st* all around (18)
Finish off, leaving a long tail for sewing. Pin the spikes on as shown, do not stuff them! Make sure you pin the spikes on so they are flat. Once sewn on, weave in ends and cut any excess yarn.

Wings: (Make 2)
In White

Row 1: Ch 3. Sc in the 2nd Ch from the hook. Sc in that same st. Inc in the next st (4)
Row 2: Ch 1 and turn. Inc in the next st, Sc in the next 2 st, Inc in the next st (6)
Row 4: Ch 1 and turn. Inc in the next st, Sc in the next 4 st, Inc in the next st (8)
Row 5: Ch 1 and turn. Inc in the next st, Sc in the next 6 st, Inc in the next st (10)
Row 6: Ch 1 and turn. Inc in the next st, Sc in the next 8 st, Inc in the next st (12)
Row 7: Ch 1 and turn. Inc in the next st, Sc in the next 10 st, Inc in the next st (14)
Row 8: Ch 1 and turn. Inc in the next st, Sc in the next 12 st, Inc in the next st (16)
Row 9: Ch 1 and turn. Inc in the next st, Sc in the next 14 st, Inc in the next st (18)
Row 10: Ch 1 and turn. Inc in the next st, Sc in the next 16 st, Inc in the next st (20)
Row 11-13: Ch 1 and turn. Sc in the next 20 st (20)
Row 14: Ch 1 and turn. SlSt in the first st. Repeat *2 Dc in each of the next 2 st, SlSt in the next 2 st* 4 times. 2 Dc in each of the next 2 st, SlSt in the next st.
Now crochet entirely around the edges of the wing. Once you complete going around the wing, finish off and leave a long tail for sewing. Pin the wings on as shown and sew on. Once sewn on, weave in ends and cut excess yarn.

Tail Spike:
In Grey
Round 1: 6 Sc into a Magic Ring (6)
Round 2: *Sc* all around (6)
Round 3: *Inc* all around (12)
Round 4: *Sc* all around (12)
Round 5: *Inc, Sc in the next st* all around (18)
Round 6-7: *Sc* all around (18)
Finish off, leaving a long tail for sewing. Pin the tail on as shown and sew on. Once sewn on, weave in ends. Cut any excess yarn.

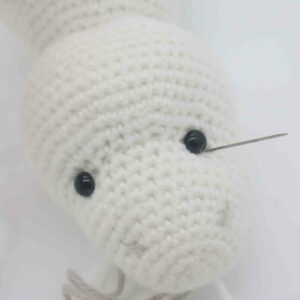
Face Definition:
In White
Take a 12″ piece of yarn and place it on a needle. Insert the needle where shown (Pic 1). Pull needle out next to the right of the toy’s eye (Pic 2).
1. 2.
2.
Reinsert needle to the left of the toy’s eye (Pic 3). Pull needle out where shown, about 1 stitch over from where we originally inserted the needle (Pic 4).
3. 4.
4.
Reinsert needle 1 stitch over (Pic 5). Pull needle out at the right side of the left eye (Pic 6).
5. 6.
6.
Reinsert needle at the left side of the left eye (Pic 7). Pull needle out at the same stitch where we originally inserted out needle (Pic 8).
7. 8.
8.
Pull both ends of yarn firmly to tighten the toy’s face (Pic 9). Tie both ends of yarn together a few times to form a knot. Bring the tail ends of yarn into the toy’s head to hide the knot. Cut excess yarn. Done!
9. 10.
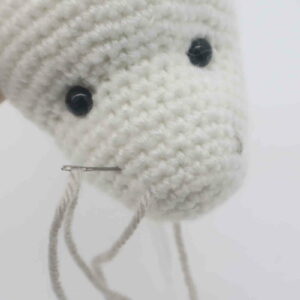
Nostrils:
In Grey Yarn
Insert needle with thread into the bottom of the toy’s head (Pic 1). Pull needle out at where shown (Pic 2).
1. 2.
2.
Insert needle a few stitches above as shown (Pic 3). Pull needle out at the left area as shown (Pic 4). Reinsert needle a few stitches above as shown (Pic 5). Pull needle out anywhere. Tie the ends of yarn into firm knots. Bring the knots inside the toy to hide, cutting any excess yarn.
3. 4.
4. 5.
5. 6.
6.


97 Comments
Do you know approximately how many yards of yarn are needed for this project? I would be using #4 medium weight yarn. Thank you and have a good one! 🙂
I used a little under 4 yards for the body and about 2 for the wings and other parts
I’m wondering this as well.
Oh my goodness! He’s so cute! I will definitly be making him soon. 😉
Wings are actually 13 rows, pattern is missing row 3
❤️ lovely pattern and love my little guy
I was knitting from plush yarn and therefore in many moments I had to change the pattern. Thank you for your hard work! despite this, it was very useful
Struggling with row 25 on the body. 24 is correct but 25 makes no sense. Its not logical the math.
Couldn’t wait to make this pattern! Have a question though. Round 8, sc inc* all the way around I made it 36 not 30? Am I miss counting somehow? Thankyou 😀
You have to Increase one stitch sc next stitch increase next stitch. So every other will be an increase an next will be a sc
everytime i try to make round. 13 i miss one stitch for the last 3 sc?.. can someone explain?
Thank you! and btw i LOVE this patern!!!
I think it’s meant to be Row 8; *Inc, Sc in next 3 stitches* Repeat all the way around.
H, I just started making this adorable dragon and I think you have a typo in round 8 of the body. To increase the round from 24 to 30 it should be “Inc, Sc in the next 3 st” all around. Hopefully this will help prevent some confusion and frustration for others 🙂 thank you for your wonderful patterns!!
This looks so cute! I have noticed that rounds 66 and 67 of the body seem to be missing though. Should it be “Rounds 66-69” or “Rounds 66-67”?
Thanks!
hello, it means that you need to sc around during rounds 66, 67, 68 and 69 :)) (the – means TO, ex : from 66 to 69)
Wings – row 3 is skipped.
Is the numbering for the wings just off? Line 3 seems to be missing. Thanks
I love this dragon! I’m very much a beginner, and row 13 is very confusing for me. I did the first 9 SC in FLO, but I don’t understand what else to do in the row after that.
Thank you for you help:)
Im having the same issue. Did you ever get this figured out?
I believe it’s wants us to do *9 SC FLO, [INC, 2 SC] x6, 3 SC* (36)
Thank you this helped me so much!!
No the correct pattern is 9 sc in both loops and then in Front Loops in [Inc, 2 sc] and do that 6 times IN FRONT LOOPS. Then return back to both loops and do 3 sc.
Im lost on row 13. The numbers don’t work out. I’ve tried to interpret what I’m doing wrong but to no avail. Some explanation would be great cuz I really love this pattern.
I’m stuck on that, too…
Ahhh I finally have the perfect yarn for this and row 13 has me stumped!
I love it so far! But row 14 of the wing has me very confused. I’m not sure what I’m missing! Does anyone know if there is a video tutorial or somewhere I can get more direction?
Took me a bit to figure it out but here it is:
-1 SlSt
-do this 4 times: 2 Dc in 1 st, 2 Dc in 1 st, 1 SlSt, 1 SlSt
-2 Dc in 1 st
-2 Dc in 1 st
-1 SlSt
Thanks so much! 🙂
Does the *inc, 2sc* also work in FLO as well for the following rounds?
I need some clarification on how to start the wings. Can anyone help?
Love this pattern and all your patterns🧶💜
Looks great! About how many yards did you use for the head/ body?
Great pattern, and easy to put together. I just saw that there is a small typo (in the body with the increase) but I did report it
Pattern was easy to follow & came out super cute! Made one for my daughter! 💜😍
LOVE THIS
Aww thank you! 🙂
Also just finished my son one! These turn out too cute! 😌
So, my friend and I started this last night. As we were late into the night, we stopped at row 12 so my friend could go home. I decided to continue and finally figured out Row 13 (Long explanation: Single crochet in the first 9 stitches. In Front Loop Only {AKA: the outside loop} repeat “Increase 1 stitch, single crochet the next 2” 6 times. Working both loops, single crochet in the next 3 stitches.) However, as I got through row 15 (my stopping point for the night), I notice the markers for where the eyes are supposed to be are a bit weird. One (stitch 8) is 1/4 way up the left side and the other eye (stitch 15) is the halfway point of that row. And this is with the circle end point being directly on the bottom, which makes it look like it’s expanding properly. So, I am a bit confused about the placement of the eyes. If the working loop is at the bottom (after doing a whole row), then aren’t the eyes in the wrong place? And is the working loop at the end of the row is not the bottom of the dragon, then isn’t it expanding lopsided? (The gold pin at the bottom is the beginning/ed of my row, while the 2 silver pins are the markers for the eyes.)
I have the same issue, did you find a solution?
Did you figure this out? I was stumped too. I’m about to just omit the eye markers and figure it out myself once the head is done.
I am puzzled by this too.
I figured the eyes are supposed to be centered in the FLO-part? I’d place the on stitch 15 and 21 instead. Anyone else can confirm this?
I flipped it so the 3 SC were first, and the 9 were at the end. It’s a better match for the remaining rows of the head. It makes the beginning at the right side of the head if you’re looking at it. Then, on mine at least, the beginning went to the bottom as I was finishing the head and working toward the neck. By the time I got to the body, the beginning was on the bottom, which made sense with the expansion there.
OMG, thank you so much! I couldn’t fathom why it was looking strange and I thought I was putting the markers in the wrong place….but I knew I wasn’t. I must have re-done those rows 4 times hoping it would look different. I finally searched the comments for someone addressing this. You MUST do 3SC, then the FLO series, then 9SC. Why haven’t the above instructions been changed to reflect this? (BTW, I’m using Bernat Baby chunky yarn that I got from a thrift store and my dragon is gonna be HUGE! My whole hand fits into the snout alone!)
I had the same problem but i saw this after i had got to row 40 so im going to re-do it again now
Thank you so much! So glad I came to the comments before moving on. I kept doing row 13 over and over trying to figure out it out and thinking the eyes and forehead were not going to line up. I’m at row 33 now and things are looking amazing!
This was a really fun pattern! I wanted a little ragamuffin dragon and I really like how it turned out. My baby really likes the horns and the spikes, as they feel a bit nipply. The pdf was really clear and easy to print and take with me. Thanks!
thank you for this pattern!! it turned out so well and colorful :))
thank you for this pattern!! it turned out so well and colorful 🙂
(thanks from France :P)
At row 13 do i have to make only the 9sc in flo or the inc, 2sc x6 in Flo too?
The first 9 and last 3 are normal sc’s,
Reverse the 9SC and 3SC or your eyes won’t be in the correct place. Row 13 should be 3SC, then the FLO series of stitches, then 9SC.
OMG thank you so much!
Merci pour ce patron, il a fallu que je modifie 2-3 trucs pour m’adapter à l’épaisseur de ma laine !!!
I’m unsure about row 23 is the total number of stitches suppose to be 43 I have tried it a million different ways and can’t seem to come up with that number and not sure if I’m doing something wrong. TIA
I can’t figure out the last row of the wing. I noticed that row 3 was skipped so I added it and am ending with 22 stitches. But I can’t get the last row to wave like it shows in the pictures. What am I doing wrong?!
I can’t figure out the last row of the wings. How do the curved edges shape? I feel as if a DC in a round must be different than DC…. Is there a video somewhere or at least a final stitch count somewhere for this last row, then maybe I can figure it out.
Such a cute little pattern. I got stuck on the same areas as the others, but figured it out in the end. Perhaps the author should fix line 13 to make it more legible, and then correct lines 3/4 (row 3 being left out). Other than that, a fairly simple and easy pattern. The only thing I did differently was gave it some eye brows lol. I would totally make this again. I was able to finish it in a day.
*** I mean lines 3/4 under the ‘Wings’ section ***
These are the row yarn markers for where I crossed over. This is looking from the bottom. Again, when I started, the beginning was on the right side of the head (looking at it in the eyes), and as I worked, it moved to the bottom.
Absolutely adore this pattern, it worked great! I did make the mistake of using size 7 yarn which did make is adorable but also over 3 feet long and it used over 3 balls of yarn! Totally worth it though 🙂
Voilà, merci pour ce modèle
J ai remplacé les mailles serrés de la dernière ligne des ailes par des brides
Here’s my finished product!
Is this pattern done in a continuous circle? I’m new to amigurumiu.
Yes
It’s a really cute pattern! But the wings have me a little stumped, how do you skip a row?
I can say that I’m working on some new colors because he came out so cute. I found it challenging at certain parts, mostly row 13 and the subsequent expansion of the head, along with the eye placement (which I ended up choosing after the face was done). The rest was easy.
Hi!! How did you end up doing Row 13 of the head? I’ve read through all the comments but keep debating the method. Thank you!!
Where are the instructions for the tail? Thanks
I was also wondering this. Did you figure it out, or can someone please help us with this? Did I miss something in the instructions?
Shortly after asking that, I stared at the pattern for a long time until I realized what I had personally done wrong and managed to undo and fix it
The tail connects to the body, It’s one piece so there’s no separate pattern for it.
I’m confused where is Row 3 for the wings? It skips directly to row 4.
Thanks
After a ch 1 and turn, sc in each stitch across…no increase in this row.
Super cute pattern! Made one for my sister for Christmas 🙂 she’s bound to love it!
My dragon so far is looking weird. Not sure if I’m doing something wrong
I don’t know why it’s flaring like that
Personally I think your project is flaring due to your tension. It could be too tight. I’m not 100% sure though, as I’m a pretty new beginner.
Thank you for posting this free pattern! I have been teaching myself how to crochet through YouTube and written patterns for about 3 months and I dreamed of making a Dragonfruit dragon. It took me a week to make this big guy but it was so worth it!!
You have done an amazing job on your dragon! I’d say exceptional as you have only started to crochet 3 months ago! Wow!
I love the dragon I purchased the pattern and payed for it though PayPal but I did not get a email to download it I sent at least 5 emails to you but still had no response from you . You had my money but you have given me the pattern it does not give me the confidence to order any more patterns from you.
Also made it as one of my first projects :3 and I am honestly pretty happy about how it turned out :3
Love it! About how many yards did you use for the body?
Thank you so much! How many balls of white yarn do I need?
I’m trying to make the wings and i have no clue what to do for row 14, I know how to do a normal decrease but every time I try to make this row mine doesn’t look like the pictures and I have no idea what I’m doing wrong!! Someone please explain this to me as a complete beginner
*DC* means Double Crochet. You need to learn how to knit double crochet. Good luck!
it’s actually not a decrease but a double crochet. I also made this mistake, but when you realise it’s not a decrease, it’s easy to figure out.
If you don’t know how to do a double crochet you can search it on YouTube. there’s plenty of easy to understand tutorials there. Hope this helps:))
This is my little golden dragon <3
love it so much, thank you for sharing the pattern
Hello, I don’t understand where we should put the eyes ? Which row and which st ?
I had a blast making my cute blue dragon. My husband is in love with it.
I had a blast making my cute blue dragon. My husband is in love with it. In fact I have a friend who wants one.
I’ve made 2 of these so far and love making them.
Love this pattern.
Cute pattern worked up quickly and turned out adorable. Or at least I think it is adorable. This one is a birthday gift for a friend. My daughter found a dragon scale day bag and the dragon fits perfectly in the bag. Thanks for sharing your pattern.
i think I did this wrong 🙁 my guy is all slanted, both of my little guys actually. I made one with acrylic yarn and his neck is very stretched with holes but that’s my fault. Its head kind of looks like this ( |. so I made another one with fluffy yarn but it’s doing the same thing, I think I’m accidentally switching my order of stitches. :p
Thank you so much for the pattern! It turned out super cute!
She’s adorable! I used leftover yarn from a baby blanket to make the little dragon for big sister. I’m am absolute beginner so she’s not perfect, but she’s good enough😉 The corrections in the comments explain the few problems I had, and I’ll likely make another for the practice. Thank you for a fun pattern!
I’m really proud of how this came out! This is the largest crochet animal I have made this far. Made is for my niece!