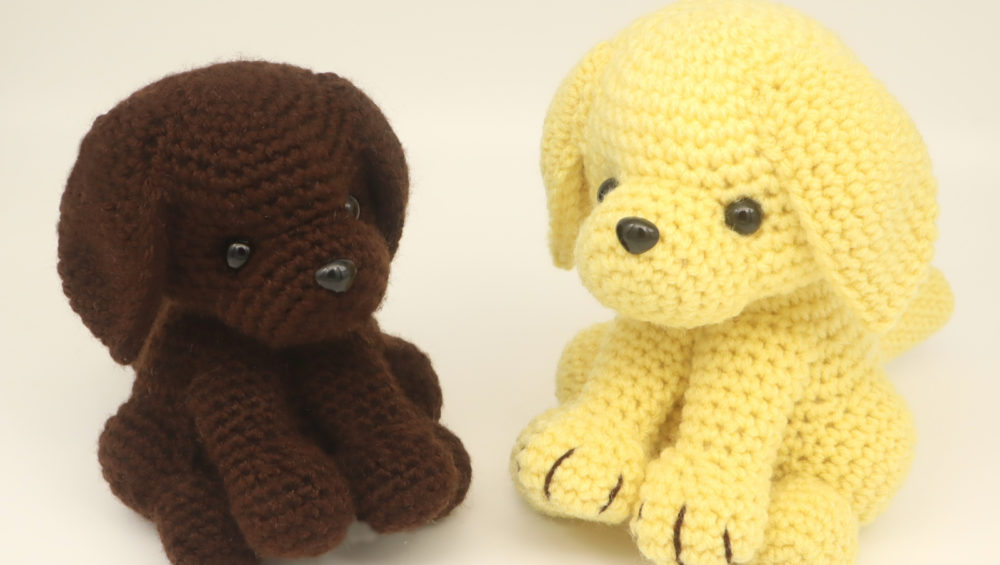
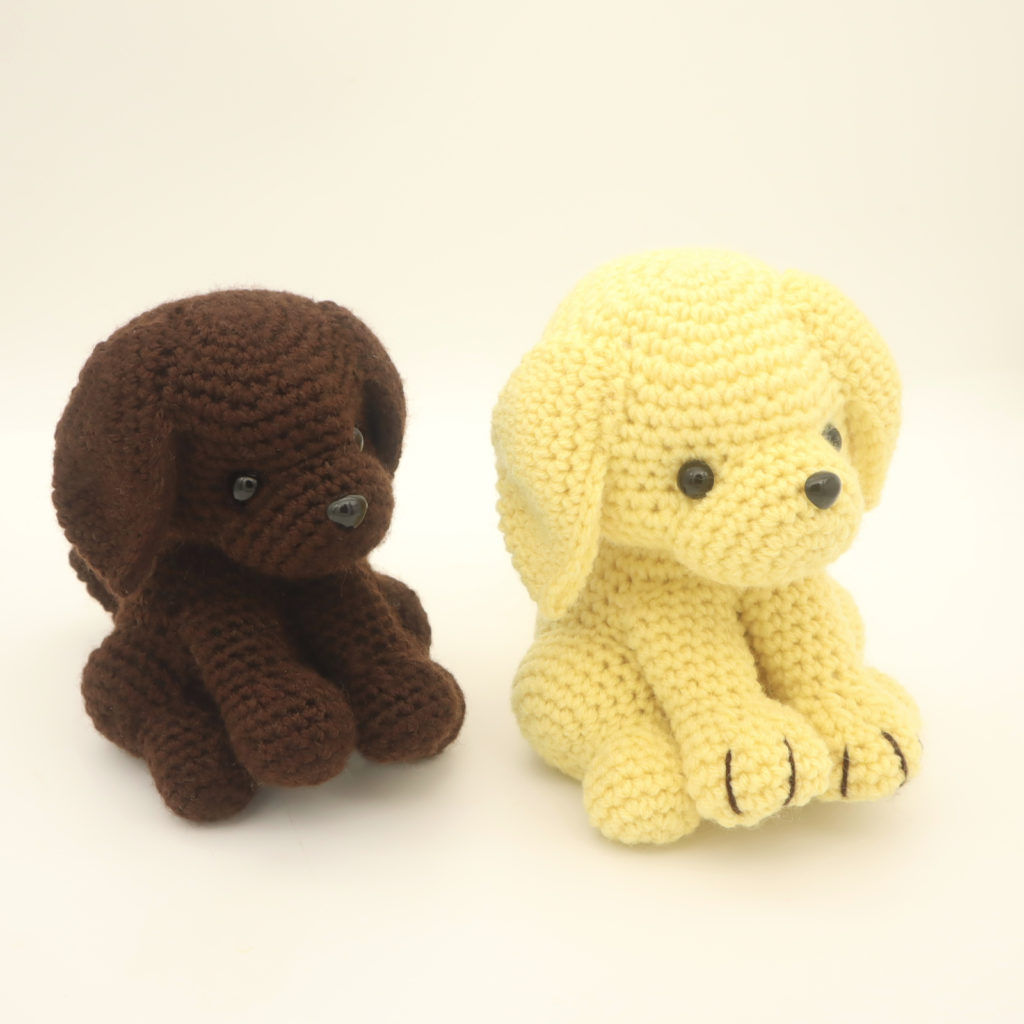
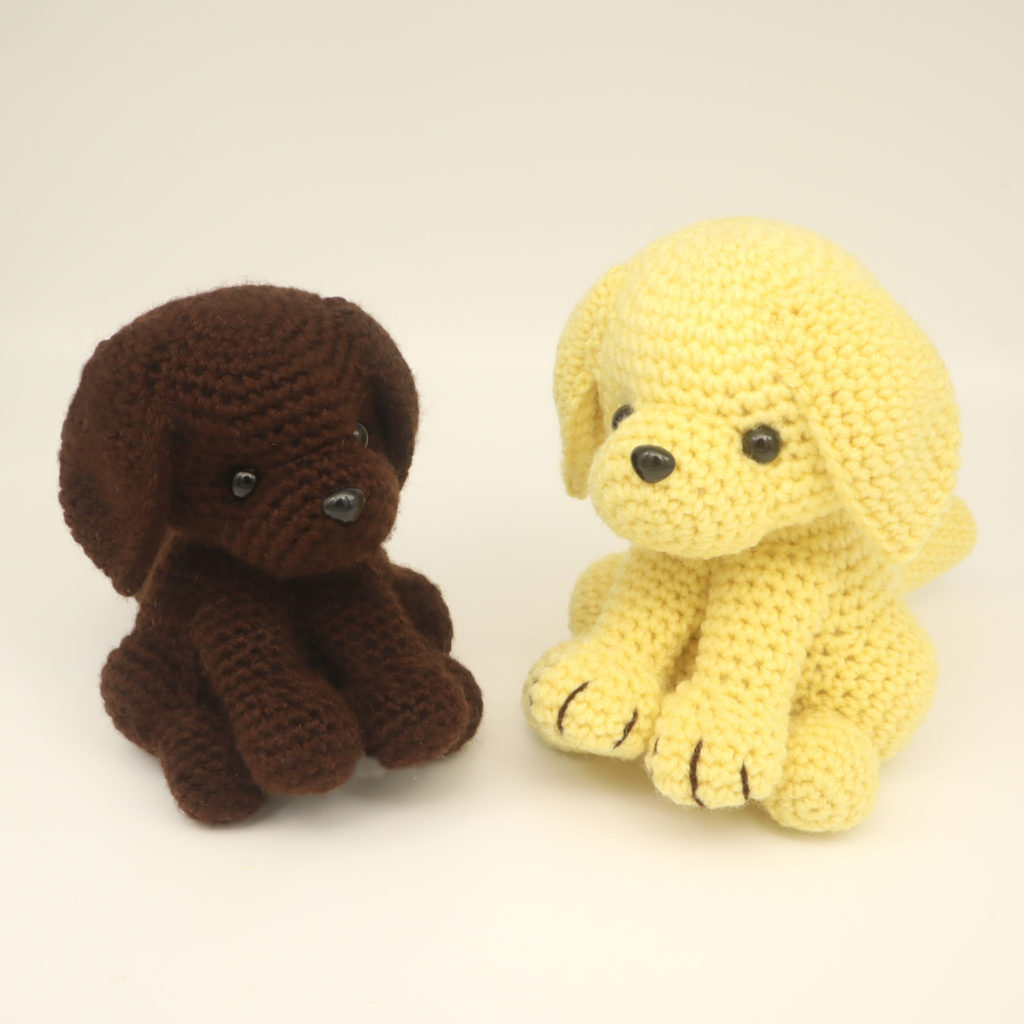
Labrador Dog Amigurumi – Free Crochet Pattern
Print this pattern out – purchase the PDF version here!


 Supplies:
• Yarn 4/Medium Weight in:
Brown, Light Yellow, or Black
•4mm Crochet Hook
•Tapestry needle
•Scissors
•Stuffing
•12mm safety eyes, 12mm safety nose
Additional Information:
•Difficulty: Easy, but lots of sewing.
•Size: 7.5″ inches tall
These cute Labradors are easy to make and result in such a cute toy. If you’re a dog lover, this pattern is for you! Even though this pattern is for a Labrador, you can just make it a generic dog! You could even customize the colors so it looks like your dog 🙂 Just add any specific spots in certain areas and you’ll have your very own dog in toy form!
All of the pieces in this pattern are very simple and use basic stitches. However, there are a lot of pieces which need to be sewn on.
Let’s get started!
Head/Body:
In main color

Round 1: 6 Sc into a Magic Ring (6)
Round 2: *Inc* all around (12)
Round 3: *Inc, Sc in the next st* all around (18)
Round 4: *Inc, Sc in the next 2 st* all around (24)
Round 5: *Inc, Sc in the next 3 st* all around (30)
Round 6: *Inc, Sc in the next 4 st* all around (36)
Round 7: *Inc, Sc in the next 5 st* all around (42)
Round 8-12: *Sc* all around (42)
Now we will mark where to place the eyes. Add a different colored stitch marker into the 20th and 27th stitch in Round 12.
Round 13-16: *Sc* all around (42)
Round 17: *Dec, Sc in the next 5 st* all around (36)
Round 18: *Dec, Sc in the next 4 st* all around (30)
Round 19: *Dec, Sc in the next 3 st* all around (24)
Add the eyes into the marked areas now.
Round 20: *Dec, Sc in the next 2 st* all around (18)
Round 21: In the FLO (Front Loop Only), *Inc, Sc in the next 2 st* all around (24)
Round 22: In BOTH Loops, repeat *Inc, Sc in the next 3 st* all around (30)
Round 23-24: *Sc* all around (30)
Round 25: *Inc, Sc in the next 4 st* all around (36)
Round 26-27: *Sc* all around (36)
Round 28: *Inc, Sc in the next 5 st* all around (42)
Round 29-34: *Sc* all around (42)
Stuff the head now.
Round 35: *Dec, Sc in the next 5 st* all around (36)
Round 36: *Dec, Sc in the next 4 st* all around (30)
Round 37: *Dec, Sc in the next 3 st* all around (24)
Round 38: *Dec, Sc in the next 2 st* all around (18)
Stuff the body now. Continue stuffing after each round.
Round 39: *Dec, Sc in the next st*all around (12)
Round 40: *Dec* all around (6)
Finish off, leaving a long tail for sewing. Sew the remaining stitches closed. Once done, weave in ends and cut any excess yarn.
Muzzle:
In Main Color

Round 1: 6 Sc into a Magic Ring (6)
Round 2: *Inc* all around (12)
Round 3: *Inc, Sc in the next 2 st* all around (16)
Round 4: *Sc* all around (16)
Now we will mark where to place the safety nose. Add a different colored stitch marker into the 6th stitch in Round 4.
Round 5-6: *Sc* all around (16)
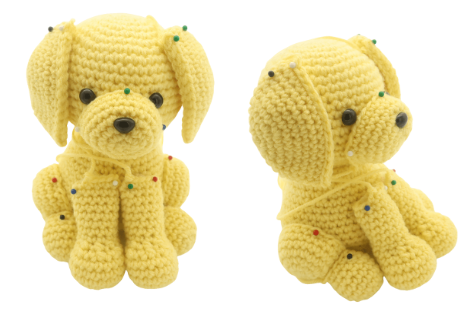
Finish off, leaving a long tail for sewing. Add the nose to the marked area in Round 4 now. Pin the muzzle to the toy as shown. Sew on – be sure to firmly stuff the muzzle before fully sewing closed. Once done, weave in ends and cut any excess yarn.

Ears: (Make 2)
In Main Color

Round 1: 6 Sc into a Magic Ring (6)
Round 2: *Inc* all around (12)
Round 3: *Inc, Sc in the next st* all around (18)
Round 4: *Inc, Sc in the next 2 st* all around (24)
Round 5: *Inc, Sc in the next 3 st* all around (30)
Round 6-10: *Sc* all around (30)
Round 11: Fold the ear in half so the stitches align as shown (Pic 1). Going through BOTH stitches as shown (Pic 1), SlSt down until the ear is closed (Pic 2-3).
Once done, finish off, leaving a long tail for sewing. Pin the ears on as shown and sew on. Weave in ends and cut any excess yarn.
1. 2.
2. 3.
3.

Legs: (Make 2)
In Main Color

Round 1: 6 Sc into a Magic Ring (6)
Round 2: *Inc* all around (12)
Round 3: *Inc, Sc in the next st* all around (18)
Round 4: *Inc, Sc in the next 2 st* all around (24)
Round 5-7: *Sc* all around (24)
Finish off, leaving a long tail for sewing. Pin the legs onto the side of the toy as shown. Sew on – be sure to firmly stuff the leg before fully sewing on. Once done, weave in ends and cut any excess yarn.

Foot: (Make 2)
In Main Color

Round 1: 6 Sc into a Magic Ring (6)
Round 2: *Inc* all around (12)
Round 3: *Inc, Sc in the next 2 st* all around (16)
Round 4-6: *Sc* all around (16)
Round 7: *Dec, Sc in the next 2 st* all around (12)
Round 8: *Sc* all around (12)
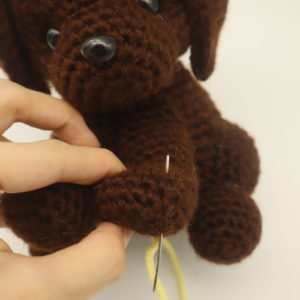
Finish off, leaving a long tail for sewing. Stuff the foot firmly now. Pin the foot to the front of the toy’s leg as shown. When we do this, the dog should be able to sit comfortably. If yours doesn’t sit, readjust the foot. Once sewn on, weave in ends and cut any excess yarn.

Arms: (Make 2)
In Main Color

Round 1: 6 Sc into a Magic Ring (6)
Round 2: *Inc* all around (12)
Round 3: *Inc, Sc in the next st* all around (18)
Round 4-6: *Sc* all around (18)
Round 7: Sc in the next 6 st. Repeat *Dec, Sc in the next st* 3 times. Sc in the next 3 st (15)
Round 8: Sc in the next 6 st. *Dec* 3 times. Sc in the next 3 st (12)
Round 9-16: *Sc* all around (12)
Finish off, leaving a long tail for sewing. Stuff the foot firmly, and stuff the arm lightly. Pin the arms on as shown. Sew on. Once sewn on, weave in ends. Cut any excess yarn.
Toes: (Optional)
In Contrast Color
Insert needle with thread into the bottom right side of the toy’s paw as shown (Pic 1). Pull needle out at the top area as shown (Pic 1). Reinsert needle into the original insertion spot as shown (Pic 2). Pull needle out at the top middle area as shown (Pic 3). Reinsert needle into the middle area of the bottom of the paw as shown (Pic 4). Pull needle out at the top left area of the paw (Pic 5). Reinsert needle into the bottom left area of the toy’s paw and pull needle out at the original insertion spot (Pic 6). You will have two ends of yarn. Pull both ends of yarn at the same time to tighten the paw’s shaping (Pic 7).
1. 2.
2. 3.
3. 4.
4. 5.
5. 6.
6. 7.
7.
Tail:
In any color

Round 1: 6 Sc into a Magic Ring (6)
Round 2: *Inc* all around (12)
Round 3-17: *Sc* all around (12)
Finish off, leaving a long tail for sewing. Stuff the bottom of the tail firmly, leaving the opening side of the tail lightly stuffed. This will help the tail not stick straight out, it will look more natural. Pin the tail to the back of the toy as shown. Sew on. Once sewn on, weave in ends and cut any excess yarn.
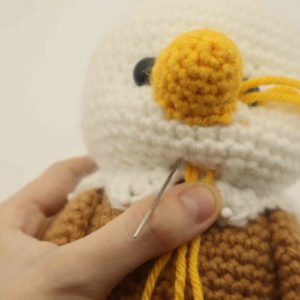
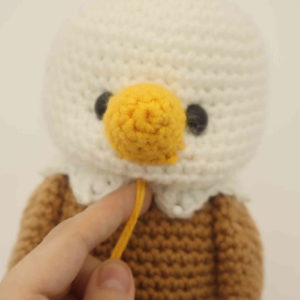
Face Definition: (Optional)
In main color
Face definition can make the toy look cuter! The pictures show an eagle, but the steps are the exact same no matter which animal you try this technique out with.
Take a 12″ piece of white yarn and place it on a needle. Insert the needle where shown (Pic 1). Pull needle out next to the right of the toy’s eye (Pic 2).
1.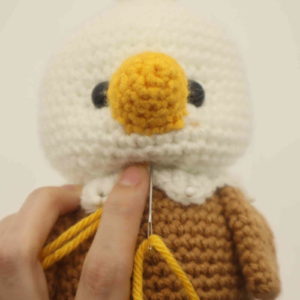 2.
2.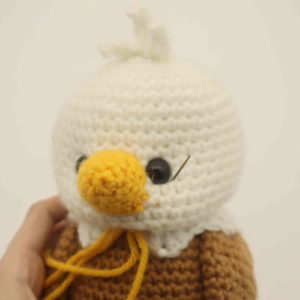
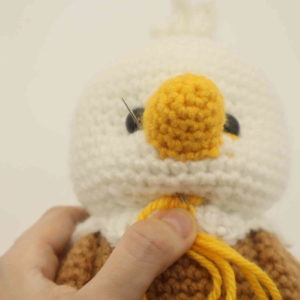
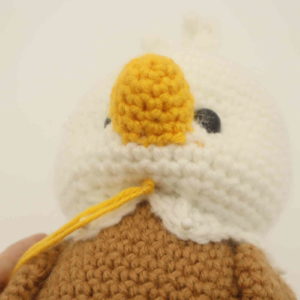
Reinsert needle to the left of the toy’s eye (Pic 3). Pull needle out where shown, about 1 stitch over from where we originally inserted the needle (Pic 4).
3. 4.
4.
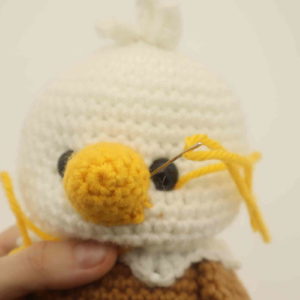
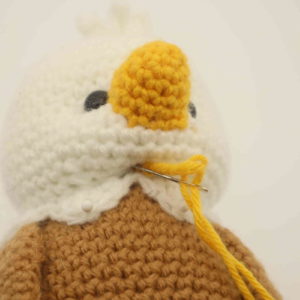
Reinsert needle 1 stitch over (Pic 5). Pull needle out at the right side of the left eye (Pic 6)
5. 6.
6.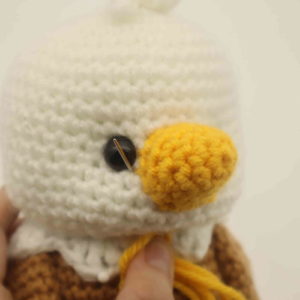
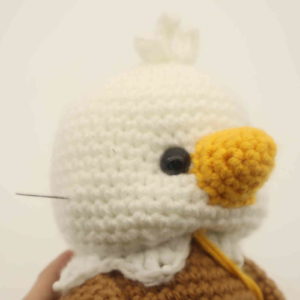
Reinsert needle at the left side of the left eye (Pic 7). Pull needle out at the same stitch where we originally inserted out needle (Pic 8).
7. 8.
8.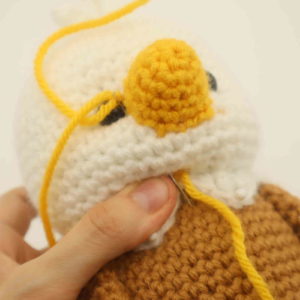
Pull both ends of yarn firmly to tighten the toy’s face (Pic 9). Tie both ends of yarn together a few times to form a knot (Pic 10).
9. 10.
10.
Bring the tail ends of yarn into the toy’s head to hide the knot (Pic 11-12). Cut excess yarn.
11. 12.
12.
Done! If you made this dog, I would LOVE to see it! You can show me by posting a picture in the comments section underneath this post 🙂


20 Comments
Is it possible for Pinterest for your projects. I do not have a printer.
Hi Ronda! If you’d like, you can pin this pattern on Pinterest 🙂
Why does the dog pattern show part of the eagle pattern in the directions?
Hi Sharon!
That section is to show how to do the face shaping technique. The pattern shows an eagle, but the method is the exact same regardless of which animal you try the technique on. Basically, we are threading yarn from the lower neck area to the eyes, back to the toy’s neck. We then pull the strings, which will tighten the face and give it a cuter shape!
I hope this could help answer your question 🙂
NO idea
This is a cute pattern. Can you do one of a. American Bulldog, please? My brother loves those.
Thank you.
Hi
Thanks for the pattern, I lost my lab last week and it was great therapy to make this little guy
Omg. Thank you for you pattern. I will definitely try this out. Your instructions are also very detailed. Thank you. thank you
😍😍
Loved making this for my sister, whose best friend just crossed the rainbow bridge.
If I wanted to make this a bit bigger would I just use a bigger hook?
Chose a more playful colour and used a velvet yarn… I think it turned out pretty well.
great pattern! made it for my little cousin’s birthday! so cute!
I just made this dog for my friends birthday and it’s so cute!!! I’ll definitely be making one for myself
Adjusted the ears to make them stand up.
Thank you for this pattern. It was easy to follow and turned out so cute!
I decided to turn her into an angel for my brother-in-law who just lost his best friend.
From round 1 to round 21 the head and than round 21 to round 40 the bodyor is it the other way around PLEASE TELL ME IM ABOUT TO CRY
The head is the first part crocheted then the body is the second, so round 1-21 is the head and round 21-40 is the body
Changed the color and ears and made it an australian shepherd
Loved this pattern! I am pretty new to crocheting and this is the largest project I’ve made so far (and my first gift!) and it was very easy to follow. I made it for a friend’s birthday, modifying and adding to it slightly to make it look like her dog. She loves it!