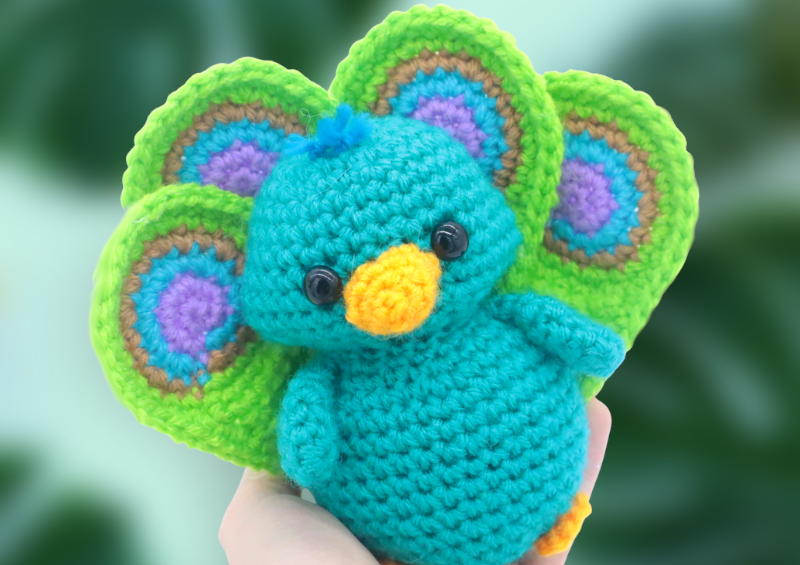
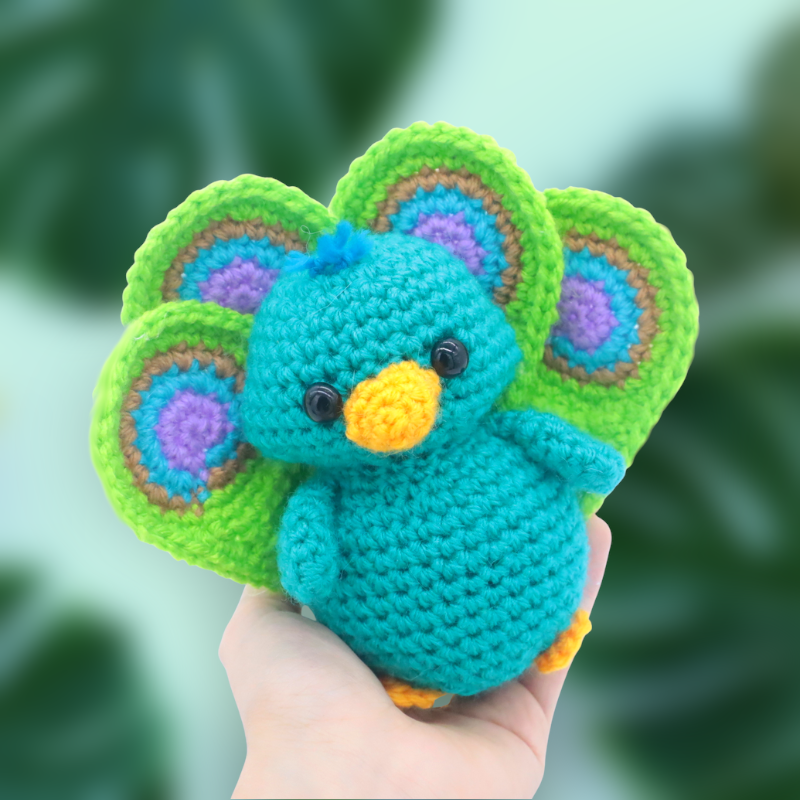
Peacock Amigurumi – Free Crochet Pattern
Print this pattern out – purchase the PDF version here!


 Supplies:
• Yarn 4/Medium Weight Yarn in…
blue, light blue, purple, brown, green, and yellow
•4mm Crochet Hook
•Tapestry needle
•Scissors
•Stuffing
•8mm safety eyes
Additional Information:
•Difficulty: Easy
•Size: 6″ tall
This peacock pattern is great to express your creativity! You can make it in so many different colors 🙂 If peacocks aren’t for you, you can also use the base of the pattern to make any bird you want! This pattern is easy and quick, so it’s great for beginner crocheters and experts who want an easy project.
Let’s get started!
Body:
In Blue

Round 1: 6 Sc into a Magic Ring (6)
Round 2: *Inc* all around (12)
Round 3: *Inc, Sc in the next st* all around (18)
Round 4: *Inc, Sc in the next 2 st* all around (24)
Round 5: *Inc, Sc in the next 3 st* all around (30)
Round 6-8: *Sc* all around (30)
Round 9: Sc in the next 8 st. Inc in the next 3 st. Sc in the next 12 st. Inc in the next 3 st. Sc in the next 4 st (36)
Now we will mark where to add the safety eyes. Add an eye stitch marker into the 18th and 23rd stitch in Round 9.
Round 10-11: *Sc* all around (36)
Round 12: Sc in the next 9 st. *Dec* 3 times. Sc in the next 13 st. *Dec* 3 times. Sc in the next 2 st (30)
Round 13: *Dec, Sc in the next 3 st* all around (24)
Add the eyes in the marked areas now.
Round 14: *Dec, Sc in the next 2 st* all around (18)
Round 15: Working in the Front Loop Only, *Sc* all around (24)
Round 16: In BOTH loops, *Inc, Sc in the next 2 st* all around (30)
Stuff the head now.
Round 17: *Inc, Sc in the next 3 st* all around (36)
Round 18: *Inc, Sc in the next 4 st* all around (42)
Round 19-25: *Sc* all around (42)
Round 26: *Dec, Sc in the next 4 st* all around (36)
Round 27: *Dec, Sc in the next 3 st* all around (30)
Stuff the body now. Continue stuffing after each round.
Round 28: *Dec, Sc in the next 2 st* all around (24)
Round 29: *Dec, Sc in the next st* all around (18)
Round 30: *Dec* all around (6)
Finish off now and sew the remaining stitches together. Weave in ends and cut any excess yarn.
Beak:
In Yellow

Round 1: 6 Sc into a Magic Ring (6)
Round 2: *Sc* all around (6)
Round 3: *Inc, Sc in the next st* all around (9)
Round 4: *Sc* all around (9)
Finish off, leaving a long tail for sewing. Lightly stuff the beak. Pin on as shown and sew on. Weave in ends and cut any excess yarn.

Feathers: (Make 4)
Start in purple

Round 1: 6 Sc into a Magic Ring (6)
Round 2: *Inc* all around (12)
Round 3: Change to Lighter Blue. *Inc, Sc in the next st* all around (18)
Round 4: Change to Brown. *Inc, Sc in the next 2 st* all around (24)
Round 5: *Inc, Sc in the next 3 st* all around (30)
Row 6: Sc in the next 9 st.
Row 7: Ch 1 and turn. Dec 1 time, Sc in the next 5 st, Dec 1 time (7)
Row 8: Ch 1 and turn. Sc in the next 7 st (7)
Row 9: Ch 1 and turn. Dec 1 time, Sc in the next 3 st, Dec 1 time (5)
Row 10-11: Ch 1 and turn. Sc in the next st (5)
Row 12: Ch 1 and turn. Dec 1 time, Sc in the next st, Dec 1 time (3)
Row 13-16: Ch 1 and turn. Sc in the next 3 st
Row 17: Working along the edge of the feather, Sc around the entire feather. This will make the edge look cleaner. Finish off once you meet the beginning. Pin the feathers on as shown, making the two middle feathers higher than the outer feathers. Sew or hot glue on. Once done, weave in ends and cut any excess yarn.

Arms: (Make 2)
In Blue

Round 1: 6 Sc into a Magic Ring (6)
Round 2: *Sc* all around (6)
Round 3: *Inc, Sc in the next st* all around (9)
Round 4-6: *Sc* all around (9)
Round 7: *Inc, Sc in the next 2 st* all around (12)
Finish off, leaving a long tail for sewing. I didn’t stuff my arms because I like them laying flat to the body, but you can add a little stuffing if you’d like. Now pin the arms on as shown and sew on. Weave in ends and cut any excess yarn.
Feet: (Make 2)
In Yellow

Round 1: 6 Sc into a Magic Ring (6)
Round 2: *Inc* in the next 3 st (9)
Finish off, leaving a long tail for sewing. Pin the feet on as shown and sew or hot glue on. Once done, weave in ends and cut any excess yarn.

Hair:
In Blue
Thread a small piece of blue yarn through the top of the toy’s head. Only pull the yarn half way through. With both ends of the yarn, tie a firm knot two times. Trim the hair and untwist the yarn edges to make the hair fluffy. Repeat this with one more piece of yarn.


Tail:
In Green

Row 1: Ch 14. Dc in the 2nd Ch from the hook. Dc into the same st. Dc 2 times in each of the next 2 chains. Trc 2 times in each of the next 7 chains. Dc 2 times in each of the next 3 chains. Finish off, leaving a long tail for sewing. Pin the tail on as shown and sew or hot glue on. Weave in ends. Cut any excess yarn.

 All done! If you made a peacock, I would LOVE to see! You can show me by posting a picture in the comments below this post 🙂


14 Comments
Hi! Really excited for this one. On the body, between Round 14 and 15 it goes from 18 stitches to 24 but round 15 just includes Sc stitches. Am I missing something or is there a typo? Thank you!
I was wondering the same thing
Had to improvise a little but finished no problem! Thank you for the pattern!
How did you improvise this to fix it? Yours looks great!
It looks like a typo because round 16 is the stitch pattern to make 24 stitches.
I completed my peacock! He’s so cute. And yes, there seems to be something missing at rounds 14 and 15 so I improvised. Also, there is no instructions to change to green on the feathers, but I figured that out too. Thanks for the cute pattern!
I had such fun making this little guy! I made the stingray too. I love your stuff so much that I purchased an annual membership! Guess I’m an official StringyDingDong now. When my husband asked who I was giving the peacock to I told him “no one — I am making myself an entire zoo!” 🙂 I’m going to start with birds first — looking forward to making more of your bird patterns. Do you have a bird book coming out? Thanks!
Love how you used a multicolored yarn and body color for the feathers.
Love the little peacock. Same issues as above. I’m pretty sure it’s just the stitch counts that are off starting with row 15 of the body. Also, row 5 of feather seems to be missing note to change to green.
Enjoyed making your peacock and loved how it turned out.
I started making this and realized the same issue with row 15. My row 15 has 18 stitches and all the row stitch counts are off. Can anyone who improvised say what they did or what they think the stitch count should be?
Thanks – yes, please for those who improvised say how, or maybe the Creator would answer the questions about how it is off? Very cute project, but hesitant to start if the pattern is off. Thanks again.
I was really excited to make this peacock for a coworker, and have made other items from Stringy DingDing, but for some reason really struggled with this pattern. Following the instructions, my row count was wrong. So then I’d adjust to get the appropriate amount of stitches at the end of my round, triple check it was the same number that matched to the instructions, but then my next round would be messed up too. Honestly, from row 14 onward for the body, things just never worked the way they were written. I frogged about 6 times, but finally just somehow pieced it together and it ended up a peacock still! Super cute and glad I stuck with it! Maybe it was just an off day for my brain and it wasn’t connecting, but I’m the end I like how it turned out!
Love the pattern! From round 14 on in the body the pattern is good just the total numbers are off! When I was making I would just look at the pattern and not the numbers. If people need the numbers just subtract 6 from the listed number