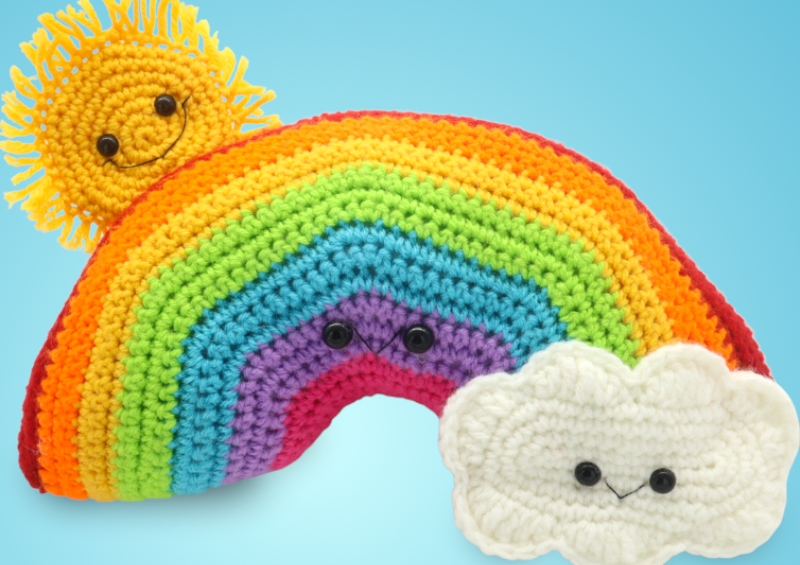
Rainbow Amigurumi – Free Crochet Pattern
Hello everyone! This week we’re releasing a free rainbow amigurumi crochet pattern! The small add ons, such as a sun and cloud, really make this rainbow pop! This rainbow is a great item to make for Valentine’s Day and is especially great to make for St. Patrick’s Day. Most of all – if you just want to brighten someone’s day – make them this rainbow! Let’s start making the rainbow now.
Purchase the PDF version here!


 Supplies:
• Yarn 4/Bulky Weight in…
Red, orange, yellow, green, blue, purple, pink, and white
•4mm Crochet Hook
•Tapestry needle
•Scissors
•Stuffing
•12mm safety eyes for rainbow, 10mm eyes for the sun and cloud
•Black Embroidery Thread
Additional Information:
Difficulty: Easy
Let’s get started!
The rainbow is created by working in rows. We will make two rainbow pieces and crochet them together. After making the rainbow, we will make the sun. Lastly, we will make the cloud!
Rainbow: (Make 2)
Start in pink
Row 1: Ch 15. Sc in the 2nd Ch from the hook, Sc in the next st. Repeat *Inc, Sc in the next 2 st* 4 times (18)
Row 2: Sc in the next st. Repeat *Inc, Sc in the next 3 st* 4 times. Sc in the next st (22)
Row 3: Sc in the next st, Repeat *Inc, Sc in the next 4 st* 4 times. Sc in the last st (26)
Row 4: Change to Purple. Sc in the next st, *Inc, Sc in the next 5 st* 4 times. Sc in the last st (30)
Row 5: Sc in the next st. Repeat *Inc, Sc in the next 6 st* 4 times. Sc in the next st (34)
Now we will mark where to place the eyes. Add a stitch marker into the 14th and 20th stitch of Row 5.
Row 6: Sc in the next st. Repeat *Inc, Sc in the next 7 st* 4 times. Sc in the next st (38)
Row 7: Change to Blue. Sc in the next st. Repeat *Inc, Sc in the next 8 st* 4 times. Sc in the next st (42)
Add eyes into the marked areas now 
Row 8: Sc in the next st. Repeat *Inc, Sc in the next 9 st* 4 times. Sc in the next st (46)
Row 9: Sc in the next st. Repeat *Inc, Sc in the next 10 st* 4 times. Sc in the next st (50)
Row 10: Change to Green. Sc in the next st. Repeat *Inc, Sc in the next 11 st* 4 times. Sc in the next st (54)
Row 11: Sc in the next st. Repeat *Inc, Sc in the next 12 st* 4 times. Sc in the next st (58)
Row 12: Sc in the next st. Repeat *Inc, Sc in the next 13 st* 4 times. Sc in the next st (62)
Row 13-15: Change to Yellow. Ch 1 and turn. Sc in the next 62 st (62)
Row 16-18: Change to Orange. Ch 1 and turn. Sc in the next 62 st (62)
Row 19: Change to Red. Sc in the next st. Repeat *Inc, Sc in the next 14 st* 4 times. Sc in the next st (66)
Finish off the first piece you make. DON’T finish off the second piece. Instead, continue on the following steps.
Rainbow Assembly:
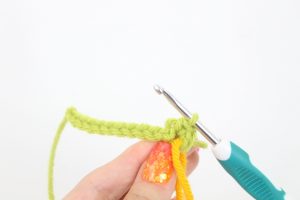
Place the two rainbow pieces together – have the WRONG SIDES face each other. This means the ugly side of the safety eyes will be out towards us and the pretty side of the eyes are on the inside (Pic 1). Line up the rainbow’s stitches together (Pic 2). Insert your hook through BOTH stitches (Pic 3). Yarn over (Pic 4).
1. 2.
2. 3.
3. 4.
4.
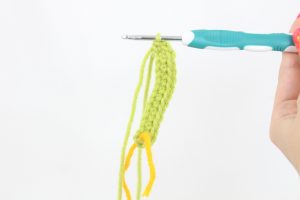
Pull the yarn through (Pic 5-6). Yarn over again (Pic 7). Pull through both loops (Pic 8).
5. 6.
6. 7.
7. 8.
8.
You have just made one single crochet! (Pic 9). Continue crocheting the rainbow together with a single crochet. Continue single crocheting when you meet the side of the rainbow (Pic 10). Change to the next color by using the finished off tail end of the next color yarn (Pic 11-12). Once you meet the curve, continue making the single crochets together (Pic 13).
9. 10.
10. 11.
11. 12.
12.
Single crochet the next side, but DO NOT single crochet the last 3 colors together (Pic 14). Finish off here and leave this strand uncut because we will use it later. Tie the other strands of yarn together to form firm knots and cut excess yarn (Pic 15).
13. 14.
14. 15.
15.
Rainbow Assembly Part 2:
Look at the hole we left (Pic 1). Bring the inside of the rainbow out through that hole (Pic 2-4). The correct side of the rainbow will now be exposed (Pic 4). Stuff the rainbow firmly now (Pic 4). After this, using the yellow tail of yarn we left, sew the remaining stitches closed (Pic 6). Weave in ends.
1. 2. 3.
3. 4.
4. 5.
5. 6.
6.
Smile:
Black Embroidery Thread
Insert needle next to the toy’s right eye and pull the needle out next to the toy’s left eye as shown (Pic 1). Reinsert needle into the original insertion spot (Pic 2), and pull needle out at the middle as shown, making sure the needle lands ABOVE the thread (Pic 2). Reinsert needle into the same spot, making sure the needle lands BELOW the thread (Pic 3). Pull needle out at the original insertion spot (Pic 3). Tie both ends of thread into a firm knot and bring into the toy to hide. Cut any excess thread. Done! (Pic 4).
1. 2.
2. 3.
3. 4.
4.
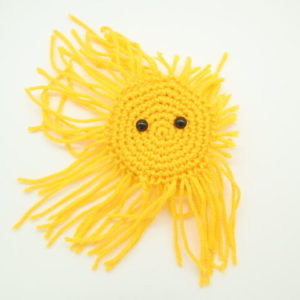
Sun:
In yellow

Round 1: 6 Sc into a Magic Ring (6)
Round 2: *Inc* all around (12)
Round 3: *Inc, Sc in the next st* all around (18)
Round 4: *Inc, Sc in the next 2 st* all around (24)
Round 5: *Inc, Sc in the next 3 st* all around (30)
Round 6: *Inc, Sc in the next 4 st* all around (36)
Round 7: *Inc, Sc in the next 5 st* all around (42)
Round 8: In the BLO (Back Loop Only), *Dec, Sc in the next 5 st* all around (36)
Round 9: In BOTH Loop,s *Dec, Sc in the next 4 st* all around (30)
Round 10: *Dec, Sc in the next 3 st* all around (24)
Round 11: *Dec, Sc in the next 2 st* all around (18)
Round 12: *Dec, Sc in the next st* all around (12)
Round 13: *Dec* all around (6)
Finish off, leaving a long tail for sewing. Sew the remaining stitches closed. Weave in ends.
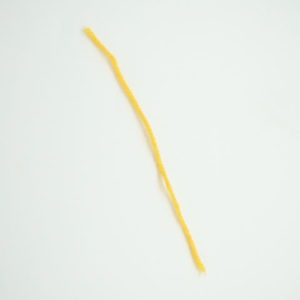
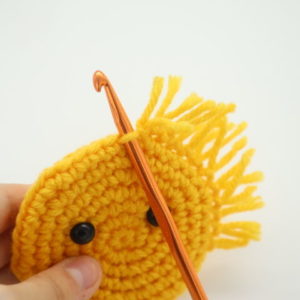
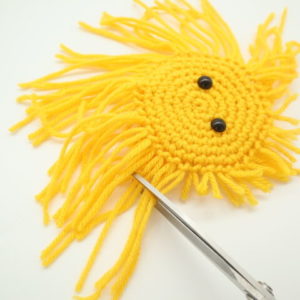
Sun Rays:
In Yellow
Take a ~4″ piece of yarn (Pic 1). Insert your hook into one of the front loops we left in Round 8 (Pic 2). Yarn over with the strand (Pic 3) and pull it through the loop (Pic 4-5).
1. 2.
2. 3.
3. 4.
4.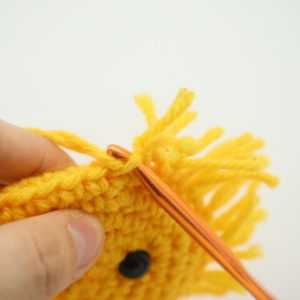 5.
5.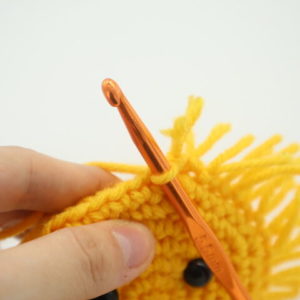
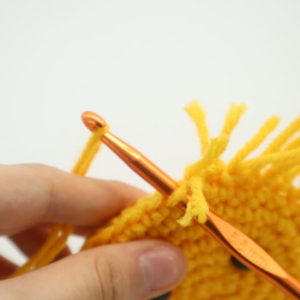
Yarn over with both ends of the strand (Pic 6) and pull through (Pic 7-8). Repeat this all around (Pic 9). Trim the yarn to your liking (Pic 10). Done!
6. 7.
7.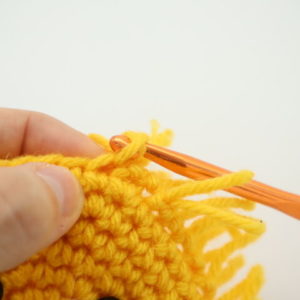 8.
8. 9.
9. 10.
10. 11.
11.
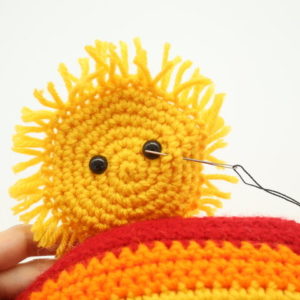
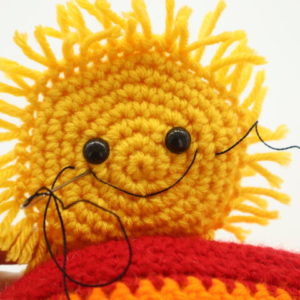
Sun Smile:
In black embroidery thread
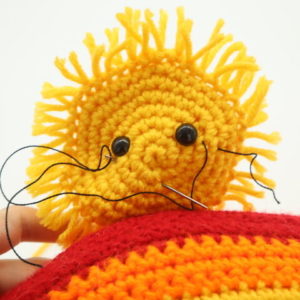
Insert needle with thread a few stitches over from the right sun’s eye as shown (Pic 1) and pull needle out at next to the left of the sun’s right eye (Pic 1). Insert needle next to the sun’s left eye (Pic 2). Pull needle out at the middle of the sun as shown, making sure the needle lands ABOVE the thread (Pic 2). Reinsert needle into the same spot, making sure the needle lands BELOW the thread (Pic 3). Pull the needle to the left of the left eye as shown (Pic 3). Reinsert needle where shown (Pic 4).
1. 2.
2. 3.
3. 4.
4.
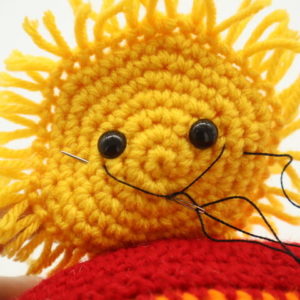
Pull needle out as the right side of the eye as shown (Pic 5). Reinsert needle into the next stitch to the left as shown (Pic 6). Tie both tail ends of thread into firm knots. Bring the knots into the sun to hide. Cut any excess thread.
Pin the sun on as shown and sew on. Weave in ends.
5.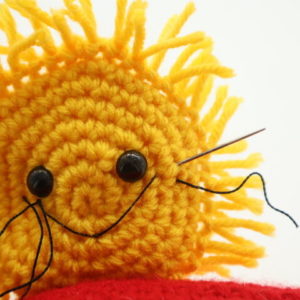 6.
6.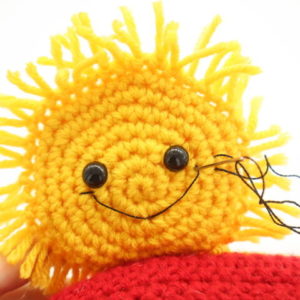 7.
7.
Cloud: (Make 2)
In White

The cloud is made by creating a chain and working COMPLETELY around the chain to form a round.
Round 1: Ch 13 (Pic 1). Sc 3 times in the 2nd Ch from the hook (Pic 2). Sc in the next 10 st. Sc 3 times in the last Ch. Now we’re at the end of the chain (Pic 3). Turn your work to the OTHER side of the chain, where we haven’t made any stitches yet (Pic 4). Working on that other side, Sc in the next 10 st (Pic 5, Stitch count: 26) Add eye stitch markers into the 19th and 24th stitch.
1. 2.
2. 3.
3. 4.
4. 5.
5.
Round 2: *Inc* in the next 3 st, Sc in the next 10 st, *Inc* in the next 3 st. Now we’ll be working on the other side, Sc in the next 10 st (32)
Round 3: Repeat *Inc, Sc in the next st* 3 times. Sc in the next 10 st. Repeat *Inc, Sc in the next st* 3 times. Sc in the next 10 st (38)
Round 4: Repeat *Inc, Sc in the next 2 st* 3 times. Sc in the next 10 st. Repeat *Inc, Sc in the next 2 st* 3 times. Sc in the next 10 st (44)
Round 5: Repeat *SlSt in the next 2 st, Dc 2 times in the next st, Trc 1 time in the next 2 st, Dc 2 times in the next st* 6 times.
SlSt in the next 2 st, Dc 2 times in the next st, Trc 1 time in the next 2 st, Dc 2 times in the next st, Dc in the next st, SlSt in the next st.
Finish off the first piece you make. DON’T finish off the second piece you make. Instead, continue on the next step. Add eyes into the marked areas now.
Assembly:
Place the two cloud pieces together, making sure the eyes are facing out (Pic 2) and the stitches line up together (Pic 3). Going through BOTH stitches (Pic 4), Sc the clouds together until they’re fully crocheted together. Once done place the cloud on the right side of the rainbow and sew on. Weave in ends.
1. 2. 3.
3. 4.
4.
Cloud Smile:
In black embroidery thread
Insert needle next to the toy’s right eye and pull the needle out next to the toy’s left eye as shown (Pic 1). Reinsert needle into the original insertion spot (Pic 2), and pull needle out at the middle as shown, making sure the needle lands ABOVE the thread (Pic 2). Reinsert needle into the same spot, making sure the needle lands BELOW the thread (Pic 3). Pull needle out at the original insertion spot (Pic 3). Tie both ends of thread into a firm knot and bring into the toy to hide. Cut any excess thread. Done! (Pic 4).
1. 2. 3. 4.


4 Comments
The rainbow pattern doesn’t have any information for the color Orange. Can you please share that info?
hi!! love the pattern, but what is the pattern for the orange row?
This is such a cute pattern! Thank you for sharing.
Hi, do your patterns use US crochet terminology?