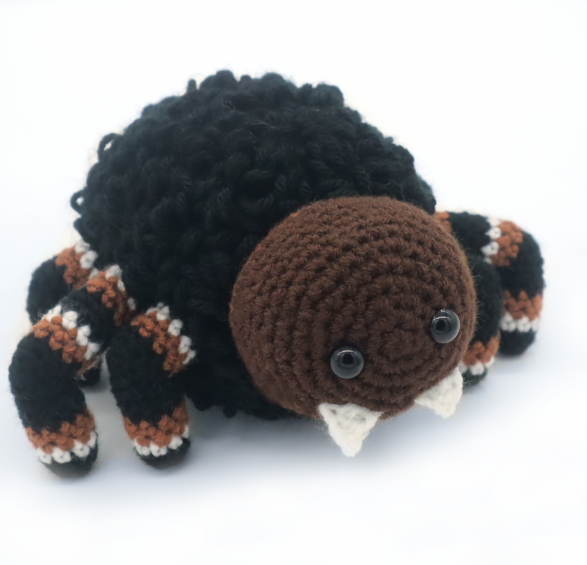
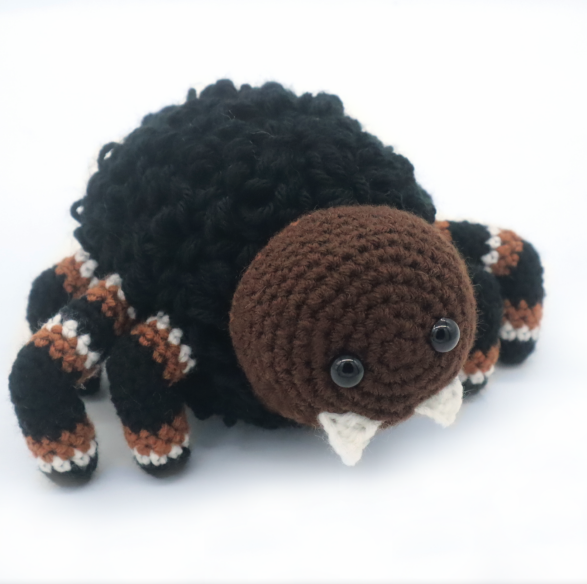
Spider Amigurumi – Free Crochet Pattern
Print this pattern out – purchase the PDF here!

 Supplies:
• Yarn 4/Medium Weight Yarn in…
Black, brown, light brown, and white
•4mm Crochet Hook
•Tapestry needle
•Scissors
•Stuffing
•12mm safety eyes
Additional Information:
Difficulty: Easy
Size: 8″ long
In real life, I’m very afraid of spiders… but not this little guy! This easy spider amigurumi is so cute you’ll want to give him a hug. Notice that the body of this pattern has a unique texture thanks to the use of loop stitches. In fact, for beginners, this is a great pattern to practice loop stitches on an uncomplicated, reasonably sized pattern (your spider will be about 8 inches long when completed). This adorable little spider is perfect for Halloween or as a decoration any time of year. Enjoy!
How to do a loop stitch:
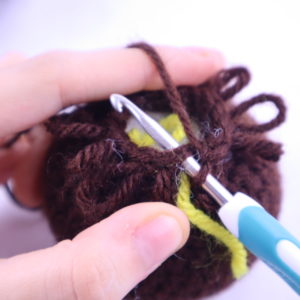
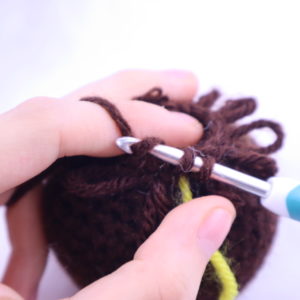
Insert your hook into the next stitch (Pic 1).
1.
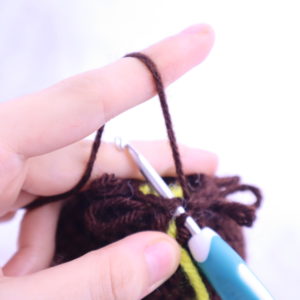
Hold the yarn as shown (Pic 2).
2.
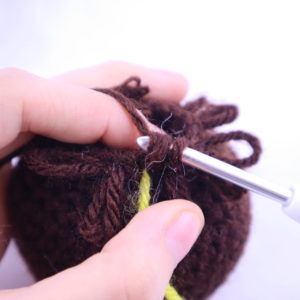
Pull the yarn on the left with your hook through the stitch (Pic 3-5).
3.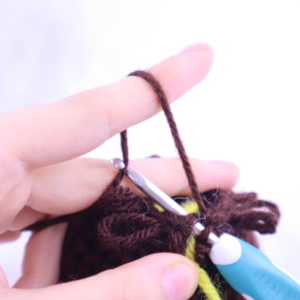 4.
4.
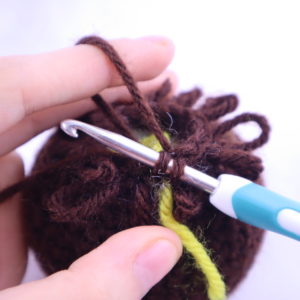
You will have 2 loops on your hook (Pic 5).
5.
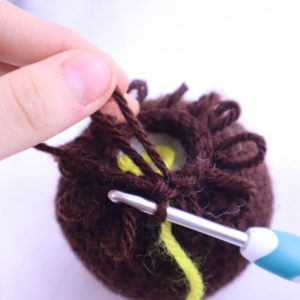
Yarn over and pull through both loops (Pic 6-8). You’ve made 1 loop stitch, it will be a loop at the back.
6. 7.
7. 8.
8.
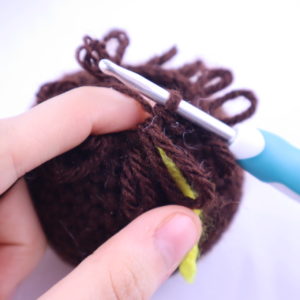
Bring the loop to the front (Pic 9-10). Continue crocheting!
9. 10.
10.
Supplies:
• Yarn 4/Medium Weight Yarn in…
Black, brown, light brown, and white
•4mm Crochet Hook
•Tapestry needle
•Scissors
•Stuffing
•12mm safety eyes
Additional Information:
In real life, I’m very afraid of spiders… but not this little guy! This easy spider amigurumi is so cute you’ll want to give him a hug. Notice that the body of this pattern has a unique texture thanks to the use of loop stitches. In fact, for beginners, this is a great pattern to practice loop stitches on an uncomplicated, reasonably sized pattern (your spider will be about 8 inches long when completed). This adorable little spider is perfect for Halloween or as a decoration any time of year. Enjoy!
Head/Body:
In Brown
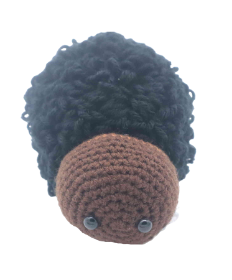
Round 1: 6 Sc into a Magic Ring (6)
Round 2: *Inc* all around (12)
Round 3: *Inc, Sc in the next st* all around (18)
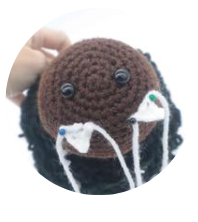
Now we will mark where to place the eyes. Add an eye stitch marker into the 5th and 15th stitch. Later we will replace these eye stitch markers with the safety eyes.
Round 4: *Inc, Sc in the next 2 st* all around (24)
Round 5: *Inc, Sc in the next 3 st* all around (30)
Round 6: *Inc, Sc in the next 4 st* all around (36)
Add eyes into the marked areas now.
Round 7-12: *Sc* all around (36)
Round 13: Change to light brown. *Sc* all around (36)
Round 14: *Dec, Sc in the next 5 st* all around (30)
Round 15: *Dec, Sc in the next 4 st* all around (24)
Round 16: *Dec, Sc in the next 3 st* all around (18)
Round 17: Change to Black. Working in the Front Loop Only, *LpSt* all around (18)
In the following rounds we will be making increases. Simply make two loops stitches into the same stitch to form an increase. “LpSt” stands for loop stitch. Follow the previous instructions to learn how to do a loop stitch.
Round 18: *Inc, LpSt in the next 3 st* all around (24)
Round 19: *LpSt* all around (24)
Stuff the head firmly now.
Round 20: *Inc, LpSt in the next 4 st* all around (30)
Round 21: *Inc, LpSt in the next 5 st* all around (42)
Round 22-24: *LpSt* all around (42)
Round 25: *Inc, LpSt in the next 6 st* all around (48)
Round 26: *LpSt* all around (48)
Round 27: *Dec, LpSt* in the next 6 st* all around (42)
Round 28-30: *LpSt* all around (42)
In the following rounds we will make decreases. Simply make a regular decrease!
Round 31: *Dec, LpSt in the next 5 st* all around (36)
Round 32-33: *LpSt* all around (36)
Round 37: *Dec, LpSt in the next 4 st* all around (30)
Round 38-39: *LpSt* all around (24)
Stuff the body firmly now. Continue stuffing after each round.
Round 40: *LpSt* all around (24)
Round 41: *Dec, LpSt in the next 2 st* all around (18)
Round 42: *Dec, LpSt in the next st* all around (12)
Round 43: *Dec* all around (6)
Finish off, leaving a long tail for sewing. Sew the remaining stitches closed and weave in ends.
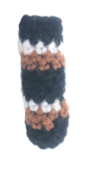
Small Arms: (Make 4)
In Black

We’re making 4 small arms, 2 for each side of the spider. The small arms are sewn on, then later we will add the legs to the arms.
Round 1: 6 Sc into a Magic Ring (6)
Round 2: *Inc, Sc in the next st* all around (9)
Round 3-4: Change to brown. *Sc* all around (9)
Round 5: Change to Light Brown. *Sc* all around (9)
Round 6: Change to White. *Sc* all around (9)
Round 7-8: Change to black. *Sc* all around (9)
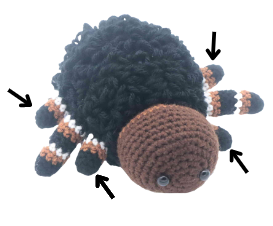
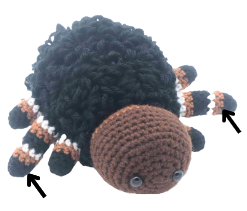
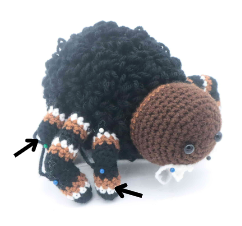
Finish off, leaving a long tail for sewing. Stuff the arms firmly. Pin the small arms on the outer sides of the spider as shown. Sew on. Once sewn on, weave in ends and cut any excess yarn.
Big Arms: (Make 2)
In Black
We’re making 2 big arms, 1 for each side of the spider. The big arms are sewn on, then later we will add the legs to the arms.
Round 1: 6 Sc into a Magic Ring (6)
Round 2: *Inc, Sc in the next st* all around (9)
Round 3-4: *Sc* all around (9)
Round 5-6: Change to Light Brown. *Sc* all around (9)
Round 7: Change to White. *Sc* all around (9)
Round 8-10: Change to Black. *Sc* all around (9)
Round 11: Change to Light Brown. *Sc* all around (9)
Round 12: Change to White. *Sc* all around (9)
Round 13-15: Change to Black. *Sc* all around (9)
Finish off, leaving a long tail for sewing. Stuff the arms. Pin them on between the short legs as shown and sew on. Once sewn on, weave in ends and cut any excess yarn.
Small Legs: (Make 4)
In Black
We’re making 4 small legs, 2 for each side of the spider. The small legs are sewn onto the small arms.
Round 1: 6 Sc into a Magic Ring (6)
Round 2: *Inc, Sc in the next st* all around (9)
Round 3: *Sc* all around (9)
Round 4: Change to white. *Sc* all around (9)
Round 5-6: Change to light brown. *Sc* all around (9)
Round 7-8: Change to black. *Sc* all around (9)
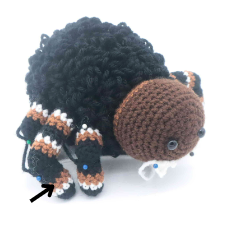
Finish off, leaving a long tail for sewing. Stuff the legs firmly. Pin them on as shown. Align the legs to the arms carefully for a seamless look. Sew on. Once sewn on, weave in ends and cut any excess yarn.
Big Legs: (Make 2)
In Black
We’re making 2 big legs, 1 for each side of the spider. The big legs are sewn onto the big arms.
Round 1: 6 Sc into a Magic Ring (6)
Round 2: *Inc, Sc in the next st* all around (9)
Round 3: *Sc* all around (9)
Round 4: Change to white. *Sc* all around (9)
Round 5-6: Change to Light Brown. *Sc* all around (9)
Round 7-9: Change to Black. *Sc* all around (9)
Finish off, leaving a long tail for sewing. Stuff the legs. Pin them on as shown. Align the legs to the arms carefully for a seamless look. Sew on. Once sewn on, weave in ends and cut any excess yarn.
Teeth: (Make 2)
In White
Row 1: Ch 4. SlSt in the 2nd Ch from the hook, Hdc in the next Ch, Dc in the next ch. Finish off, leaving a long tail for sewing. Pin the teeth on as shown as sew on. Once sewn on, weave in ends and cut any excess yarn.
 Done! If you made a spider I would LOVE to see! You can show me by posting a picture in the comments section underneath this post 🙂


3 Comments
it’s super cute…BUT it needs 2 more legs spiders have 8 legs. i love all your patterns and i hope to see lots more. i have made lots of them and am still making more!!! love AB
WAIT NO it has 8 silly me
A little artistic license but I think it works! 😁