
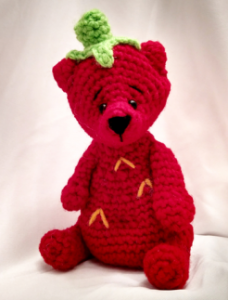
StrawBeary
Purchase the PDF version to this pattern here
You are 100% allowed to sell anything you make from my patterns anywhere, no credit needed, please just don’t sell the actual pattern itself (the written pattern), nor repost the actual pattern itself anywhere (the written pattern). Of course you can link my patterns on your site!
Use 4.00mm hook
3mm Safety eyes
Yarn needed: Medium/4 weight yarn in Red, green, yellow, black embroidery yarn for nose and eyebrows. I used Red Heart Solids.
Head
Row 1: In red, 4 sc in magic ring (4)
Row 2: *inc* all around (8)
Row 3: Sc, inc, sc 3, inc, sc 2 (10)
Row 4: *sc* around (10)
Row 5: Sc 9, inc in last st (11)
Row 6: Sc 1, inc, sc, inc, sc 4, inc, sc 2 (14)
Row 7: Sc 1, inc, sc 2, inc, sc 2, inc, sc 5, inc (18)
Row 8: Sc 1, inc, sc 3, inc, sc 3, inc, sc 7, inc (22)
Row 9: Sc 1, inc, sc 4, inc, sc 4, inc, sc 9, inc (26)
Row 10: Sc 1, inc, sc 5, inc, sc 5, inc, sc 11, inc (30)
Row 11: Sc 1, inc, sc 6, inc, sc 6, inc, sc 13, inc (34)
Row 12-14: *sc* around (34)
Row 15: *dec, sc 6* around, dec in last 2 st (29)
Row 16: *dec, sc 5* around, 1 sc n last st (25)
Row 17: *dec, sc 4* around, 1 sc in last st (20)
Stuff at this point.
Row 18: *dec, sc 3* around, 1 sc in last st (16)
Row 19: *dec, sc 2* around, 1 sc in last st (12)
Row 20: *dec* all the way around (7)
Finish off and add any additional stuffing. Sew shut and leave a tail for sewing.
Body:
Row 1: In red, 6 sc in magic ring (6)
Row 2: *inc* all around (12)
Row 3: *inc, sc* all around (18)
Row 4: *inc, 2 sc* all around (24)
Row 5: *inc, 3 sc* all around (30)
Row 6: *inc, 4 sc* all around (36)
Row 7-11: Sc around (36)
Row 12: Sc 7, dec, sc 3, dec, sc 3, dec, sc 3, dec, sc 12 (32)
Row 13: Sc 7, dec, sc 2, dec, sc 2, dec, sc 2, dec, sc 11 (28)
Row 14-15: Sc around (28)
Row 16: Sc 7, dec, sc 1, dec, sc 1, dec, sc 1, dec, sc 10 (24)
Row 17-18: Sc around (24)
Stuff at this point
Row 19: Sc 7, dec 5 times, sc 7 (19)
Row 20-21: *Sc* around (19)
Row 22: *sc, dec* sc in last st (13)
Finish off but don’t sew shut Add any additional stuffing and pin the head to the body. Leave a tail for sewing.
Legs
Stuff lightly throughout.
Row 1: In red, 4 sc in magic ring (4)
Row 2: *inc* all around (8)
Row 3: *inc, 1 sc* all around (12)
Row 4: sc 3, dec 4, sc 1 (8)
Row 5-11: *sc* around (8)
Finish off and pin to the sides of the body. Leave a tail for sewing.
Arms
Stuff lightly throughout.
Row 1: In red, 4 sc in magic ring (4)
Row 2: *inc* all (8)
Row 3: inc, sc, inc, sc 5 (10)
Row 4: *sc* around (10)
Row 5: dec 3 times, sc 4 (7)
Row 6-12: sc around (7)
Finish off and pin to the upper body. Leave a tail for sewing.
Ears
Row 1: 4 sc in magic ring (4)
Row 2: *inc* all around (8)
Row 3: *sc* around (8)
Finish off and pin to the head. Leave a tail for sewing.
Strawberry Hat
Row 1: In green, 4 sc in magic ring (4)
Row 2: *inc* all around (8)
Row 3: *sc* around in BLO (back loop only) (8)
Row 4-6: *sc* around (8)
Row 7: sc 1, ch 4, sc 3 down ch, sc in next 2 st, ch 4, sc 3 down ch, sc in next 2 st, ch 4, sc 3 down ch, sc in next 2 st, ch 4, sc 3 down, sc in next st and finish off.
Finish off and pin to the head.
Assembly
Make any adjustments before sewing on. Start with sewing on the head. Then sew on limbs.
Details
Sew on face details and eyes before sewing on ears and hat. This will make sure that the placement is perfect 🙂
Insert 3mm eyes around row 7 of the head. Place the eyes about 4 stitches apart. Once you are happy with placement of eyes, remove eyes and insert red yarn going between the two eyes. Now insert thread going back between the two eyes, about 1 st over. Pull thread, this creates a more defined face. Reinsert eyes. (I glue them in)
Now using black embroidery yarn, sew tilted eyebows 2 stitches above the eyes.
Using black embroidery yarn, sew a triangle nose at the tip of the nose. After creating the nose, create a line going from of the tip of the triangle down to make a little mouth.
Now you can sew on ears and hat.
Belly
To give a defined belly button, go from the back of the bear and insert red yarn, going to the belly button area of the bear. Now about 1 st to the left, reinsert yarn going to the same area on the back of the bear. Pull thread and make a knot. Hide knot by leaving a tail and sewing the tail into the bear.
Seeds
Take a darker yellow yarn and create 3 arrows on the bear. These will look like strawberry seeds.


1 Comment
A really super pattern & great little bear,thanks.