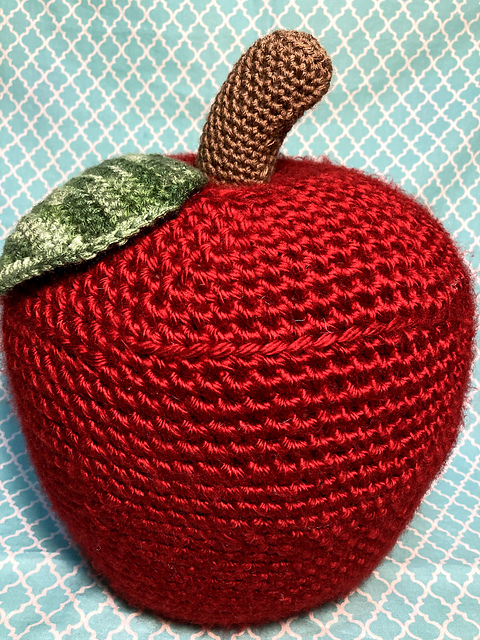
Featured Designer: Giant Apple Free Crochet Pattern – Crocheted by Mia
 I feel like I say this every week, but I’m SO excited to bring you this week’s pattern! This giant apple pattern is created by Mia, a designer who has contributed her pattern to StringyDingDing! She’s our first featured designer. Please give her a warm welcome in the comments section of this post, let her know how like this pattern!
If you’d like to support her, I would really encourage you to buy her PDF version here. It would help show her that people love her work 🙂 Let’s get to know Mia a bit better! Here’s what she’s all about:
Hello, my name is Mia
and I have been crocheting for about a year and a half. I first got into crocheting when I took a class on amigurumi, before that I had no real knowledge of crochet, but I picked it up quickly, and now it’s mostly second nature to me. I am currently working on a lot of orders for my little crochet shop. But I am coming up with a design for a dress, and eventually more stuffed animals. I have a tiny bee pattern in the works as well. I thank Olive for letting me share my pattern with you all and I hope you like it.
My Ravelry is: https://www.ravelry.com/designers/mia-hamby
Print this PDF pattern out – purchase Mia’s PDF pattern here!

Supplies:
•Yarn 6/super bulky weight yarn in red
•Yarn 4/medium weight yarn in brown and green (I used Red Heart Super saver in Green Tones)
•J/10 – 6mm crochet hook
•F/5 – 3.75mm crochet hook
•Tapestry needle
•Stuffing
•Scissors
•One pipe cleaner
•Long dowel
•Good quality tape (heavy duty)
(You can also use a stuffing stick if that is
what you have on hand. Depending on what
stuffing you buy, it should come with one in
the bag)
Additional Information:
Difficulty level-Medium
This pattern is started at the top and shapes the indention of the apple that the stem is placed in. Then we attach the leaf and you’re done.
I used lion brand yarn for the apple body and red heart super saver yarn for the stem and leaf.
Also, unless you have seriously good memory, I recommend using a stitch marker or a scrap of contrasting colored yarn to hold your place.
This apple is HUGE, but despite the daunting number of stitches, it works up quick and is mostly easy.
Have fun!!!
MAKING THE APPLE
Using 6mm hook and size 6 yarn (6)
Round 1: Sc 6 in the MR (6)
Round 2: *Inc.* all around (12)
Round 3: In the flo, *Sc* all around (12)
Round 4: In the blo, *Inc, sc* all around (18)
Round 5: In BOTH loops, *Inc, Sc. 2* all around (24)
Round 6: In the blo, *Inc, Sc. 3* all round (30)
Round 7: In the blo, *Inc, Sc. 4* all around (36)
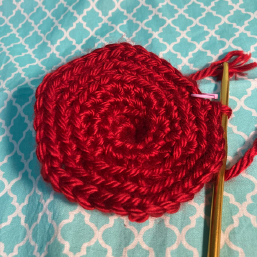
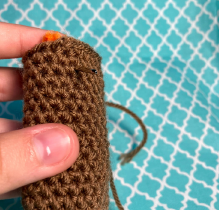
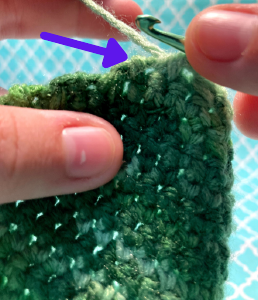
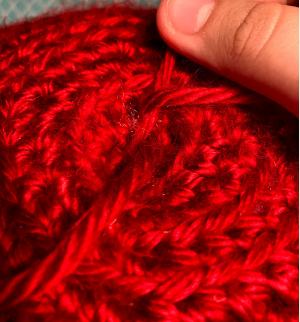
Round 7 indentation pictured below:
Round 8: In BOTH loops, *Sc* all around (36)
Round 9: *Inc, Sc 5* all around (42)
Round 10: *Inc, Sc 6* all around (48)
Round 11: *Inc, Sc 7* all around (54)
Round 12: *Inc, Sc 8* all around (60)
Round 13: *Inc Sc 9* all around (66)
Round 14: *Inc, Sc 10* all around (72)
Round 15: *Inc, Sc 11* all around (78)
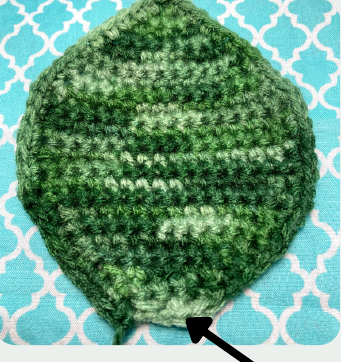
Round 16: *Sc* all around (78)
Round 17: In the blo, *Sc* all around (78)
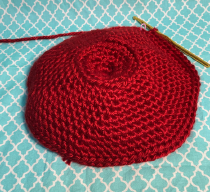
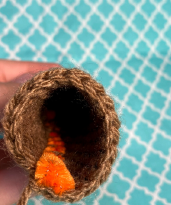
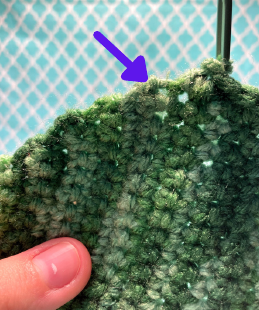
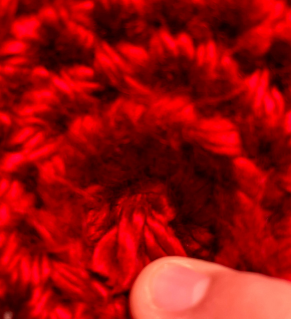
Round 17’s top will look like the picture below:
Round 18-21: In BOTH loops, *Sc* all around (78)
Round 22: *Inc, Sc 12* all around (84)
Round 23-25: *Sc* all around (84)
Round 26: *Dec, Sc 5* all around (72)
Round 27: *Dec, Sc 7* all around (64)
Round 28-36: *Sc* all around (64)
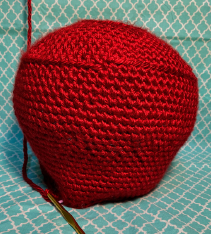
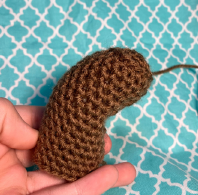
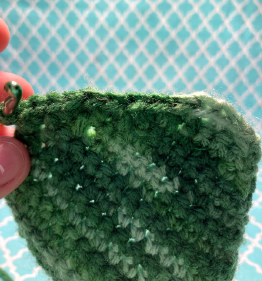
Round 35 will look like the picture below:
Round 37: *Dec, Sc 6* all around (56)
Round 38: *Sc* all around (56)
Round 39: *Dec, Sc 5* all around (48)
Round 40: *Dec, Sc 4* all around (40)
Round 41: *Sc* all around (40)
Start stuffing here and continue in each round
Round 42: In the BLO, *Sc* all around (40)
Round 43: In BOTH loops *Dec, Sc 3* all around (32)
Round 44: *Dec, Sc 6* all around (28)
Round 45: *Dec, Sc 5* all around (24)
Round 45: *Dec, Sc 2* all around (18)
Round 47: *Dec* all around (9)
Fasten off and sew closed. DO NOT CUT AFTER YOU
SEW. Leave a tail about 16-18 inches long. We will
make the indent stay in place later. Set aside for now.
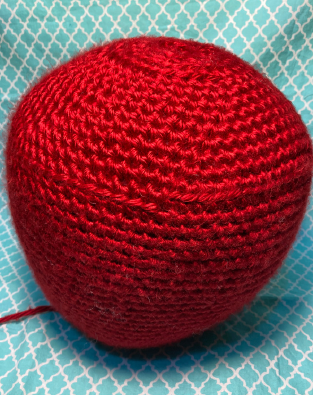 This is the completed apple shape, without modification,
the apple will not look like this when it’s done.
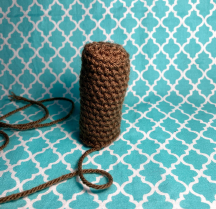
STEM
in Brown
Round 1: 6 Sc in the MR (6)
Round 2: *Inc* all around (12)
Round 3: *Inc, Sc* all around (18)
Round 4: In the BLO, *Sc* all around (18)
Round 5-18: In BOTH loops, *Sc* all around (18)
Fasten off and leave a long tail to sew. get the pipe cleaner and we will sew it into the stem to make the stem bend. (Photo 1) Finished crocheted stem. (Photo 2) Get your pipe cleaner and bend it half, then half again.
. 2.
2.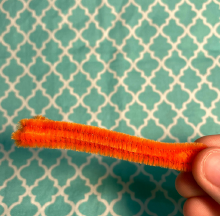
(Photo 3) Insert the pipe cleaner into the stem, and start sewing it on. (Photo 4-5), continue sewing until you get to the top. (Photo 6) Turn, and sew back down to the bottom. (Photo 7) The pipe cleaner is all stitched in. (Photo 8) Bend and stuff the stem. Now you are done with it, set aside for now.
3. 4.
4.
5. 6.
6.
7. 8.
8.
LEAF
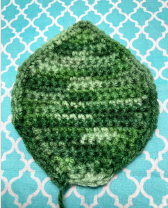
The leaf is started with a Magic ring, because I wanted the leaf to have a nice, perfect leaf shape. If you don’t want to do the Magic ring, simply replace row 1 with:
Ch 3, Sc in the second Ch from hook, Sc in the last Ch.
After this continue to row 2. After it is done, we will crochet around the edge to give it a cleaner look. Then you’re done!
With 3.75 hook and Green tones yarn.
Row 1: Sc 2 in the MR. (2)
Row 2: Ch and turn. *Inc* in all stitches (4)
Row 3: Ch and turn. Inc, Sc in the next 2 St, Inc. (6)
Row 4: Ch and turn. Inc, Sc in the next 4 St, Inc. (8)
Row 5: Ch and turn. Inc, Sc in the next 6 St, Inc. (10)
Row 6: Ch and turn. Inc, Sc in the next 8 St, Inc. (12)
Row 7: Ch and turn. *Sc* in all St. (12)
Row 8: Ch and turn. Inc, Sc in the next 10 St, Inc (14)
Row 9: Ch and turn. Inc, Sc in the next 12 St, Inc. (16)
Row 10-15: Ch and turn. Sc in all St. (16)
Row 16: Ch and turn. Dec, Sc in the next 12 St, Dec. (14)
Row 17: Ch and turn. Dec, Sc in the next 10 St, Dec. (12)
Row 18: Ch and turn. Sc in all St. (12)
Row 19: Ch and turn. Dec, Sc in the next 8 St, Dec. (10)
Row 20: Ch and turn. Dec, Sc in the next 6 St, Dec. (8)
Row 21: Ch and turn. Dec, Sc in the next 4 St, Dec.(6)
Row 22: Ch and turn. Dec, Sc in the next 2 St, Dec. (4)
Row 23: Ch and turn. Dec, in all St. (2)
Leaf edge
After the leaf is crocheted (photo 1), you can crochet around it for a cleaner edge. (Photo 2) Place your stitches in the gaps around the edge. (Photo 3) Part example of what the edge looks like. (Photo 4) In the turning stitches, Sc 2 in each space. (Photo 5) on the corner of the leaf, Sc 2 in the spot. continue with the same rules to the other side, but leave the corner a straight edge, (Photo 6).
1. 2.
2.
3. 4.
4.
5. 6.
6.
APPLE ASSEMBLY
This is the hardest part of the apple, because you need to bring the yarn tail from the bottom straight through the apple which it a little under a foot tall. After that, you need to pull the yarn tight and take another piece of yarn and tie it low on the yarn pulled through the apple. The Knot needs to be big enough to where it won’t go through the hole again, therefore holding the apple together. Then we will add the stem, and lastly the leaf.
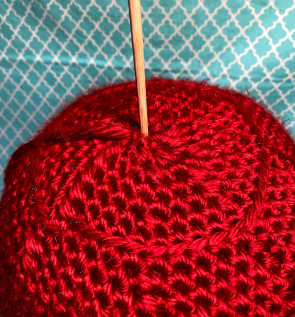
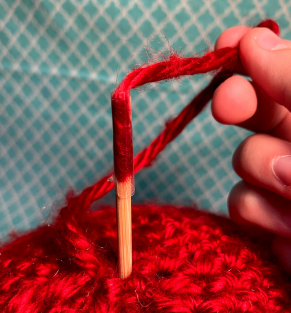
(Photo 1) I started by inserting the stick straight through the apple, but leaving about three inches exposed on the bottom. (Photo 2) This is where the tape comes in, there was no other way for me to attach the yarn to the stick. So, use the tape to firmly put the yarn on the stick. wrap it with as little ridges as possible. (Photo 3) Pull the stick with the yarn fully through the apple and take the tape off of the yarn. You will no longer need the dowel.
1. 2.
2.
3.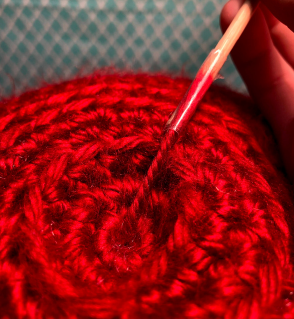
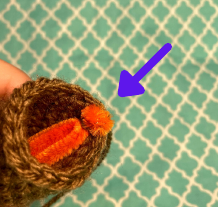
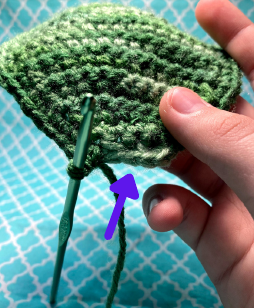
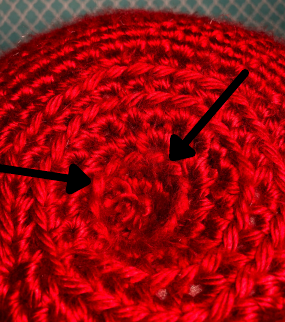
(Photo 4) This part is hard. You want to squish the apple down as your tying this knot. When you let go to tie it again, it might be pulled through the hole again, just pull it back out and tie more and more until the knot is bug enough to not be pulled back through, your apple should have a nice indent now. (Photo 5) The apple will not show this knot when the stem is sewed on (Photo 6) The arrows indicate the round that the stem should be sewn on. It is round 4, that was crocheted in the BLO.
1. 2.
2.
3.
Here is the apple with the stem. We will proceed to sewing on the leaf.
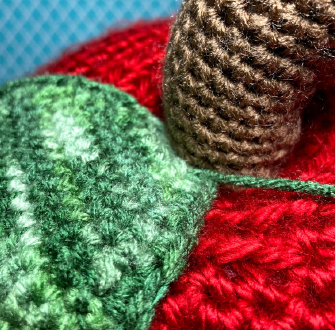
APPLE ASSEMBLY-LEAF
(Photo 1) With the edge indicated at on the leaf, place it
from that area closely to the stem in whatever area you feel works. (Photo 2) I did about 1/3 around the stem opposite the curve. Then sew on.
1.
2.
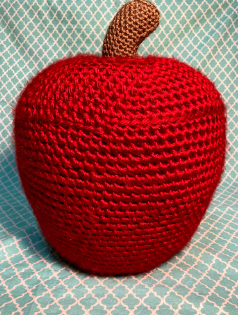
 Now you’re done! I hope you enjoyed this pattern and made a lovely apple, whether it’s for a teacher, or just for fun, I hope you liked it!


2 Comments
I love apples!! 🍎 This pattern looks great, good work making it Mia! 👍 I’m definitely going to have to crochet it someday.
Thank you so much, it was really hard to figure out how to go through it, so I hope the instructions with the tape and dowel make enough sense