
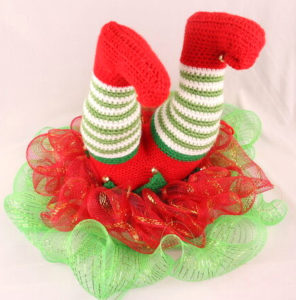
Purchase the PDF version here!

Unlock the ENTIRE 202 Christmas PDF Bundle & Enter in our Member’s Crochet Along for a chance to win $100!
Supplies:
• Yarn 4/Medium Weight Yarn in…
Red, Green, Dark Green, and White
•4mm Crochet Hook
•Tapestry needle
•Scissors
•Stuffing
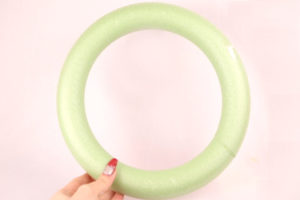
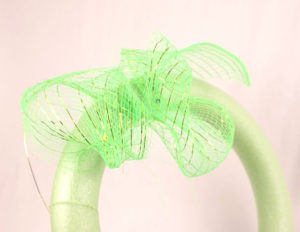
•10 inch Wreath
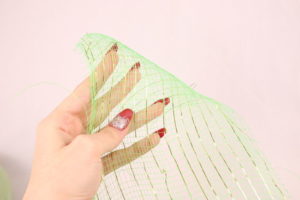
•Mesh for Wreath
Additional Information:
Difficulty: Easy
• Before we get started…
You will need a wreath. I bought a foam wreath (10 inch) from Dollar Tree. However, a wire wreath is better suited for the frilly wreath we’ll be doing. There are video tutorials online showing how to put mesh around a wire wreath, but I will show you how I did mine with a foam wreath.
You’ll also need colorful mesh to go around the wreath. I got 2 rolls from Dollar tree as well. The little bells you can also get from Dollar Tree.
• Let’s Get Started!
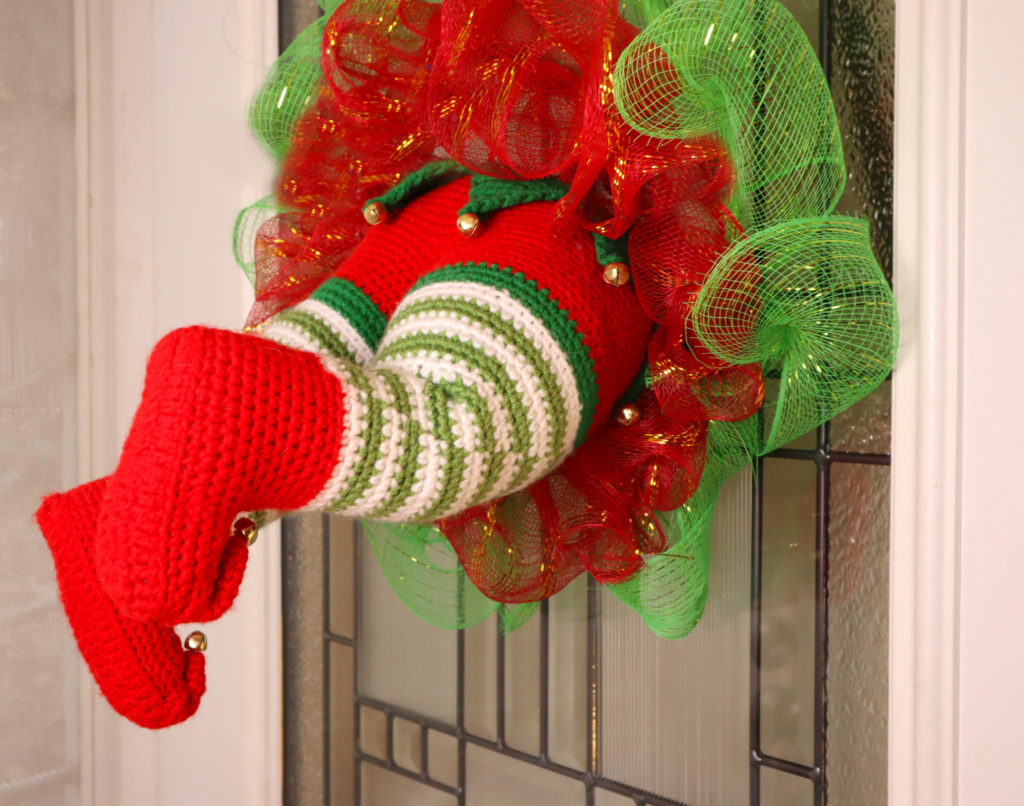
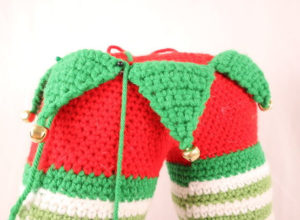
We will first start by making a shoe, this shoe will lead into the lead. We will then make a second leg and crochet both legs together to form the waist area. After this we will make the curly part of the shoe, the green triangles around the waist, and put the mesh around the wreath. Lastly, we will attach the elf to the wreath!
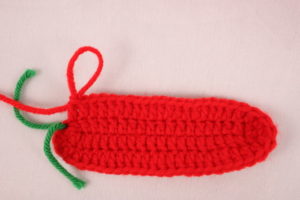
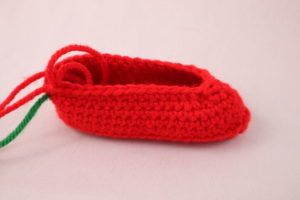
Elf Shoe:
In Red
In round 1 we will make a foundation chain. This means we will make a chain, work down one side of the chain, then we turn to the other side of the chain and continue down that side. This will make a round. We are NOT turning the work and crocheting over the stitches we just made! That would be working a row.
Round 1: Ch 22 Pic 1. Dc in the 3rd Ch from the hook. Dc in the next 18 Ch Pic 2. Dc 3 times in the last Ch Pic 3. Now turn the chain to the opposite side, where we haven’t worked any double crochets yet Pic 4. Dc in the next 18 st Pic 5-6 (40)
1. 2.
2.
3.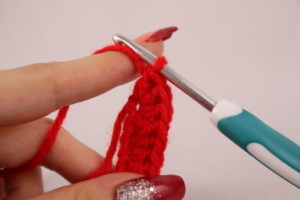 4.
4.
5. 6.
6.
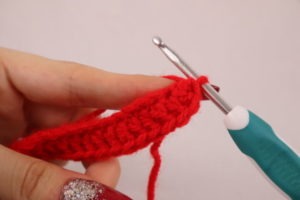
Round 2: *Inc, Dc in the next 4 st* 8 times (48)
Round 2 Pictured Below
Round 3: In the BLO (Back Loop Only) Sc in the next 48 st (48)
Round 4-6: In BOTH Loops, *Sc* all around (48)
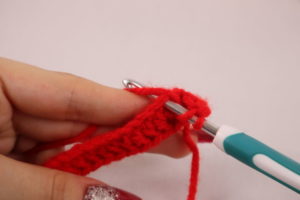
Round 7: Sc in the next 17 st, Repeat *Dec, Sc in the next st* 6 times. Sc in the next 13 st (42)
Round 8: Sc in the next 17 st, *Dec* 6 times, Sc in the next 13 st (36)
Round 8 Pictured Below
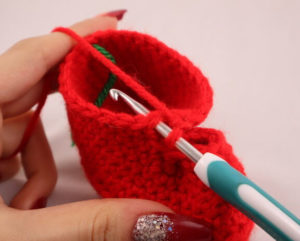
Round 9: Sc in the next 16 st Pic 1. Count the next 9 st and Sc into that 9th st Pic 2-3. Sc in the next 11 st Pic 4-5 (28)
1. 2.
2.
3.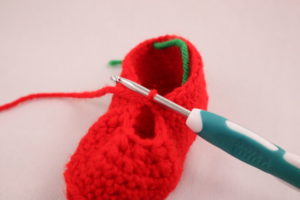 4.
4.
5. 
This will create a leg on the shoe. We will also have a hole near the front. Don’t worry, we will just sew it closed later!
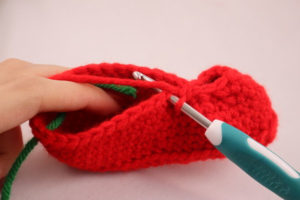
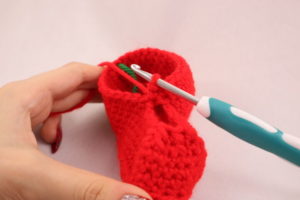
Round 10: Sc in the next 16 st Pic 1. Sc in the next st that connects the shoe Pic 2-3. Sc in the next 11 st Pic 4 (28)
1. 2.
2.
3. 4.
4.
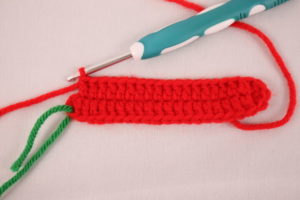
Round 11-13: *Sc* all around (28)
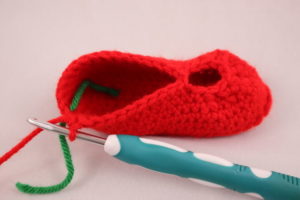
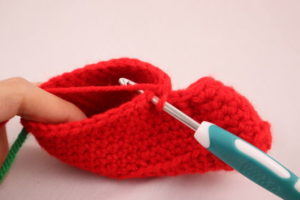
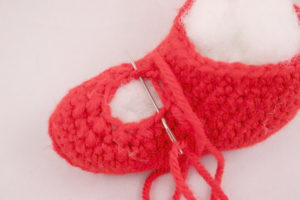
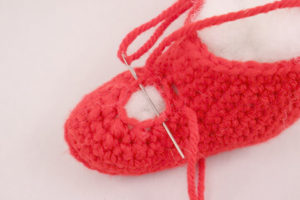
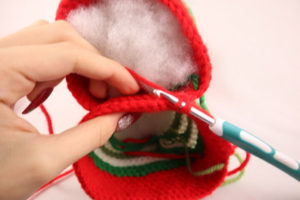
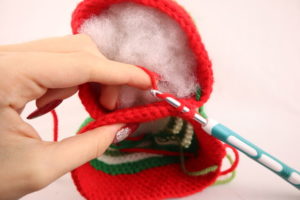
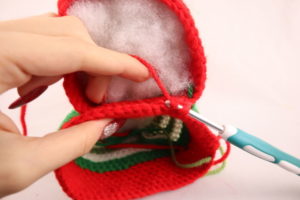
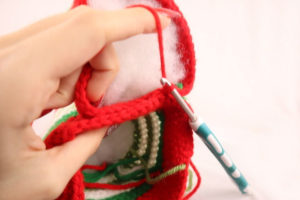
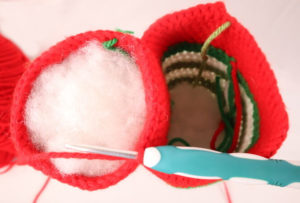
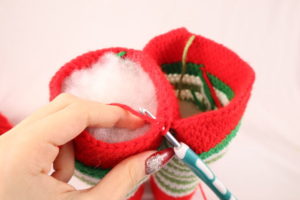
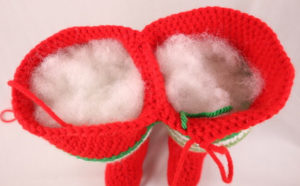
Stuff the shoe here Pic 1. Now we will sew the front hole of the shoe closed. Take a needle with red yarn and sew through the stitches that align Pic 2-5. Grab both tail ends of yarn and pull firmly at the same time to tighten the yarn. Now tie each tail end of yarn into firm knots and bring into the shoe to hide.
1. 2.
2.
4. 4.
4.
5.
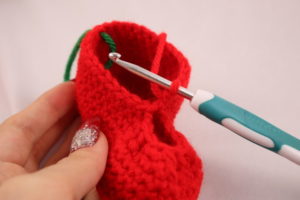
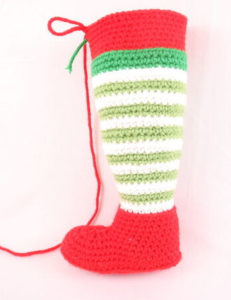
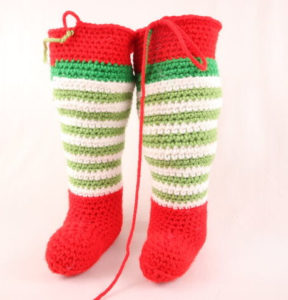
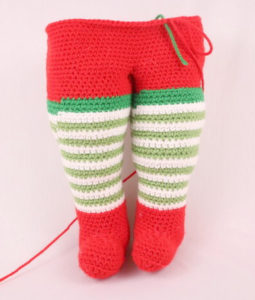
Now we make the leg. It’s easy, but we make frequent color changes
Round 14: Change to White. In the BLO *Sc* all around (28)
Round 15: In BOTH Loops, *Sc* all around (28)
Round 16-17: Change to Green. *Sc* all around (28)
Round 18-19: Change to White. *Sc* all around (28)
Round 20-21: Change to Green. *Sc* all around (28)
Round 22: Change to White. *Sc* all around (28)
Round 23: Repeat *Inc, Sc 3* 7 times (35)
Round 24-25: Change to Green. *Sc* all around (35)
Round 26-27: Change to White. *Sc* all around (35)
Round 28-29: Change to Green. *Sc* all around (35)
Round 30-31: Change to White. *Sc* all around (35)
Round 32: Change to Green. Repeat *Inc, Sc 4* 7 times (42)
Round 33: *Sc* all around (42)
Round 34: Change to White. *Inc, Sc 5* 7 times (49)
Round 35: *Sc* all around (49)
Round 36-37: Change to Green. *Sc* all around (49)
Round 38-39: Change to White. *Sc* all around (49)
Round 40: Change to DARK Green. In the BLO. *Sc* all around (49)
Round 41-42: In BOTH Loops, *Sc* all around (49)
Round 43-47: Change to Red. *Sc* all around (49)
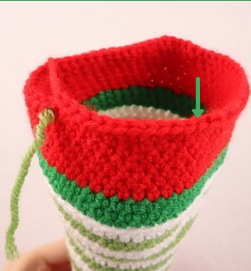
Round 48: In BOTH Loops, *Inc, Sc in the next 6 st* 7 times (56)
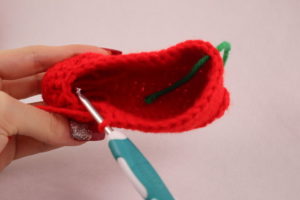
Here is where we will do a different pattern depending on which leg you’re making:
First leg, Round 49: In BOTH Loops, *Sc* all around (56)
Finish off the first leg here, keep the stitch marker in this leg, we will need it later. Stuff now.
Continue on the next section for the second leg.
Second leg, Round 49: Sc in the next 3 st Pic 1. Take the first leg made and count 12 stitches to the right of the stitch marker Pic 2.
1. 2.
2.
Next we will Sc going through BOTH the first and second leg.
While your hook is still in the working loop of the second leg Pic 3, also insert your hook into that 12th stitch on the first leg Pic 4. Now insert hook into the next stitch of the first leg Pic 5. Yarn over and pull up a loop Pic 6-8.
3. 4.
4.
5. 6.
6.
7. 8.
8.
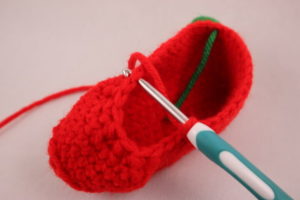
Yarn over and pull through both loops at the same time Pic 9-11. This makes 1 single crochet.
Continue working through BOTH the first and second leg. Sc in the next 10 st Pic 12-13. Continuing on the second leg (the left leg), Sc in the next 42 st Pic 14-15.
9. 10.
10.
11. 12.
12.
13. 14.
14.
15.
Round 50: Sc in the next 3 st Pic 1. Now we will work on the other leg. Sc in the next 45 st Pic 2-3. Now we meet the other leg. Sc in the next 42 st Pic 4-5 (90)
1. 2.
2.
3. 4.
4.
5.
Round 51-60: *Sc* all around (90)
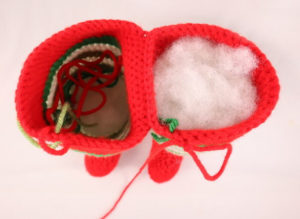
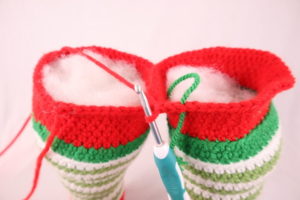
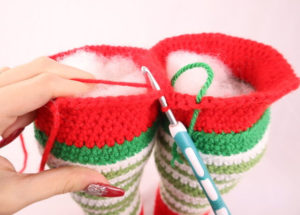
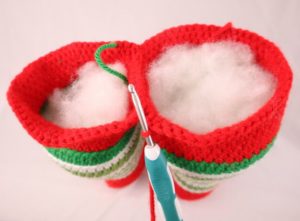
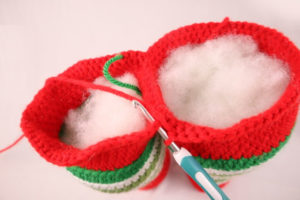
Stuff here. Continue stuffing after each round.
Round 61: In the BLO, *Dec, Sc 7* 10 times (80)
Round 62: In BOTH Loops, *Dec, Sc 6* 10 times (70)
Round 63: *Dec, Sc 5* 10 times (60)
Round 64: *Dec, Sc 4* 10 times (50)
Round 65: *Dec, Sc 3* 10 times (40)
Round 66: *Dec, Sc 2* 10 times (30)
Round 67: *Dec, Sc 1* 10 times (20)
Round 68: *Dec* all around (10)
Round 69: *Dec* all around (5)
Finish off and sew closed.
Shoe Tip:
In Red

Round 1: 6 Sc into a Magic Ring (6)
Round 2: *Inc, Sc* all around (9)
Round 3-9: *Sc* all around (9)
Round 10: Repeat *Inc, Sc in the next st* 4 times, Sc in the last st (13)
Round 11: *Inc in the next st, Sc in the next 2 st* 4 times, Sc last st (17)
Finish off, leaving a long tail for sewing.
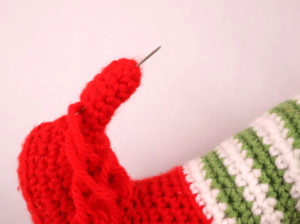
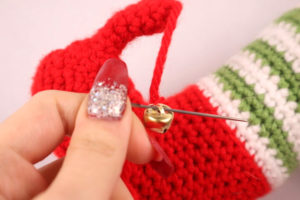
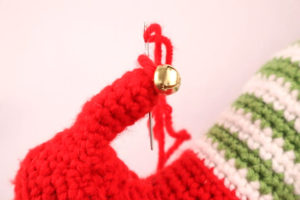
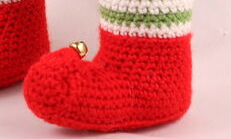
Pin this piece to the tip of the shoe as shown Pic 1. Sew on, and after sewing on bring the yarn up to the very tip of the piece Pic 2. Bring this yarn through a bell Pic 3, and reinsert needle into the tip to secure the bell Pic 4. Pin the piece down as shown Pic 5, and sew on going from the shoe to the tip piece Pic 5. Weave in any ends!
1. 2.
2.
3. 4.
4.
5. 6.
6.
Waist Frills: (Make 8)
In Green
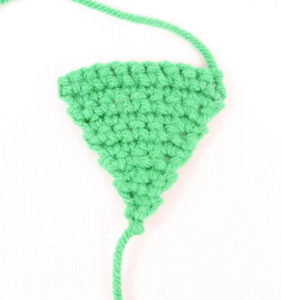
Row 1: Ch 2. Sc in the 2nd Ch from the hook (1)
Row 2: Ch 1 & turn. *Inc* in the next st (2)
Row 3: Ch 1 & turn. *Sc* in the next 2 st (2)
Row 4: Ch 1 & turn. *Inc* in the next 2 st (4)
Row 5: Ch 1 & turn. *Sc* in the next st (4)
Row 6: Ch 1 & turn. *Inc* in the next st, Sc in the next 2 st, *Inc* in the next st (6)
Row 7: Ch 1 & turn. *Sc* in the next 6 st (6)
Row 8: Ch 1 & turn. *Inc* in the next st, Sc in the next 4 st, *Inc* in the last st (8)
Row 9: Ch 1 & turn. Sc in the next 8 st (8)
Row 10: Ch 1 & turn. *Inc* in the first st, Sc in the next 6 st, *Inc* in the next st (10)
Row 11: Ch 1 & turn. Sc in the next 10 st (10)
Finish off, leaving a long tail for sewing.
Assembly:
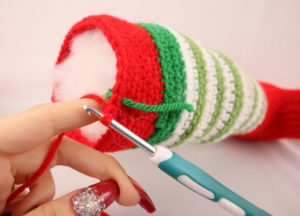
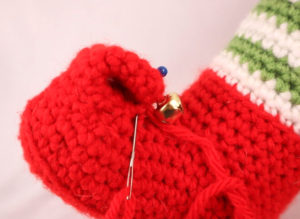
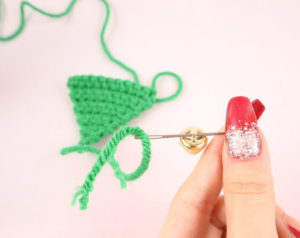
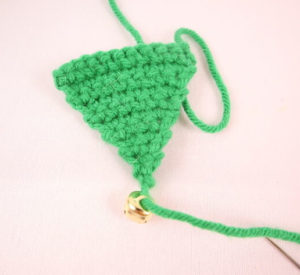
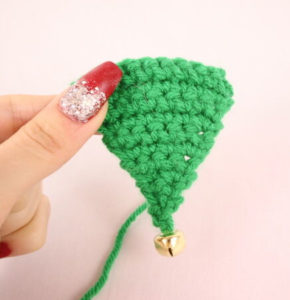
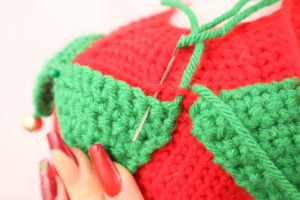
Take the tail end of yarn left at the very tip of the triangle and sew it through a bell Pic 1-2. Weave this tail end of yarn back through the triangle to secure Pic 3-4. Pin the triangle to the waist, right on Round 60 Pic 5. Sew the triangle on, going through the front loops left from Round 61 Pic 6.
1. 2.
2.
3. 4.
4.
5. 6.
6.
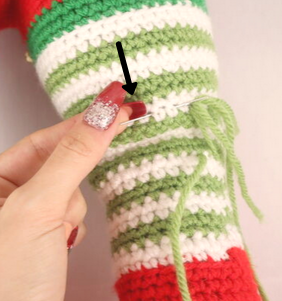
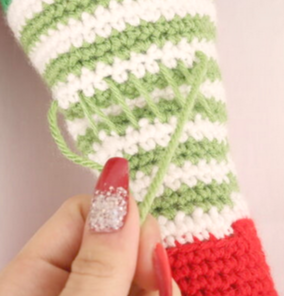
Leg Assembly:
In Green
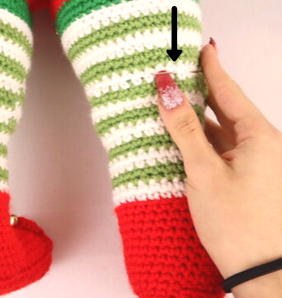
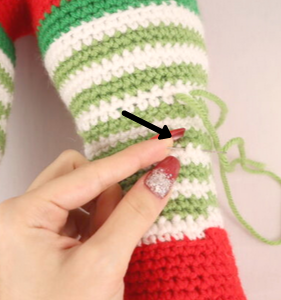
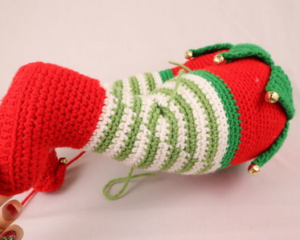
To make the elf look like he’s fallen in the wreath, we need to bend his leg slightly. Here is how we do that!
Insert needle with green yarn into the 5th white stripe on the right leg, and pull needle out a stitch to the left Pic 1. Reinsert needle on the 3rd right stripe, lining up to where you’d previously pulled in and out the needle Pic 2. Reinsert needle on the 5th white stripe, next to where you previously had sewed. Pull the needle out about 2 stitches to the left Pic 3. Reinsert needle into the 3rd stripe, next to where you previously had sewed. Pull the needle out about 2 stitches to the left Pic 4. Repeat this process until you’ve sewed the back of the leg. Pull both tail ends of yarn firmly at the same time to tighten the leg Pic 5-6. Tie the ends of yarn into firm knots and weave in to hide.
1. 2.
2.
2. 4.
4.
5. 6.
6.
4. 3.
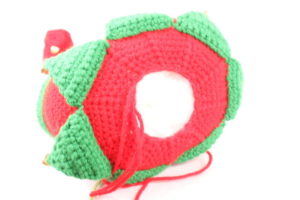
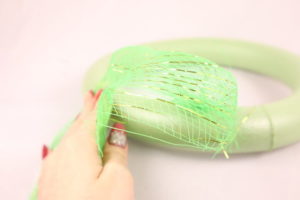
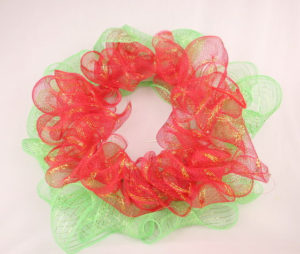
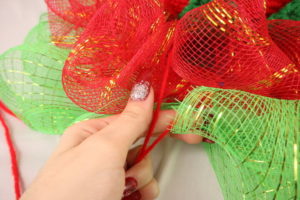
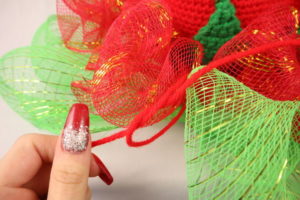
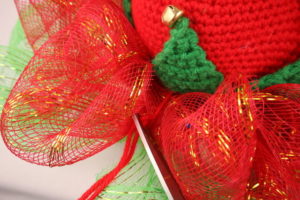
Wreath Assembly:
If you know how to make your own wreath, feel free to do so! However, this was my first wreath ever and I just made do with the supplies I had.
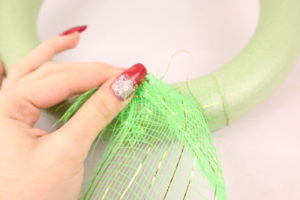
Take a wreath (I am using a foam wreath from Dollar Tree, they also have wire wreaths that are better suited for making frilly wreaths like this. I just didn’t know at the time that a foam wreath is more for flowers). Now take mesh and bunch it up at the very tip and place it on the wreath Pic 3. Place a pin to secure this mesh, try to make sure the pin goes through all layers of the mesh Pic 4.
1. 2.
2.
3. 4.
4.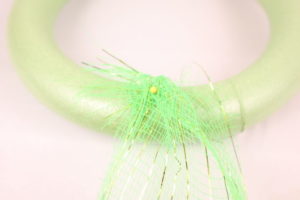
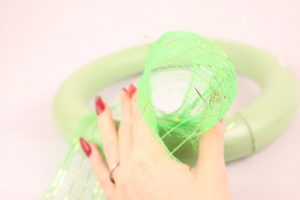
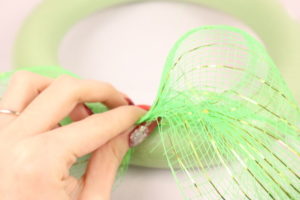
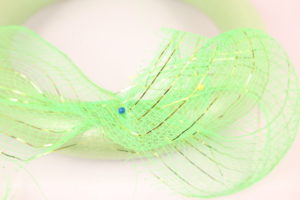
Grab a section of the mesh and bring it to close to the previous mesh you pinned, it should make what looks like a loop Pic 5-6. Bunch this area up close to the wreath Pic 7, and place a pin going through all layers of the mesh Pic 8-9. Repeat this process all around. I did red mesh first and closer to the center, then repeated the same process with green mesh at the outside of the wreath.
5. 6.
6.
7. 8.
8.
9. 10.
10.
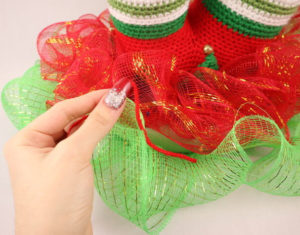
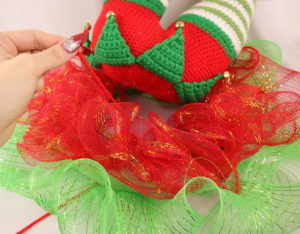
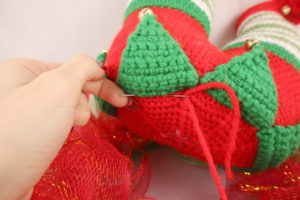
Attaching Elf to Wreath:
We will attach the elf to the wreath by tying him to it. This secures it really well and you won’t see the yarn as long as you use a color that matches your wreath’s mesh.
Do these steps only on the left and right side of the elf. You can also do these steps for the top of the elf if you need to secure it more.
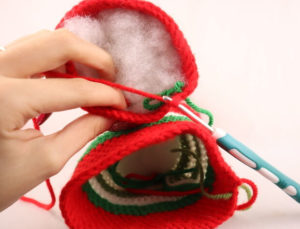
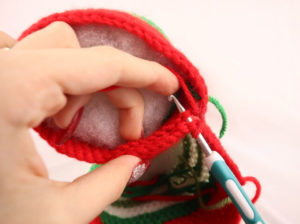
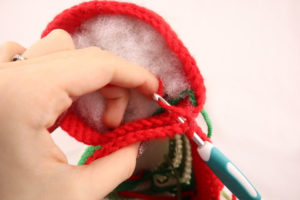
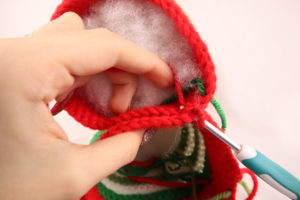
Take a 8″ piece of yarn and place it on a needle Pic 1. Bring this yarn through the wreath as shown Pic 2. Insert the needle through the elf and pull the needle out about 4 stitches to the left Pic 3. This yarn through now be at the top of the wreath. Grab both tail ends of yarn and pull them very firmly so the elf is close to the wreath Pic 4. Tie these tail ends of yarn firmly together a few times and cut the excess yarn Pic 5-6.
1. 2.
2.
3. 4.
4.
5. 6.
6.
7.
Repeat this a total of 2 times on the left and right side of the elf, as well as once at the top of the elf.
All done! I hope you had a fun time making this big elf wreath. If you made it, I would LOVE to see. Just post a picture in the comments below this post, or “try” it on Pinterest!


76 Comments
I love this! I’m going to make it today. You make such amazing patterns! Thank you for sharing them. 🙂
That’s so awesome to hear! I hope you have fun, and let me know if I can clarify anything in the pattern 🙂 Thank you so much for the very kind comment, I am so excited to keep making more fun amigurumis 😍
I am curious to know what ply of yarn you used? Was it regular red heart or more of a soft kinda of yarn? What colors also?
Hi Dawn, thank you for the question! I used Red Heart in Tea Leaf for the light green stripes on the legs. I used Big Twist in Varsity Red for the red parts, and White from Big Twist as well. Then the dark green is Jelly Bean from I Love This Yarn.
You can just any 4/medium weight yarn to make this pattern! So yarns like Red Heart would be perfect 🙂 Please feel free to let me know if you have any other questions! ❤️
Hi, great pattern and I’m really enjoying making this. Only thing is that the picture for round 2 is the same as picture 6 and doesnt show the second round
Thank you for sharing
Hi Sue! I’m really happy to hear that you’re having fun with this pattern, that’s really awesome 😍 I see what you mean, I change the picture showing Round 2 to the correct picture! Sorry about that, with adding so many photos there’s bound to be one that slips by me LOL! Thanks so much for letting me know! 🥰 Please feel free to let me know if you have any questions. I’d also LOVE to see your wreath once it’s all done! 🙂
Can’t wait to make this wreath
Thank you
Aww thank you for the kind comment! I hope you have fun making it 🙂 Each step on making this wreath is really exciting!
How much yarn does this take .like how many skeins and oz
Hi there Charlene,
I am not sure how much specifically, but I didn’t use up an entire regular 360-ish yard skein 🙂 Probably you’ll use up over half of a red skein, and less than half for the green and white! Sorry I couldn’t be more helpful, I never measure yarn because I’m not sure how LOL! 😍
Beautiful pattern, love it. Have you considered making the top. I think it would be awesome, I would place it in my living room window or under a mistletoe.
Thank you so much Nancy! I did think about making the other side of the elf, but ended up liking the legs hanging out! Maybe I can add on to this elf next year 🙂 I hope you’ll make it, I could definitely see it looking cute in a window! ❤️
Hi there Olive ! I think someone copied your elf wreath and said its a new design of theirs… its heartbreaking. 🙁
Hi Dianna, thank you so much for letting me know! Dang that is indeed my pattern LOL 😂 I will have to make sure it’s taken down. The person who runs that website has tried to do this in the past with my patterns 🙁
Thanks so much for letting me know!
I enjoyed making this but the only thing I did differently was instead of dividing the waist in 10’s I did 6’s it didn’t tighten up so fast. So the inter decreasing didn’t pull so much. thank you for sharing, I’m think about a nutcracker same way but put a coat tail on him
I’m so happy to hear that you had fun making this! I could definitely see how working in an increment of 6 decreases would be smoother than 10 decreases for the front waist 🙂 I’m glad you were able to find something that worked out for you! If you have time, I would really love to see a picture of your finished elf wreath 😍 I’m sure it looks adorable!
And your idea of a nutcracker is hilarious, I think that would work out great! You wouldn’t need to make a ton of adjustment, mostly the colors would be different, don’t make the pointy shoe tips, and like you said add the coat tail! I want to make a bunny wreath similar to this elf wreath. Like the rabbit’s feet are sticking out 🙂
I finished this today. I had a hard time with making it stay attached on back. I used floral stems ran in two different directions and praying it dont break the yarn on the elf bottom. I also use tulle instead of the ribbon you have as i cant find that. Loved it I even set it on the table and it looks great as a centerpiece.
I did the wreath a little different. Thanks for the pattern!
OH MY GOSH! That’s an AMAZING wreath you’ve made, Missy!!! It looks like a poinsettia, one of my favorite plants 😍 I don’t know how you did it, but you did an amazing job. Thank you so much for sharing, I hope you get many compliments 🙂
Hello thank u so much for an amazing pattern for us .I’m just getting started reading patterns.can I ask when u increase the first time it’s says Inc dc in next 4st,8times so does that mean I put 2 dc in to each turning chain to have popped a pic see if it’s the correct place to put increase in
Hi there Kim! Thank you so much for your super kind comment, I truly appreciate that you like the pattern so far 😍 You have a great question when it comes to this pattern!
When it says *Inc, Dc in the next 4 st* 8 times, you will put 2Dc into the next 1 stitch, then make 1 Dc in the next 4 st. Repeat that process a total of 8 times.
You don’t need to make any chains or turn your work, as we will work in continuous Rounds (so to clarify, don’t turn your work like you do in a row. Only turn to the other side of the shoe to continue working in an oval) 🙂 Your first Dc increase will go into the first stitch. Here’s a picture of where to place the first Inc stitch: https://stringydingding.com/wp-content/uploads/2021/09/2-dc.jpg
Sorry if that’s confusing, please just let me know if I can clarify anything! I’m always happy to help 🙂 Good luck making your elf wreath!
Olive
Thank you so much for getting back to me so quick.thank you so much for clearly explaining where I’m increasing, been a massive help thank u so much xx
Hi olive.im so sorry to be a pain.but I’m determined I’m goin to read pattern and make this.thank u for explaing the increase.ive manage to do my increase and have 48stitches😊could I ask if u could explain how I do the sc decrease please ? Then I think I will be able to get on with the pattern with no more confusion.thank u so much for your time xx
I’m so glad I was able to help out a bit, yay! 🙂 Please don’t worry about asking questions, I think it’s great you want to make sure you do everything correctly. I love to try and help!
Luckily making a single crochet decrease is pretty easy. I would love to explain here, but I think it would help out a lot more to visually see what’s being done. I have a video tutorial on my members website that shows how to make every beginner’s stitch and technique here: https://members.stringydingding.com/crochet-stitches/
However, the membership is $6 per month. If you’d like, I found a video tutorial for free here! https://www.youtube.com/watch?v=Fqeh12-yaMo
Please let me know if this helped. I’m happy to help you if you need it!
Olive
Thank u so much for taking the time to reply to me.im just waiting for pay day then I’ll be joining straight away😊can’t wait to learn even more crochet.i had a look at YouTube link u sent me ,it was a massive help for me.thank u so much.cant wait to get on and getting it made.and I will pop a picture up once complete 😊xx
Of course, I don’t mind helping! I’m glad the video I linked could help explain that part in better detail 🙂 No pressure on joining my membership, there are tons of useful resources for free online, in fact, it’s what I used to learn crochet! I’m super excited to see your finished elf! 😍
when you did the wreath, did you leave the pins in place or did you go back and glue it somehow? I could not find the metal one in 10″ and picked up a foam one at my local dollar tree, thanks for the tip on that… I love this…
Hi there, Bev! You have a great question 🙂 I left the pins in place and didn’t glue it down. Sometimes hot glue can come undone a little easily, but you can definitely give it a try! (I often use e6000 since it has a stronger hold). If you want to glue the pieces down, first pin the next piece in place so you like how it looks. Then, lift up the pin, place glue where you had it pinned, then place the pin down in the same spot. Let it sit overnight to secure.
They have pins for wreaths that secure the mesh much better than regular sewing pins, but I couldn’t find any at my Dollar Tree! You can try looking at places like JoAnn Fabrics in the floral department for “greening pins”. They look like this:
I made one, this one was almost easier than the witch one. It took me about a week between crocheting and assembling the wreath.
Thank you for the pattern! Made this for my cousin
Thank you very much for the pattern it absolutely amazing but for the wreath do you keep the pin on or you see the ribbon on a wreath thank you for you reply
Hi Nathalie! The pin will hold the mesh, so I keep the pin on 🙂 However, you can pin the pieces in place, then tie yarn around each piece that has pin to secure it. You could also try hot glue on the pieces that have a pin – just be sure to remove the pin right before gluing!
I hope this could help 🙂
Olive
Hi there, thank you for the pattern. I might have missed this, but what terminology are you using in the pattern. US, or UK?
Thanks so much for the pattern. I thought it would be difficult and pondered on making one for a few days. Your instructions was clear enough for me to accomplish my wreath elf. My daughter is going to love this so again thankyou!
Hi there, 🙂
Absolutely love this pattern and really want to crochet it. Struggling though to see where the stitches at the back of the foot are picked up? I’ve got sides but no back. 😀 There’s 18 DCs up each side and around the toe area but not sure where I’ve gone wrong at the back. Thanks for any help. DeeDee
Hope pic explains what I’m meaning. 🙂
I finally finished this, thank you so much for the great pattern!!
Thanks you for sharing this pattern
Curious as to why header says free pattern but there is no way to print. Is it free as it states on your website and pinterest or not? Thanks
I am in love with this . Thank you so much for sharing.
Thank you so much for sharing.
I love this pattern so much! I made this one for my dentist and now I want one of my own! Amazing creativity. Thank you.
I love the added detail for the boots! How did you do that?
What is the gauge for this pattern? Thanks!
It’s anything you want it to be Rhiannan. Fine wool and thinner hook will result ina small elf. I used UK dk yarn and a 3.5m hook. My finished elf is approx 10 inches.
Just completed my elf. I’m so pleased with it
Thanks for the pattern. Happy Christmas
Thank you for this pattern.
I love it.
My first crochet wreath!!
It’s a little dodgy but I’m happy for a first attempt as I’m still a novice.
I loved making this. Made it for my son’s preschool.
So I love this wreath but when I try to hang mine it pulls away from the door at the top because the roof legs are so much heavier than the wreath form. How do you fix this? Thank you so much!
Hallo …deon Elf ist wunderbar …ich habe ihn auch gehäckelt ….Danke sehr gut gemacht … ich habe es ein bisschen anderst gemacht und zwar alles gehäckelt ….Vorlage wird immer von dir genannt …ehre wem es gebührt lg aus dem Blackforest…..
Hi,
It looks like your elf took a long trip all the way to Turkey. She enjoyed travelling and I surely loved making it.
Thank you so much for sharing!
Merry Christmas!
Hello from Poland! Thank you for this pattern. It’s really great! All my friends and family are delighted.
I made the Witch and the Elf. Then I decided I needed a Santa with his bag of toys. It was fun. Thank you for your cute ideas.
I made the Witch and the Elf. Then I decided I needed a Santa. It was fun. Thank you for your cute ideas.
I’ve loved making this I struggled working out the netting but between Hubby & myself we got there my 2nd one is already on my hook. Thank you so much for sharing
lovely thanks for sharing
I didn’t do an Elf I made the Easter bunny…
Love it!! Making one, probably donate for silent auction at church.
hi i love this pattern but I’m stuck at Round 2 on the elf shoes can you please help me?
I struggled with making round 2 work at first too. Probably just our tension. In the end I amended it a bit to make it work for me…
I started with a chain of 21 instead of 22 and put the extra stitch back in the first chain worked to bring the first and last stitch closer together and keep the original stitch count. I also worked the sole of the shoes in joined rounds instead of working in a spiral. I’ve just finished the elf and am now starting the wreath. I hope this helps as I loved making it and am glad I didn’t give up.
I’ve loved making this I struggled working out the netting but between Hubby & myself we got there my 2nd one is already on my hook. Thank you so much for sharing
Dakujem za navod
Aj za tento
Aj za tento
This is my version from the elf, loved to crochet this wonderful wreath. I had so much fun, so as my neighbours now ☺️. Thank you for this great pattern and greetings from switzerland!
merci pour ce modèle, en remerciement, voici ma “réalisation”…..
This is my interpretation of an Aussie elf, getting stuck in the gum leaves and a fly wire door that keep the blowies and the mozzies at bay during our long hot summers. As soon as the grandkids see this they will want to take it home. Loved making it, thanks for the great pattern.
Thank you so much for this amazing pattern!
I managed to finish this last week.
I used flower wire to hold the legs in position.
I have made few changes to my own comfort. I have received many compliments for this wonderful design of yours. Thank you so much once again!
Simply loved it!
Here is the pic of the finished project.
Hi thankyou so much for sharing this project I have absolutely loved making this but the only thing I am having trouble is wrapping the mesh around my form ring lol I think it is just me
Hi,
I am wondering if you have a video of how to attach to a wire hoop??
Love this wreath! I’m a beginner crocheter and this will be my first try at something other than squares and blankets
Thank you so much for the pattern. It’s easy to make yet beautiful. I can see the post of others and it’s all beautiful and creative and imaginative so jealous. Made mine simple.
I recently learned to crochet – this is the first project I did using a pattern. It was so easy to follow and I have had so much fun completing it. My husband suggested having the Elf come from the ceiling instead of the wreath. It is the “talk” of all who visit this season and is bringing so much joy and laughter to our home. Thank you!!